 This lab using credit card fraud detection dataset from Kaggle
Various of companies want to make their data more valuable because data analysis is one way to make better quality of service to client. Valuable data also have a great insight to get more business opportunities. Thus, many startups or companies decide to build machine learning workflow but the process is so complicated that can easily cause several problems. One of main problems is due to lack of data scientist or data engineer team, so the training process seems too difficult to create and make sense. Another problem is deployment of machine learning backend server that contains lots of trouble to engineer which impossible to fulfill workflow in a short time.
AWS plays an important role of machine learning solution on cloud. We will focus on Amazon SageMaker to quickly create training job and deploy machine learning model. You can invoke Amazon SageMaker endpoint to do A/B test for production. The architecture also integrate with several services to invoke endpoint with serverless application which contains S3, Lambda, API Gateway.
Since July this year 2020, Amazon Fraud Detector is Generally Available, meaning that apart from using Amazon SageMaker doing data processing and ML training, now you can use Amazon Fraud Detector Service, which it's a fully managed service that makes it even more easier and faster to intergrate with your online application, as simple as just using API calls to the Amazon Fraud Detector service.
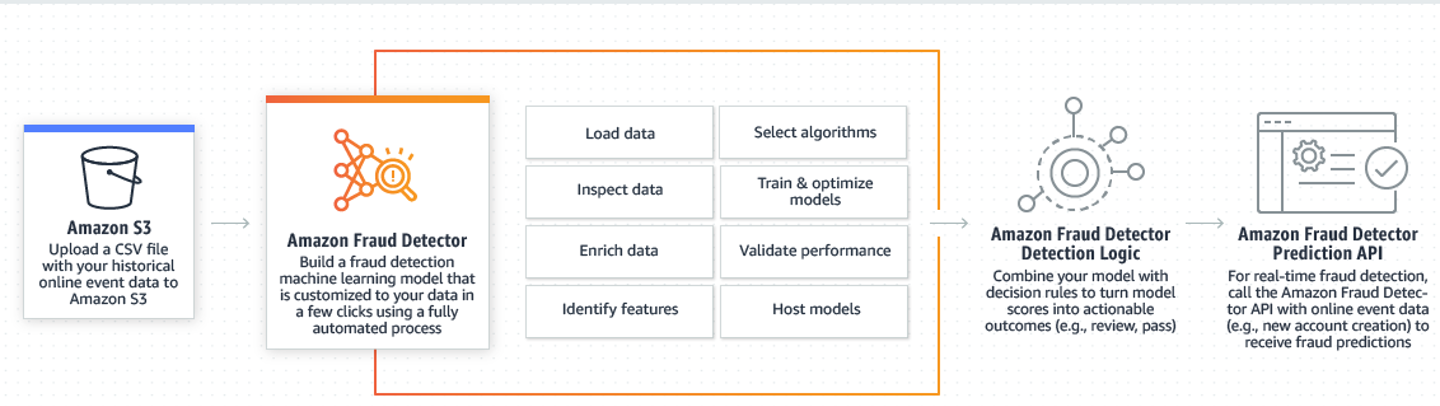
To learn more about the service, please visit to the Amazon Blog: Amazon Fraud Detector is now Generally Available
In this Github Repository, we still stick with using Amazon SageMaker Service as the lab material, for you to understand the machine learning flow from data processing, choosing algorithm, performing ML training and model deployment.
Dataset: Credit Card Fraud Detection from Kaggle
Here are some of the screenshots for the dataset, those columns v1 to v28 are the data that already finished feature engineering, those are in the feature format. So we can straightly use this dataset pass into the supervised learning algorithm for training.


As illustrated in the preceding diagram, this is a big data processing in this model:
-
Developer uploads dataset to S3 and then loads dataset to SageMaker
-
Developer train machine learning job and deploy model with SageMaker
-
Create endpoint on SageMaker that can invoked by Lambda
-
Create API with API Gateway in order to send request between Application and API Gateway
-
API Gateway send request to Lambda that invoke prediction job on SageMaker endpoint
-
Amazon SageMaker response the result of prediction from API Gateway back to Application
Amazon SageMaker is a fully managed machine learning service. With Amazon SageMaker, data scientists and developers can quickly and easily build and train machine learning models, and then directly deploy them into a production-ready hosted environment. It provides an integrated Jupyter authoring notebook instance for easy access to your data sources for exploration and analysis, so you don't have to manage servers. It also provides common machine learning algorithms that are optimized to run efficiently against extremely large data in a distributed environment.
TensorFlow DNN classifier using estimators
https://www.tensorflow.org/api_docs/python/tf/estimator/Estimator
TensorFlow's high-level machine learning API (tf.estimator) makes it easy to configure, train, and evaluate a variety of machine learning models.
- Sign-in a AWS account, and make sure you have select N.Virginia region
- Make sure your account have permission to create IAM role for following services: S3, SageMaker, Lambda, API Gateway
- Download this repository and unzip, ensure that folder including two folders and some files:
Folder: Flask-app (contains the code to build application of demo)
Folder: data including train_data.csv, test_data.csv (training and testing data of machine learning job of SageMaker)
The role that allow Lambda trigger prediction job with Amazon SageMaker by client request from application
The role that allow Amazon SageMaker to execute full job and get access to S3, CloudWatchLogs (create this role in SageMaker section)
-
On the service menu, click IAM.
-
In the navigation pane, choose Roles.
-
Click Create role.
-
For role type, choose AWS Service, find and choose Lambda, and choose Next: Permissions.
-
On the Attach permissions policy page, search and choose AmazonSageMakerFullAccess, and choose Next: Review.
-
On the Review page, enter the following detail:
Role name: invoke_sage_endpoint -
Click Create role.
After above step you successfully create the role for Lambda trigger prediction job with Amazon SageMaker

-
On the service menu, click Amazon SageMaker
-
In the navigation pane, choose Notebook.
-
Click Create notebook instance and you can find following screen
-
In IAM role blank select Create a new role
-
For S3 buckets you specify, choose Any S3 bucket and click Create role

-
Back to IAM console, click Roles
-
Click the role AmazonSageMaker-ExecutionRole-xxxxxxxxxxxxxxx you just created by before step
-
In Permissions tab below click Attach policy
-
Search and choose policy name CloudWatchLogsFullAccess then click Attach policy
-
You will see below screen on console

You successfully create the role for Amazon SageMaker to execute full job and get access to S3, CloudWatchLogs
Create a bucket to store train_data.csv, test_data.csv which also provide the bucket location for SageMaker jobs to store result
- On the service menu, click S3.
- Click Create bucket.
- Enter the Bucket name “yourbucketname-dataset” (e.g., tfdnn-dataset) and ensure that the bucket name is unique so that you can create.
- For Region choose US East (N. Virginia).
- Click Create.
- Click “yourbucketname-dataset” bucket.
- Click Upload.
- Click Add files.
- Select file train_data.csv and test_data.csv in data folder then click Upload.
- Make sure that your S3 contain this bucket “yourbucketname-dataset” and the region is US East (N. Virginia)
Congratulations! now you can start building notebook instance on SageMaker
- On the Services menu, click Amazon SageMaker.
- In the navigation pane, choose Notebook.
- Click Create notebook instance
- Enter Notebook instance name for “ML-cluster”
- For Notebook instance type, select “ml.t2.medium”
- For IAM role, choose AmazonSageMaker-ExecutionRole-xxxxxxxxxxxxxxx you just created by before step
- Leave other blank by default and click Create notebook instance

- Notebook instance will pending for a while until it in service

- Until the status of ML-cluster transform into InService click open

- The jupyter notebook screen show up like below

- Click on sample-notebooks in file tab
- You can find that different machine learning sample is out there

In this workshop, we use TensorFlow DNN Classifier in sagemaker-python-sdk that is suitable for our data - Click sagemaker-python-sdk
- Click tensorflow_iris_dnn_classifier_using_estimators

- Click tensorflow_iris_dnn_classifier_using_estimators.ipynb to open kernel
- The kernel name conda_tensorflow_p27 will show up on the upper right and a tutorial for this SDK in this page

You can find that the tutorial example is for Iris data set to predict flower species based on sepal/petal geometry

- In the cell (code blank) below “Let us first initialize variables” heading, change the bucket location with “yourbucketname-dataset”. For example:
custom_code_upload_location = 's3://tfdnn-dataset/customcode/'
model_artifacts_location = 's3://tfdnn-dataset/artifacts'

After changing bucket name

Remember to press shift + enter to run this cell
In next step we will create a deep neural network model with a source code:
The framework is TensorFlow estimator
Neural network classification model with DNN Classifier
TensorFlow estimator hint below:
https://www.tensorflow.org/get_started/premade_estimators
- Back to Home of jupyter notebook and click iris_dnn_classifier.py

You will see this python code

First, we need to modify the parameter shape which represent the label or the column we want to train in our credit card fraud detection dataset
In function estimator_fn modify shape from 4 to 29 that means we train V1, V2, V3 … V28 and Amount label (total: 29) and predict the Class
In function serving_input_fn modify shape from 4 to 29 that means we train V1, V2, V3 … V28 and Amount label (total: 29) and predict the Class
Second, we need to modify the predict label n_classes which means how many type or class for predict label
In function estimator_fn modify n_classes from 3 to 2 that means our fraud detection class only contain two types : 0 (normal) or 1 (Fraud)
Third, we modify the name of training data and test data that match to train_data.csv and test_data.csv
In function train_input_fn modify iris_training.csv to train_data.csv
In function eval_input_fn modify iris_test.csv to test_data.csv
Last, let’s modify the function that load csv with header. Our dataset is without header after preprocessing
In function _generate_input_fn modify
tf.contrib.learn.datasets.base.load_csv_with_header to
tf.contrib.learn.datasets.base.load_csv_without_header
The origin source code below

The code we modify for our dataset below

When you finish the code click File and click Save
- Back to tensorflow_iris_dnn_classifier_using_estimators.ipynb console
Run the cell that contain !cat "iris_dnn_classifier.py" you will see iris_dnn_classifier.py

In following cells, modify the parameter that we have done in iris_dnn_classifier.py
(shape=[29], n_classes=2, train_data.csv for training set ,load_csv_without_header)
Cell below “Using a tf.estimator in SageMaker” heading
Origin code

After modify

Cell below “Describe the training input pipeline” heading
Origin code

After modify

Cell below “Describe the serving input pipeline” heading
Origin code

After modify

Remember to run those cells to ensure whether an error occur in model
Next part we train our model and get the result of training
- Move on to the cell below “Train a Model on Amazon SageMaker using TensorFlow custom code” heading
- Ensure that entry_point parameter is iris_dnn_classifier.py
- We choose ml.c4.xlarge for instance type as default

Press shift + enter to run the cell

- Move on to the cell below that contain code including boto3 library

- Modify the train_data_location to 's3://yourbucketname-dataset' as below

The most important, the code in this cell is start training job and running with instance. Make sure not ignore any previous steps before run this cell. - Run this cell and you need to wait for a while

The console output some results when it is about to finish training

TensorFlow evaluation step output

Important Statistic value of training process

In this training process:
Accuracy = 0.99953127
AUC = 0.9594897
Average loss = 0.0026860863
Summary: Those value indicate that this machine learning model perform well on our dataset
- Move on to the cell below “Deploy the trained Model” heading
- When you run this cell represent that creates an endpoint** which serves prediction requests in real-time with an instance
- Set instance_type as 'ml.m4.xlarge' as default and run the cell

Wait for a while until it finish deployment

- The cell below “Invoke the Endpoint to get inferences” heading do prediction job and output the prediction result
- Modify the data in iris_predictor.predict()
Change to this data below:
[-15.819178720771802,8.7759971528627,-22.8046864614815,11.864868080360699,-9.09236053189517,-2.38689320657655,-16.5603681078199,0.9483485947860579,-6.31065843275059,-13.0888909176936,9.81570317447819,-14.0560611837648,0.777191846436601,-13.7610179615936,-0.353635939812489,-7.9574472262599505,-11.9629542349435,-4.7805077876172,0.652498045264831,0.992278949261366,-2.35063374523783,1.03636187430048,1.13605073696052,-1.0434137405139001,-0.10892334328197999,0.657436778462222,2.1364244708551396,-1.41194537483904,-0.3492313067728856]
This data is selected from real fraud data that can test accuracy of our model for prediction (output contain class 0 for normal transaction and class 1 for fraud transaction )

Then run the cell to get the output

The result shows the fraud probability of this credit card data is 0.9518 (for example of this model)
- Now don’t run the cells below “(Optional) Delete the Endpoint” heading. That means to delete this endpoint. You can delete it after this workshop.
- Back to SageMaker console, click Endpoints you will find the endpoint you just created and click Models you will find the model you deployed


Congratulations! You successfully deploy a model and create an endpoint on SageMaker.
Next step you will learn how to create a Lambda function to invoke that endpoint
- On the Services menu, click Lambda.
- Click Create function.
- Choose Author from scratch.
- Enter function Name endpoint_invoker.
- Select python 3.6 in Runtime blank.
- Select Choose an existing role in Role blank and choose invoke_sage_endpoint as Existing role.

- Click Create function and you will see below screen.

- Click endpoint_invoker blank in Designer and replace original code that existing in Function code editor with below code. Remember to modify ENDPOINT_NAME to your SageMaker endpoint name
-
import boto3
import json
client = boto3.client('runtime.sagemaker')
ENDPOINT_NAME = 'sagemaker-tensorflow-xxxx-xx-xx-xx-xx-xx-xxx'

def lambda_handler(event, context):
    # TODO implement
    print(event['body'])
    print(type(event['body']))
    # list(event['body'])
    target = json.loads(event['body'])
    result = client.invoke_endpoint(EndpointName=ENDPOINT_NAME,Body=json.dumps(target))
    response = json.loads(result['Body'].read())

    print(response)

    http_response = {
        'statusCode': 200,
        'body': json.dumps(response),
        'headers':{
            'Content-Type':'application/json',
            'Access-Control-Allow-Origin':'*'
        }
    }
    return http_response

- Click Save to save the change of function.
- On the Service menu, click API Gateway.
- Click Get Started if you are first time to this console
- Choose new API of Create new API
- Enter API name predict_request and set Endpoint Type as Reginal then click Create API
- Click Actions and select Create Resource
- Enable Configure as proxy resource and enable API Gateway CORS

- Click Create Resource
- In proxy setup, choose Lambda Function Proxy for Integration type, Lambda Region select us-east-1, select “endpoint_invoker” for Lambda Function then click Save.

Click OK in order to add permission to Lambda function

You will see this screen

- Click Method Response
- Click Add Response and enter 200 and save
- Spread HTTP 200 status blank

Click Add Header and enter Access-Control-Allow-Origin then save
Click Add Response Model and enter application/json for Content type
Select Empty in Model then save

- Click Actions then select Deploy API
- Choose New Stage for Deployment stage
- Enter dev for Stage name and click Deploy
- You will see the Invoke URL for this API

Now you finish API deployment and you can try the demo on application
- For this workshop, we build a Flask web application to call API
Detail: http://flask.pocoo.org/
Make sure that you have installed python2.7 in your system
https://www.python.org/downloads/
You also need to setup environment for Flask
Run pip install Flask in terminal

- The source code of application is inside the flask-app folder
- Modify the file app.py that inside flask-app with your editor

In function predict_result() find the post URL in about line 33
Modify the URL to your invoke URL{proxy+} that have created on API Gateway

In terminal go to the same directory path of flask-app folder
e.g., Mac example below

Run below two commands to run Flask web application
export FLASK_DEBUG=1
FLASK_APP=app.py flask run

Python will run it on localhost:5000
We prepare 10 input data that is real fraud data for prediction at the screen below (in app.py)


You can copy and paste each data in input area and click predict

Then you will get the prediction result on http://localhost:5000/result
Default input data is “input_data”

Change input data to input_data5

You will get different result

For non-fraud transaction data in the real world, we also prepare 5 transactions to test
You can see the results of prediction


- Let's try those different data to explore the fraud detection result


-
On the service menu, click Cloud9.
-
Click Create environment
-
Enter the name of your environment in Name (e.g., flask-env)
-
Click Next step
-
Select Create a new instance for environment (EC2) and t2.micro (1 GiB RAM + 1 vCPU) for Environment type and Instance type
-
Click Next step
-
Click Create environment You will need to wait Cloud9 for setup environment in a few minutes

-
Paste command at below terminal
-
git clone https://github.com/ecloudvalley/Credit-card-fraud-detection-with-SageMaker-using-TensorFlow-estimators.git -
sudo pip install flask -
Click app.py in Credit-card-fraud-detection-with-SageMaker-using-TensorFlow-estimators/flask-app
-
In line 80, modify the port from 5000 to 8080

-
In line 50 ~ 51, modify the url of post request to your API url that you create in API Gateway step

-
Click Run on the toolbar and click Preview Running Application in Preview

The screen will show as below

-
Click Pop Out Window to open website in another tab in your browser

We prepare 10 input data that is real fraud data for prediction at the screen below (in app.py)

You can copy and paste each data in input area and click predict

Then you will get the prediction result on cloud9 website


In the real-world example, when the system detects the fraud you may want to inform your client by sending the message through mobile phone or email, so actually, you can integrate with SNS service in this architecture
-
First you need to create a topic and subscribe that topic in SNS dashboard

-
There are various types of target to send the message

-
Back to your Lambda function and add some code as below
-
import boto3 import json from time import gmtime, strftime import time import datetime client = boto3.client('runtime.sagemaker') sns = boto3.client('sns') ENDPOINT_NAME = 'YourSageMakerEndpointName' def lambda_handler(event, context): # TODO implement # print(event['body']) # print(type(event['body'])) # list(event['body']) target = json.loads(event['body']) result = client.invoke_endpoint(EndpointName=ENDPOINT_NAME,Body=json.dumps(target)) response = json.loads(result['Body'].read()) print(response) fraud_rate = response['result']['classifications'][0]['classes'][1]['score'] fraud = float(fraud_rate)*100 if fraud>=90: now = datetime.datetime.now() tdelta = datetime.timedelta(hours=8) mytime = now + tdelta mail_response = sns.publish( TopicArn='YourSNSTopicArn', Message='Do you remember this transaction?' + '\n' + mytime.strftime("%Y-%m-%d %H:%M:%S") + '\n Please check your credit card account \n it might be a fraud transaction', Subject='Transaction Alert') http_response = { 'statusCode': 200, 'body': json.dumps(response), 'headers':{ 'Content-Type':'application/json', 'Access-Control-Allow-Origin':'*' } } return http_response -
Remember to change ENDPOINT_NAME of SageMaker and TopicArn of SNS
-
In this example, SNS will push a message to my Email if the fraud rate of prediction is over 90%

- You will recieve an alert message from your target of SNS topic
- You can also check the time that transaction occurred (Email for this example)
