
This is a checklist and a small amount of code that makes it easy to for me to quickly launch a new project. After going through step-by-step guide, you'll have a a simple website for your new project with an embedded email list signup form, free webhosting, HTTPS enabled by default, and optional links to any of your social media accounts.
I start a bunch of projects. Open source software projects, community groups, activist projects, events, all kinds of stuff. Whether it's a big project or it's just a one-off quick thing, I usually want to make a simple webpage for it with a mailing list signup. I find myself doing this frequently enough that I made this toolkit with some code and some notes to help myself very quickly put a project online.
- github - this code in this github project is a simple webpage. And we'll be using Github Pages, a way that github offers free webhosting.
- MailChimp - email list management software. free for lists under 2000 signups.
- NameCheap - a company that allows us to register a domain name. About $10/year for a domain.
- Cloudflare - A company that allows us to easily enable HTTPS for the webpage for free. Free
And now onto the step-by-step guide!
Goal: Setup a simple customized website with free hosting.
- Click the fork button at the top of this github project, this will make a copy of this project on your github account.
- Now you should be working on the fork of the project. Rename the github project to the name of the new project that you're launching.
- An FYI for experienced developers. Usually your git repository has a
masterbranch. In this project, I've added thegh-pagesbranch and deleted themasterbranch. Having agh-pagesbranch tells github that you want the code in this project to be served via Github Pages, their free webhosting program. And since this only has a webpage, we no longer need themasterbranch. I've found that keepingmasteraround only leads to confusion, so I deleted it entirely. - Customize the webpage.
- Edit
config.ymlto add the details about the project that you're launching. *titleis the title of your project *taglineis a very short description of your project. This will go right on the homepage. *descriptionis a few sentences describing your project. This is used in the social media sharing text. *urlis the explicit URL of your project. Right now you can make ithttp://YourGithubUsername.github.io/github-project-nameand this webpage will load fine. If you are buying a domain for your project (covered later), you can go ahead and put your URL here. Or you could always come back after you buy a domain and change this. - Add a logo
- Upload a logo and overwrite
logo.pngin theimagesdirectory in this project. The best is a PNG file with a transparent background. You can upload a file by clicking on theimagesfolder in this github project and then dragging your logo to that folder. - If you overwrite the existing
logo.pngfile then you don't need to do anything further. If your logo has a different filename, you then need to editconfig.ymland change the line that sayslogo: /images/logo.pngtologo: /images/YOURFILENAME. - Optional: You can add a background image for the site. Upload an image to the
imagesdirectory in this github project, just like you did for the logo. Now editconfig.ymland add the path to your background image, eg/images/background.jpg. - Optional: You can also now add a social media sharing image. This is different from your logo because it's the image that facebook and twitter will use as the preview image when someone is sharing a link to your webpage on their social network. If you have a custom one, you can leave it set to the same as your logo (
/images/logo.png). - Add your domain to the
CNAMEfile. Open upCNAMEand replaceexample.comwith your domain name (don't include http, https or www in the domain name eg just putyourdomain.com). If you haven't already, go back toconfig.ymland update yoururlin the config file with your domain name. - (Optional) Add a privacy policy
- Edit
privacy.mdto add your privacy policy for anyone who signs up for your email list. - To display the privacy policy, edit
config.ymland change the line that saysshowPrivacyPolicy: falsetoshowPrivacyPolicy: true.
Goal: Get form submission URL for email list sign up and spam checker code. Add them to the config.yml file in this github project.
- Create a new MailChimp account.
- Login and go to your email list. Find the option for Signup Forms setup a new account and get the code for a signup link:
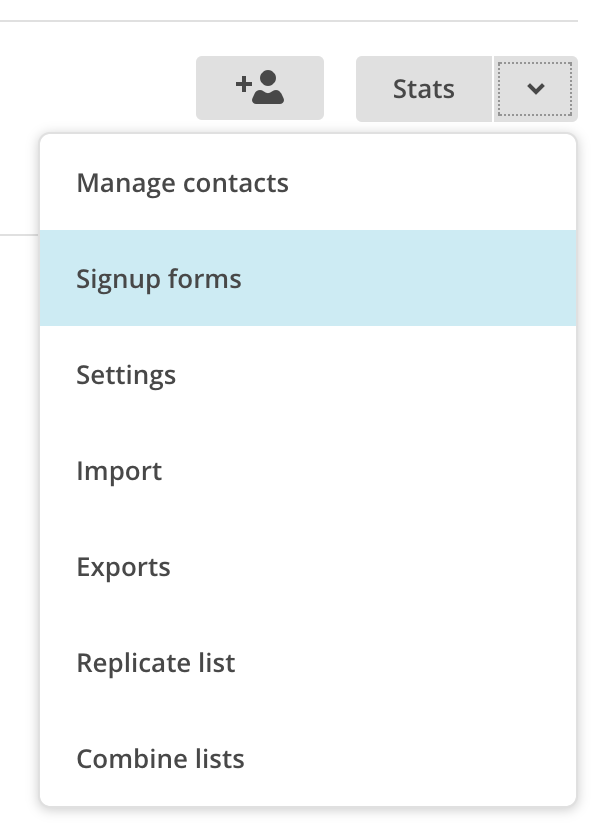
- Choose embeddable forms.
- Then choose "Super slim form"
- Scroll down to find the HTML code.
- Find
form action=copy the URL from there and then openconfig.ymlfile in this github project and paste that URL to themailchimpURIvalue. - You need to copy one more thing from the HTML code, it prevents spam submissions to your email list. There should be a line that says 'real people should not fill this in and expect good things - do not remove this or risk form bot signups'. Look for the next
inputtag after that line, there's an attribute in that tag calledname=and then some garbled text. Copy that garbled text and paste it into themailchimpAntiSpamCodevalue.

Goal: Buy a domain and point the nameservers to Cloudflare.
- Go to NameCheap.com and buy a domain for the project.
- After paying, go to your Domains dashboard and change the Nameserver settings to custom:
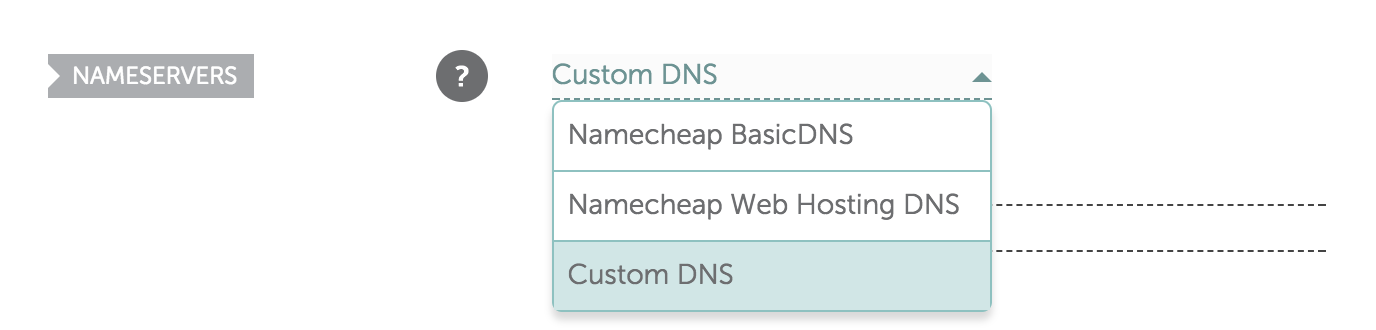
- Set the first one to:
cortney.ns.cloudflare.comand the second one to:gabe.ns.cloudflare.com

Goal: Point your new domain to github pages for webhosting and enable HTTPS.
- Create an account with Cloudflare and Login.
- Add your new domain. It will likely ask to scan your domain for existing DNS entries. Choose a free account.
- After you add your new domain, go select it from the dropdown at the top of the page and go to the DNS settings.
- Delete all of the existing DNS entries.
- Now we're going to setup the domain to point to Github Pages for free webhosting.
- Add an A Name entry. Set the Name to
@and set the Value to192.30.252.153. - Add a second A Name entry. Set the Name to
@and set the Value to192.30.252.154. - Add a CNAME entry. Set the Name to
wwwand set the value toYOURDOMAIN.com. Your DNS setting should look like this: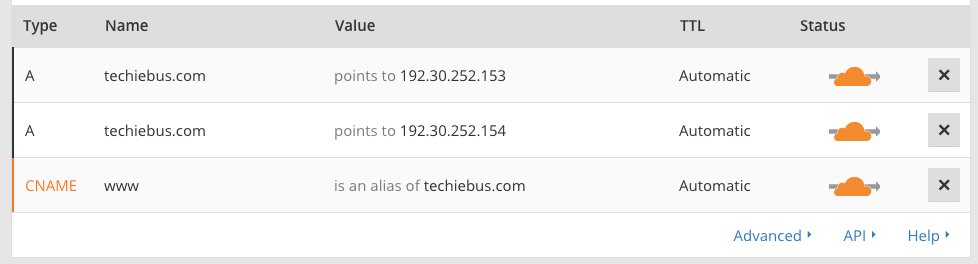
- Now let's enable HTTPS.
- Go to the Page Rules tab.
- Click 'Create Page Rule' and
http://yourdomain.com/to the text field and choose 'Always Use HTTPS' from the dropdown settings menu. Click 'Save and Deploy'. - Add another page rule for
http://yourdomain.com/*and again choose 'Always Use HTTPS'. Save and deploy. - Test HTTPS by loading http://yourdomain.com in your browser. It should automatically redirect you to the https version of the site and a small lock icon should appear in your browser. This means that data is now being encrypted from the browser to your server.

Goal: Add social media links to your webpage.
If you have social media accounts for your project, you can enable social media links on your site by adding the usernames to the appropriate variables in config.yml. eg if you have a twitter account, you can add your username to config.yml by adding editing the twitter line to say twitter: drewSaysGoVeg or for instagram: instagram: YourInstgramName. For facebook, some new pages don't yet have a short name. For facebook social media links to work, you need put everything that comes after facebook.com, eg facebook: theleagueofjust.us or facebook: \213213112423\YourFacebookPageName.
Mailgun - hello@yourdomain.com
Goal: Create a hello@yourdomain.com email address so people can email you and forward it to another email account.
- Create a Mailgun account.
- Add your domain to your account.
- Mailgun will give you a DNS record that you need to add to your domain.
- Login to Cloudflare and add this DNS record to the domain.
- After you've set up the DNS record, come back to Mailgun to set up an email route.
- You can add you desired email address eg
hello@yourdomain.com. Then you can choose where to forward this email address. - Set up gmail to send as alias.
- Login to your gmail account. Go to the settings tab. Choose 'Accounts and Import'.
- Under 'Send mail as', add your new email address.
- You'll be asked for the outgoing mail server information. You'll need to get this from mailgun. The SMTP address is probably
smtp.mailgun.combut the username and password will be unique to your Mailgun account. Login to Mailgun, click on the 'Domains' tab, then click on your domain. In the top section, there should be login info for your SMTP server. The username is likely,postmaster@yourdomain.com. Copy those creditials to your gmail account. - Now when you create a new email message in gmail, you should have a drop down menu for 'from'--you can choose which email address to send the email from.
- IFTTT - use this to automate posting across social media platforms. eg Whenever you post to instagram, also post the content to twitter.
- Slack notifications - get automatic slack notifications when someone signs up for your email list or takes another kind of action.
- Google Apps for Nonprofits - if this is a nonprofit or educational project, google apps is a free resource that provides you with a free custom version of gmail, google docs, google calendar and all the other google apps services for organizations.