This is a distributed Application (microservices), with the Backend using .NET Core 3.1 - There are 7 API's communicating through MessageBus (RabbitMQ).
This is a project to conclude the Technical Course in Systems Development (TCC) at the Brazilian School SENAI "Ary Torres". The project consists of an e-commerce website with front-end developed in Angular 9, back-end in .NET Core 3.1, Entity Framework Core and SQL Server. Initially, it was managed in Microsoft Azure DevOps and transferred to Github.
The source code of the Angular Front-end you can find in this repository: https://github.com/edsont8/TCC_Frontend and is hosted at this address: https://edsont8.github.io/TCC_Frontend
- API - Authentication
- API - Clients
- API - Catalog of products
- API - Gateway (BFF)
- API - Payment
- API - Cart
- API - Orders
Requirements:
-
Have Docker installed on your computer
-
Have Heroku installed on your computer
-
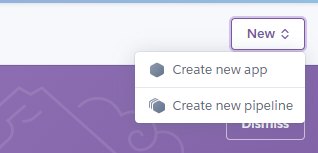
Installing Heroku CLI and Creating an application After creating an account on Heroku, you just have to click New and then Create new app:
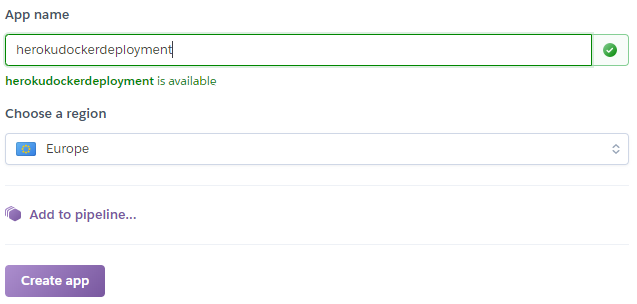
- Now you just have to choose a name for an app and a region where the server will be. Your app name will determine your application URL, following the pattern < your-heroku-app-name >.herokuapp.com
-
Run the cmd (Your Operacional Sistem CLI)
-
Log in:
> docker login> heroku container:login- Enter the API directory:
> cd OneDrive \ Desktop \ TCC_Backend \ FullAPI \ src \ services \ ECOM.API.Client- Publish the Application:
> dotnet publish -c Release- Enter the directory where the files were published:
> cd bin \ Release \ netcoreapp3.1 \ publish- Replace the Dockerfile file with another with the following code:
FROM mcr.microsoft.com/dotnet/core/aspnet:3.1-buster-slim AS base
WORKDIR /app
COPY . .

CMD ASPNETCORE_URLS=http://*:$PORT dotnet ECOM.API.Client.dll
Note that not hard coding a port is very important, Heroku listens to the HTTP request in the port $PORT, which is not necessarily the port 80. When your application starts, the port expected by Heroku is going to be assigned to the variable. So you should use like this:
ASPNETCORE_URLS=http://*:$PORT
POSSIBLE ERROR:
crit: Microsoft.AspNetCore.Server.Kestrel[0]
Unable to start Kestrel.
System.Net.Sockets.SocketException (13): Permission denied
Replace the:
ENTRYPOINT ["dotnet", "ECOM.API.Client.dll"]
by command:
CMD ASPNETCORE_URLS=http://*:$PORT dotnet ECOM.API.Client.dll
- Now Build the application to transform it into an image in the docker:
> docker build -t heroku-clients -f Dockerfile -t heroku-clients . - Crie a TAG para poder subir a imagem para o Heroku:
> docker tag heroku-clients registry.heroku.com/heroku-clients/web- Create the TAG in order to upload the image to Heroku:
> docker push registry.heroku.com/heroku-clients/web- Finally create the release of the app on Heroku:
> heroku container:release web --app heroku-clientsFinally your API is hosted on Heroku, and to access it just log into your Dashboard on Heroku, click on the app you created and click on the OPEN APP button. If your API has a swagger, just type /swagger/index.html at the end of your API URL in the browser.
- If you want to view the application log inside Heroku, type the following command inside your cmd:
> heroku logs --app heroku-clients --tailEdson Costa 📖 Commits |
Luiz Miguel 📖 Commits |
Mateus Pereira 📖 Commits |


