AutoWater is a project which automates watering a potted plant by measure soil moisture levels using a capciative moisture sensor. If the water levels are beneath a threshold, AutoWater will trigger a normally-closed solenoid valve, pumping water into the pot.
In order to begin this project you will need:
- Arduino Uno or compatible board, with a 9v power supply (1)
- TIP 120 transistor (1)
- 1N4007 Diode (1)
- 1k Ohm Resistor (1)
- Analog Capacitive Soil Moisture Sensor v1.0 (1)
- Breadboard (1)
- Jumper wires (10+)
- Alligator clamps (2)
- Solenoid Valve (1)
- Plastic tubing (10 feet)
- Potted plant (1)
The first step is to set up the moisture sensor and get a reading off of it.
In the tests directory, there is a file which can be used to run the test: MoistureSensorTest.ino
Place the moisture sensor carefully in the potted plant, leaving the wire section exposed. Notice that on the sensor there is a horizontal white line: do not submerge the sensor beyond this line, as it is possible to damage the sensor if the top gets wet. Ideally place the sensor such that the dirt level is approximately 1 inch below this.
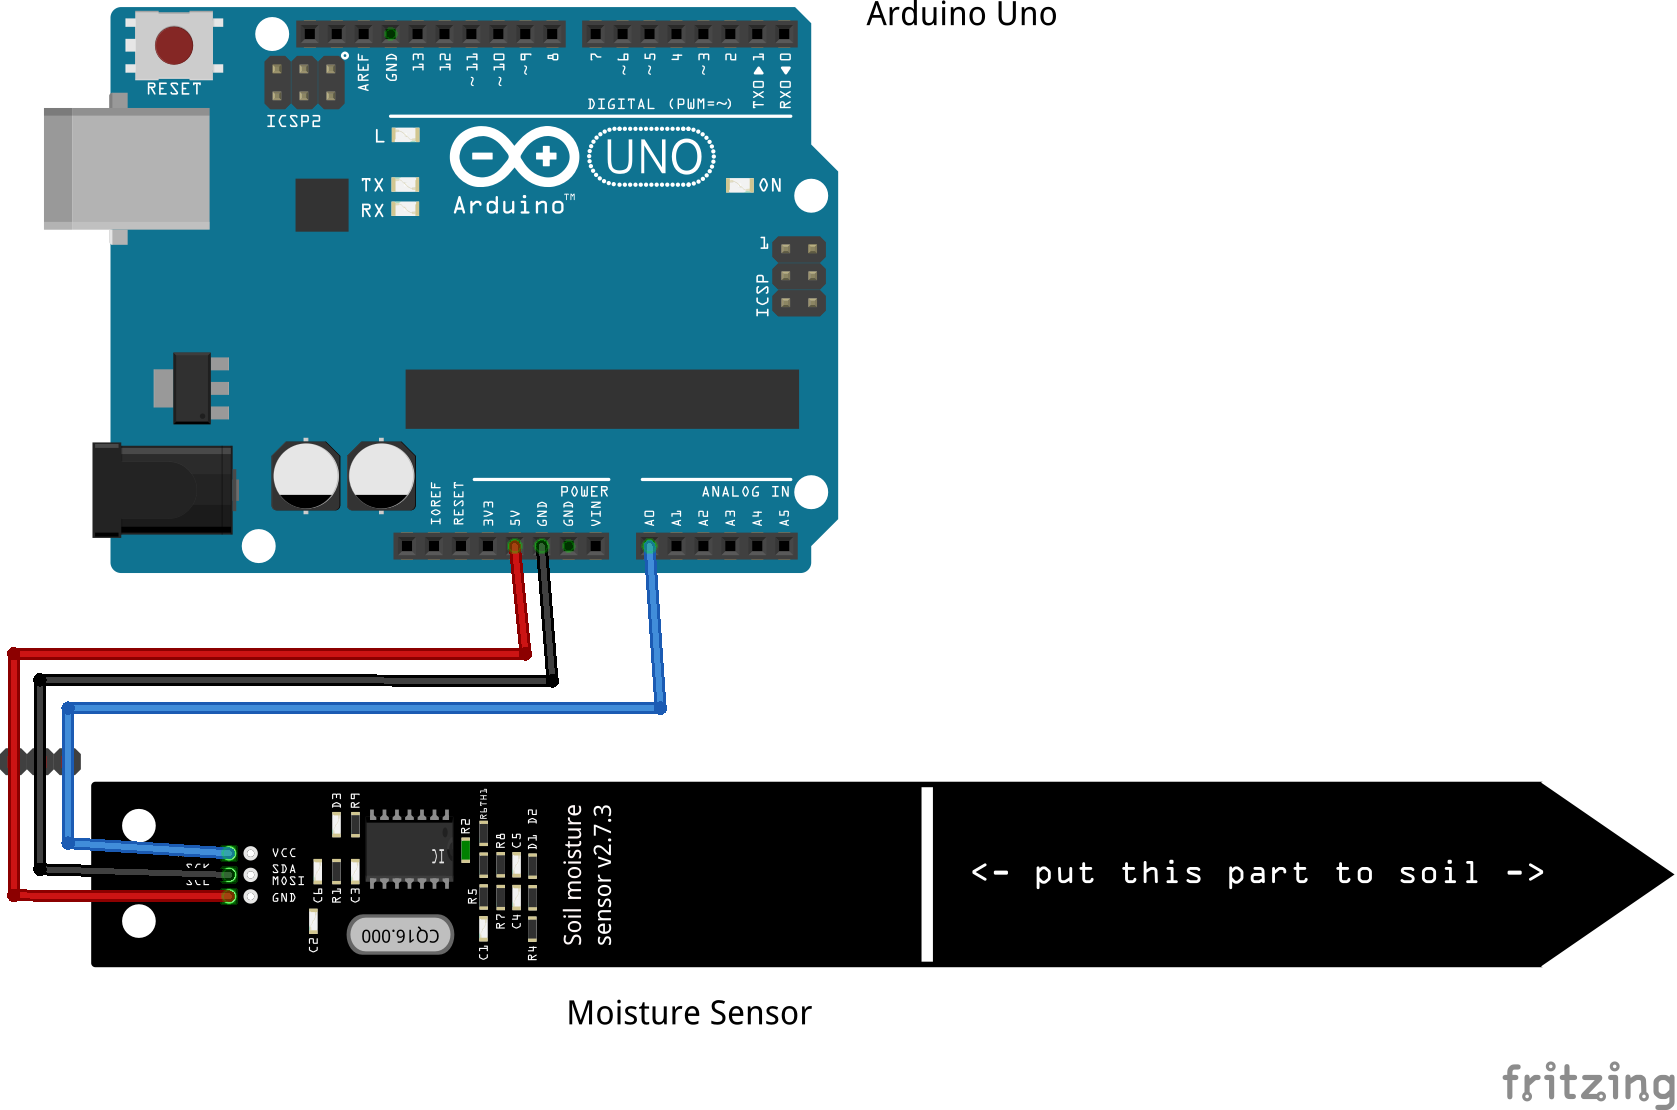
Take three jumper wires (1 red, 1 black, 1 blue). Match them to the same colors coming off of the sensor. Run the red wire into the 5v pin on the Arduino: this will provide power to the sensor. Next run the blue wire to the Analog 0 pin, and the black wire to the ground pin (GND).
Here is a diagram showing the connections between the Arduino and the moisture sensor:
Plug in the Arduino to your computer, then open the Arduino IDE and upload MoistureSensorTest.ino to it. If you get permissions issues and can't upload it, look up the error message it spits out. Likely you will need to run a command like sudo chmod a+rw /dev/ttyACM0, which will give you write permissions for the Arduino.
Once you have successfully uploaded the file to the board, from the Tools menu of the IDE, select Serial Monitor. If everything has been set up correctly, the window which opens will display a reading from the sensor which is updated every few seconds. If the monitor displays nonsensical symbols instead of human-readable text, make sure that the baud rate for the monitor matches what is set in the code: using the vanilla code, set to 9600 Bd.
In order to be sure that the sensor is working proper, after you have begun to see readings from it, slowly add water to the plant. Pour carefully, taking care to not splash the sensor directly. Gradually the reading from the sensor should decrease in value.
This step is optional, depending on the accuracy you want the moisture sensor to report human-readable moistures with (e.g. "75% Humidity").
To calibrate your moisture sensor, follow the steps above to set it up for testing. In addition you will need a glass of water. First, dry off the moisture sensor entirely. Then fire up MoistureSensorTest.ino, and record the value that the sensor reports while held outside of any soil, in the air. Write down this value, which will be used as the 0% Humidity value.
Next, submerge the sensor up to the horizontal line in the glass of water. After the readings stabilize, write down the number, as this will be used as the 100% Humidity value.
Once we've captured these two values, open up the Arduino IDE, as we are going to make some small changes to the code. First find a global variable named DEBUG. It is set to 0. Change the value to 1. Next, find the variables AIR_VALUE and WATER_VALUE.
Change the value for the first from 1000 to the number you recorded when calibrating the moisture sensor in the air.
Next, change the value for the second from 200 to the value you recorded when calibrating the moisture sensor in the cup of water.
Finally, we need to make the interval correct. Find the variable INTERVAL. You need to set this value to (AIR_VALUE - WATER_VALUE)/4. Originally the variable was set like so: (1000 - 200)/4 = 800/4 = 200. If the result gives you a fraction, round to the nearest integer.
Save the code and re-upload it to the Arduino. Re-run the test in the air, water and soil, and see what values you get. Now you should see lines like "Humidity: >50%" in the output, which indicates that the humidity is >50 % and <75 % of WATER_VALUE.
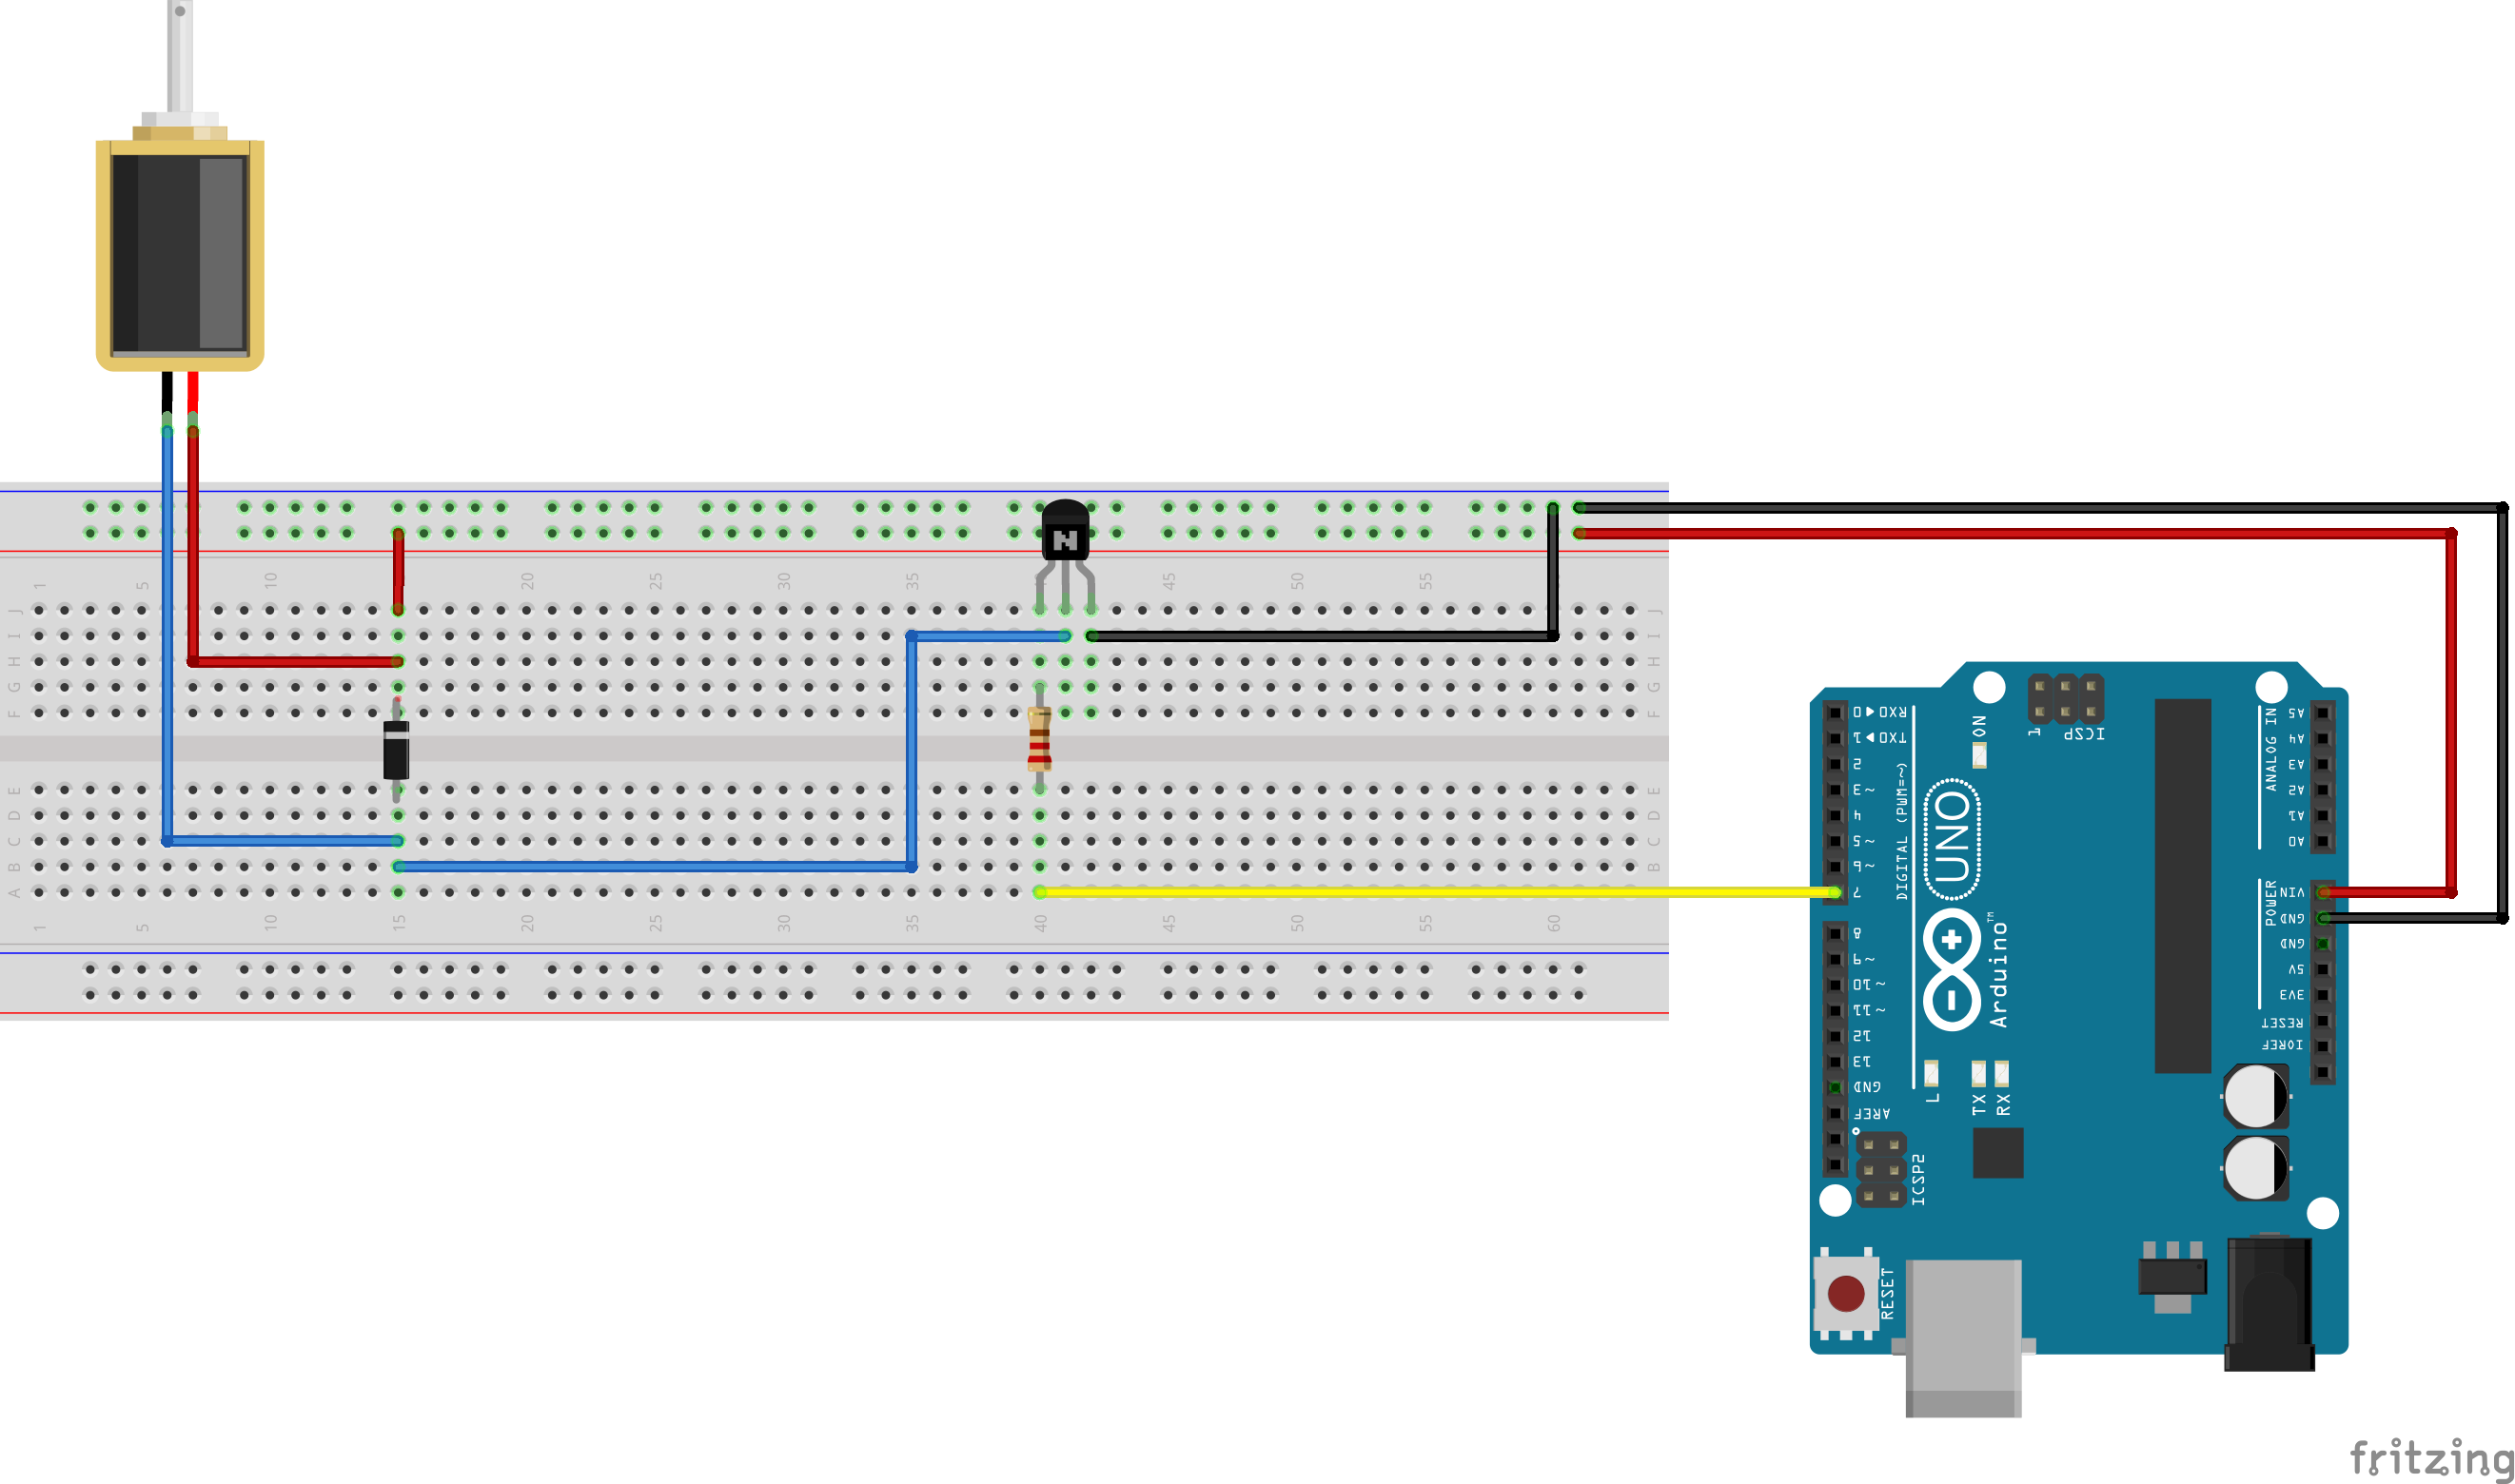
Here is a diagram showing the setup of the solenoid valve.

The setup in this section is based on a tutorial from BC Robotics, which can be found here.
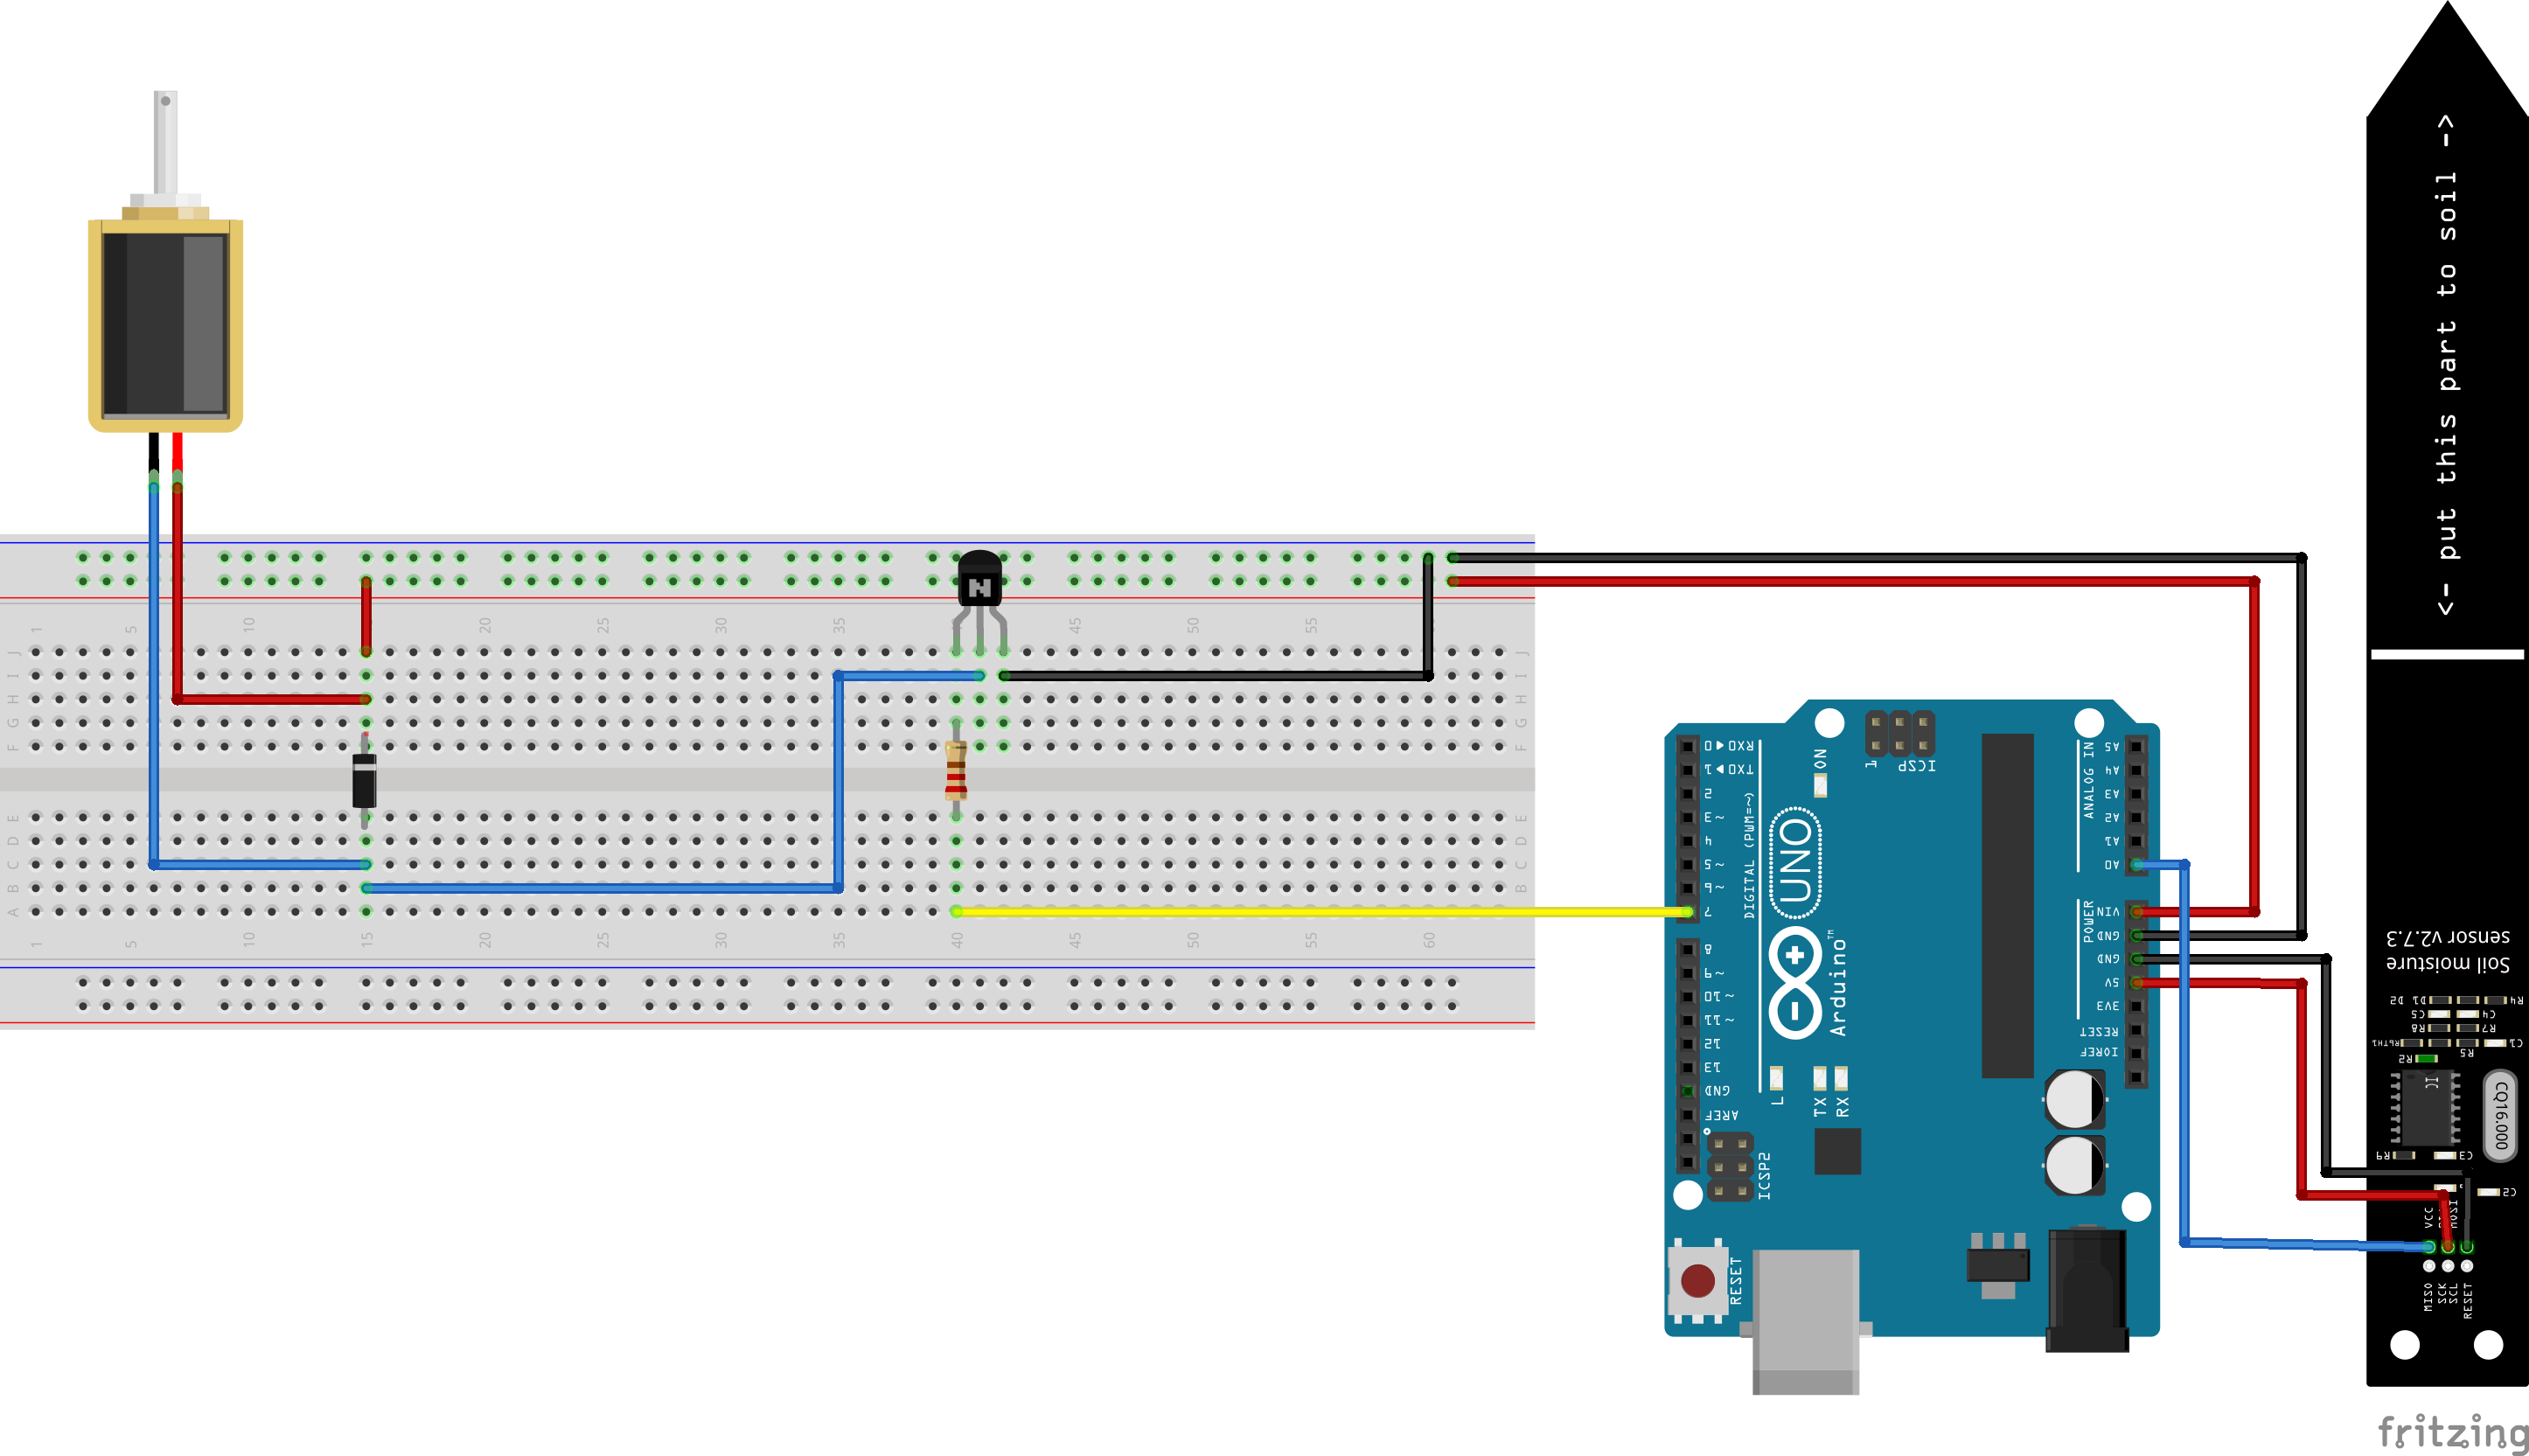
Note that none of the pins used here overlap with those used during the moisture sensor test. As a result, you don't need to unplug anything from the previous step. If you leave the moisture sensor plugged in during the next step, all the pieces will be correctly set up. If you want to just play around with the solenoid valve setup, however, feel free to start with a clean breadboard.
To begin with turn the breadboard so that j1 is in the top left corner. Next, take a red wire and connect it to the Vin pin on the Arduino. Plug this in to the positive rail on the top right of the breadboard. This will take the direct voltage from the 9v power supply and pass it to the solenoid valve, without first sending it to the board's regulator. If you tried to use a lower voltage, the solenoid valve would not be able to turn. With another red wire connect the positive rail to the near end of a column, on the left side of the breadboard. Immediately below plug in another red wire; take an alligator clamp and attach it to this wire. Connect the other end of this alligator clamp to the positive side of the solenoid valve.
Take the diode and put the side with the white line immediately beneath the last wire plugged in to the breadboard. Plug the other end into row c of the same column. In row b plug in a black wire. Take the second alligator clamp and attach it first to this black wire, then to the negative side of the solenoid valve.
Take the TIP-120 transistor and find the front. With the transistor facing you, plug all three pins into three columns in row j beginning several columns to the right of the diode column. Take a black wire and plug it first into row a of the diode column, then into row i of the column containing the transistor's middle pin. Take the resistor and plug it into the column of the left pin, leaving at least one open pin; in row a of the same column, plug in a yellow wire. Plug the other end of the yellow wire into digital pin 7 on the Arduino.
In the column of the right pin of the transistor, add a black wire. Run this wire into the ground rail at the top of the breadboard. Take another black wire and run it from one of two GND pins on the Arduino to the ground rail on the breadboard. The circuit is now complete!
Open up the IDE and connect the Arduino to your computer. Upload the file SolenoidTest.ino. Pick up the solenoid valve and put it next to your ear. You should hear it turn once per second.
Unplug the Arduino. Take a short length of aquarium tubing and cut it off, placing one end inside the solenoid valve and the other end inside the water reservoir or pump. Cut off a second length of tubing and put it into the other side of the solenoid valve. For the test, place this other end inside a bucket.
Plug the Arduino back in and run SolenoidTest.ino again. The valve should alternate between opening for a second and closing for a second, letting water out into the bucket each time it is open.
 If you didn't unplug the moisture sensor during the last step, congratulations! You are almost ready to run AutoWater. If you did, follow the instructions for plugging in the moisture sensor while leaving all the wires from setting up the solenoid valve plugged in.
The last step before you run everything is connecting the potted plant. First place the moisture sensor in the soil, then take the output side of the tubing amd place it so that the output water will end up watering the plant, but not directly on the moisture sensor.
Open up AutoWater.ino in the IDE and edit the file to fit the values calibrated during the moisture sensor testing phase. Set the DEBUG value to the appropriate level of logging: 0 has minimal logging, 1 has normal logging, and 2 has logging set to max while disabling the actual watering functionality. This last mode is very useful for debugging and experimenting.
Upload the completed file to the Arduino and open the Serial Monitor. Immediately you should see a reading from the moisture sensor. If that reading is too low and DEBUG < 2, AutoWater will water your plant! Once you've played around for a bit and have a good idea of how things work, change the time variables to fit the watering needs of your plant. Now you can happily go about your day knowing that the needs of your plant are being taken care of!
