Assuming that CustomView uses a Nib file to create the visual elements of it's user interface, the most common way of instantiating a new instance of this class is as follows:
Swift
let nib = UINib(nibName: "CustomView", bundle: nil)
let v = nib.instantiate(withOwner: nil, options: nil).first as! CustomView
v.frame = CGRect.init(x:0, y:0, width:320, height:50)
v.backgroundColor = UIColor.green
v.nameLabel.text = "Happy"
v.valueLabel.text = "Holidays"
self.view.addSubview(v)
The Nib is an implementation detail of CustomView, and as such shouldn't be exposed to the caller. If the developer of CustomView were to change from using Interface Builder to create the visual elements, to constructing the visual elements programmatically inside init or init(frame:), then the calling code would also need to change as follows:
Swift
let v = CustomView(frame: CGRect.init(x:0, y:0, width:320, height:50)
v.backgroundColor = UIColor.green
v.nameLabel.text = "Happy"
v.valueLabel.text = "Holidays"
self.view.addSubview(v)To hide the Nib construction implementation detail from calling code, most solutions (Stack Overflow, Medium, Ray Wenderlich etc) suggest the following pattern:
Swift
class CustomView: UIView {

  var contentView: UIView!

  required init?(coder aDecoder: NSCoder) {
    super.init(coder: aDecoder)
    loadNib()
  }

  override init(frame: CGRect) {
    super.init(frame: frame)
    loadNib()
  }

  func loadNib() {
    let nib = UINib(nibName: "CustomView", bundle: nil)
    contentView = nib.instantiateWithOwner(self, options: nil)[0] as! UIView
    contentView = self.bounds
    contentView = [UIViewAutoresizing.FlexibleWidth, UIViewAutoresizing.FlexibleHeight]
    addSubview(contentView)
  }
}
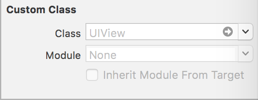
The CustomView Interface Builder file that was used to create the visual elements has to be of type UIView, rather than a Custom Class of CustomView.
The Nib instantied UIView is then added as a subview of CustomView, leading to a nested UIView hierarchy, and all the problems that it entails.
Objective-C has long been able to solve both problems by allowing the CustomView subclass to instantiate it's visual elements using loadNibNamed inside the initializer and assigning the resulting CustomView to self as follows:
Objective-C
- (instancetype) initWithFrame: (CGRect) frame {
    self = [[[NSBundle mainBundle] loadNibNamed: @"CustomView" owner: nil options: nil] objectAtIndex: 0];
    if (self) {
        self.frame = frame;
    }
    return self;
}
This solves both problem #1 (exposing the internal implementation) and #2 (nested view hierarchy)
The same code cannot be achieved in Swift as you cannot assign to self in a Class initializer. You cannot for instance do the following:
Swift
public override convenience init(frame: CGRect) {
  self = Bundle.main.loadNibNamed("CustomView", owner:nil, options:nil)![0] as! Self;
  self.frame = frame
}
This will result in compilation errors.
The solution for Swift is to use protocol extensions. Initializers declared in protocol extensions are the only initializers allowed to assign to self.
Swift
fileprivate protocol _CustomView {
}

extension CustomView: _CustomView {
}

fileprivate extension _CustomView {

    init(internal: Int?) {
        self = Bundle.main.loadNibNamed("CustomView", owner:nil, options:nil)![0] as! Self;
    }
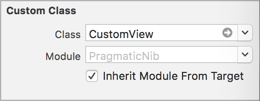
}The PragmaticNib project demonstrates both Objective-C CustomObjCView and Swift CustomView versions of loading Nibs from a bundle and assigning to self. The CustomView Interface Builder file that was used to create the visual elements has a Custom Class of CustomView.
All code developed in Xcode 9.2 with SDK11, Swift 4 - the solution should also work with earlier versions of Xcode and Swift.

