- Test-Suite to directly execute generated tests in your IDE
- Automatic generation of .toml configuration files (with placeholders)
- Response validation with swagger for each round trip (request -> response)
- Response validation with variables in .toml files
- Sending json payloads, configurable in .toml files
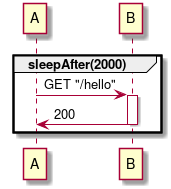
- Introduction of "Sleep" blocks to delay a request
- Generation of Mocks
- Various bug fixes
More in-depth examples might be available in: core/src/test/resources.
-
Test-Suite to directly execute generated tests in your IDE:
-
Open the project with IntelliJ and run
./gradlew build(see old documentation) -
The "Plantestic Run Example" run configuration for IntelliJ includes an example how tests can be generated
-
Tests are by default generated into:
test-suite/tests -
Toml Templates are generated into:
test-suite/config -
Tests can be run by opening a test in
test-suite/testsand clicking on the run icon on the left side of the code (in IntelliJ) -
Via the CLI various other options can be set:
./gradlew run --args="your-args-here"--input TEXT Path to the PlantUML file containing the API specification. --output TEXT Output folder where the test cases should be written to. Default is '../test-suite/tests' --execute Run the pipeline and execute the test --config TEXT .toml file which is to be used by the pipeline --mock TEXT .toml file which is to be used by the pipeline --tomlTemplateOutput TEXT Output folder where the toml templates should be written to. Default is '../test-suite/config' --dontGenerateTomlTemplate Prevent generation of toml templates for the generated tests -h, --help Show this message and exit```
-
-
Automatic generation of .toml configuration files (with placeholders):
- Enabled by default. You just need to fill out the placeholders, remove lines you don't like or add/remove comments.
-
Response validation with swagger for each round trip (request -> response):
-
We validate:
- Are all required parameters set in the request?
- Are all required parameters set in the response?
- Are parameters set which are not specified in the swagger (request & response)?
-
The swagger file has to be set in the appropriate .toml file and looks like this:
-
[Roundtrips] [Roundtrips.roundtrip3] # swaggerUrl = "" [Roundtrips.roundtrip1] swaggerUrl = "/home/sample/git/plantestic/minimal_swagger_response.yml" # uiswitch = "" # reroute = "" # warmhandover = "" [Roundtrips.roundtrip2] swaggerUrl = "https://petstore.swagger.io/v2/swagger.json" # eventid1 = "" # agent1 = "" # agent2 = "" -
In the example above, we check for required or unspecified fields in roundtrip1 and roundtrip2, but we don't do any checks in roundtrip3 (commented out)
-
-
Response validation with variables in .toml files
-
Responses can be validated in two ways:
- Comparison with a hard coded string value from the .toml file
- Comparison with a variable, e.g. a variable that was returned in a request
-
[Roundtrips] [Roundtrips.roundtrip1] swaggerUrl = "/home/sample/git/plantestic/minimal_swagger_response.yml" uiswitch = "123" # reroute = "" # warmhandover = "" [Roundtrips.roundtrip2] swaggerUrl = "https://petstore.swagger.io/v2/swagger.json" eventid1 = "${eventId}" # agent1 = "" # agent2 = "" -
In the example above we validate that the response for the first request contains a parameter with the value "123"
-
In roundtrip2 we validate that the value of eventid1 equals the value of eventId. You can basically compare any variables.
-
-
Sending json payloads, configurable in .toml files:
-
First set a parameter named requestBody in your request.
-
User -> J : POST "/json/${id}" (requestBody : "${json}", query : "some_query") -
Then add the variable in the .toml file (Note: the auto-generated .toml files doesn't include the json variable yet):
-
json = """{ "key": "value"} """ -
The .toml format requires the use of triple-" when setting multi-line values
-
-
Introduction of "Sleep" blocks to delay a request:
-
Generation of Mocks see: link
The test case generator Plantestic produces test cases from a sequence diagram.
A sequence diagram models a sequence of interactions between objects.
A test case then checks for such an interaction whether it is implemented as the sequence diagram defines it.
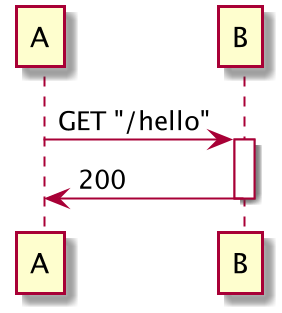
In an example sequence diagram called Hello, let there be two actors Alice and Bob.
Alice sends Bob the request GET /hello and Bob answers with Hello World.
The corresponding test case now sends an HTTP request GET /hello to the backend.
The test case then expects a response with status 200 OK and date Hello World.
    @Test
	public void test() throws Exception {
		Response roundtrip1 = RestAssured.given()
		        .auth().basic(subst("${B.username}"), subst("${B.password}"))
		        .filter(responseFilter("Roundtrips.roundtrip1"))
		    .when()
		        .get(subst("${B.path}") + subst("/hello"))
		    .then()
		        .assertThat()
		            .statusCode(IsIn.isIn(Arrays.asList(200)))
		        	.and().extract().response();
}The implementation of user requirements often deviates from the specification of the same user requirements. Individual work, teamwork, and collaboration between teams can produce such a divergence. For example, requirements may be misinterpreted or overlooked. Teamwork, especially with multiple teams, causes interface errors. For example, subsystems of the same product may use conflicting technologies or conflicting data formats.
Our test case generator detects deviations at an early stage: The test case generator derives test cases directly from the specification. If the implementation fulfills these test cases, then the implementation fulfills the specification. If the implementation does not fulfill these test cases, the implementation deviates from the specification. With our test case generator, developers can quickly uncover inconsistencies, fix them, and save costs.## Demo
Plantestic is universal in that it can run in any IDE. For this, Plantestic uses Gradle.
Plantestic is user-friendly: You set it up by installing Java and downloading Plantestic. You generate a test case by filing a sequence diagram and entering one instruction.
Plantestic has a powerful condition evaluation: A sequence diagram can contain alternative or optional interactions that it invokes under a certain condition. Plantestic will evaluate any condition that conforms to JavaScript. For this, it uses a JavaScript engine.
You can pass parameters to your sequence diagram if you wish to customize its flows. For example, you no longer need to reveal security-critical information such as passwords in your sequence diagram. Plantestic evaluates the parameters using templating.
- Install Java SE Development Kit 8 or higher. You can find Java SE Development Kit 8 under the website https://www.oracle.com/technetwork/java/javase/downloads/jdk8-downloads-2133151.html.
- Clone the Plantestic repository.
- Run
./gradlew build.
The input is a PlantUML sequence diagram.
This sequence diagram contains several participants and interactions between the participants.
One participant is the client who calls the test cases. The other participants are services of the implementation.
In the example diagram, the client is CCC and the services are CRS and Voicemanager.
An interaction contains a request from the client and a response from a service. A request contains an HTTP method, a URL, and possibly parameters. A response contains an HTTP status code and, if applicable, data. A hyphen separates the HTTP status codes and the data.
The HTTP method is GET, POST, or PUT.
The URL path is a String. In it, slashes separate the path components.
A parameter name in curly braces, preceded by a dollar symbol, thereby specifies parameterized path components.
Example: /path/${param}
We specify the request parameters in a tuple:
An opening bracket is followed by the first request parameter.
This request parameter is followed - comma-separated - by the second request parameter, and so on.
The last request parameter is followed by a closing bracket.
We specify the request parameter as a Name: Value pair:
The name of the request parameter is followed by a space, a colon, a space, and the value of the request parameter as a string.
We define the value of the request parameter in curly brackets, preceded by a dollar symbol.
Example: (name1 : "${value1}", name2 : "${value2}")
We specify the response data in a tuple:
An opening bracket is followed by the first response datum.
This response datum is followed - comma-separated - by the second response datum, and so on.
The last response datum is followed by a closing bracket.
We specify the response datum as a Name: XPath pair:
The name of the response datum is followed by a space, a colon, a space, and the xpath of the response datum as a string.
In the xpath, slashes separate the path components. .
Example: (name1 : "/value/value1", name2 : "/value2")
- Create a PlantUML sequence diagram. Note the input requirements above.
- Save the sequence diagram.
- Call the command
./gradlew run --args="--input=<path/to/sequence/diagram/diagram_name.puml>".
The generated test cases are in <path/to/sequence/diagram/generatedCode/<diagramName>.java>.
Take the following test case generation from a minimal sequence diagram as an example:
- You can find the sequence diagram
minimal_hello.pumlin the Plantestic project under./core/src/test/resources/minimal_hello.puml:
-
In the Plantestic console, call
./gradlew run --args="--input=./core/src/test/resources/minimal_hello.puml". This will generate test cases for the provided diagram. -
You will find the test case in the Plantestic project under
./core/build/resources/main/code-generation/generatedCode/minimal_hello_puml.java:
package com.plantestic.test;

import java.util.Arrays;
import java.util.Map;
import java.util.HashMap;
import io.restassured.RestAssured;
import io.restassured.response.Response;
import org.hamcrest.collection.IsIn;
import java.nio.file.Files;
import java.nio.file.Path;
import java.nio.file.Paths;
import org.apache.commons.text.StringSubstitutor;
import com.moandjiezana.toml.Toml;
import javax.script.ScriptEngine;
import javax.script.ScriptEngineManager;
import javax.script.ScriptException;

public class Test {

	Map<String, Object> paramsMap = new HashMap();
	ScriptEngine engine;
	StringSubstitutor substitutor;
	private static final boolean IS_WINDOWS = System.getProperty( "os.name" ).contains( "indow" );

	public Test(String configFile) throws Exception {
		try {
			String osAppropriatePath = IS_WINDOWS ? configFile.substring(1) : configFile;
			Path path = Paths.get(osAppropriatePath);
			String paramsFileContent = new String(Files.readAllBytes(path));
			paramsMap = unnestTomlMap(new Toml().read(paramsFileContent).toMap());
			substitutor = new StringSubstitutor(paramsMap);
			ScriptEngineManager factory = new ScriptEngineManager();
			engine = factory.getEngineByName("JavaScript");
		} catch(Exception exception) {
			System.out.println("An Error occured, possible during reading the TOML config file: " + exception);
			throw exception;
		}
	}

	public void test() throws Exception {
		try {
			Response roundtrip1 = RestAssured.given()
					.auth().basic(substitutor.replace("${B.username}"), substitutor.replace("${B.password}"))
				.when()
					.get(substitutor.replace("${B.path}") + substitutor.replace("/hello"))
				.then()
					.assertThat()
					    .statusCode(IsIn.isIn(Arrays.asList(200)));
		} catch (Exception exception) {
			System.out.println("An error occured during evaluating the communication with testReceiver: ");
			exception.printStackTrace();
			throw exception;
		}
	}

	public static Map<String, Object> unnestTomlMap(Map<String, Object> tomlMap) {
		Map<String, Object> resultMap = new HashMap<>();
		for (Map.Entry<String, Object> entry : tomlMap.entrySet()){
			if(entry.getValue() instanceof Map){
				Map<String, Object> innerMap = (Map<String, Object>) entry.getValue();
				for (Map.Entry<String, Object> nestedEntry : innerMap.entrySet()){
					resultMap.put(entry.getKey() + "." + nestedEntry.getKey(), nestedEntry.getValue());
				}
			} else {
				resultMap.put(entry.getKey(), entry.getValue());
			}
		}
		return resultMap;
	}
}
- When actor A sends actor B a request, Plantestic expects actor B to send actor A a response. Actors A and B must be different actors.
- Plantestic neither supports options nor loops.
- Plantestic can handle alternatives as long as they are not nested.
- We only support authenticated requests with username and password.
* contributed equally
The repository plantuml-eclipse-xtext defines the grammar of PlantUML. We pass this grammar to Xtext.
The repository qvto-cli demonstrates how QVT operations can be performed without Eclipse.
From the article Standalone Parsing with Xtext we learned how to use Xtext without Eclipse.
From the Wiki article QVTOML/Examples/InvokeInJava we learned how to call QVT from our pipeline.
From the paper Grammar-based Program Generation Based on Model Finding we learned about the Eclipse Modeling Framework.
Copyright [2019] [Stefan Grafberger, Fiona Guerin, Michelle Martin, Daniela Neupert, Andreas Zimmerer]
Licensed under the Apache License, Version 2.0 (the "License"); you may not use this file except in compliance with the License. You may obtain a copy of the License at
http://www.apache.org/licenses/LICENSE-2.0
Unless required by applicable law or agreed to in writing, software distributed under the License is distributed on an "AS IS" BASIS, WITHOUT WARRANTIES OR CONDITIONS OF ANY KIND, either express or implied. See the License for the specific language governing permissions and limitations under the License.


