Deep-tempest: Using Deep Learning to Eavesdrop on HDMI from its Unintended Electromagnetic Emanations
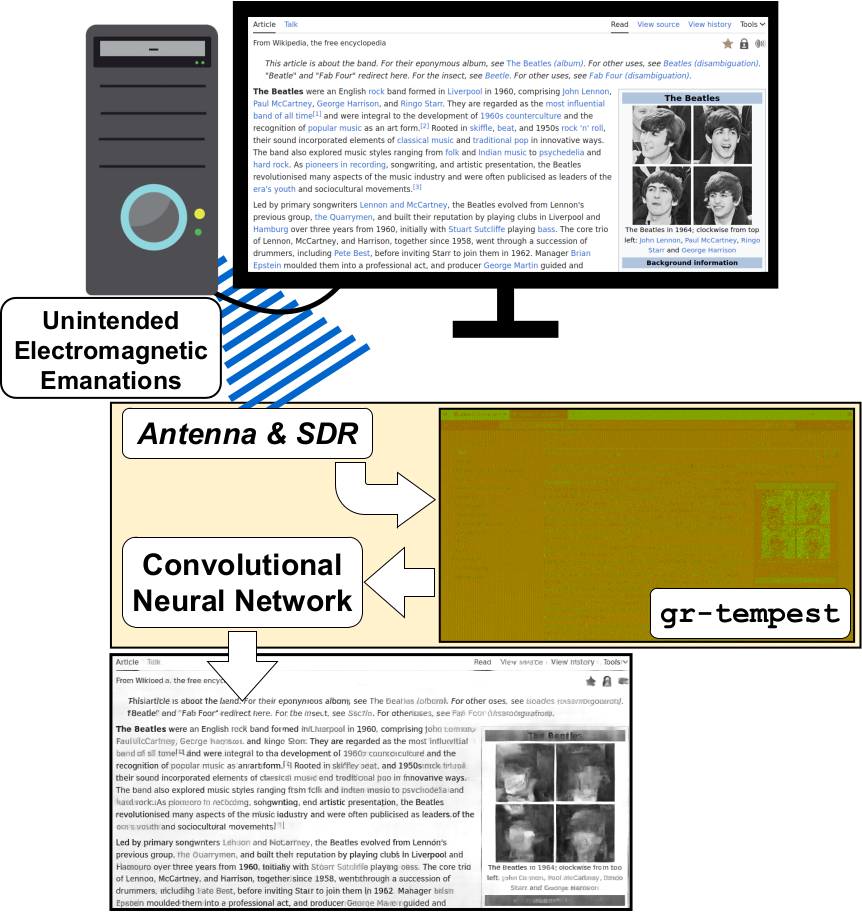
In this project we have extended the original gr-tempest (a.k.a. Van Eck Phreaking or simply TEMPEST; i.e. spying on a video display from its unintended electromagnetic emanations) by using deep learning to improve the quality of the spied images. See an illustrative diagram above. Some examples of the resulting inference of our system and the original unmodified version of gr-tempest below.
The following external webpages provide a nice summary of the work:
- NewScientist: AI can reveal what’s on your screen via signals leaking from cables
- RTL-SDR.com: DEEP-TEMPEST: EAVESDROPPING ON HDMI VIA SDR AND DEEP LEARNING
- PC World: Hackers can wirelessly watch your screen via HDMI radiation
- Techspot: AI can see what's on your screen by reading HDMI electromagnetic radiation
- Futura: Hallucinant : ce système permet d’afficher et espionner ce qu’il y a sur l’écran d’un ordinateur déconnecté
- hackster.io: Deep-TEMPEST Reveals All
- Hacker News: Deep-Tempest: Using Deep Learning to Eavesdrop on HDMI
- TechXplore: Security researchers reveal it is possible to eavesdrop on HDMI cables to capture computer screen data
- Tom's Hardware: AI can snoop on your computer screen using signals leaking from HDMI cables — researchers develop new AI model that enables using antennas for long-range attacks
- Montevideo Portal: ¿Por qué la inteligencia artificial puede ver una pantalla? Un estudio uruguayo indagó
- El Observador: Uruguayos interceptan señales del cable HDMI para espiar monitores y asombran al mundo
- El País: La amenaza invisible: uruguayos descubrieron cómo un hacker podría espiar tu pantalla a través del cable HDMI
We are particularly interested in recovering the text present in the display, and we improve the Character Error Rate from 90% in the unmodified gr-tempest, to less than 30% using our module. Watch a video of the full system in operation:
You can find a detailed technical explanation of how deep-tempest works in our article. If you found our work or data useful for your research, please consider citing it as follows:
@misc{fernández2024deeptempestusingdeeplearning,
      title={Deep-TEMPEST: Using Deep Learning to Eavesdrop on HDMI from its Unintended Electromagnetic Emanations},
      author={Santiago Fernández and Emilio Martínez and Gabriel Varela and Pablo Musé and Federico Larroca},
      year={2024},
      eprint={2407.09717},
      archivePrefix={arXiv},
      primaryClass={cs.CR},
      url={https://arxiv.org/abs/2407.09717},
      note={Submitted}
}
In addition to the source code, we are also open sourcing the whole dataset we used. Follow this dropbox link to download a ZIP file (~7GB). After unzipping, you will find synthetic and real captured images used for experiments, training, and evaluation during the work. These images consists of 1600x900 resolution with the SDR's center frequency at the third pixel-rate harmonic (324 MHz).
The structure of the directories containing the data is different for synthetic data compared to captured data:
-
ground-truth (directory with reference/monitor view images)
- image1.png
- ...
- imageN.png
-
simulations (directory with synthetic degradation/capture images)
- image1_synthetic.png
- ...
- imageN_synthetic.png
- image1.png (image1 ground-truth)
- ...
- imageN.png (imageN ground-truth)
-
Image 1 (directory with captures of image1.png)
- capture1_image1.png
- ...
- captureM_image1.png
-
...
-
Image N (directory with captures of image1.png)
- capture1_imageN.png
- ...
- captureM_imageN.png
Clone the repository:
git clone https://github.com/emidan19/deep-tempest.gitBoth gr-tempest and end-to-end folders contains a guide on how to execute the corresponding files for image capturing, inference and train the deep learning architecture based on DRUNet from KAIR image restoration repository.
The code is written in Python version 3.10, using Anaconda environments. To replicate the working environment, create a new one with the libraries listed in requirements.txt:
conda create --name deeptempest --file requirements.txtActivate it with:
conda activate deeptempestRegarding installations with GNU Radio, it is necessary to use the gr-tempest version in this repository (which contains a modified version of the original gr-tempest). After this, run the following grc files flowgraphs to activate the hierblocks:
Finally run the flowgraph deep-tempest_example.grc to capture the monitor images and be able to recover them with better quality using the Save Capture block.
IIE Instituto de Ingeniería Eléctrica, Facultad de Ingeniería, Universidad de la República, Montevideo, Uruguay, http://iie.fing.edu.uy/investigacion/grupos/artes/
Please refer to the LICENSE file for contact information and further credits.


