


Dependencies and date last changed:
This is an extension to let you debug CC65 C code (and ASM code to a small degree) made for the Commodore platforms (well-tested) and NES (experimental), including the Commodore 64, using VICE emulator and Visual Studio Code.
If you're having trouble understanding how this extension is supposed to be used, any other issues setting it up, or any features to suggest, please let me know by creating an issue or messaging me on Mastodon ( @empathicqubit (at) dizl.de ) [if copy/pasting, replace the (at) with @ ] .
Have you found this project useful, or even utter rubbish? The Flying Spaghetti Monster and I would really appreciate your rating on the Visual Studio Marketplace or OpenVSX!
If you'd like to skip some of the below setup, you can use one of the project templates. They are pretty much the same except for one or two files. After you fork them, you can open the project in Codespaces using the devcontainer.json. Keep in mind that a lot of the graphical features in the main panel will only work in VSCode on your computer, not in the web browser, but you can still do basic debugging. If you connect VSCode to Codespaces, all the features will work correctly, it just might be slow since the debugger has to run on the remote machine.
- Choose either the C or the Assembly template.
- Click the green "use this template" button at the top right corner
- Give your repo an interesting name and configure other settings, then create it!
- Click the green "<> Code" button and on the "Codespaces" tab, click "Create codespace on main"
- Wait for a somewhat lengthy amount of time... (Click the "Show Logs" link to see progress)
- The project will open in VSCode in your browser. This works fine, but only good for basic debugging
- Please click the "CC65 - Run" tab and note that it is blank. This is a limitation of the browser vscode. Connecting from your computer does not have this limitation.

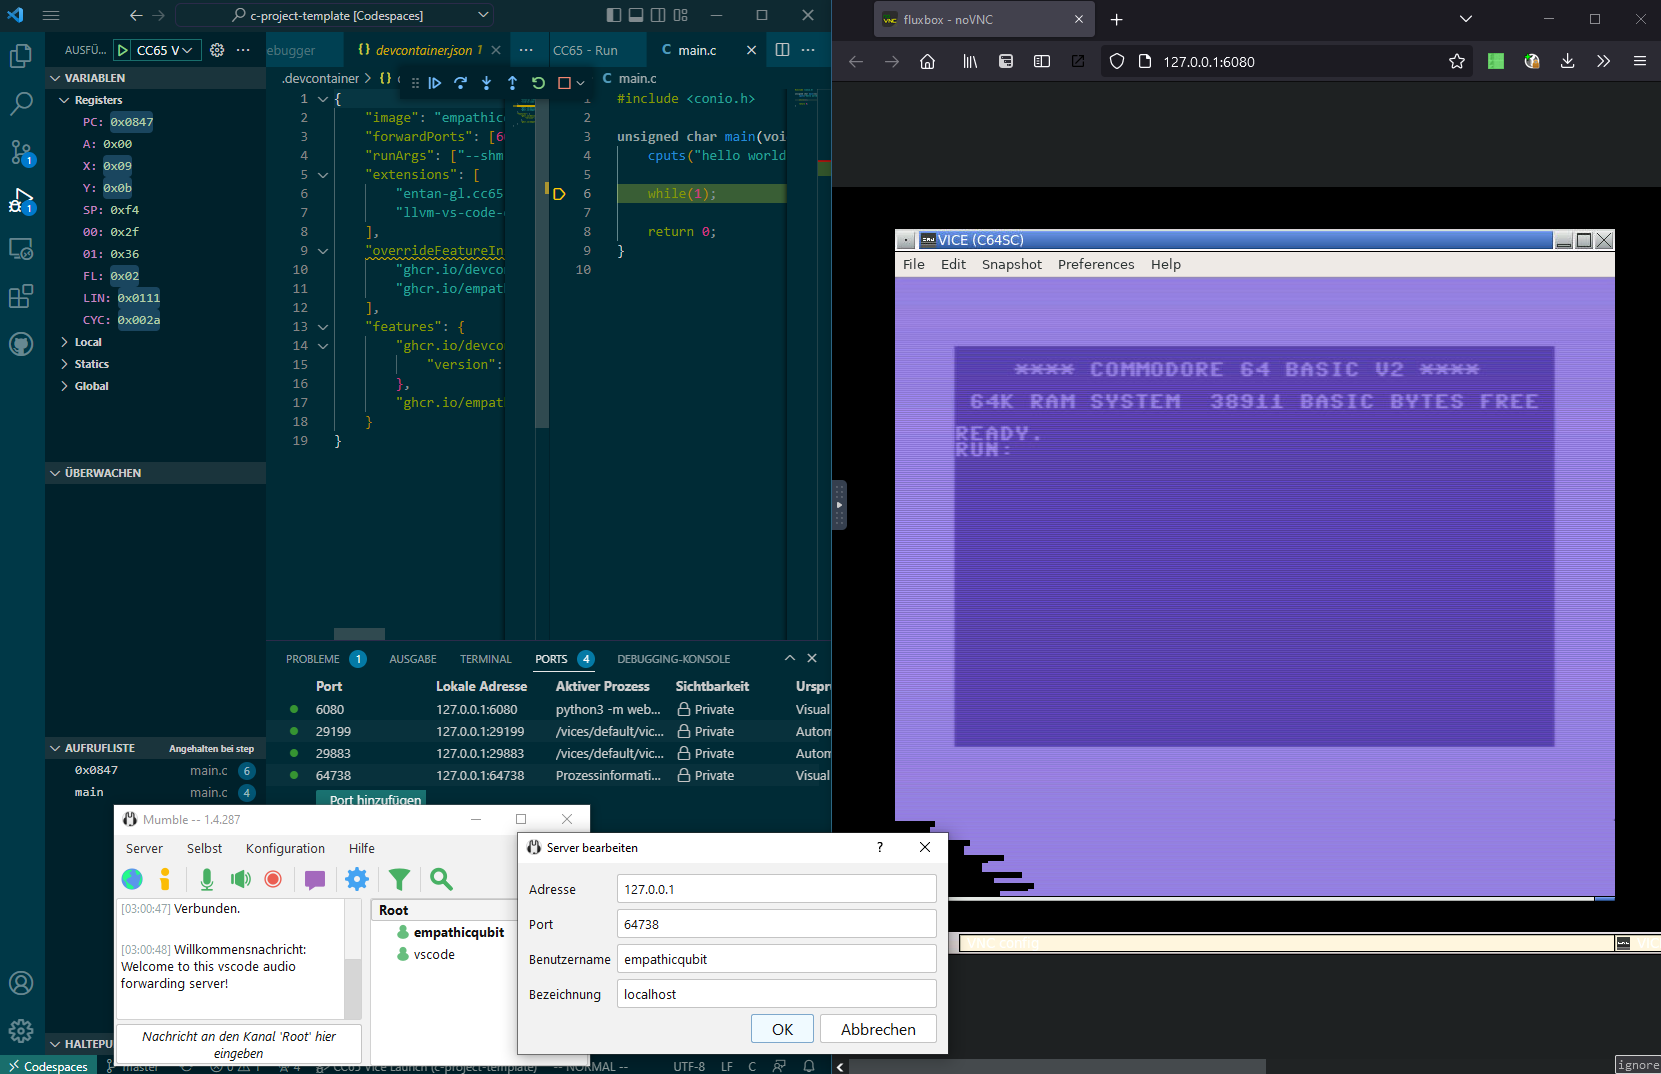
- In the browser or local VSCode, go to the "PORTS" tab on the bottom of the screen and select port 6080, then click the globe button which appears. This will launch novnc in your browser.
- Click the connect button, and use a password of "vscode". This will get you to the desktop where your program will appear.
- Go to the debugging tab in VSCode, and select the first launch target in the dropdown next to the green play button.
- Click the green play button. Debugging starts. You can see the VICE window on the novnc desktop.
- Go to Codespaces. You will see your container there.
- Click the three dots button on your container, and select open in VSCode. Your browser will ask to open VSCode URI.
- Accept opening the link in VSCode, and it will load up. You're done. Magic. You can also open the novnc port locally, and there's also port 64378, which is for audio. You will need a Mumble client to access this port. By default there is no password.
If you'd like to run a project entirely from your computer without Codespaces or devcontainers, you can also do that. This way is probably better if you want to get more serious with your development. To make sure all the features work, you'll want to install VICE 3.8 or later. A modified build of CC65 for Linux, Windows, and Mac OS is already included.
You will need to install VICE 3.8 or later and make. A modified build of CC65 is included. The easiest way to install VICE to your PATH is to use Chocolatey.
# Make sure you use an Administrator shell!

# Skip this command if you have Chocolatey already.
Set-ExecutionPolicy Bypass -Scope Process -Force; [System.Net.ServicePointManager]::SecurityProtocol = [System.Net.ServicePointManager]::SecurityProtocol -bor 3072; iex ((New-Object System.Net.WebClient).DownloadString('https://chocolatey.org/install.ps1'))

# Install the packages
choco install --version 3.8.0 winvice-nightly
choco install make

# This isn't required, but installing it will make C development a little easier.
# If you install this you should also install the llvm-vs-code-extensions.vscode-clangd
# VSCode extension from the Marketplace.
choco install llvm
Make sure these directories are not on your PATH. They will break the Makefile:
C:\Program Files\Git\bin
C:\Program Files\Git\usr\bin
These directories are okay:
C:\Program Files\Git\cmdYou will need to install VICE. The easiest way to do this is with Brew.
brew install viceAlternatively, use the official release from Sourceforge. You will need to point
the viceDirectory setting to the bin path. So if you dropped the folder in
Applications, that would look similar to this:
/Applications/vice-arm64-gtk3.8.0/bin
You may also want to add that path to your PATH so you can use tools like c1541
in your Makefile.
You will need to install VICE 3.8 or later and make. A modified build of CC65 is included.
To install VICE 3.8 before it is packaged for your distribution, you will need to build VICE from source, to do that, download the source from the VICE website, then follow the below steps:
sudo apt install build-essential subversion dos2unix xa65 automake autoconf zip
sudo apt build-dep vice
cd vice-3.8.0
./autogen.sh
./configure
make -j$(nproc)
sudo make install
The last two commands will take a while, but afterwards VICE should be installed.
After installing go to your launch.json and create a new section using the snippet. If you don't have a launch.json, the "create a launch.json file" link in the debug section should create a simple one.

Obsolete settings:
- viceCommand: Please see the setting
cc65vice.viceDirectoryin your user settings.
Required settings for both launch and attach:
- name: The name in the debug dropdown menu.
- request:
launchwill launch,attachwill attach. - type: Always
cc65-vicefor this debugger. - build: Attributes for the build command. You need this for attachment as
well, so the debugger can find relative paths in your debug file.
- command: Your actual build command. Defaults to make if unspecified. You will need to change your Makefile to support being debugged with this.
- args: An array with args for your command. Defaults to [] if unspecified.
- cwd: The working directory for your build command. You need this for attachment as well, so the debugger can find relative paths in your debug file.
- skip: Should we skip building before execution?
Required for attach mode only:
- port: The port to attach to in attach mode. This is the port
configured with VICE's
-binarymonitoraddressoption. If you specify this for a launch, it will force it to use that port instead of a random one.
Required for launch mode only:
- emulatorArgs: You'll want to set your C64 model here, and any other special hardware options that you need for your program. Either NTSC or one of the PAL models (jap, drean, etc). Look at the VICE manual for the full list.
Other shared settings:
- stopOnEntry: This will break at the beginning of the program. Otherwise it will continue automatically after the debugger connects.
- stopOnExit: This will break at the end of the program. Otherwise it will terminate automatically.
- program: Specify this if the debugger can't find your binary file. By default it will look for a d81/d64 and if it can't find any a PRG. If you have multiple of those types of files, it will try some fanciness to determine which one is the "real" one, such as looking at the modification date and how many files are in your disk image, but those may fail.
- machineType: The machine type to use, instead of the autodetected one.
- mapFile: Manually specify the path of your map file. Use this if auto detection fails. When this is unset it will look for a file in the same folder as your program named PROGRAMNAME.map
- debugFile: Manually specify the path of your debug file. Use this if auto detection fails. When this is unset it will look for a file in the same folder as your program named PROGRAMNAME.dbg
There are also some user settings to note:

- cc65vice.enableCycleCounters: Enable cycle counters next to each code line.
- cc65vice.viceDirectory: Set this to specify the directory that contains the VICE executables. You'll probably need this on Windows. If this is omitted then it will look on the system PATH.
- cc65vice.appleWinDirectory: Set this to specify the directory that contains the AppleWin executables. You'll probably need this on Windows. If this is omitted then it will look on the system PATH.
- cc65vice.mesenDirectory: Set this to specify the directory that contains the Mesen executables. You'll probably need this on Windows. If this is omitted then it will look on the system PATH.
- cc65vice.cc65Home: Set this to specify the directory that contains the
CC65 build. This is the
CC65_HOMEdirectory, and not the bin directory, so the folder above bin. If your system doesn't have prebuilt binaries, you probably want to use CC65 on your PATH, and not this. - cc65vice.preferX64OverX64sc: Set to true to use x64, which is not recommended.
- cc65vice.disableMetrics: This disables metric reporting, which tracks when the extension is activated or a debug session is requested or fails.
You may have some problems with autostart-warp working correctly. The way
VICE detects this may be to blame. To turn it off, just add +warp and
+autostart-warp to your emulatorArgs:
{
    ...
    "emulatorArgs": [
        "+autostart-warp", "+warp",
        "-model", "ntsc"
    ]
    ...
}You will need to tell the linker that you want a debug file and a map file. You would add the following options to your linker:
-g -Wl "--mapfile,build/PROGRAMNAME.map" -Wl "--dbgfile,build/PROGRAMNAME.dbg"And the following to your compiler:
--debug-tables "FILENAME.tab"Make sure that the paths on the files are in the same folder and have the same name (minus the extension, of course) as your main program!
If you have included any optimizations (-Osir) you should probably turn those
off, however, effort has been made to trace some of them.
Please also note the mk.sh and mk.bat. These will help you run make (or anything else with minor modifications) from the proper context outside of vscode, so that you use the builtin cc65 compiler when possible, instead of the one installed on your machine.
You will need node >=13, vscode >=1.42, pnpm >=5.5, Python 3 (to generate the font), and Subversion. Jest Test Explorer extension is also recommended.
For more details about what is needed to build, please look at the Dockerfile
To test:
pnpm install --shamefully-hoist
pnpm build:full
pnpm test
To build, run the following commands:
pnpm install --shamefully-hoist
pnpm build:full
If you want to debug the extension, use the Extension + Server debug target
in VSCode after running the build commands above at least once. This will start two
debug sessions. You will need to restart the Server if you change any code
called by the main debug session process. Basically anything referenced by
src/dbg/runtime.ts.
You will need to restart the Extension if you change anything in the Extension which is not UI code. All the UI side code is located under src/webviews/index.ts since there is only one screen at the moment. All the non-UI code is under src/ext.
If you change UI code while debugging, it will automatically be reloaded. However you may need to close the webview and restart the cc65-vice session to get it to reappear correctly.
Some other package.json scripts of note:
- clean: Will remove all generated outputs such as files in
dist. Use this If something doesn't seem to update. - distclean: Will remove all files including
node_modulesand the3rdpartydirectories. Use this if something is really sideways. - compiler: Will build all the versions of cc65 to
dist/cc65 - compiler:quick: Will only build the x86 versions of cc65 for your platform. This is used when you launch the project in VSCode.
- webpack and webpack:debug: Builds all the webpacked parts of the project. The debug adapter, monitor, extension, and extension UI code.
- tisk: Builds all the source with standard
tsc. Called byCtrl+Shift+Bin VSCode. This doesn't actually build the project, just quickly verifies that the code isn't broken. Also used before the Webpack build so each component doesn't revalidate the syntax, making it faster overall. - build:full: Builds everything for deployment.
- build:test: Only builds the parts needed to run the tests, and to debug the extension in VSCode.
- vscode:prepublish: Used for vsce packaging. Will run the tests before generating a vsix file.
- vscode:prepublish:github: Only called on the build server. Skips the tests since they are run separately as a PR check.
- vice:choose: Selects a version of VICE to test against. Look at build.env.sample
- applewin:choose: Selects a version of AppleWin to test against. Look at build.env.sample
- lint: Project linting. Not as important since TypeScript itself prevents a lot of obvious mistakes.
- jest: Run only some of the tests. For example:
pnpm jest -- src/__tests__/runtime-other-platforms.test.ts - jest:compile: Runs only the compile tests. This is separate because the other tests are dependent on the cc65 projects being compiled.
- jest:noncompile: The tests that come after compilation.
- test: Run the tests in the correct order. Does not build anything, so
use
build:testfor that. - package: Run
vsce packageusing pnpm. The project is using a modified version of vsce that has support for pnpm.
All work happens on master, and releases are merged from pull requests using Google's Release Please. Commit messages should start with fix: for bug fixes or feat: for new features, which will appear as bullet points in the changelogs. You can only have one fix: or feat: per commit message, and it must be on the first line. Do not manually edit the version or the CHANGELOG, unless your name is empathicqubit. Breaking changes should use fix!: and feat!:. Force pushes occassionally happen on master because I forget to add the tags to my commit messages.
Download the file vimspector-gadget.json from the Release page and run a command similar to the following:
.vim/plugged/vimspector/install_gadget.py --enable-custom ./vimspector-gadget.jsonAn example .vimspector.json is included in the example projects. Note that you
will need to set build.skip to true.
To use Mesen-X with NES, download Mesen-X and set your cc65vice.mesenDirectory
setting to the path where Mesen-X is. The file should be named Mesen.exe. Then add NES to your targets in your Makefile:
TARGETS := nes
Keep in mind that stdio is not implemented correctly, so printf and file operations will not work. This is a limitation of the NES platform in CC65.
- Terminal: mintty, from Git for Windows
- Compilation: A modified version of CC65 is included with this project, in order to generate detailed type information at compile time.
- Assembly syntax highlighting: Borrowed from tlgkccampbell/code-ca65
- Font: Font for the screen text viewer is generated using atbrask/c64ttf
- Icon: Based on a character that appears on the box art for Bug Blaster.