-
Use pip to install the kernel and the management utility
pip install ghidra-jupyter
-
Use the management utility to install the extension. Make sure
$GHIDRA_INSTALL_DIRis defined, as it points the utility to the right path.ghidra-jupyter install-extension
-
If you have multiple installs of Ghidra, you can point the installer to the right one.
ghidra-jupyter install-extension --ghidra <my-ghidra-install-dir>
-
Use pip to install the kernel and the management utility
pip install ghidra-jupyter
-
Download
GhidraJupyterKotlin-1.0.0.zipfrom our releases page -
Place the zip under
$GHIDRA_INSTALL_DIR/Ghidra/Extensions/
After installation, you should be prompted about a new plugin when opening the CodeBrowser. Confirm the installation and activate it via "File -> Configure..." and ticking the checkbox for the "Miscellaneous" Group.
Directly after you'll see 2 new buttons and a new menu inside Ghidra.


The third action is only available in the menu and provides a shortcut
to open an already running juptyter-notebook server or to start a new one.
This feature requires the Jupyter QT Console to be installed and jupyter-qtconsole to be available in your PATH. This is a separate package on PyPI and in most distros, so you typically need to explicitly install it.
Click the  button to open a QtConsole.
Once you click, a Jupyter Kernel will be initialized in the current Ghidra program and the Jupyter QtConsole will launch.

If you want to interrupt the code you executed, the menu action "Interrupt Current Kernel" or "Ctrl+C" will NOT work. It will simply print Cannot interrupt a kernel I did not start.
This is a limitation of the Jupyter QT console. To work around this issue, the plugin provides an action Interrupt Execution in the Jupyter submenu. This will interrupt the curently executed cell:

-
Start Jupyter Notebook or Jupyter Lab
jupyter notebook
or by using the menu action.
-
Click the
 button in Ghidra to accept a notebook connection
The following popup will show, indicating that Ghidra is actively waiting

-
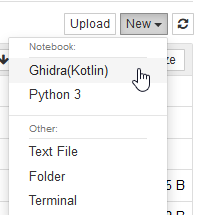
In the Jupyter Notebook home page, create a Ghidra(Kotlin) notebook
Once you do, the notebook will connect to your waiting Ghidra instance.


These snippets can be pasted directly in the QT console or a notebook cell.
Generate a x64dbg script based on the currentProgram that labels all the functions in x64dbg and stores it in the clipboard
import java.awt.Toolkit;
import java.awt.datatransfer.Clipboard;
import java.awt.datatransfer.StringSelection;

currentProgram.functionManager.getFunctions(false)
.map { f -> "lblset 0x${f.entryPoint.offset}, ${f.name}"}.joinToString("\n")
.let {
    val sel = StringSelection(it)
    Toolkit.getDefaultToolkit().systemClipboard.setContents(sel, sel)
}- Get the [kotlin-jupyter-kernel] jars
- Install the Kotlin Jupyter kernel
pip install kotlin-jupyter-kernel
- Copy the JARs over to
GhidraJupyterKotlin/lib-
First, we use
pip show kotlin-jupyter-kernelto see where it was installedpip show kotlin-jupyter-kernel
-
From the Location line (usually site-packages) we go to the run-kotlin-kernel package and copy the jars. So
site-packages/run-kotlin-kernel/jars/*. The contents should be:annotations-13.0.jar jupyter-lib-0.8.3.1.jar kotlin-jupyter-kernel-0.8.3.1.jar kotlin-reflect-1.4.30-dev-2223.jar kotlin-script-runtime-1.4.30-dev-2223.jar kotlin-stdlib-1.4.30-dev-2223.jar kotlin-stdlib-common-1.4.30-dev-2223.jar
-
- Build the Ghidra plugin
cd GhidraJupyterKotlin gradle - Install the plugin using the ghidra-jupyter installer
ghidra-jupyter install-extension --extension-path GhidraJupyterKotlin/dist/<today's-zip-file>
- Install the Kotlin Jupyter kernel
This project is released under the MIT license.
The project uses components that are released under different licenses:
- kotlin-jupyter is released under the Apache-2.0 License
- The Kotlin runtime and libraries are released under the Apache-2.0 License