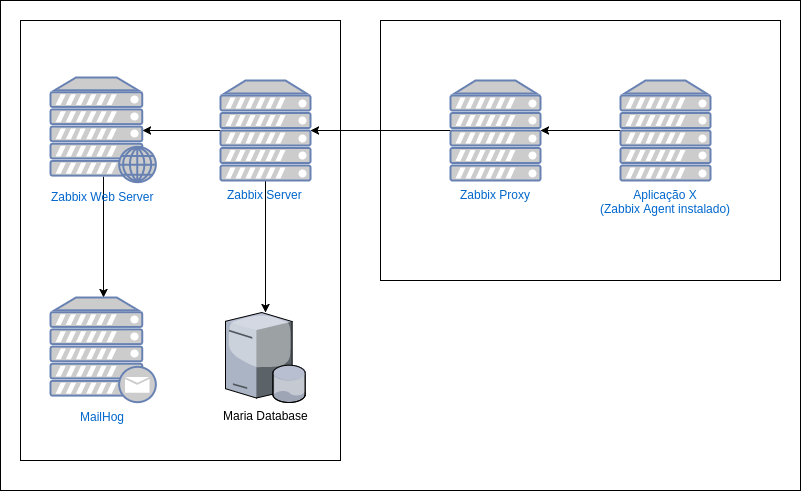
Creating a basic environment to test Zabbix monitoring. Zabbix is enterprise open source monitoring software for networks and applications, created by Alexei Vladishev. (from https://en.wikipedia.org/wiki/Zabbix)
- Tested with docker 17.03.1-ce and compose 1.14.0
- Not designed to production environment!
- Tcp ports 80 and 8025 are used to web interfaces (zabbix web and mailhog)
Compose is a tool for defining and running multi-container Docker applications. With Compose, you use a Compose file to configure your application’s services. Then, using a single command, you create and start all the services from your configuration. (from https://docs.docker.com/compose/overview)
To start this lab, clone the repository:
git clone https://github.com/ericogr/docker-zabbix-lab.git
cd docker-zabbix-lab
Create and start containers:
docker-compose upafter some time in console:
... (other things...)
** Database 'zabbix' does not exist. Creating...
** Creating 'zabbix' schema in MySQL
** Fill the schema with initial data
** Preparing Zabbix server configuration file
This process can take fill minutes to get ready. After some time, you can open http://localhost to access zabbix web interface
To stop and remove containers:
docker-compose downMore information about docker compose: https://docs.docker.com/compose/reference/overview/
- Access web interface: http://localhost
- Login if you are not logged (username/password): Admin/zabbix
- Click Administration/Proxies
- Click "Create Proxy" button
- Fill Proxy name with "zabbix-proxy"
- Click Add
- Access web interface: http://localhost
- Login if you are not logged (username/password): Admin/zabbix
- Click Administration/Media types
- Click Email to edit current e-mail settings
- Fill SMTP server with "mailserver" and SMTP server port with "1025"
- Do not touch other parameters and click Update
- zabbix agent
- zabbix proxy
- zabbix server
- zabbix web server
- mailhog
- mariadb
web interface: http://localhost
  hostname: zabbix-web-server
  username: Admin
password: zabbixweb interface: http://localhost:8025
hostname: mailserverMailHog is an email testing tool for developers.
- Configure your application to use MailHog for SMTP delivery
- View messages in the web UI, or retrieve them with the JSON API
- Optionally release messages to real SMTP servers for delivery
In active mode, uses sqlite database.
hostname: zabbix-proxy hostname: zabbix-proxy hostname: zabbix-agent hostname: db
username: root
password: admin- Access web interface: http://localhost
- Login if you are not logged (username/password): Admin/zabbix
- Click Administration/Proxies
- Click "Create Proxy" button
- Fill Proxy name with "zabbix-proxy"
- Click Add
- Access web interface: http://localhost
- Login if you are not logged (username/password): Admin/zabbix
- Click Administration/Media types
- Click Email to edit current e-mail settings
- Fill SMTP server with "mailserver" and SMTP server port with "1025"
- Do not touch other parameters and click Update
Parameters are defined in .env file:
#database
MYSQL_ROOT_PASSWORD=zabbix

#zabbix-web
PHP_TZ=America/Sao_Paulo

#common
ZBX_DEBUGLEVEL=3
ZBX_TIMEOUT=4
ZBX_UNAVAILABLEDELAY=60
ZBX_UNREACHABLEDELAY=15

#zabbix-proxy
ZBX_CONFIGFREQUENCY=10
ZBX_PROXYHEARTBEATFREQUENCY=5

#zabbix-server
ZBX_SENDERFREQUENCY=30
ZBX_CACHEUPDATEFREQUENCY=20
ZBX_TRAPPERIMEOUT=300
ZBX_UNREACHABLEPERIOD=45
ZBX_PROXYCONFIGFREQUENCY=10
ZBX_PROXYDATAFREQUENCY=1

#zabbix-agent
ZBX_ENABLEREMOTECOMMANDS=0
ZBX_LOGREMOTECOMMANDS=0
ZBX_REFRESHACTIVECHECKS=120- After starting docker compose with command
docker-compose up, at certain point, you get a message like this:
zabbix-server_1      |    172:20170623:161156.544 cannot parse autoregistration data from active proxy at "172.19.0.6": proxy "zabbix-proxy" not found
zabbix-proxy_1       |    116:20170623:161156.544 cannot send history data to server at "zabbix-server": proxy "zabbix-proxy" not found
You need to wait zabbix server finish start
- Some time after starting docker compose with command
docker-compose up, at certain point, you get a message like this:
zabbix-server_1      |    142:20170621:001640.841 cannot parse heartbeat from active proxy at "XXX.XXX.XXX.XXX": proxy "zabbix-proxy" not found
zabbix-proxy_1       |    109:20170621:001640.841 cannot send heartbeat message to server at "zabbix-server": proxy "zabbix-proxy" not found
You need to add zabbix-proxy configuration using zabbix web server.
- Incorrect time events
***You need to specify
