-
3A is hooked to arduino pin 3;
-
4A is hooked to arduino pin 5;
-
1A is hooked to arduino pin 6;
-
2A is hooked to arduino pin 9;
-
3,4EN and 1,2EN hooked directly to arduino 5V output pin;
-
hbridge pin labels:
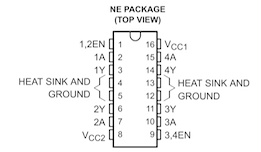 taken from documentation here (Section 6, page 3)
 -
loosely following this wiring diagram: https://github.com/rwaldron/johnny-five/blob/master/docs/motor-hbridge.md
-
Left trigger and echo both hooked to 7.
-
Right trigger and echo both hooked to 4.

-
Install Arduino
-
Upload the firmware to the robot:
use PingFirmata http://johnny-five.io/api/proximity/#pingfirmata Source code: https://gist.githubusercontent.com/rwaldron/0519fcd5c48bfe43b827/raw/f17fb09b92ed04722953823d9416649ff380c35b/PingFirmata.ino
-
Install node and npm
-
Run npm install
- this currently doesn't install socket.io-client, webppl, or sleep, so you'll have to do that separately. (TO DO: update package)
-
Run
node index.jsin one terminal -
Run
webppl robot.wppl --require robotin another terminal to enter autonomous mode for 100 iterations -
Open a browser to 127.0.0.1:3000 for a remote control
-
???
-
Profit