This is a mvc base framework for Unity Engine.
Navigate Tools/MVC/Create Root. In the editor window, there is a field for Root name. Editor automatically create a test scene for you. If you don't want to create a new scene you need to make Create Scene toggle to false. If you want, you can override root scene path. In context, there are some of methods automatically overrode for you.
==> You can bind signals in this method.
public override void SignalBindings()
{
    base.SignalBindings();
}
==> You can bind models or other classes that you want in this method.
public override void InjectionBindings()
{
    base.InjectionBindings();
}
==> You can bind view and mediators in this method.
public override void MediationBindings()
{
    base.MediationBindings();
}
==> You can bind commands in this method.
public override void CommandBindings()
{
base.CommandBindings();
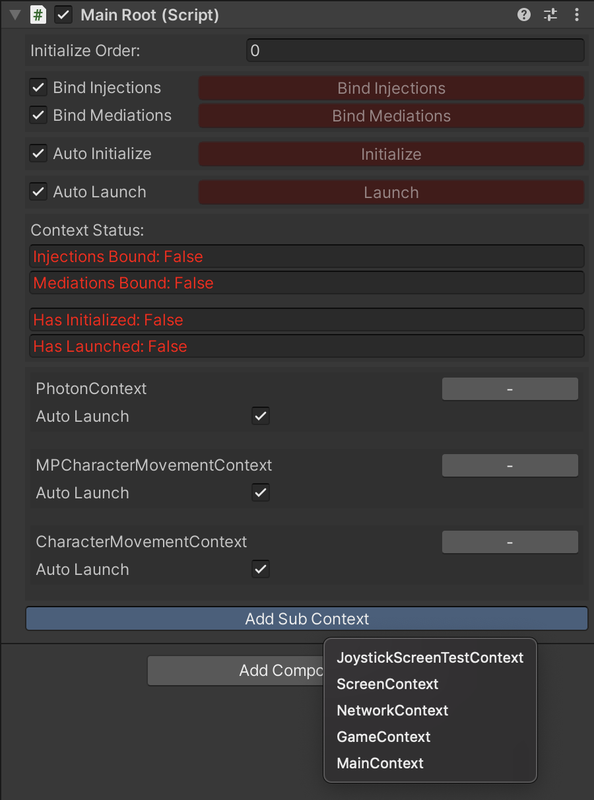
}In inspector, there are some toggles and fields that shows some information about status of Context. At the beginning of game, Bindings methods executed one by one. If you want you can disable these methods in inspector.
Initialize Order is a order number which is very helpful in multi context scenes. You can choose context's initialize order with this parameter.

In mvc-base you can separate your context to sub-context files. If you work in a big project, your contexts going to be so larger. Because of that it's going to be hard to test. With Sub-Contexts you can add normal context to other context as a sub-context. At the beginning of the game, the main context is going to execute all sub-contexts one by one.
Press the Add Sub Context button. It will show you all context files in your game. And you can choose the context that you want to add.
Once adding to context as a sub-context, you can disable Launch method in the inspector. Because maybe you use that context to test something and you don't want to execute launch method in real scene.
In mvc-base there is a editor window that helps to create views inside of Unity-Editor.
Navigate **Tools/MVC/Create View**.

There are some field you need to fill up. The editor shows all Context classes in the project. You need to choose current context related to your view or you can choose Global. The editor window organized folder structure for you. It automatically create view and mediator. You need to bind your views and mediators in your context. If you don't bind, the system will not register your mediator. Also if you choose Test toggle, editor will create your view and meditor in #Unity-Editor flags.
public override void MediationBindings()
{
    base.MediationBindings();

    MediationBinder.Bind<PlayerView>().To<PlayerMediator>();
}
In mediator there are 2 methods called OnRegister and OnRemove. OnRegister methods execute automatically when your mediator registered. OnRemove method execute when your view removed from system.
public class PlayerMediator : IMediator
{
    [Inject] private PlayerView _view { get; set; }

    public void OnRegister()
    {
    }

    public void OnRemove()
    {
    }
}
In mvc-base, mediators are automatically created as a lite-mediator. You can not see them in inspector. If you want to see mediator in inspector, you can inherit from MonoBehaviour. But there is one component called ViewInjector. You can track view status in inspector.
You can test OnRegister and OnRemove methods by clicking buttons from inspector. Also you can disable auto register toggle.
If auto-register is disabled, you can register view like below and you can remove registration by calling RemoveRegistration method.
_playerView.InjectView();
_playerView.RemoveRegistration();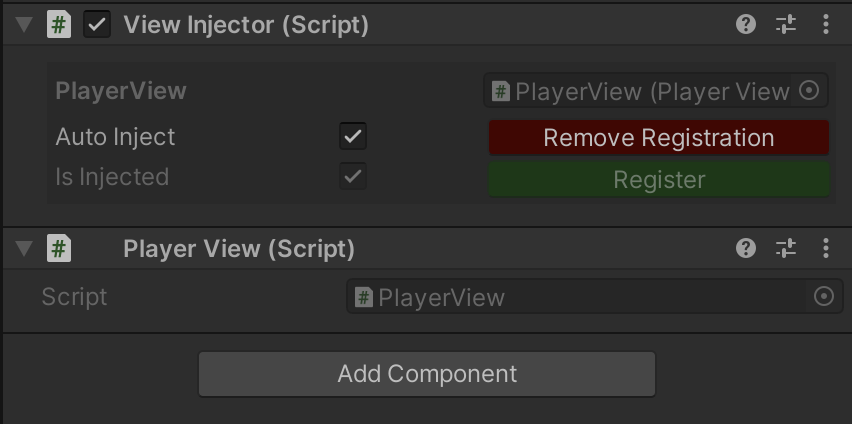
Commands work with signals. You need to bind command or commands
to signal. To execute command, you need to Dispatch signal.
public class PlayerSignals
{
    public Signal InitializePlayer;
}
public override void CommandBindings()
{
base.CommandBindings();
CommandBinder.Bind(_playerSignals.InitializePlayer)
.To<InitializePlayerDataCommand>();
}_playerSignals.InitializePlayer.Dispatch();There are 5 type signals that 4 of them can take parameters.
You can send parameter in Dispatch method.
You can get signal parameters by using [SignalParam] attribute.
public Signal<double> AddCurrency;public class AddCurrencyCommand : Command
{
[Inject] private IPlayerModel _playerModel;
[SignalParam] private double _currencyAmount;
public override void Execute()
{
// Add currency here!
_playerModel.AddCurrency(_currencyAmount);
}
}_playerSignals.AddCurrency.Dispatch(100d);You can use commands in sequence.
And you can pass parameters in sequence commands, using Release method.
If you run Release method, system is going to execute next command
in the sequence. But if you want to use Release method
, you need to call Retain method first.
Retain stops sequence in current command and wait for Release method.
If you want to use Retain and Release methods, the binding sequence type is need to be InSequence.
Otherwise, system will give you some errors.
There are 2 sequence type. Sequence and Parallel. The commands are going to executed one by one, if the binding type is sequence. But in parallel, you can not use retain and release methods.
CommandBinder.Bind(_playerSignals.AddCurrency)
    .To<AddCurrencyCommand>()
    .To<SavePlayerDataCommand>()
    .InSequence();
public class AddCurrencyCommand : Command
{
[Inject] private IPlayerModel _playerModel;
[SignalParam] private double _currencyAmount;
public override void Execute()
{
Retain();
_playerModel.AddCurrency(_currencyAmount);
Release(_playerModel);
}
}
public class SavePlayerDataCommand : Command<IPlayerModel>
{
public override void Execute(IPlayerModel playerModel)
{
playerModel.SaveCurrencyData();
}
}Functions are the best feature in this framework.
They work like commands but as you know, commands can not return values.
Also if you want to execute command, you need to dispatch signal.
But functions work by FunctionProvider.
Functions created for some functions that developer need to execute
wherever he/she wants. It's kinda injectable methods.
There are two kind of functions, first one can return value,
the other one is void function.
If you want to use Functions, you need to Inject IFunctionProvider property.
[Inject] private IFunctionProvider _functionProvider;In this example, as you can see function have 2 generic types. The first type specify the return type of Function. And other types specify Execute method parameter types.
public class CalculateDamageFunction : FunctionReturn<double, string>
{
    [Inject] private IPlayerModel _playerModel;
    [Inject] private IWeaponsModel _weaponsModel;

    public override double Execute(string weaponId)
    {
        var weaponConfigVO = _weaponsModel.GetConfigVO(weaponId);

        var damage = weaponConfigVO.baseDamage * _playerModel.GetPlayerDamageMultiplier();
        return damage;
    }
}
Simple execution for this function like this:
_functionProvider
    .Execute<CalculateDamageFunction>()
    .AddParams(_weaponId)
.SetReturn<double>();In mvc-base there is a ScreenManager to handle UI panels and everything about UI. Every UI popup or screens need to inherit from ScreenView class to integrate into system.
There is a editor window to create Screen.
Navigate Tools/MVC/Create Screen In this editor, there is a list shows all Context files in your project. You can choose the context to organize your file structure. Every context has a uniq folder in the Scripts/Contexts folder. And Views and Screens that you want to create will be created the context folder that you chose.
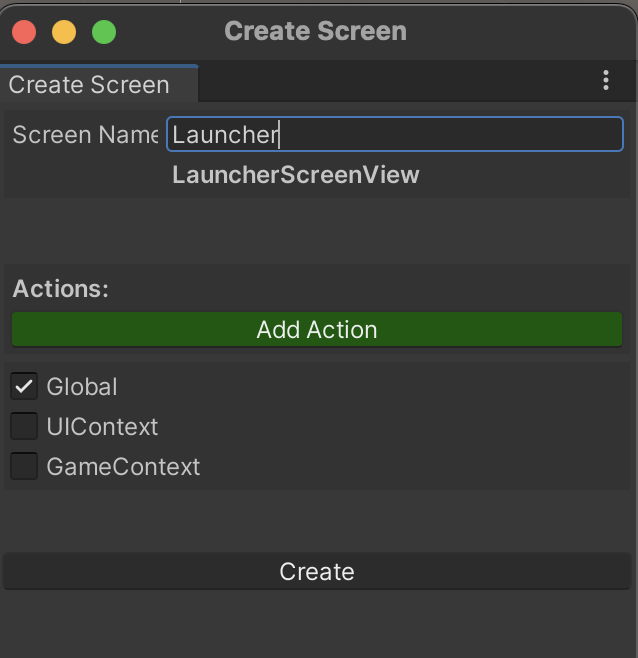
After screen creation, you current scene will be changed by the editor. System automatically create a TestScene, TestContext and TestRoot classes for you. In this test scene you will be able to make your own test. You can bind your classes into TestContext and you can simulate special situations. And editor creates a prefab file that you can design your popup in it. You can find prefab in Resources/Screens folder.

Screens also work the same way as Views. You need to bind them into your context.
MediationBinder.Bind<LauncherScreenView>().To<LauncherScreenMediator>();All screen operations handling by IScreenModel. It already bound in context file so you don't need to bind it again.
_screenModel.NewScreen(GameScreens.LauncherScreen)
    .SetLayer(ScreenLayerIndex.Layer_8)
    .SetParameters(_playerId)
.Show<LauncherScreenView>();_screenModel.HideScreen(_launcherScreen);If you want to use custom animations, please complete list below.
- Toggle on related buttons at screenview.
- Use related virtual methods :
OpeningAnimation,ClosingAnimation - Invoke related action after custom animation is completed :
OpeningAnimationCompleted,ClosingAnimationCompleted
        /// <summary>
        /// It runs if CustomOpeningAnimation is true.
        /// This is the method for handling custom animations.
        /// You can run your timeline animations or you can use tween animations.
        /// </summary>
        protected override void OpeningAnimation()
        {
            // Do some opening animations
            OpeningAnimationCompleted?.Invoke();
        }
/// <summary>
/// It runs if CustomClosingAnimation is true.
/// This is the method for handling custom animations.
/// You can run your timeline animations or you can use tween animations.
/// </summary>
protected override void ClosingAnimation()
{
// Do some closing animations
ClosingAnimationCompleted?.Invoke();
}