MyMoneyUP is a django project for track your assets, and send a email with a report and a newsletter with the progress and performance of that assets. Check in mymoneyup.tech :|
TODO: Put a GIFT of the website view here!
For the correct operation of the project, it is necessary to have installed the following programs:
- Python 3.10 (or higher)
- Pip 22 (package installer for Python)
- Python VENV (virtual environment)
- PostgreSQL (12 or higher, 16 recommended)
Create a virtual environment
python3 -m venv envActivate the virtual environment
source env/bin/activateIf you are on Ubuntu-based distributions, it may ask you to install the following code in the console to be able to use the virtual environment:
sudo apt install python3.10-venvIn case it is not the same code, pay attention to the data provided by the terminal of your editor
Or in Others OS :|
env\Scripts\Activate.ps1 # Windows PowerShell
env\Scripts\Activate.bat # Windows CMD
. env/bin/activate # Mac & Linux?
Install the requirements (don't forget activate the venv!)
pip install -r requirements-dev.txt- Now! Stop! We need create a file .env in the root of project, and add the same variables of .env.example file, click here for check what mean each variable: File of Variables.
Inside our Postgres, it is necessary to create the corresponding database to perform development tests for the code to function:
sudo -u postgres psql # Enter to postgresql
-
CREATE DATABASE mymoneyup;
-
\l # List databases (check if the database was created)
\c mymoneyup # Connect to database (check if can connect)
\dt # List tables (check if the database is empty)
\q # Exit of postgresqlIt will also be necessary to run the populate.sh file, which automatically contains the execution of 'makemigrations' and 'migrate':
For Linux:
sh .github/fordevs/populate_project.sh For Windows:
.github/fordevs/populate_project.ps1python manage.py runserverFor contribute in this project, you need to follow the next steps:
- Fork this repository
- Clone your forked repository
- Create a new branch
- Make your changes
- Run the tests
- Pre-Commit your changes
pre-commit run --all-files- Push your changes to your forked repository
- Make a pull request
Clone repository
git clone THE_URL_OF_YOUR_FORKED_REPOSITORYUpdate repository
git pull origin main # or use fetch and merge :|Create a new branch
git checkout -b name_of_your_new_branchCheck the status of your repository
git status # check the files modified!
git branch # check the branch!
Make your changes
- For your first contribution, you can add your name in the list of collaborators in the file README.md, and then, make a pull request.
Don't forget to make your tests before and after make your changes
pytestAdd your changes
git add . # add all files modified
git add name_of_file # add a specific file
Commit your changes
git commit -m "a message of your commit"Push your changes to your forked repository
git push # fail, because you need to set upstream your branch
git push --set-upstream origin name_of_your_new_branch
Make a pull request
- Go to your forked repository in GitHub, and click in the button "Compare & pull request"
- Add a title and a description of your pull request
- Click in the button "Create pull request"
And that's it, you made your first contribution :D For more changes, you can repeat the steps, don't forget update your repository!
In this file we have the variables of environment, obviously, this file is ignored by git, because we don't want to share our secrets with the world.
- SECRET_KEY = 'a random key for Django security'
- DEBUG = True/False (use True only in development)
- PATH_CONFIG_YAML = 'path of config.yaml file in the root of project'
- DOMAIN_DEV = 'domain of development (in local is "127.0.0.1")'
Remember, first create the database in PostgreSQL, and then, add these variables!
- DBNAME_DEV = 'name of database'
- DBUSER_DEV = 'user of database (default is postgres)'
- DBPASSWORD_DEV = 'password of database'
- DBHOST_DEV = 'host of database (default is localhost)'
- DBPORT_DEV = 'port of database (default is '5432')'
- EMAIL_USER_DEV = 'from (gmail) for send emails'
- EMAIL_PASSWORD_DEV = 'obtained from gmail for not secure apps!'
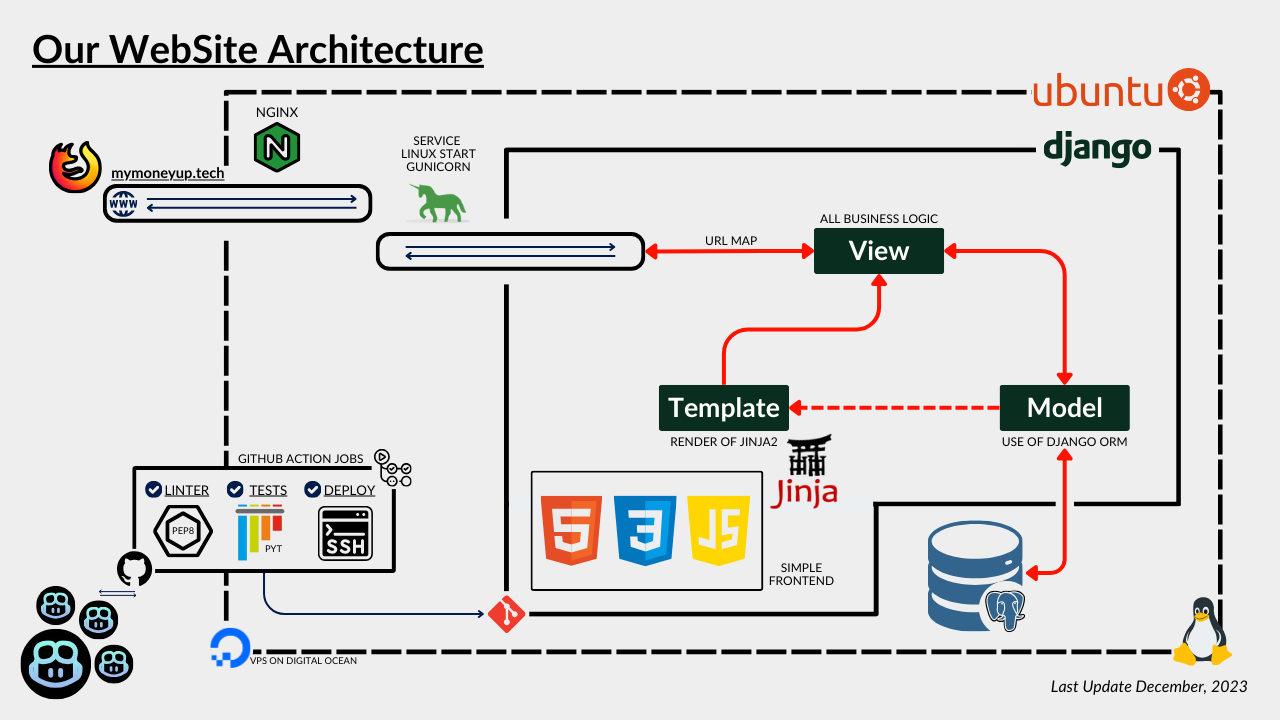
For make a project with a good architecture, we made this diagram, and it's
a responsibility of all developers, follow and maintain the better practices :|

Tree of the project
tree -I "env|.git|.pytest_cache|__pycache__" -laIf you want to delete the data in your database you can run this scripts
- For Linux
sh .github/fordevs/delete_all_data.sh or
bash .github/fordevs/delete_all_data.sh Backup the database Check .github/fordevs/backups/BACKUP.md for more information!
Update the assets from API
python manage.py sync_assetsDon't forget to make your tests before and after make your changes
pytest