photo-recommender
A system that recommends photos based on previous photos you liked.
The system works by looking at your favorites, and the favorites of the photographers who took those photos. The assumption is that your favorites represent the work that you aspire to, and theirs represent the work that they aspire to. Thus, if you like someone's work, you'll really like the work they aspire to.
It scores each photographer who took one of your favorites (your "neighbors") by the number of favorites you have in common with them. The more favorites in common, the closer your tastes are assumed to be aligned. Then, it looks at the set of photos favorited by all of your neighbors, and scores them based on the scores of your neighbors who favorited them. If a photo was favorited by several of your neighbors with whom your tastes are closely aligned, maybe you'll like it too.
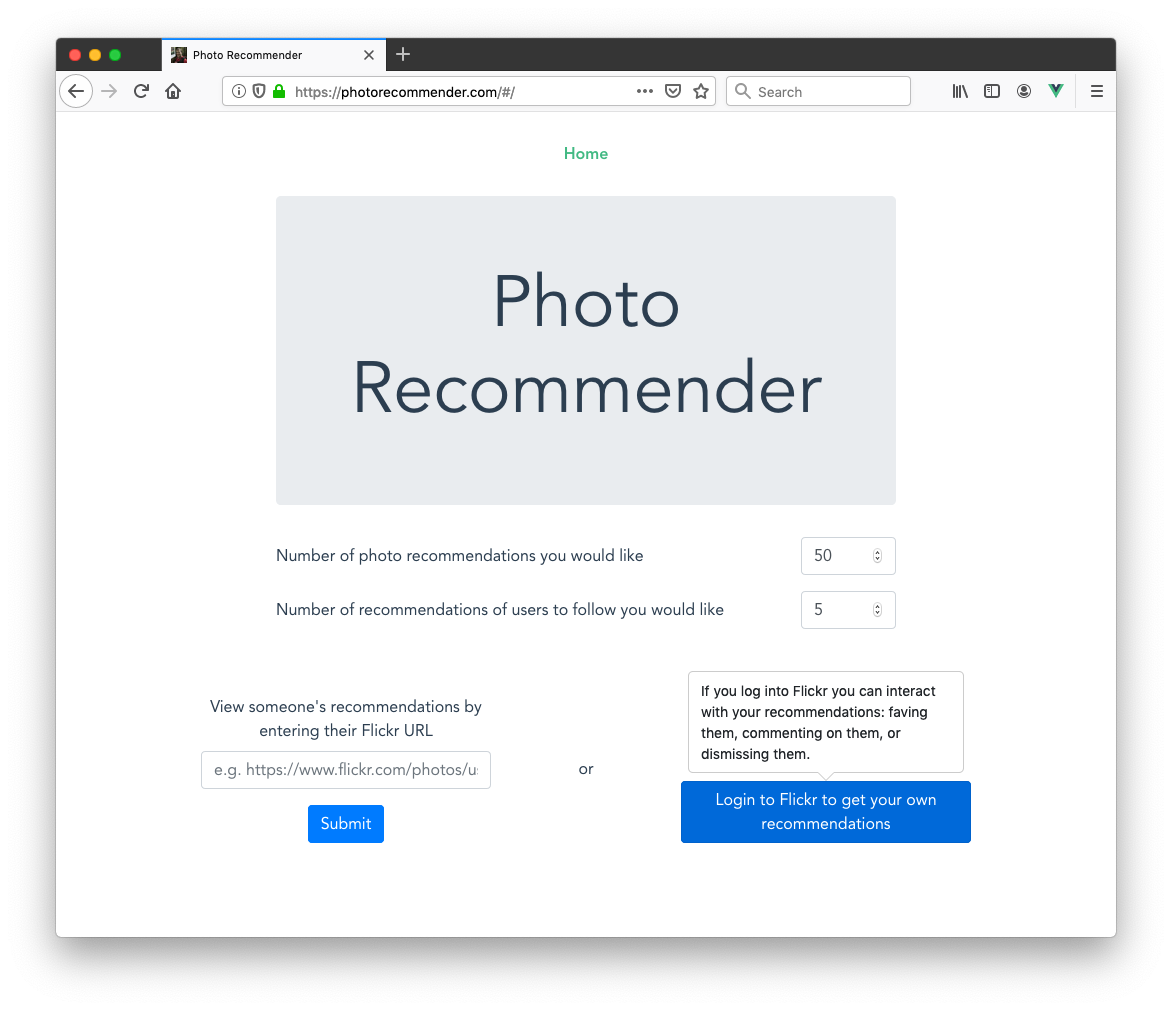
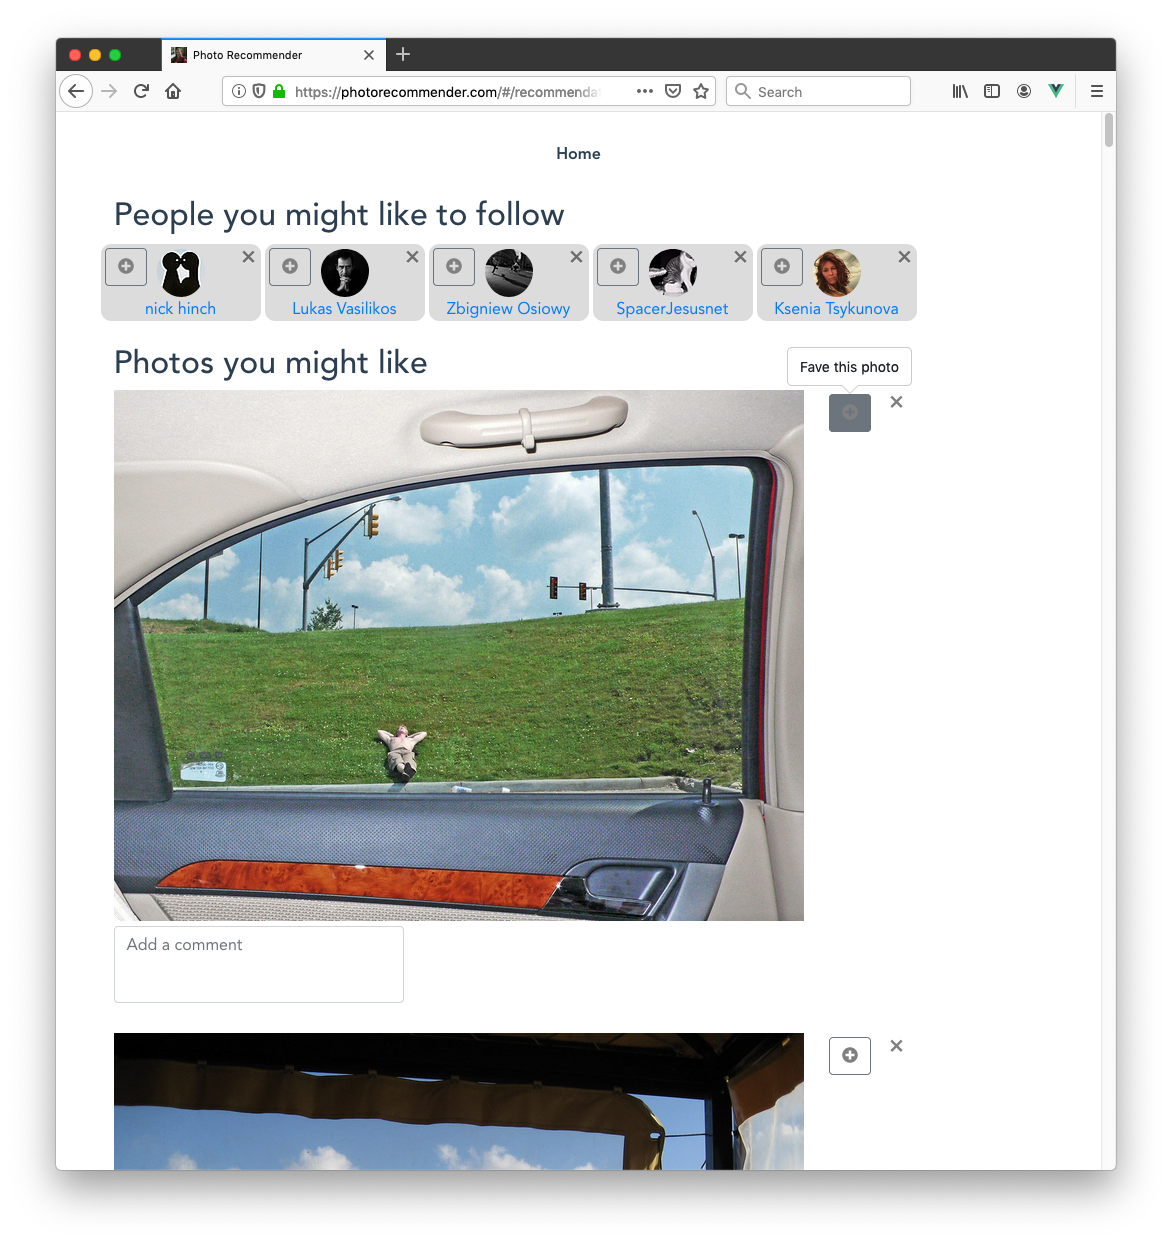
You begin by either logging into Flickr to see your own recommendations, or entering someone's Flickr URL to see theirs. If you log in, you'll be able to fave and comment (and dismiss recommendations you don't like) right from the app. If you view someone else's, you can just see their recommendations but you can't interact with them directly. You can always visit the photo or user pages linked from the app to follow, fave, and comment there.
As you fave photos from within the app, it automatically pulls more data from Flickr based on your new favorites and updates your recommendations in near-realtime. Refresh at any time to see new photos!
The central concept behind these recommendations is based on a system called Flexplore written by Lars Pohlmann back around 2008: https://www.flickr.com/groups/flexplore/
Technical details
The system is designed to be horizontally-scalable and handle many users simultaneously.
It uses:
- Terraform: https://www.terraform.io/
- Elastic Container Service: https://aws.amazon.com/ecs/ and Elastic Container Registry: https://aws.amazon.com/ecr/
- SQS for the initial stab at data injestion, but consider changing to Kafka https://aws.amazon.com/msk/ or Kinesis https://aws.amazon.com/kinesis/
- RDS for the initial stab at data storage, but consider changing to Clickhouse: https://clickhouse.yandex/ or Redshift https://aws.amazon.com/redshift/
- A bunch of Python libs, most notably Flask and gunicorn
- ALB for load balancing: https://aws.amazon.com/elasticloadbalancing/
- S3 for serving static assets, CloudFront for routing requests, and Route53 for DNS
- CloudWatch for metrics & alarms, and a dashboard: https://aws.amazon.com/cloudwatch/
- Random other parts of AWS like ElastiCache, Parameter Store, and Key Management Service
- Vue.js and friends for the frontend: https://vuejs.org/. The frontend project based on the Vue CLI: https://cli.vuejs.org/
The frontend
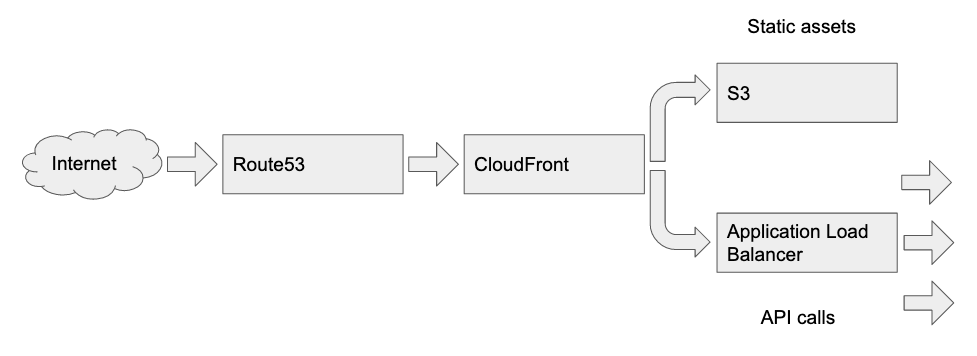
Requests are routed through Route53 to CloudFront, which passes requests for static assets to S3 and API calls to an Application Load Balancer.
The backend
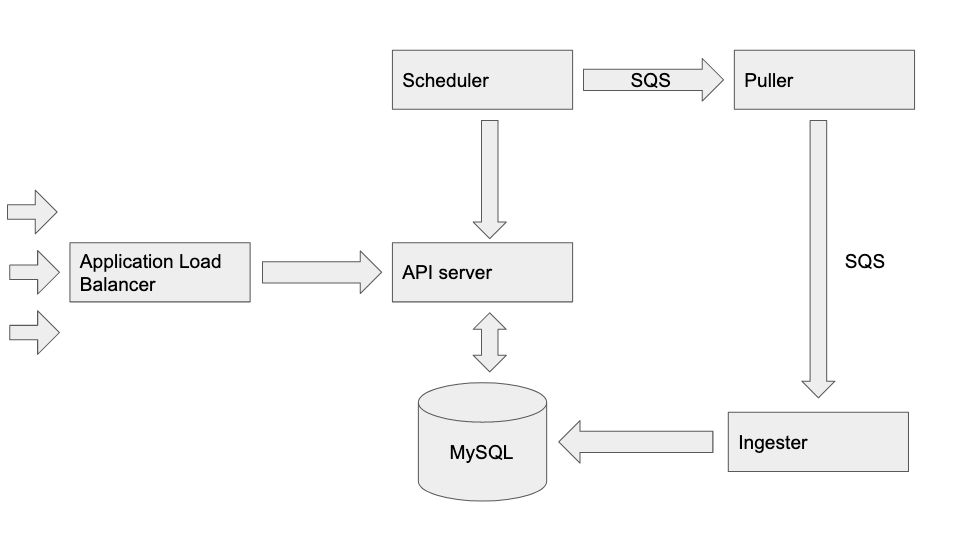
The Application Load Balancer fronts the API server. The API server talks to the database to do several tasks including create users, passing through calls to Flickr, and updating recommendations. The Scheduler periodically talks to the API server to find out when users need their data updated, and when they do it puts requests on the Puller queue. The Puller processes talk to the Flickr API and retrieve favorites and contacts data for individual users, and put this onto the Ingester queue. The Ingester processes batch and write this data to the database.
This explanation is a bit simplified to try and make clear the central operation of the system. For example, when a user faves a photo in the front end, the API server will kick off a request to the Puller so that the new favorites data can be ingested into the database, but this line is omitted for clarity. There are also 2 additional processes, puller-response-reader and ingester-response-reader which read response messages from their namesake processes and update the API server so it can track how many messages have been successfully processed so that the frontend knows when processing is complete for a particular user.
Each process shown here (except the load balancer and database) represents many instances of the same process in different availability zones. We have to make a lot of separate API calls to Flickr for each user who requests their recommendations, so the more we can do in parallel the faster the system will perform.
A note on Flickr
Flickr is the only photo-sharing service I know of where the API exposes lists of images that users favorited. It's the power of this user-created data that makes the recommendations work well, rather than any special magic in the scoring system.
- imgur: looks like it has a similar API, but you have to be logged in as each user in order to see their favorites: https://api.imgur.com/endpoints/account
- Instagram: deprecated their API that allowed access to users' likes on Apr 4 2018: https://www.instagram.com/developer/changelog/
- Smugmug: I don't see any facility for adding favorites or getting them from the API: https://api.smugmug.com/api/v2/doc
- 500px: Their API is no longer free: https://support.500px.com/hc/en-us/articles/360002435653-API- Their API did appear to have the concept of "votes" which might be similar: https://github.com/500px/legacy-api-documentation/tree/master/endpoints/photo
- Spotify: Is it possible to do something here with playlists? https://developer.spotify.com/documentation/web-api/
- YouPic: Seems to have a similar idea with favorites, and a somewhat similar idea with stars, although no public API that I see: https://youpic.com/faq
Instructions
Backend setup: AWS and terraform
First we need to create the infrastructure that the various parts of the system will run on
Install packages
brew install terraform
brew install mysql
Create a fork of this project
In order to create the pipeline used to build this project, you must have your own fork so that you can connect AWS Code Build to your github account to receive events from it. If you don't create this fork, you can't connect Code Build to my github account :)
Create an AWS account
Go to https://aws.amazon.com/ and click on "Create an AWS Account"
Then create an IAM user within that account. This user will need to have various permissions to create different kinds of infrastructure.
Copy the file terraform/aws_credentials.example to terraform/aws_credentials
- Copy the new user's AWS key and secret key into the new file you just created.
Copy the file terraform/terraform.tfvars.example to terraform/terraform.tfvars
- Enter the CIDR of your local machine/network
- Copy your ssh public key (contained in
~/.ssh/id_rsa.pub. If that file doesn't exist, runssh-keygen -t rsato generate it) - Enter the github address of your fork of this project
- Fill in your Flickr API key and secret: https://www.flickr.com/services/apps/create/apply
- Fill in a master password for the various databases
- If you're going to make a prod instance with a real domain, register that domain using AWS's Route53 manually and fill in the domain name in this file.
- Fill in a 256-bit AES encryption key, used to encrypt user session data. Can be obtained from https://www.allkeysgenerator.com/Random/Security-Encryption-Key-Generator.aspx for example
- Fill in a 256-bit AES encryption key, used to encrypt user access tokens in the database. Can be obtained from the same place as the above
We specially encrypt these tokens because in dev we may want to have a small RDS instance for billing purposes that doesn't support encrypting the whole database, but it will still be storing real user access tokens.
You'll be able to ssh into any EC2 instances created with ssh ec2-user@<public ip of instance>
To kick the ECS service, ssh onto the instance you want to kick then type sudo systemctl restart ecs
Run terraform
Note that this will create infrastructure within your AWS account and could result in billing charges from AWS
Note: Run terraform with the environment variable TF_LOG=1 to help debug permissions issues.
For convenience we will create a symlink to our terraform.tfvars file. You can also import these variables from the command line when you run terraform if you prefer.
cd terraform/dev
ln -s ../terraform.tfvars terraform.tfvars
terraform init
terraform plan
terraform apply
You will eventually get an error saying something similar to "Could not find access token for server type github". Go into Code Build in the AWS console, choose each of the projects that was created, and connect them to your github account (where you have the fork of this project). This manual step cannot be automated. See https://docs.aws.amazon.com/codebuild/latest/userguide/sample-github-pull-request.html for more details.
Then run terraform again:
terraform apply
Manual steps to push our docker images to ECR
Install docker: https://docs.docker.com/install/
Install the AWS CLI: https://docs.aws.amazon.com/cli/latest/userguide/install-bundle.html
Copy terraform/aws_credentials to ~/.aws/credentials
Log into your docker repository:
eval "$(aws ecr get-login --no-include-email --region us-west-2)"
Then build and push your image:
docker build -f ../../src/puller-flickr/Dockerfile ../../src
docker images
docker tag <ID of image you just built> <URI of puller-flickr-dev repository in ECR: use AWS console to find>
docker push <URI of puller-flicker-dev repository in ECR>
and again for the next images
docker build -f ../../src/puller-response-reader/Dockerfile ../../src
docker images
docker tag <ID of image you just built> <URI of puller-response-reader-dev repository in ECR: use AWS console to find>
docker push <URI of puller-response-reader-dev repository in ECR>
docker build -f ../../src/ingester-database/Dockerfile ../../src
docker images
docker tag <ID of image you just built> <URI of ingester-database-dev repository in ECR: use AWS console to find>
docker push <URI of ingester-database-dev repository in ECR>
docker build -f ../../src/ingester-response-reader/Dockerfile ../../src
docker images
docker tag <ID of image you just built> <URI of ingester-response-reader-dev repository in ECR: use AWS console to find>
docker push <URI of ingester-response-reader-dev repository in ECR>
docker build -f ../../src/api-server/Dockerfile ../../src
docker images
docker tag <ID of image you just built> <URI of api-server-dev repository in ECR: use AWS console to find>
docker push <URI of api-server-dev repository in ECR>
docker build -f ../../src/scheduler/Dockerfile ../../src
docker images
docker tag <ID of image you just built> <URI of scheduler-dev repository in ECR: use AWS console to find>
docker push <URI of scheduler-dev repository in ECR>
Frontend setup
Install packages
cd ../../frontend
brew install yarn
yarn install
Optional project dashboard
yarn global add @vue/cli
vue ui
Then go to: http://localhost:8000/dashboard
Deploy the frontend
Edit the bucket names in frontend/vue.config.js and frontend/.env.production to be the website s3 bucket(s) created by terraform if necessary. Similarly for the CloudFront IDs.
yarn build --mode development
yarn deploy --mode development
If you have a domain name, then go into route53 and point it at the nameservers listed there. If you don't, then go into CloudFront to get the domain for our distribution.
Point your browser there and enjoy!
To do
- Consider moving MySQL passwords into config files rather than passing on command line from terraform script
- Add tests
- Look into how to lock versions of python dependencies of our dependencies (rather than just the packages we explicitly reference)
- Encrypt SQS messages in prod
- Centralize logging and make it searchable. Maybe like this: https://aws.amazon.com/solutions/centralized-logging/
- Make puller-flickr only get incremental updates since the last time it ran, rather than pulling all data every time
- Make puller-flickr look for deletions of favorites
- Add CSRF token
- Make batch messages for both types of response readers, rather than sending each message individually
- Does this reduce the performance of the system from the users' perspective?
- Have dismissed photos + users feed back into recommendations with negative scores
- Make visualization of how many instances of each process are doing work at a given time - send task ID to metics and get a count of distinct IDs?
- Need to have the browser authenticate with the API server to prevent API abuse of users whose tokens we have
- Same as CSRF prevention or different?
- AWS API Gateway?
- Consider normalizing the
favoritestable by splitting it into a table that just has the photos, and another table of who's favorited them- What is the impact on write throughput of this change?
- Highlight new recommendations by moving them to the top of the list. Maybe have a "first recommended on" field per user, and use that to boost score?
- Investigate why puller-flickr often has such a long max time to process a single user
- Remove already-favorited images from the AddFavorites screen
- Add logout to the navigation bar


