리액트만을 이용해 작성한 form 로직과 react-hook-form을 도입하여 작성한 form 로직을 비교해본다.
- react : 리액트만 이용하여 만든 register form.
- react-hook-form : react-hook-form을 이용하여 만든 register form.
기존에 react로 form태그를 controlled component 방식으로 구현했을때, 텍스트의 유효성을 검사하고 form에서 일어나는 이벤트를 핸들링하기 위한 로직들이 늘어나며 코드가 너무 복잡해졌다. 이를 해결하고자 react-hook-form을 도입하게 되었다. react-hook-form이 어떻게 위와 같은 문제를 해결해주는지 알아보고, 기본적인 문법과 예시를 알아보겠다.
- form을 다루기 위한 로직을 직접 작성하였다.
form을 다루기 위한 로직의 종류들:
- 각각의 input value를 state로 관리하고, 검증하기
- 유효하지 않은 input value에 대한 에러 메시지 관리하기
- 폼 제출 다루기
export default function Form() {
  const [passwordInputValue, setPasswordInputValue] = useState < string > "";
  const [emailInputValue, setEmailInputValue] = useState < string > "";
  const [checkedTerms1, setCheckedTerms1] = useState < boolean > false;
  const [validationMessage, setValidationMessage] = useState < string > "";

  const handleSubmit = () => {
    const result = {
      email: emailInputValue,
      password: passwordInputValue,
    };

    alert("submit completed!" + JSON.stringify(result));
  };

  const emailValidator = (value: string) => {
    const regex = /^[\w\W-\.]+@([\w-]+\.)+[\w-]{2,4}$/;

    if (value.length === 0) {
      setValidationMessage("이메일은 필수입니다");
    } else {
      if (regex.test(value)) {
        setValidationMessage("");
      } else {
        setValidationMessage("유효한 이메일 양식이 아닙니다");
      }
    }
  };

  const passwordValidator = (value: string) => {
    const regex = /^(?=.*[A-Za-z])(?=.*\d)(?=.*[@$!%*#?&_])[\w\W]{8,}$/;
    return regex.test(value) || "8자리 이상의 영문, 숫자, 특수문자";
  };

  const handleEmailInputChange = (e: React.FormEvent<HTMLInputElement>) => {
    setEmailInputValue(e.currentTarget.value);
    emailValidator(e.currentTarget.value);
  };
}
(아주 간단한 email, password, 약관동의 check box를 입력받는 예제에서 필요한 로직이다. 더 복잡한 폼이라면 더 많은 로직이 필요할 것이다.)
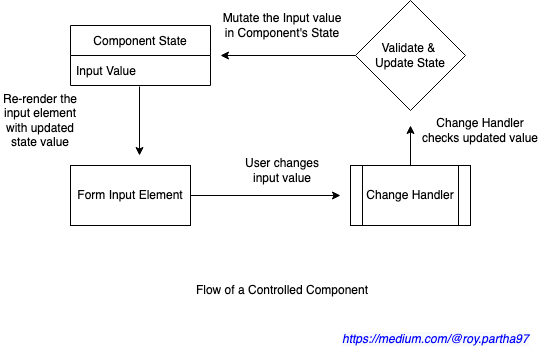
- 제어컴포넌트를 이용해 관리해 타이핑이 일어날 때마다(onChange이벤트가 호출될 때마다) 전체 form컴포넌트가 리렌더링된다.
controlled, uncontrolled component에 대한 좀 더 자세한 설명은 여기를 참고
uncontrolled component를 베이스로 form을 핸들링하는 라이브러리로 최소한의 리렌더링을 통한 높은 성능을 제공한다.
위에서 uncontrolled로 작성했던 코드를 React Hook Form을 사용해 작성해보았다. 우선 email input 한 가지 요소만 react hook form을 도입해본다면 기존 로직을 다음과 같이 변형할 수 있다.
기존 로직)
export default From = () => {
  const [emailInputValue, setEmailInputValue] = useState < string > "";
  const [validationMessage, setValidationMessage] = useState < string > "";
  const emailValidator = (value: string) => {
    const regex = /^[\w\W-\.]+@([\w-]+\.)+[\w-]{2,4}$/;

    if (value.length === 0) {
      setValidationMessage("이메일은 필수입니다");
    } else {
      if (regex.test(value)) {
        setValidationMessage("");
      } else {
        setValidationMessage("유효한 이메일 양식이 아닙니다");
      }
    }
  };
  const handleEmailInputChange = (e: React.FormEvent<HTMLInputElement>) => {
    setEmailInputValue(e.currentTarget.value);
    emailValidator(e.currentTarget.value);
  };

  return (
    <form onSubmit={handleSubmit} className="register-form">
      <div className="form-item">
        <label htmlFor="email">Email: </label>
        <input
          id="email"
          type="text"
          value={emailInputValue}
          onChange={handleEmailInputChange}
          autoComplete="off"
          pattern="[A-Za-z-\.]+@([a-z-]+\.)+[\w-]{2,4}"
          required
        />
        <p className="error-message">이메일을 확인해주세요</p>
      </div>
    </form>
  );
};
react-hook-form)
export default Form = () => {
  const {
    register,
    handleSubmit,
    formState: { errors },
  } = useForm<FormValues>();

  return(
    <form onSubmit={handleSubmit(onSubmit)} className="register-form">
      <div className="form-item">
        <label htmlFor="email">Email: </label>
        <input
          type="text"
          {...register("email", {
            required: {
              value: true,
              message: "이메일은 필수입니다",
            },
            pattern: {
              value: /^[A-Za-z-.]+@([a-z-]+.)+[w-]{2,4}/i,
              message: "유효한 이메일 양식이 아닙니다",
            },
          })}
        />
        <p className="error-message">{errors?.email?.message}</p>
      </div>
    </form>
  );
};
useForm hook으로부터나온 register, handleSubmit, formState등의 메서드를 통해 input 값을 검증하고, 폼 이벤트를 핸들링할 수 있다.
- useForm이 제공하는 기능들
- register: react-hook-form의 가장 주요한 기능이라고 볼 수 있다. input 또는 select 태그 안에서 spread 구문으로 작성되어 기본 HTML input/select 태그를 확장해주는 역할을 한다. 각각의 form 요소와 해당 요소의 검증규칙을 등록할 수 있다.
- watch: 특정한 요소의 input value를 얻을 수 있다. 이 메서드를 통해 특정한 input 값의 상태에 따라 조건부로 렌더링을 시켜주어야할 때 유용하게 사용된다.
- handleSubmit: 파리미터로 두 개의 콜백함수를 받는데, 첫 번째 함수는 폼이 성공적으로 제출되었을 때 실행되는 콜백함수이고, 두 번째 콜백함수는 폼이 검증 규칙을 통과하지 못했을 때 실행되는 콜백함수이다.
- 코드가 간결해짐 & 코드 길이 축소
기존 로직에서 4개의 state, 5개의 함수가 필요했던 것에 비해 react-hook-form을 도입한 로직에서는 useForm 선언, onSubmit함수 선언만으로 충분했다. (물론 후자의 경우 렌더링 로직이 추가되었다)
코드의 길이도 축소되었다.
- 기존 로직: 약 50줄
- react-hook-form: 약 40줄
이것저것 생략된 코드라 정확한 비교는 아니긴하지만, 확실히 코드량이 줄었다. 물론! 코드량이 줄었다고 해서 무조건 좋아졌다라고 하긴 어렵다.
- 선언적인 코드
내가 생각하는 react-hook-form의 큰 장점이다. react-hook-form이 제공해주는 register메서드를 통해 input의 값을 검증하는 로직에서 각각의 규칙에 대한 error message를 선언적으로, 그리고 이해하기 쉽게 작성할 수 있게 되었다.
- 성능 개선
react-hook-form 공식문서에서 제공해주는 정보에 따르면 uncontrolled component 방식을 사용하는 라이브러리여서 그런지 성능면에서 뛰어나다고 한다. (다만, 간단한 폼의 경우에는 성능 차이가 크지 않을 것 같다.)
두 가지 버전에 대한 코드는 이 레포지토리에서 확인할 수 있다.(react / react-hook-form branch에 각각의 코드를 작성해놓았다.)
react-hook-form은 uncontrolled 방식으로 form을 정의하여 각각의 input을 isolate하게 렌더링시켜줌으로써 높은 성능을 제공하고, 여러 추상화 메서드들을 이용해 선언적이고 가독성 높은 방식으로 form을 다룰 수 있게 해준다.
form을 핸들링하는 로직을 좀 더 간결하게 작성하고자할 때, 성능면에서 더 나은 방식을 선택하고자할 때 고려해보면 좋은 라이브러리라고 생각한다. (경우에 따라서 controlled component를 사용해야하는 경우 controlled componenet방식으로도 폼을 작성할 수 있는 기능을 제공하니 상황에 따라 유연하게 사용할 수도 있겠다.)