This .Net 4.5 assembly is a collection of helpers for the Asp.Net 4.5 identity model that add support for common Azure usage scenarios. Currently included are:
-
Use Azure Active Directory groups as roles in ASP.Net authentication with the Authorize attribute
-
Use Azure Table Storage as a store for identity information with the new OAuth implementation
The assembly is available as a NuGet package named ASP.Net 4.5 Azure Identity Helpers.
In addition to the guidance below further background can be found on my blog Azure From The Trenches.
Although it’s simple to use Azure Active Directory for authentication (see here) group memberships are not exposed as claims and so if you try and use an authorization attribute with a role (for example [Authorize(Roles=“Operator”)]) you’ll get an UnauthorizedException.
To enable this functionality a claims authentication manager (called GraphRoleClaimsAuthenticationManager) is included in this assembly that, on a successful authentication, uses the Azure AD Graph API to query the directory for group memberships and creates role claims for them.
Before you can use the claims manager however you need to configure the Azure Active Directory your application is using for authentication to support read access of the graph data.
Before commencing with the below it’s worth ensuring that your web site does already authenticate against Azure Active Directory without roles just to be sure that you’ve got the basics configured correctly.
Assuming you’ve already got a website authenticating against an Azure Active Directory then you should see it listed in the Applications tab of your Active Directory in the Azure Management Portal. You can see mine listed below:
Select your application and you’ll be taken to the application configuration page whish should look something like the below:
To configure your app you need to tap the Manage Access button down the bottom. Do that and then select Change the directory access for this app. Then on the next page select Single sign on, read directory data.
Azure will whirr away for a short while changing settings on your AD and when it’s done you need to go to the Configure tab (click configure at the top of the page as shown in the image above). In here you need to create a key that your application can use to authenticate with the Graph API and read AD data.
To do this scroll down to the Keys section and click the drop down and choose whether you want a 1 year or 2 year key. In the screenshot below I’ve picked 1 year.
After you’ve done this click save in the toolbar at the bottom and you’ll see your key.
We’ve just about done in the Azure Management Portal all you need to do before you leave is take note of the Client ID and the Key as shown in the image below (mine are blurred out!).
For the rest of this walkthrough I’m assuming you’re configuring a web site rather than an Azure Web Role but the claims manager uses the Azure Configuration Manager so if you are using a Web Role you can simply put the settings in your .cscfg and .csdef files.
Firstly add the NuGet package to your project which you can do in the Package Manager GUI or in the console:
Install-Package accidentalfish.aspnet.identity.azure
Then you need to edit your web.config file with a couple of app settings. For this you need your Client ID and Key that you noted down earlier.
The RoleClaimIssuer is optional but is the claim issuer you want inserted into the claim, if you leave this out the issuer will be set as DefaultRoleIssuer.
The final step you need to take is to tell the ASP.Net identity model about the claims manager. To do this locate the <system.identitymodel> section of the web.config file and insert the line highlighted below at the bottom just before the closing element:
The line to paste is:
<claimsAuthenticationManager type="AccidentalFish.AspNet.Identity.Azure.GraphRoleClaimsAuthenticationManager, AccidentalFish.AspNet.Identity.Azure"/>
With that you’re done and you can use the groups you’ve configured in the Azure AD as roles with the [Authorize(Roles="...")] attribute.
The new identity model in ASP.Net 4.5 provides a pretty solid seperation between the business logic of identity management and the storage of identity information via a set of interfaces however it only ships with an implementation for Entity Framework (compatible with SQL Server and SQL Database).
The AccidentalFish.AspNet.Identity.Azure assembly contains the necessary implementation of these interfaces against Azure Table Storage however the ASP.Net New Project templates contain code that is needlessly tied to the Entity Framework so there are a few steps you need to take to swap out the Entity Framework implementation.
Firstly add the NuGet package to your project which you can do in the Package Manager GUI or in the console:
Install-Package accidentalfish.aspnet.identity.azure
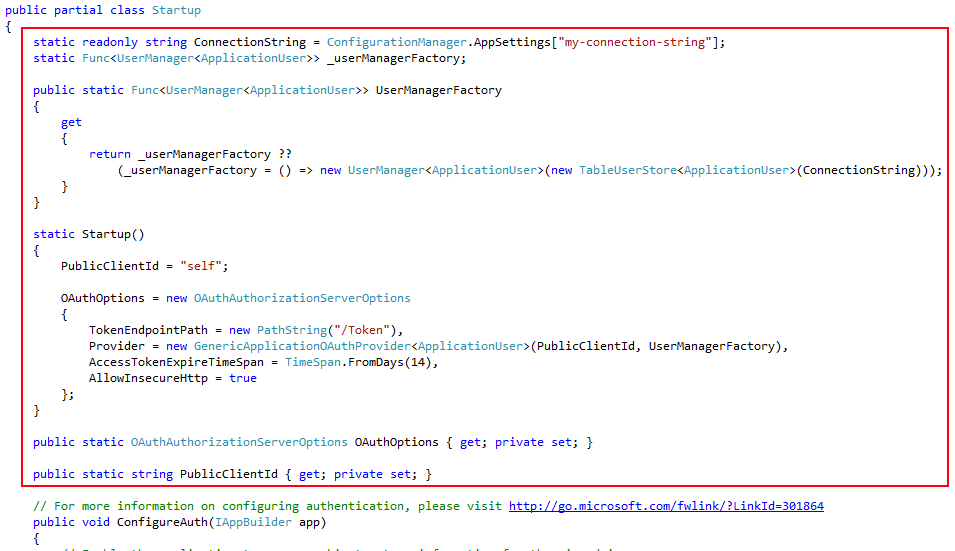
Now open the Startup.Auth.cs file and make the three changes shown below towards the top of the file:
The above assumes that you have a storage account connection string contained in an app setting called my-connection-string. Change this to get, or construct, the storage account connection string as pertinent to your application.
Now open the AccountController.cs file. This contains references to the Entity Framework identity provider types IdentityUser and IdentityUserLogin and you need to change them to TableUser and TableUserLogin - either do a search and replace or add a pair of aliases to the top and comment out the namespace reference as shown below:
That’s all the changes complete and with the approach taken above the new identity provider will function just like the Entity Framework version creating tables in your storage account when necessary.
Firstly add the NuGet package to your project which you can do in the Package Manager GUI or in the console:
Install-Package accidentalfish.aspnet.identity.azure
You may need to update various NuGet packages, depeding on the MVC template you are starting from. If you get ambiguous reference errors or invalid reference versions, that would be the first thing to try.
Now open the Startup.Auth.cs file and add the block of code shown to the top of the class:
Next, open the IdentityModels.cs file and replace the entire file with the code below (make sure to use your project's namespace instead of the example namespace):
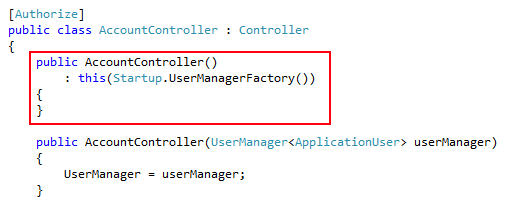
Then, open the AccountController.cs file and replace the constructor with the code below:
Finally, add the table storage connection string to your web.config file. The following entry is appropriate for development:
You will need to remove any using statement that references EntityFramework so that the application can compile and run.
Copyright (C) 2013 Accidental Fish Ltd.
Permission is hereby granted, free of charge, to any person obtaining a copy of this software and associated documentation files (the "Software"), to deal in the Software without restriction, including without limitation the rights to use, copy, modify, merge, publish, distribute, sublicense, and/or sell copies of the Software, and to permit persons to whom the Software is furnished to do so, subject to the following conditions:
The above copyright notice and this permission notice shall be included in all copies or substantial portions of the Software.
THE SOFTWARE IS PROVIDED "AS IS", WITHOUT WARRANTY OF ANY KIND, EXPRESS OR IMPLIED, INCLUDING BUT NOT LIMITED TO THE WARRANTIES OF MERCHANTABILITY, FITNESS FOR A PARTICULAR PURPOSE AND NONINFRINGEMENT. IN NO EVENT SHALL THE AUTHORS OR COPYRIGHT HOLDERS BE LIABLE FOR ANY CLAIM, DAMAGES OR OTHER LIABILITY, WHETHER IN AN ACTION OF CONTRACT, TORT OR OTHERWISE, ARISING FROM, OUT OF OR IN CONNECTION WITH THE SOFTWARE OR THE USE OR OTHER DEALINGS IN THE SOFTWARE.


