This script allows you to use footnotes within your Ghost Blog. You don't need to write the whole blog post in markdown. Just follow the steps below to get started.
Hint: Does not work in some older browsers caused by the childNodes.forEach() method
You can include the script in your Theme (preferred) or via code injection.
-
Include the script in your theme This example utilizes a Ghost handlebars helper to ensure the script is loaded only on posts with the private tag "#fn-helper" activated. The code below must be implemented between
{{#post}}and{{/post}}. If you use the casper-theme take a look at thepost.hbsfile.
-
Add a DOM element ID for the helper The helper if started parses the content of a configured DOM element of the page. You have to guarantee that possible footnotes can be found inside that DOM element. In the
post.hbsfile of the Ghost default theme named "Casper" there is this code block:If you wrote a blog post and used some footnotes they will be displayed inside this
<section>. The fn-helper needs to know this section. All you have to do is give this section an ID with the value offootnoteHelper. It's easy as that! The result should look something like this:Important: Upload your theme and restart Ghost!
-
Create footnotes in your text The script and your theme are ready. Now write your text and create some footnotes like
[1].
Use the Ghost admin editor: Click wherever you wanna place a footnote. Now type
^followed by[1]followed by another^. You can change the character inside the[]. Obviously you should increment numbers. It's best practice. If you wanna use other characters for the footnotes like(1)or{1}take a look at the scripts code and change the values of the variablesfn_charLeftandfn_charRight. The "jump back to footnote inside text" icon is changable, too. Just paste in another value for the variablefn_backSymbol.Don't forget: Footnotes like
[1]must be a link with a specific target. Within your Ghost editor mark the 3 characters and set the link target to#footnote-1. Whatever is inside the square brackets should be the link fronted with#footnote-. (This is an example. You can set you own links ;) )
-
Use HTML card for footnote section In order to display footnotes at the bottom of a post, we have to implement some custom HTML. Create a HTML-card (inside the Ghost editor) at the end of a post with the following code:
<hr class="footnotes-sep">
<section class="footnotes">
	<ol id="footnoteList" class="footnotes-list">
		<li id="footnote-1" class="footnote-item">
			<p>Footnotes are nice. Especially with <a href="https://ghost.org">Ghost</a> </p>
		</li>
		<li id="footnote-2" class="footnote-item">
			<p>Hmm. Really cool, isn't it? </p>
		</li>
		<li id="footnote-3" class="footnote-item">
			<p>Some other reference for your readers. </p>
		</li>
	</ol>
</section>
Example HTML card:
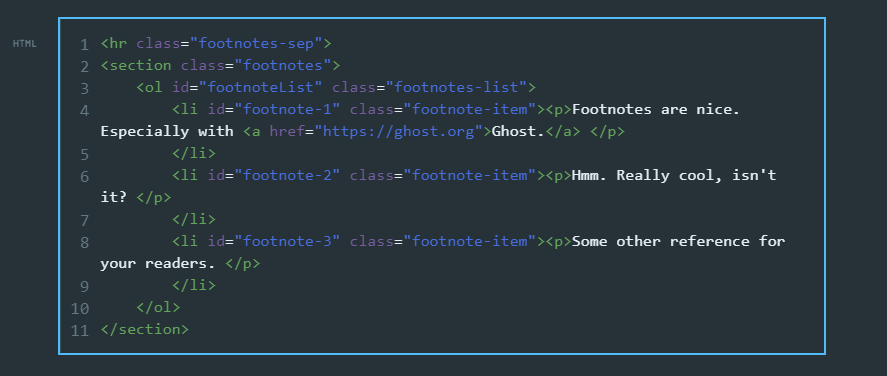 As you can see this is an ordered list and each list item
 <li>represents a footnote.Things you must change accordingly:
-
Update the
id=""of ech list item. The value must be the link of the footnote you created inside your text (see 3.). Example: If you set the link of your[1]to#footnote-1update the id toid="footnote-1" -
Enter all content of the footnote between
<p>and</p>. You can implement links with an a-tag as well. See embedded code above for example. Please include a space before the closing p-tag, like:<p>This is my footnote. </p>. The scipt will append an icon right behind the footnote text. Your readers can klick the icon and their browser will jump to the footnote inside your text. From there they can jump back by klicking the footnote[1].
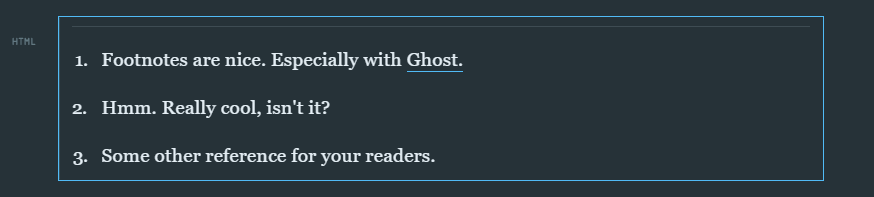
Your custom HTML inside the Ghost editor will not look like at your post page. So don't be confused. The editor will display something like:
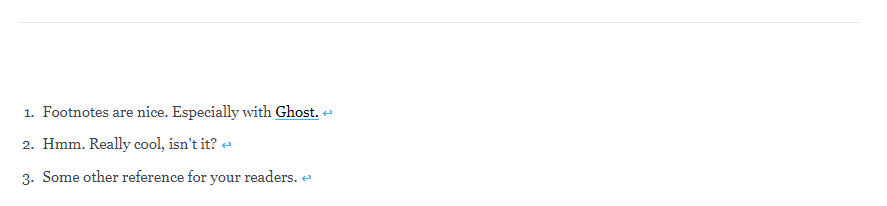
But if you visit the publicly available page the footnotes section looks pretty nice: (Obviously the style can change if you use another theme than casper)
-
- Activate the footnote helper script
With Ghost you can create tags for your posts. In order to use the fn-helper script you have to add the private tag
#fn-helperto every post with footnotes.- Create a private tag with the name
#fn-helperinside your Ghost admin interface. - Add this private tag to every post with footnotes (can be done easily within the Ghost admin interface)
- That's it. Keep in mind: The fn-helper manipulates some
id=""fields of the footnotes elements. Therefore your readers can click a footnote like[1]inside your text to jump to the explanation at the end of your post. And they can jump back by clicking the↩︎icon.
- Create a private tag with the name