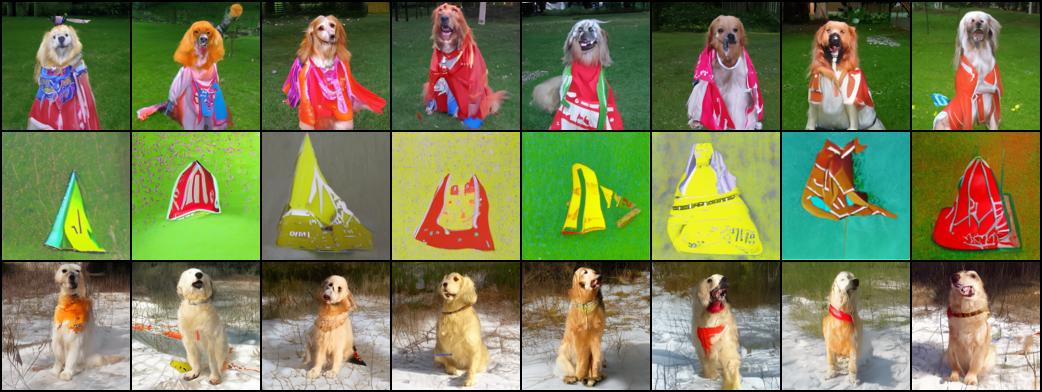
This is the codebase for High Fidelity Visualization of What Your Self-Supervised Representation Knows About
This repo is a fork of the github repository guided-diffusion which is the codebase for Diffusion Models Beat GANS on Image Synthesis.
Instead of using the gradient of a classifier to guide the sampling, our model uses the features of supervised or self-supervised models as conditioning.
Create a new conda environement
conda create --name RCDM python=3.9
conda activate RCDM
Clone this repository, navigate to it, then run:
pip install -e .
All the training and sampling scripts are located in scripts/. The SSL models that we used to compute the representations from are defined in the file ./guided_diffusion_rcdm/get_ssl_models.py. The links of the pretrained RCDM models are located in ./guided_diffusion/get_rcdm_models.py.
All model availables through this repository were trained on a resolution of 128x128 pixels. In order to use the pretrained models, you'll need to export these following FLAGS:
export MODEL_FLAGS_128="--attention_resolutions 32,16,8 --class_cond False --diffusion_steps 1000 --image_size 128 --learn_sigma True --noise_schedule linear --num_channels 256 --num_heads 4 --num_res_blocks 2 --resblock_updown True --use_fp16 False --use_scale_shift_norm True"
export TRAIN_FLAGS="--lr 1e-4 --batch_size 8"
If you don't want to use the pretrained models, you can use the FLAGS used in the original github repository guided-diffusion to train RCDM in 64x64 or 256x256.
We use submitit to run the distributed training accross several nodes. You'll probably need to adapt the file run_with_submitit.py depending on your cluster configuration. The command below run an RCDM training over the features extracted from Dino (you can change the feature extractor by changing the --type_model argument or by updating the file ./guided_diffusion/get_ssl_models.py).
python run_with_submitit.py --nodes 4 --ngpus 8 --use_volta32 $MODEL_FLAGS_128 $TRAIN_FLAGS --feat_cond --data_dir DATASET_DIR --type_model dino --out_dir SAVE_DIR
To use any of the following pretrained models, you will need to install vissl:
pip install vissl
This repository comes with a set of model that were pretrained on ImageNet (please note that even if the code is released under the MIT licence, the weights of the model are only available under the CC-BY-NC license). The models will be automatically downloaded when using any of the sampling scripts. However, you can also download them manually from the following links:
| Model | SSL Model | Type (Trunk/Head) | url |
|---|---|---|---|
| RCDM | SimCLR | Trunk | model |
| RCDM | SimCLR | Head | model |
| RCDM | Barlow Twins | Trunk | model |
| RCDM | Barlow Twins | Head | model |
| RCDM | VICReg | Trunk | model |
| RCDM | VICReg | Head | model |
| RCDM | Dino | Trunk | model |
| RCDM | Dino | Head | model |
| RCDM | Supervised | N/A | model |
To sample from these models, you can use the image_sample.py script. You need to replace DATA_PATH by the directory in which the images that will be used to compute the ssl representations are saved. The num_images parameters indicates how many images in the directory DATA_PATH you want to use. The type_model parameters indicates which SSL model to use as feature extractor. You can add --model_path to specify which RCDM checkpoints to use (Otherwise, one of the pretrained model will be downloaded automatically). You can use the argument --use_head to use the head instead of the trunk as feature extrator. The command bellow will generated 16 samples, with 8 samples par images in the DATA_PATH directory by using the representation given by Barlow Twins.
python scripts/image_sample.py $MODEL_FLAGS_128 --batch_size 8 --num_images 2 --timestep_respacing 100 --data_dir DATA_PATH --type_model barlow
To interpolate between the representations of two images, you can use the image_sample_interpolation.py script.
Replace MODEL_PATH by the relevant model checkpoint (or leave blank to use the pretrained model) and FIRST_IMAGE_PATH/SECOND_IMAGE_PATH by the path of the images you want to interpolate in the ssl representation space.
python scripts/image_sample_interpolation.py $MODEL_FLAGS_128 --batch_size 8 --timestep_respacing 100 --type_model barlow --first_image_path FIRST_IMAGE_PATH --second_image_path SECOND_IMAGE_PATH
To manipulate representations, you can use the image_sample_manipulation.py script.
Replace MODEL_PATH by the relevant model checkpoint, IMAGE_PATH by the path of the images you want to extract the attributes from, NN_PATH by the folder's path of the images in which to find the nearest neigbors and TARGET_PATH by the path of the image on which to apply the attribute on.
python scripts/image_sample_manipulation.py $MODEL_FLAGS_128 --batch_size 8 --timestep_respacing 100 --dist --type_model simclr --image_path IMAGE_PATH --folder_nn_path NN_PATH --image_target_path TARGET_PATH
If you want to reproduce the image above, just use:
python scripts/image_sample_manipulation.py $MODEL_FLAGS_128 --batch_size 8 --timestep_respacing 100 --type_model simclr --image_path IMAGENET_PATH/val/n02099601/ILSVRC2012_val_00027833.JPEG --folder_nn_path IMAGENET_PATH/val/n02099601/ --image_target_path IMAGENET_PATH/val/n02099601/ILSVRC2012_val_00001123.JPEG
The code is distributed under the MIT license. However the weights of the pretrained models that are available for download are under the CC-BY-NC license and should not be use for commercial purpose.
@article{
      bordes2022high,
      title={High Fidelity Visualization of What Your Self-Supervised Representation Knows About},
      author={Florian Bordes and Randall Balestriero and Pascal Vincent},
      journal={Transactions on Machine Learning Research},
      year={2022},
      url={https://openreview.net/forum?id=urfWb7VjmL},
      note={}
}


