SS Chrome Extension
Developed by world's [0] FrontEnd Developer : ME 😝
Introduction
Making a chrome extension was one of the most ambigous things for me and really want to develop one, but now it is easier than adding a click event in Javascript 😂
really looks like making a web page consiting of HTML , CSS , JavaScript
What is a chrome extension?
An extension is a small program that takes advantage of the web technologies that allow people to customize the web experience. Most of the time, an extension is built on top of JavaScript or HTML.
Now Let's make SS chrome extension !
1.Create the Manifest
The manifest file is the heart of a chrome extension. In our folder, we'll need to create a manifest.json file. Include this in your manifest file.
{
    "name": "Screenshot extension",
    "version": "1.0",
    "description": "Building a screenshot taking extension",
    "manifest_version": 2
}
We can now add the extension to our Chrome extensions tab after entering these keys. But first, let's figure out what each line means.
name: The name of our extension that is visible to users, such as Grammarly, honey, and so on.
version: Version denotes the extension's version number; we'll start with 1.0. description: Your extension's description is what it says on the tin.
version manifest: Developers should use the manifest version key in their manifests to declare which version of the manifest specification their package targets. In Chrome 18, the Manifest version 1 was deprecated. As a result, we'll be utilising version 2 of the manifest.
2.Testing it in chrome
-
In development mode, the directory containing the manifest file can now be added as an extension in its present state.
-
Navigate to chrome://extensions to see the Extension Management page.
-
The Extension Management page may also be accessed by hovering over More Tools, then selecting Extensions from the Chrome menu. By pressing the toggle switch adjacent to Developer mode
-
Select the extension directory by clicking the LOAD UNPACKED button.
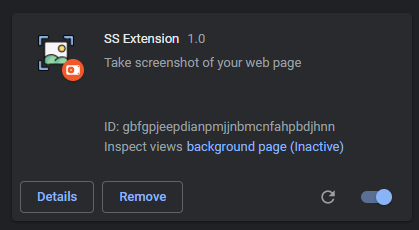
Boom! The extension has been deployed successfully. Because no icons were specified in the manifest, the extension will be given a generic toolbar icon.
3.Adding more features in manifest.json
Let's now add some features to our extension. We'll begin by placing a background script in our folder and adding some other necessary elements to our manifest file, such as icons and permissions.
{
    "name": "Screenshot extension",
    "version": "1.0",
    "description": "Building a screenshot taking extension",
    "background": {
        "scripts": ["background.js"],
        "persistent": false
    },
    "browser_action": {
        "default_icon": "yourImgSrcHere",
        "default_title": "Take a screen shot!"
    },
    "icons": {
        "16": "images/yourImgSrcHere",
        "32": "images/yourImgSrcHere",
        "64": "images/yourImgSrcHere",
        "128": "images/yourImgSrcHere"
    },
    "permissions": [
        "activeTab"
    ],
    "manifest_version": 2,
}-
background: Adding a background script to the manifest instructs the extension which file to refer to and how to act with that file. The extension is now aware that it contains a non-persistent background script, and it will search the registered file for relevant events to listen for. -
Persistentwill be set to false. The only time a background script should be kept active indefinitely is if the extension utilises Chrome. To prevent or alter network requests, use the webRequest API. Non-persistent background pages are incompatible with the webRequest API. -
browser_actionsare used to add icons to the main Google Chrome toolbar, which is located to the right of the address bar. A browser action can contain a tooltip, a badge, and a popup in addition to its symbol. The HTML pages are contained in the popup. For the time being, we'll stick with symbol and title. -
icons: It defines the size of our extension's icons. -
permissions: If an API needs you to declare permission in the manifest, it will explain you how to do so in its documentation. Each permission can be one of a list of known strings (for example, "geolocation") or a match pattern that grants access to one or more hosts.The activeTabpermission grants an extension temporary access to the currently active tab when the user engages the extension - for example, by clicking its browser action," according to the activeTab description. The user's access to the tab is granted only while they are on that page, and it is removed when they browse away or shut the tab.
4.background.js
Our manifest file is now complete. Let's look at the background.js file now.
let id = 100;
chrome.browserAction.onClicked.addListener(() => {
chrome.tabs.captureVisibleTab((screenshotUrl) => {
    const viewTabUrl = chrome.extension.getURL('screenshot.html?id=' + id++)
    let targetId = null;
chrome.tabs.onUpdated.addListener(function listener(tabId,     changedProps) {
if (tabId != targetId || changedProps.status != "complete")
        return;
chrome.tabs.onUpdated.removeListener(listener);
const views = chrome.extension.getViews();
      for (let i = 0; i < views.length; i++) {
        let view = views[i];
        if (view.location.href == viewTabUrl) {
          view.setScreenshotUrl(screenshotUrl);
          break;
        }
      }
    });
chrome.tabs.create({url: viewTabUrl}, (tab) => {
      targetId = tab.id;
    });
  });
});-
Let's have a look at this file one by one. First, we add a listener to our icon on the right of the address bar, then use the
chrome tabs APIto capture thevisible taband use thecaptureVisibleTabfunction. We'll utilise the data URL returned by this function to display the picture in the next tab. -
Then we'll make a tab URL to open the URL in the next tab, and we'll attach an id to the end of it so that each screenshot has its own page and doesn't clash with the others. We did this by setting an id variable to 100, which would keep
increasingwith each click. -
We open the tab URL by sending the URL that we just constructed to the
chrome tabs createfunction, and we save thetab idthat we obtain from this method in thetargetIdvariable when the tab is opened. -
On the newly formed tab, we also add a listener that is activated when it is loaded. As a result, we add a listener to the tabs API's
onUpdatedevent. Because the tab's URL may not be set at the time this event is triggered, we did not connect a listener to theonCreatedevent. However, you may listen toonUpdatedevents to be alerted when a URL is set. We verify if the opened tab's id is the same as thetarget idthat we just saved and that the page loading status is complete inside the listener. Either loaded or complete will be returned by thechangedPropsobject. -
We'll
deletethelisteneras soon as the tests pass because we don't need it right now, therefore we'll use removeEventListener to do so. -
The
getViewsfunction is used to retrieve all of the views opened by our extension, and it returns an array of JavaScriptwindowobjects for each of the sites running within the current extension. We check each entry's URL to the unique URL we set at the start of the loop, and if we find amatch, we call a function on that view that will be executed on the page that our extension has opened, and we send our image URL to the page so it canshowit to the user. -
Let's look at what we'll put in our
screenshot.htmlfile, which we just opened.
5.screenshot.html File
<html>
  <script src="screenshot.js"></script>
  <body>
    <img id="target" src="white.png" height="480">
  </body>
</html>- We just add an image tag that will be used to show the image url supplied by our extension; for now, we're using a white background placeholder until we can update it.
6.screenshot.js
function setScreenshotUrl(url) {
  document.getElementById('target').src = url;
}- This is the same
setScreenshotUrlthat we called in background.js file inside the loop on our view and it takes a URL as its parameter and sets that URL as image source URL and it displays our image.
7.Usage of extension
- Let's have a look at our extension in action right now. To begin, open your browser and load the unpacked extension. It will appear to the right of the address bar. Let's have a look at the preview by clicking on it.
- we took a snapshot of the website, and if you look at the URL, you'll notice that the number 100 has been tacked to the end; this is the same random variable we used, and it continues to increase as we click on it.


