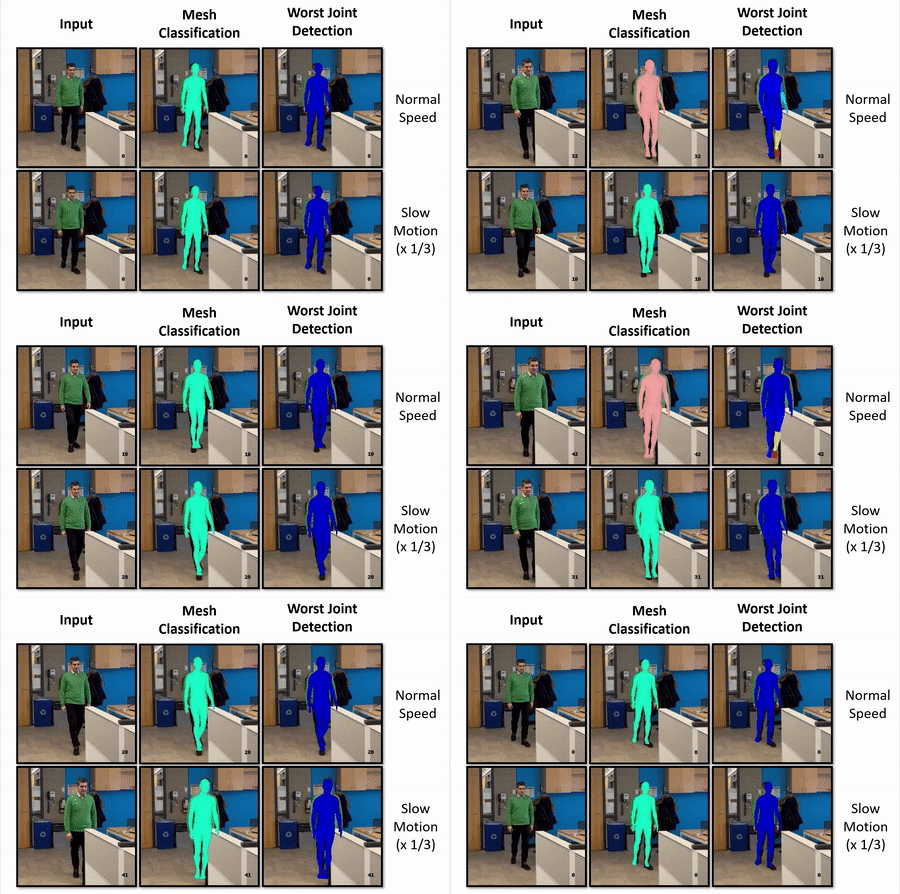
Human pose and shape estimation methods often struggle in situations where body parts are occluded, and they lack the ability to recognize when their predictions are incorrect. This limitation poses significant challenges in human-robot interaction scenarios, where reliable pose estimation is crucial. In our research, we address this problem by proposing a method that combines information from popular methods like OpenPose and SPIN. Our approach effectively identifies the least reliable regions on the predicted human body mesh, providing valuable insights. We have evaluated our method on multiple datasets, including 3DPW, 3DOH, and Human3.6M, demonstrating its effectiveness in identifying inaccurate regions. Confidence scoring for recovered meshes is an essential aspect of human-robot interaction scenarios, enabling robots to make informed decisions. By detecting unreliable regions, a robot can halt its operation or adjust its viewpoint for better reconstruction. Our method offers a comprehensive solution by highlighting these unreliable parts, as shown in figure below.
Error Estimation for Single-Image Human Body Mesh Reconstruction,
Hamoon Jafarian,
Faisal Z. Qureshi
- Go to your server and create a folder
meshConfidence - Create a docker file with the content.
- Create the docker image:
docker image build -t confidence . - Create and run the container:
docker run -it -d --gpus all --name my_confidence confidence - Attach to the running container and open
meshConfidencefolder - Download the body_pose_model.pth from here and add to
openpose/models - Get the smpl_vert_segmentation.json from here and put it in
datafolder - Get the pretrained MC and WJC:
gdown https://drive.google.com/uc?id=1-CIm4wxL7dmMy6BD__f83gBfgzrEq6PM -O classifier/mesh/classifier.ptgdown https://drive.google.com/uc?id=1-Ndd8-dspqyHMpTTfpN05ADqPjwrNlOp -O classifier/wj/classifier_wj.pt
- Now you can run the demo and choose a cropped and centered image as input. The result will be in the
demofolderpython3 demo/demo_confidence.py --checkpoint=data/model_checkpoint.pt --img=demo/3doh_img_0_orig.png
- You can access 3DOH test dataset from here and the required structure is:
data/3DOH50K/
|-----images
|-----annots.json
- For 3DPW dataset, you can download the dataset from here and the required structure is:
data/3DPW/
|-----imageFiles
|-----sequenceFiles
- To download the H36M dataset, please visit the here and download the Videos for S9 and S11. Then, use
dataset/extract_frames.pyto extract the images and use the following structure:
data/H36M/
|-----images
- Now you can run the qualitative evaluation by choosing the dataset and the image number:
python3 qualitative/confidence_mesh.py --dataset=3dpw --img_number=0
- Get male and female SMPL models from here and put it in
data/smplfolder - Now you can run sensitivity analysis for OpenPose and SPIN model for one image or the whole 3DPW dataset
python3 sensitivity/SPIN_image_sensitivity.py --checkpoint=data/model_checkpoint.pt --dataset=3dpw --img_number=0
python3 sensitivity/OP_image_sensitivity.py --checkpoint=data/model_checkpoint.pt --dataset=3dpw --img_number=0
python3 sensitivity/SPIN_sensitivity_analysis.py --checkpoint=data/model_checkpoint.pt --dataset=3dpw
python3 sensitivity/OP_sensitivity_analysis.py --checkpoint=data/model_checkpoint.pt --dataset=3dpw
- First, run the
sp_op/correlation.pyto calculate ED for different datasets and save the results (saved files are available) - Run the
classifier/data/train/traindata_prep.pyandclassifier/data/test/testdata_prep.pyto prepare the data. You should change thesp_op_NORM_MEANandsp_op_NORM_STDvalues inconstants.pywith the new printed values for the mean and std - Now you can train and evaluate the classifiers
python3 classifier/mesh/classifier_trainer.py
python3 classifier/wj/classifier_wj_trainer.py
Since the train validation separation and training process is random, the results might be slightly different each time. To evaluate, simply can run the following code:
python3 classifier/mesh/classifier_eval.py
python3 classifier/wj/classifier_wj_eval.py
Code was adapted from/influenced by the following repos - thanks to the authors!

