To run the example project, clone the repo, and run pod install from the Example directory first.
ZLayout is available through CocoaPods. To install it, simply add the following line to your Podfile:
platform :ios, "8.0"
use_frameworks!
pod "ZLayout"
##Example
Let's replicate Instagram feed UI, but with more dose of cats. After all setups of subviews this is what we should do for layout our views.
let ratio: CGFloat = 5/7
self.headerView.anchor(toParentEdge: .top, gravity: .center, width: .superView, height: 60)
self.avatarContainerView.anchor(toParentEdge: .left, gravity: .center, offset: CGPoint(x: 16, y: 0))
self.moreOptions.anchor(toParentEdge: .right, gravity: .center, width: .auto, height: .auto, offset: CGPoint(x: -16, y: 0))
self.nameLabel.alignAndFill(on: .rightOffset(16), relativeTo: avatarContainerView, withGravity: .center, stretchTo: moreOptions, trailingPadding: 16, size: .auto)
self.contentImageView.align(on: .bottom, relativeTo: headerView, withGravity: .center, width: .superView, height: .value(self.width * ratio))
self.actionsView.align(on: .bottom, relativeTo: contentImageView, withGravity: .center, width: .superView, height: 50)
self.likeImageVIew.anchor(toParentEdge: .left, gravity: .center, width: .auto, height: .auto, offset: CGPoint(x: 16, y: 0))
self.favoritesImageVIew.anchor(toParentEdge: .right, gravity: .center, width: .auto, height: .auto, offset: CGPoint(x: -16, y: 0))
self.commentImageVIew.align(on: .rightOffset(16), relativeTo: likeImageVIew, withGravity: .center, width: .auto, height: .auto)
self.viewsCountLabel.align(on: .bottom, relativeTo: actionsView, withGravity: .leftOffset(16), width: .auto, height: .auto)
self.textLabel.align(on: .bottomOffset(6), relativeTo: viewsCountLabel, withGravity: .left, width: .auto, height: .auto)
self.viewsAllCommentsLabel.align(on: .bottomOffset(3), relativeTo: textLabel, withGravity: .left, width: .auto, height: .auto)
self.dateLabel.align(on: .bottomOffset(3), relativeTo: viewsAllCommentsLabel, withGravity: .left, width: .auto, height: .auto)
Not bad for 20 lines of code! There are few ways to layout your view via ZLayout.
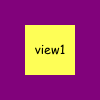
To place a view relative to the parent you can use anchoring. The most simple example is anchoring to center of parent.
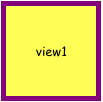
view1.anchor(toParentEdge: .centerParent, width: 50, height: 50)To fill superview you can use specific case of ZLayoutEdge named .all. In this case width and height parameters will be ignored.
view1.anchor(toParentEdge: .all, inset: UIEdgeInsets(top: 5, left: 5, bottom: 5, right: 5))You can do the same via .superView value for width and height.
centerView1.anchor(toParentEdge: .centerParent, width: .superView, height: .superView, inset: UIEdgeInsets(top: 5, left: 5, bottom: 5, right: 5))Gravity means corner which will be centered by default but you can pick one of these:
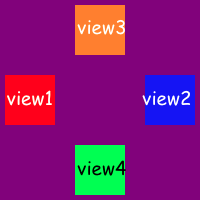
.center,.top,.bottom,.left or .right
view1.anchor(toParentEdge: .left, width: 50, height: 50, offset: CGPoint(x: 5, y: 0))
view2.anchor(toParentEdge: .right, width: 50, height: 50, offset: CGPoint(x: -5, y: 0))
view3.anchor(toParentEdge: .top, width: 50, height: 50, offset: CGPoint(x: 0, y: 5))
view4.anchor(toParentEdge: .bottom, width: 50, height: 50, offset: CGPoint(x: 0, y: -5))Another way to layout your views is align view relative to another one.
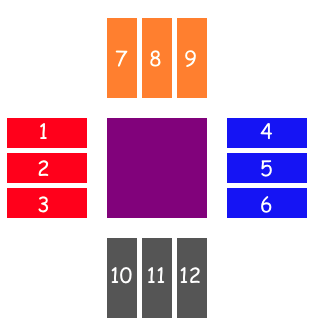
view1.align(on: .leftOffset(20), relativeTo: centerView, withGravity: .top, width: 80, height: 30)
view2.align(on: .leftOffset(20), relativeTo: centerView, withGravity: .center, width: 80, height: 30)
view3.align(on: .leftOffset(20), relativeTo: centerView, withGravity: .bottom, width: 80, height: 30)
view4.align(on: .rightOffset(20), relativeTo: centerView, withGravity: .top, width: 80, height: 30)
view5.align(on: .rightOffset(20), relativeTo: centerView, withGravity: .center, width: 80, height: 30)
view6.align(on: .rightOffset(20), relativeTo: centerView, withGravity: .bottom, width: 80, height: 30)
view7.align(on: .topOffset(20), relativeTo: centerView, withGravity: .left, width: 30, height: 80)
view8.align(on: .topOffset(20), relativeTo: centerView, withGravity: .right, width: 30, height: 80)
view9.align(on: .topOffset(20), relativeTo: centerView, withGravity: .center, width: 30, height: 80)
view10.align(on: .bottomOffset(20), relativeTo: centerView, withGravity: .left, width: 30, height: 80)
view11.align(on: .bottomOffset(20), relativeTo: centerView, withGravity: .right, width: 30, height: 80)
view12.align(on: .bottomOffset(20), relativeTo: centerView, withGravity: .center, width: 30, height: 80)
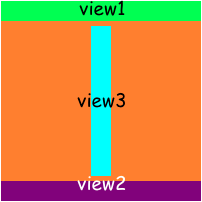
Also you can stretch view to another after alignment via alignAndFill method
view1.anchor(toParentEdge: .top, width: .superView, height: 20)
view2.anchor(toParentEdge: .bottom, width: .superView, height: 20)
view3.alignAndFill(on: .bottomOffset(5), relativeTo: topView, withGravity: .center, stretchTo: bottomView, trailingPadding: 5, size: 20)
Here size means width or height, it depends on alignment type.
ZLayout is available under the MIT license. See the LICENSE file for more info.


