This is a clone from yolov5 with a simple API to query for detections. It's a simple demo to test model deployment as a microservice. The default detect method has been slightly modified to use a config dict instead of the given script arguments to facilitate the integration with the API
Once you have your machine up and running, createa new sudo user to avoid using root, it is not secure and might casue issues with some packages
sudo useradd -s /path/to/shell -d /home/{dirname} -m -G {secondary-group} {username}
Before following the instructions below, create a new virtual environment with virtualenv or pyenv
- Install Pyenv Dependancies
sudo apt update ; sudo apt install -y make build-essential libssl-dev zlib1g-dev libbz2-dev libreadline-dev libsqlite3-dev wget curl llvm libncurses5-dev libncursesw5-dev xz-utils tk-dev libffi-dev liblzma-dev python-openssl git
- Install pyenv
curl -L https://github.com/pyenv/pyenv-installer/raw/master/bin/pyenv-installer | bash
- add the lines below to your .bashrc
export PATH="/home/ubuntu/.pyenv/bin:$PATH"
eval "$(pyenv init -)"
eval "$(pyenv virtualenv-init -)"
- Run the following command to make sure pyenv is callable:
source ~/.bashrc
- Install python 3.8>
pyenv install 3.8.3
- Create a new virtualenv with the installed version
pyenv virtualenv 3.8.3 demoyolo
- Activate your virtualenv
pyenv activate demoyolo
- Set the environment variables for the project
This projects uses a couple of environment variables, to set them copy the .env.example file to .env in the projects root directory, and change the environment variables needed (by default environment variables are already set to facilitate the demo)
cp .env.example .env
If your server has 3G<= of RAM opencv, and torch might fail to build. Instructions on how to add swap can be found here here
-
Read the steps below to get the model working and be able to test the api..
-
Once the model is up and running, follow the steps ad api/README.md

This repository represents Ultralytics open-source research into future object detection methods, and incorporates our lessons learned and best practices evolved over training thousands of models on custom client datasets with our previous YOLO repository https://github.com/ultralytics/yolov3. All code and models are under active development, and are subject to modification or deletion without notice. Use at your own risk.
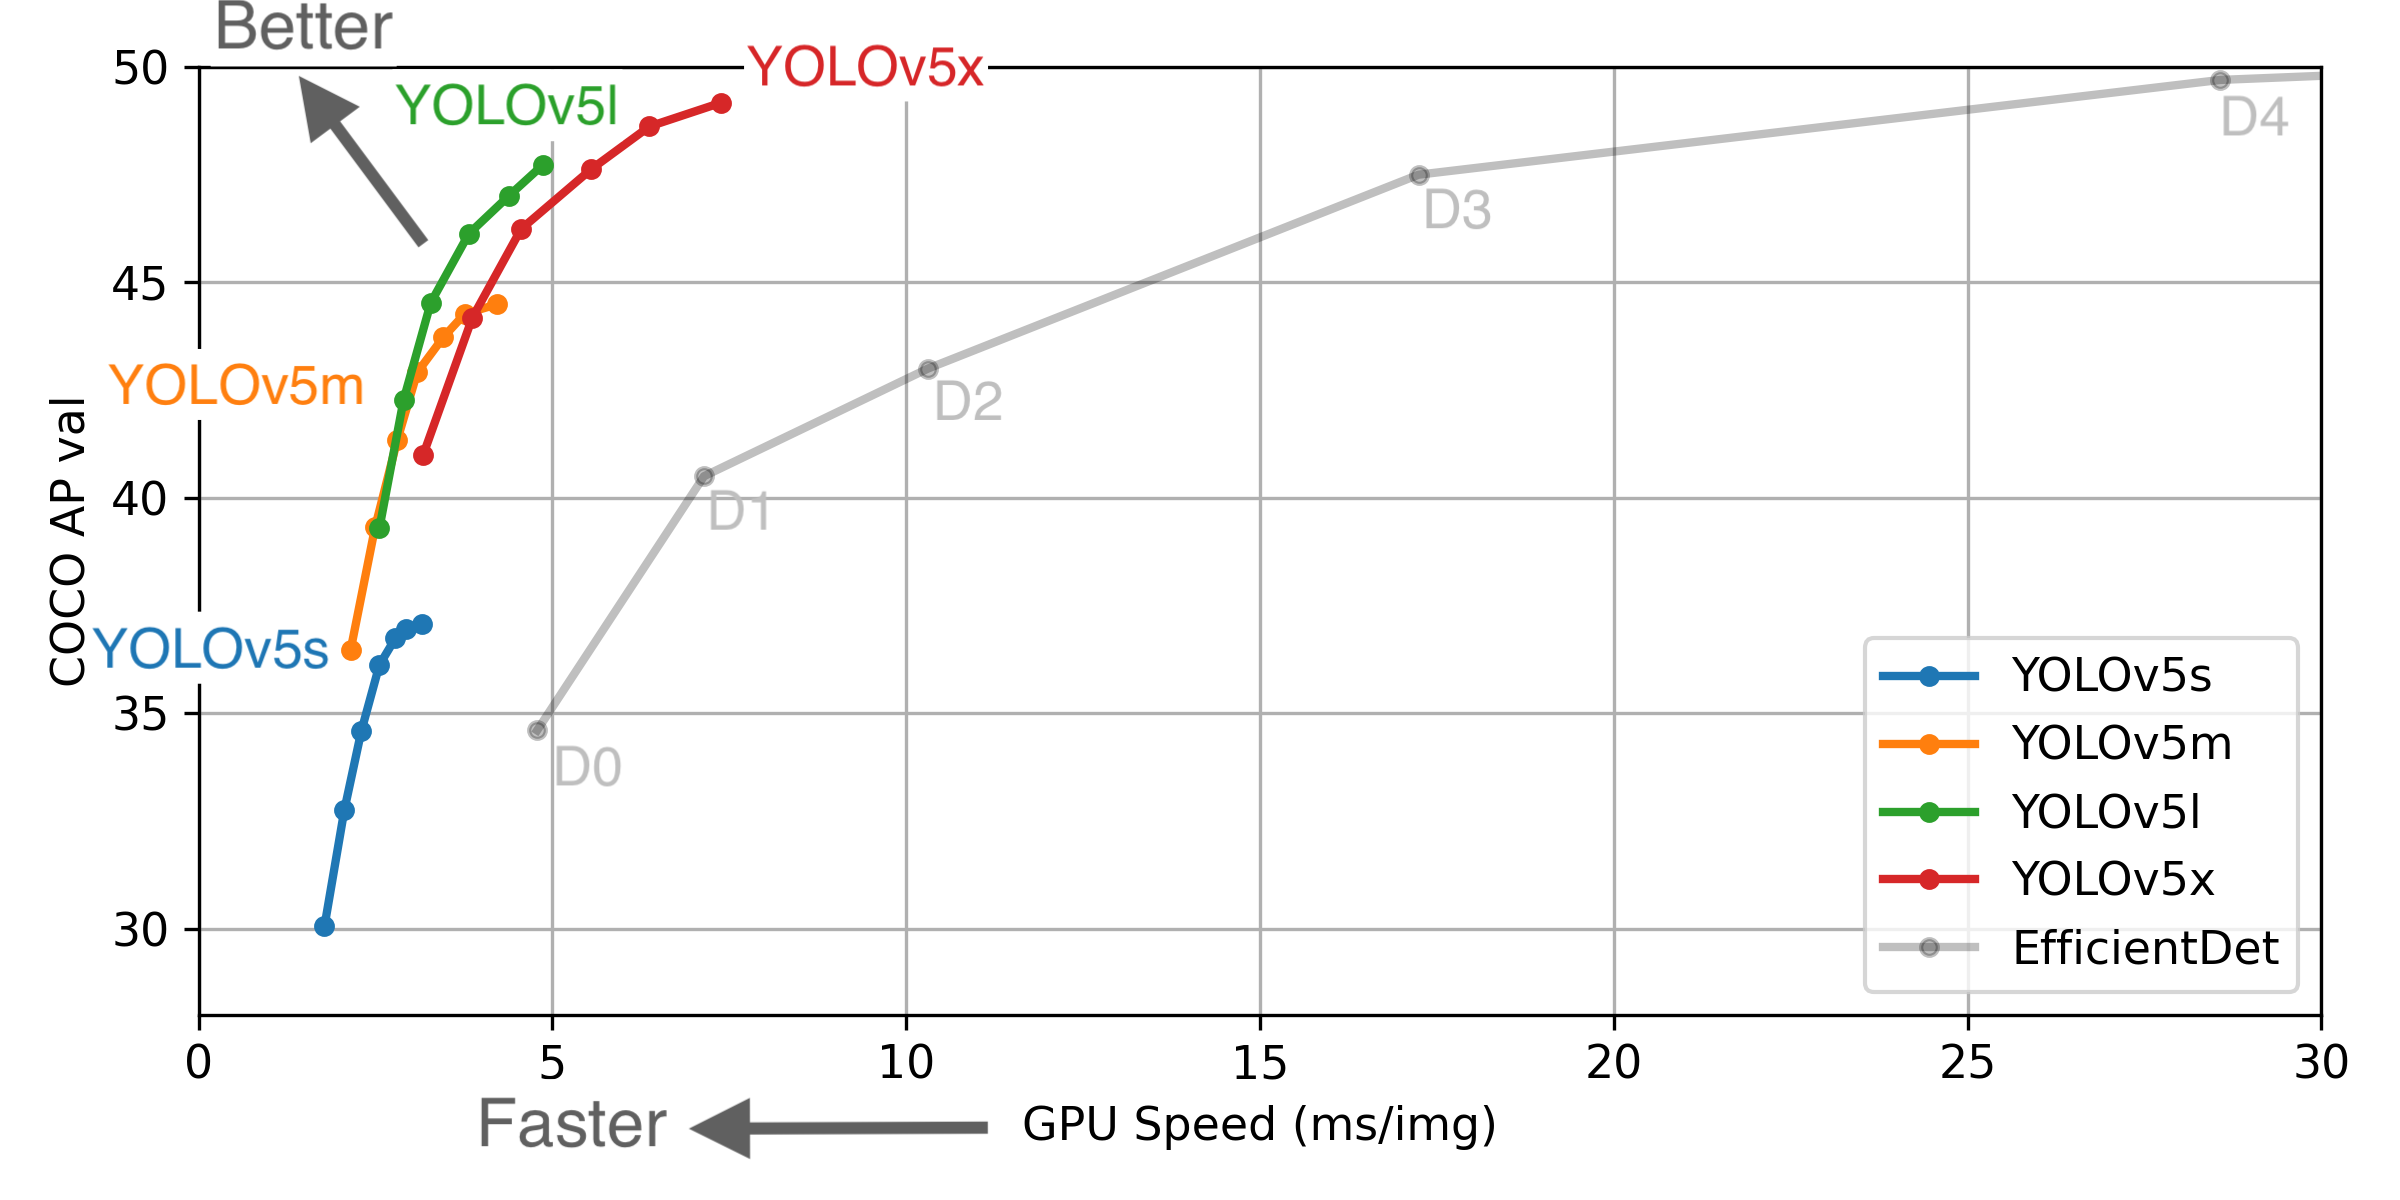
 ** GPU Speed measures end-to-end time per image averaged over 5000 COCO val2017 images using a V100 GPU with batch size 32, and includes image preprocessing, PyTorch FP16 inference, postprocessing and NMS. EfficientDet data from google/automl at batch size 8.
- August 13, 2020: v3.0 release: nn.Hardswish() activations, data autodownload, native AMP.
- July 23, 2020: v2.0 release: improved model definition, training and mAP.
- June 22, 2020: PANet updates: new heads, reduced parameters, improved speed and mAP 364fcfd.
- June 19, 2020: FP16 as new default for smaller checkpoints and faster inference d4c6674.
- June 9, 2020: CSP updates: improved speed, size, and accuracy (credit to @WongKinYiu for CSP).
- May 27, 2020: Public release. YOLOv5 models are SOTA among all known YOLO implementations.
- April 1, 2020: Start development of future compound-scaled YOLOv3/YOLOv4-based PyTorch models.
| Model | APval | APtest | AP50 | SpeedGPU | FPSGPU | params | FLOPS | |
|---|---|---|---|---|---|---|---|---|
| YOLOv5s | 37.0 | 37.0 | 56.2 | 2.4ms | 416 | 7.5M | 13.2B | |
| YOLOv5m | 44.3 | 44.3 | 63.2 | 3.4ms | 294 | 21.8M | 39.4B | |
| YOLOv5l | 47.7 | 47.7 | 66.5 | 4.4ms | 227 | 47.8M | 88.1B | |
| YOLOv5x | 49.2 | 49.2 | 67.7 | 6.9ms | 145 | 89.0M | 166.4B | |
| YOLOv5x + TTA | 50.8 | 50.8 | 68.9 | 25.5ms | 39 | 89.0M | 354.3B | |
| YOLOv3-SPP | 45.6 | 45.5 | 65.2 | 4.5ms | 222 | 63.0M | 118.0B |
** APtest denotes COCO test-dev2017 server results, all other AP results in the table denote val2017 accuracy.
** All AP numbers are for single-model single-scale without ensemble or test-time augmentation. Reproduce by python test.py --data coco.yaml --img 640 --conf 0.001
** SpeedGPU measures end-to-end time per image averaged over 5000 COCO val2017 images using a GCP n1-standard-16 instance with one V100 GPU, and includes image preprocessing, PyTorch FP16 image inference at --batch-size 32 --img-size 640, postprocessing and NMS. Average NMS time included in this chart is 1-2ms/img. Reproduce by python test.py --data coco.yaml --img 640 --conf 0.1
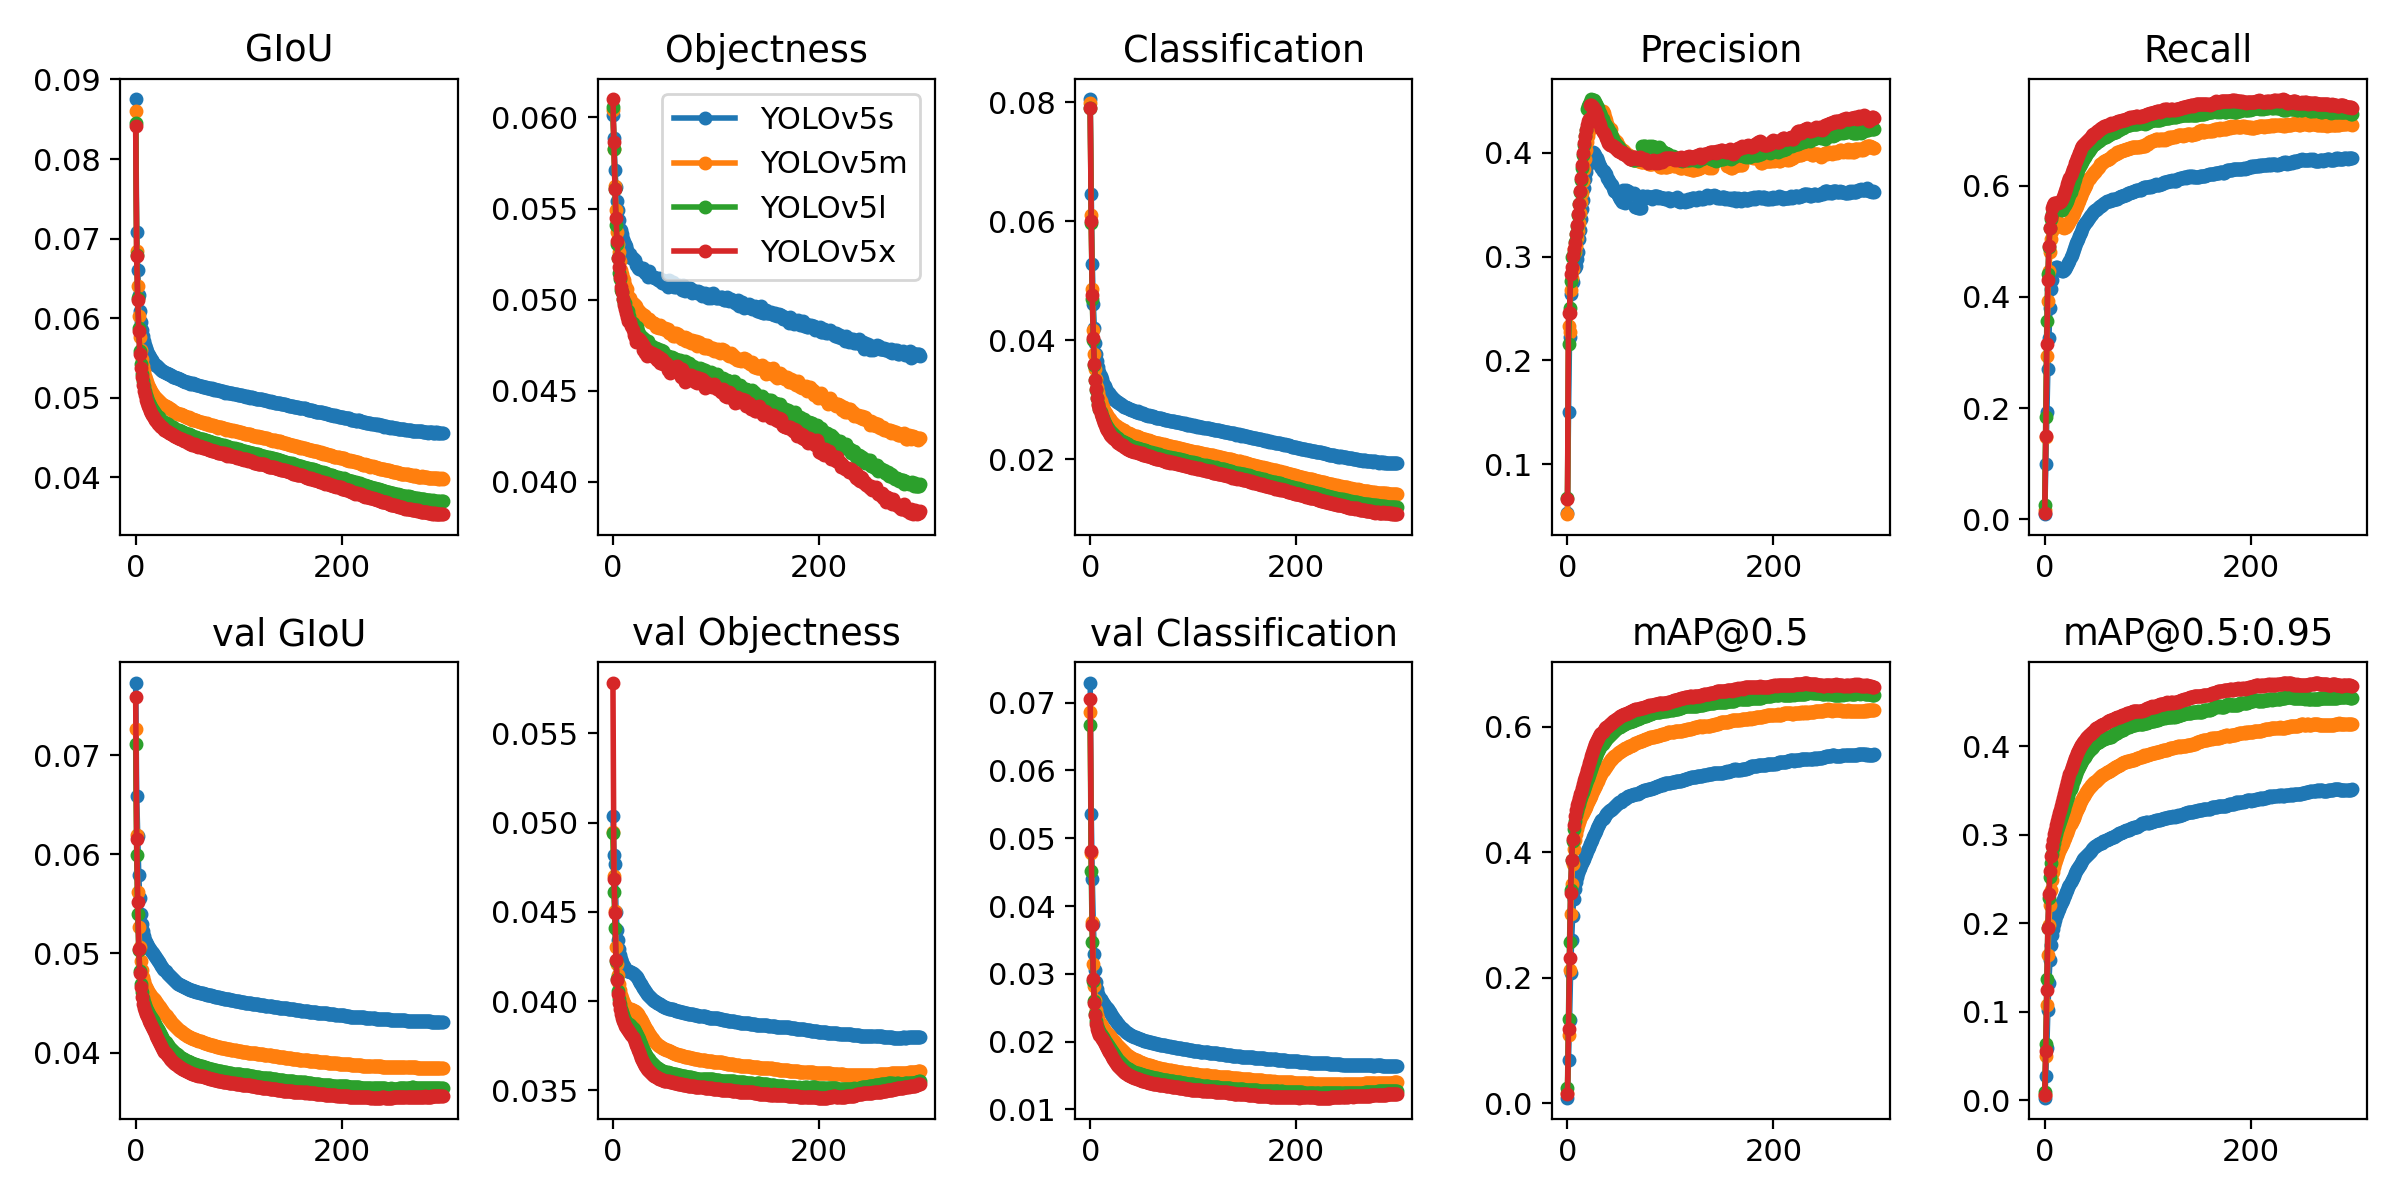
** All checkpoints are trained to 300 epochs with default settings and hyperparameters (no autoaugmentation).
** Test Time Augmentation (TTA) runs at 3 image sizes. Reproduce by python test.py --data coco.yaml --img 832 --augment
Python 3.8 or later with all requirements.txt dependencies installed, including torch>=1.6. To install run:
$ pip install -r requirements.txt- Train Custom Data
- Multi-GPU Training
- PyTorch Hub
- ONNX and TorchScript Export
- Test-Time Augmentation (TTA)
- Model Ensembling
- Model Pruning/Sparsity
- Hyperparameter Evolution
- TensorRT Deployment
YOLOv5 may be run in any of the following up-to-date verified environments (with all dependencies including CUDA/CUDNN, Python and PyTorch preinstalled):
- Google Colab Notebook with free GPU:
- Kaggle Notebook with free GPU: https://www.kaggle.com/ultralytics/yolov5
- Google Cloud Deep Learning VM. See GCP Quickstart Guide
- Docker Image https://hub.docker.com/r/ultralytics/yolov5. See Docker Quickstart Guide
Inference can be run on most common media formats. Model checkpoints are downloaded automatically if available. Results are saved to ./inference/output.
$ python detect.py --source 0  # webcam
                            file.jpg  # image
                            file.mp4  # video
                            path/  # directory
                            path/*.jpg  # glob
                            rtsp://170.93.143.139/rtplive/470011e600ef003a004ee33696235daa  # rtsp stream
                            http://112.50.243.8/PLTV/88888888/224/3221225900/1.m3u8  # http stream
To run inference on examples in the ./inference/images folder:
$ python detect.py --source ./inference/images/ --weights yolov5s.pt --conf 0.4

Namespace(agnostic_nms=False, augment=False, classes=None, conf_thres=0.4, device='', fourcc='mp4v', half=False, img_size=640, iou_thres=0.5, output='inference/output', save_txt=False, source='./inference/images/', view_img=False, weights='yolov5s.pt')
Using CUDA device0 _CudaDeviceProperties(name='Tesla P100-PCIE-16GB', total_memory=16280MB)

Downloading https://drive.google.com/uc?export=download&id=1R5T6rIyy3lLwgFXNms8whc-387H0tMQO as yolov5s.pt... Done (2.6s)

image 1/2 inference/images/bus.jpg: 640x512 3 persons, 1 buss, Done. (0.009s)
image 2/2 inference/images/zidane.jpg: 384x640 2 persons, 2 ties, Done. (0.009s)
Results saved to /content/yolov5/inference/outputDownload COCO and run command below. Training times for YOLOv5s/m/l/x are 2/4/6/8 days on a single V100 (multi-GPU times faster). Use the largest --batch-size your GPU allows (batch sizes shown for 16 GB devices).
$ python train.py --data coco.yaml --cfg yolov5s.yaml --weights '' --batch-size 64
                                         yolov5m                                40
                                         yolov5l                                24
yolov5x 16Ultralytics is a U.S.-based particle physics and AI startup with over 6 years of expertise supporting government, academic and business clients. We offer a wide range of vision AI services, spanning from simple expert advice up to delivery of fully customized, end-to-end production solutions, including:
- Cloud-based AI systems operating on hundreds of HD video streams in realtime.
- Edge AI integrated into custom iOS and Android apps for realtime 30 FPS video inference.
- Custom data training, hyperparameter evolution, and model exportation to any destination.
For business inquiries and professional support requests please visit us at https://www.ultralytics.com.
Issues should be raised directly in the repository. For business inquiries or professional support requests please visit https://www.ultralytics.com or email Glenn Jocher at glenn.jocher@ultralytics.com.


