SunFounder Smart Video Car Kit for Raspberry Pi
NodeJs project written in Typescript.
Main dependencies Johnny-Five, Socket.io, GStreamer
Disclaimer: I'm not responsible of the use you give to this tutorial or the consequences during or after following it. Happy Hacking.
Follow the original instructions available here for assembly and connections. Here you have a copy on PDF in case the website is not available.
Once you are done assembling and are familiarize with your PiCar, we need to change how the TB6612 Motor Driver is connected.
Why?
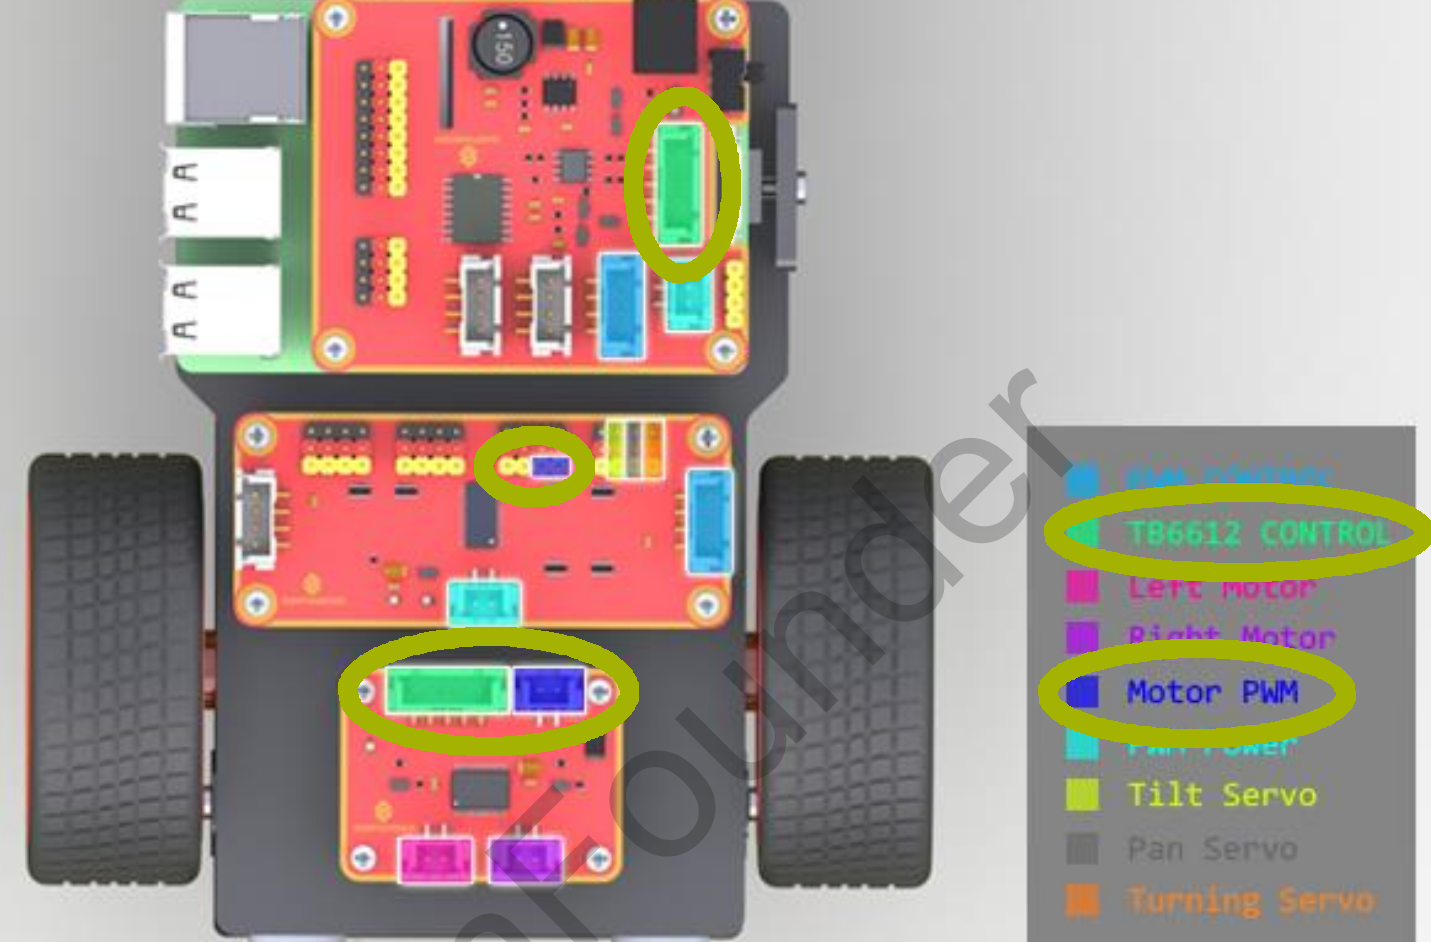
If we look at the page 22 of the manual, we can see that the Robot HATS's TB6612 CONTROL (green label) is connected to the TB6612 Motor Driver and the Motor PWM (dark blue) to the PCA9685 PWM Driver (pins 4 & 5).
Circled in some kind of green we have the important parts we need to focus on.

With the library Johnny-Five we can not use the motors while they are connected this way. It doesn't support using the board PCA9685 PWM Driver and assign other GPIO pins, in our case through the Robot HATS.
But we can easily control the TB6612 Motor Driver connected only to the PCA9685 PWM Driver thus we need to plug the cables for the direction into the PWM Driver (the power will still come from the Robot HATS).
How?
On the page 7 of the manual, we can see the cables we have in the car. We are interested in the one that connects the Robot HATS to the TB6612 Motor Driver, the 100mm HX2.54 5-Pin Jumper Wire.
We need to remove the connection of the cables white and yellow to the Robot HATS and instead connect this two cables to the PCA9685 PWM Driver into the pins 6 & 7. So in the end we should have the 5-pin cable connected normally as in the original instructions but the cables yellow and white (cut in the Robot HATS's TB6612 CONTROL side) connected to the PCA9685 PWM Driver (pins 6 & 7).
What I have done to achieve this is to crimp a two pin female connector to the end of the cut cables to easily connect them into the PCA9685 PWM Driver
Once we are done with this, we can pass to load the software into the PiCar-V
Connected in your Raspberry Pi (direct or ssh):
-
Clone the repository in your Raspberry Pi.
-
Access the repository folder in your terminal.
-
Install dependencies, run:
yarn install -
Prepare code and generate ssl certificate:
yarn first-time
This will compile ts into js and generate your certificates for the https server,
Note: Follow the instructions on screen to generate the certificates, you can press enter on all steps since this is for our localhost.
With video: yarn start raspberry-pi_ip
Without video: yarn start raspberry-pi_ip false
- Example with video:
yarn start 192.168.0.17
Note: Provide the ip of your raspberry, this is used to render the index.html and tell the sockets where to connect, servers and sockets are created on localhost
Running this command will open 2 sockets, one for sending the stream of your camera and another to listen for the events of your gamepad.
It will also start a server so you can see in your browser the video stream and once connected a gamepad it will start sending the inputs to the PiCar.
Now, on the computer, phone or whatever device you want to be controlling the PiCar, open the browser and navigate to the ip of your PiCar
- Example
https://192.168.0.17
Connect a gamepad to your device and make sure your browser asks for permissions to use the gamepad, accept and then you can have control of your PiCar.
I use a 8Bitdo SFC30 Bluetooth gamepad and the mappings of the buttons are matching my device, but most of the controllers will find this mapping adequate. If you need to change it open the file index.html and adjust to your needs. Then restart the server.
Note: To stop all press Ctrl+c on the idle terminal
- Example without video:
yarn start 192.168.0.17 false
Actually false can be anything, basically if there is anything written after the ip it will use hte without video mode
After changing the code run yarn compile to transpile to js or set IDE to compile on save
On your Raspberry pi run:
sudo bluetoothctl
That will run the bluetooth service. It will show you a list of nearby devices and their MAC address. Copy the MAC of your game controller. If not list is shown, run:
devices
To connect:
connect E1:1D:D8:23:61:89
