ASP.NET Core Detection service components for identifying details about client device, browser, engine, platform, & crawler. Responsive middleware for routing base upon request client device detection to specific view. Also in the added feature of user preference made this library even more comprehensive must for developers whom to target multiple devices with view rendered and optimized directly from the server side.
Please show me some love and click the ⭐
This project development has been in the long making of my little spare time. Please show your appreciation and help me provide feedback on you think will improve this library. All developers are welcome to come and improve the code by submit a pull request. We will have constructive good discussion together to the greater good.
- ASP.NET Core Detection with Responsive View
- Installation
- Detection Service
- Responsive Service
- Directory Structure
- Contributors
Installation of detection library is now done with a single package reference point. If you are using ASP.NET Core 2.X please use detection version 2.0 installation.
PM> install-package Wangkanai.Detection -preThis library host the component services to resolve the access client device type. To the servoces your web application is done by configuring the Startup.cs by adding the detection service in the ConfigureServices method.
public void ConfigureServices(IServiceCollection services)
{
    // Add detection services container and device resolver service.
    services.AddDetection();

    // Add framework services.
    services.AddControllersWithViews();
}AddDetection()Adds the detection services to the services container.
The current device on a request is set in the Responsive middleware. The Responsive middleware is enabled in the Configure method of Startup.cs file. Make sure that you have app.UseDetection() before app.UseRouting.
public void Configure(IApplicationBuilder app, IHostingEnvironment env)
{
    app.UseDetection();

    app.UseRouting();

    app.UseEndpoints(endpoints => endpoints.MapDefaultControllerRoute());
}
Adding the TagHelper features to your web application with following in your _ViewImports.cshtml
@using WebApplication1

@addTagHelper *, Microsoft.AspNetCore.Mvc.TagHelpers
@addTagHelper *, Wangkanai.DetectionAfter you have added the basic of the detection services, let us learn how to utilized the library in your web application. In which we have got the help from dependency injection to access all functionality of IDetectionService has to offer.
Detection service support usage in both Model-View-Controller (MVC) and Razor Pages.
Here is how you would use the library in Controller of a MVC pattern by injecting the detection service into the constructor of the controller.
public class AboutController : Controller
{
    private readonly IDetectionService _detectionService;

    public AboutController(IDetectionService detectionService)
    {
        _detectionService = detectionService;
    }

    public IActionResult Index()
    {
        return View(_detectionService);
    }
}For razor pages web application that only have the pages without PageModel behind, you can access the detection service via the @inject tag after the @page in your .cshtml files. Here would be the example below;
@page
@inject Wangkanai.Detection.Services.IDetectionService DetectionService
@{
    ViewData["Title"] = "Detection";
}
<ul>
    <li>@DetectionService.Device.Type</li>
    <li>@DetectionService.Browser.Name</li>
    <li>@DetectionService.Platform.Name</li>
    <li>@DetectionService.Engine.Name</li>
    <li>@DetectionService.Crawler.Name</li>
</ul>
What if you razor pages use the code behind model, you can still inject the detection service into it via the constructor just similar way as MVC controller does it.
public class IndexModel : PageModel
{
    private readonly IDetectionService _detectionService;

    public IndexModel(IDetectionService detectionService)
    {
        _detectionService = detectionService;
    }

    public void OnGet()
    {
        var device = _detectionService.Device.Type;
    }
}Would you think that Middleware can also use this detection service. Actually it can! and our Responsive make good use of it too. Let us learn how that you would use detection service in your custom middleware which we would use the Per-request middleware dependencies. But why would we use pre-request injection for our middleware you may ask? Easy! because every user is unique. Technically answer would be that IDetectionService by using TryAddTransient<TInterface, TClass> where you can learn more about transient. If you inject IDetectionServices into the middleware constructor, then the service would become a singleton. Meaning to subject to application not per client request.
So now we know about the basic lets look at the code:
public class MyCustomMiddleware
{
    private readonly RequestDelegate _next;

    public MyCustomMiddleware(RequestDelegate next)
    {
        _next = next ?? throw new ArgumentNullException(nameof(next));
    }

    public async Task InvokeAsync(HttpContext context, IDetectionService detection)
    {
        if(detection.Device.Type == Device.Mobile)
            context.Response.WriteAsync("You are Mobile!");

        await _next(context);
    }
}
Detection services would extract information about the visitor web client by parsing the user agent that the web browser gives to the web server on every http/https request. We would make the assumption that every requester is using common Mozilla syntax: Mozilla/[version] ([system and browser information]) [platform] ([platform details]) [extensions]. If detection service can not identify the information, it will we have give you Unknown enum flag. There are total of 5 resolver services the our detection services.
This would be the basic resolver that you might be thinking using to identify what kind client Device is access your web app, which include Desktop, Tablet, and Mobile for the basic stuff. While we can also use to identify is the device a Watch, Tv, Game Console, Car, and Internet of Things.
var isMobile = detectionService.Device.Type == Device.Mobile;Moving the stack we get what Browser is the client using to access your web app. We only include the common web browser detection starting from Chrome, Internet Explorer, Safari, Firefox, Edge, and Opera. For the rest we would mark them as others or unknown (aka Crawler).
var isIE = detectionService.Browser.Name == Browser.InternetExplorer;Now we can also identify what Platform is the client using to access your web app starting in version 3.0. We got Windows, Mac, iOS, Linux, and Android.
var isMac = detectionService.Platform.Name == Platform.Mac;Now we can also identify what Engine is the client using to access your web app starting in version 3.0. We got WebKit, Blink, Gecko, Trident, EdgeHTML, and Servo.
var isTrident = detectionService.Engine.Name == Engine.Trident;This would be something that web analytics to keep track on how are web crawler are access your website for indexing. We got starting everybody favorite that is Google, Bing, Yahoo, Baidu, Facebook, Twitter, LinkedIn, WhatsApp, and Skype.
var isGoogle = detectionService.Crawler.Name == Crawler.Google;There are basic options that you can add to detection services. Like to adding something that detection does not identify by default to the Others list.
public void ConfigureServices(IServiceCollection services)
{
    // Add responsive services.
    services.AddDetection(options =>
    {
        options.Crawler.Others.Add("goodbot");
    });

    // Add framework services.
    services.AddControllersWithViews();
}This is where thing get more interesting that is built upon detection service, or matter a fact detection service was built because of responsive service. The concept is that we would like to have views that correspond to what kind of device to accessing to our web app.
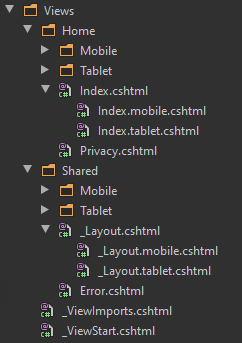
Responsive Views for MVC has 2 format for you to utilize. First is would be to most common is Suffix and the secord format is SubFolder. Lets make this follow example a suffix as of my opinionated would be the most common way to managed all the views. This suffix format is done by add device type before the file extension .cshtml like .mobile.cshtml. Below is how you would structure your Views folder.
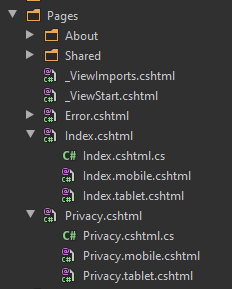
Responsive for razor pages newly added in wangkanai.detection 3.0. This enable completed responsive in asp.net core ecosystem. Same like Views in MVC we have suffix format where we add the device type in before the file extension .cshtml like .mobile.cshtml.
The next exciting feature add in wangkanai.detection 3.0 is Tag Helpers. This make you able to use the same view and just show/hide specific part of the views to the client base upon their type, this include Device, Browser, Platform, Engine, and Crawler that our detection resolver could determine from the resolver parsing services.
<device include="mobile">is mobile</device>
<device exclude="mobile">not mobile</device><browser include="chrome">is chrome</browser>
<browser exclude="chrome">not chrome</browser><platform include="windows">is windows</platform>
<platform exclude="windows">not windows</platform><engine include="blink">is blink</engine>
<engine exclude="blink">not blink</engine><crawler include="google">is google</crawler>
<crawler exclude="google">not google</crawler>When a client visit your web application by using a mobile device and you have responsive view for mobile device. But the visitor would like to view the web app with a desktop view, their click this link to change their preference to desktop view.
<a href="/Detection/Preference/Prefer">
    <div class="alert alert-light" role="alert">
        Desktop version
    </div>
</a>
If the client selected to view in desktop view, he/she can switch back mobile view by the follow example;
<preference only="mobile">
    <a href="/Detection/Preference/Clear">
        <div class="alert alert-light" role="alert">
            Switch to mobile version
        </div>
    </a>
</preference>You can customize the default behaviour of how responsive service would react to client request. You can go in deep by examining ResponsiveOptions.
public void ConfigureServices(IServiceCollection services)
{
    // Add responsive services.
    services.AddDetection(options =>
    {
        options.Responsive.DefaultTablet  = Device.Desktop;
        options.Responsive.DefaultMobile  = Device.Mobile;
        options.Responsive.DefaultDesktop = Device.Desktop;
        options.Responsive.IncludeWebApi  = false;
        options.Responsive.Disable        = false;
        options.Responsive.WebApiPath     = "/Api";
    });

    // Add framework services.
    services.AddControllersWithViews();
}
AddDetection(Action<DetectionOptions> options)Adds the detection services to the services container.
src- The source code of this project lives heretest- The test code of this project lives herecollection- Collection of sample user agents for lab testingsample- Contains sample web application of usagedoc- Contains the documentation on how utilized this library
All contribution are welcome, please contact the author.
This project exists thanks to all the people who contribute. [Contribute].
Become a financial contributor and help us sustain our community. [Contribute]
Support this project with your organization. Your logo will show up here with a link to your website. [Contribute]


