📂 Java RMI
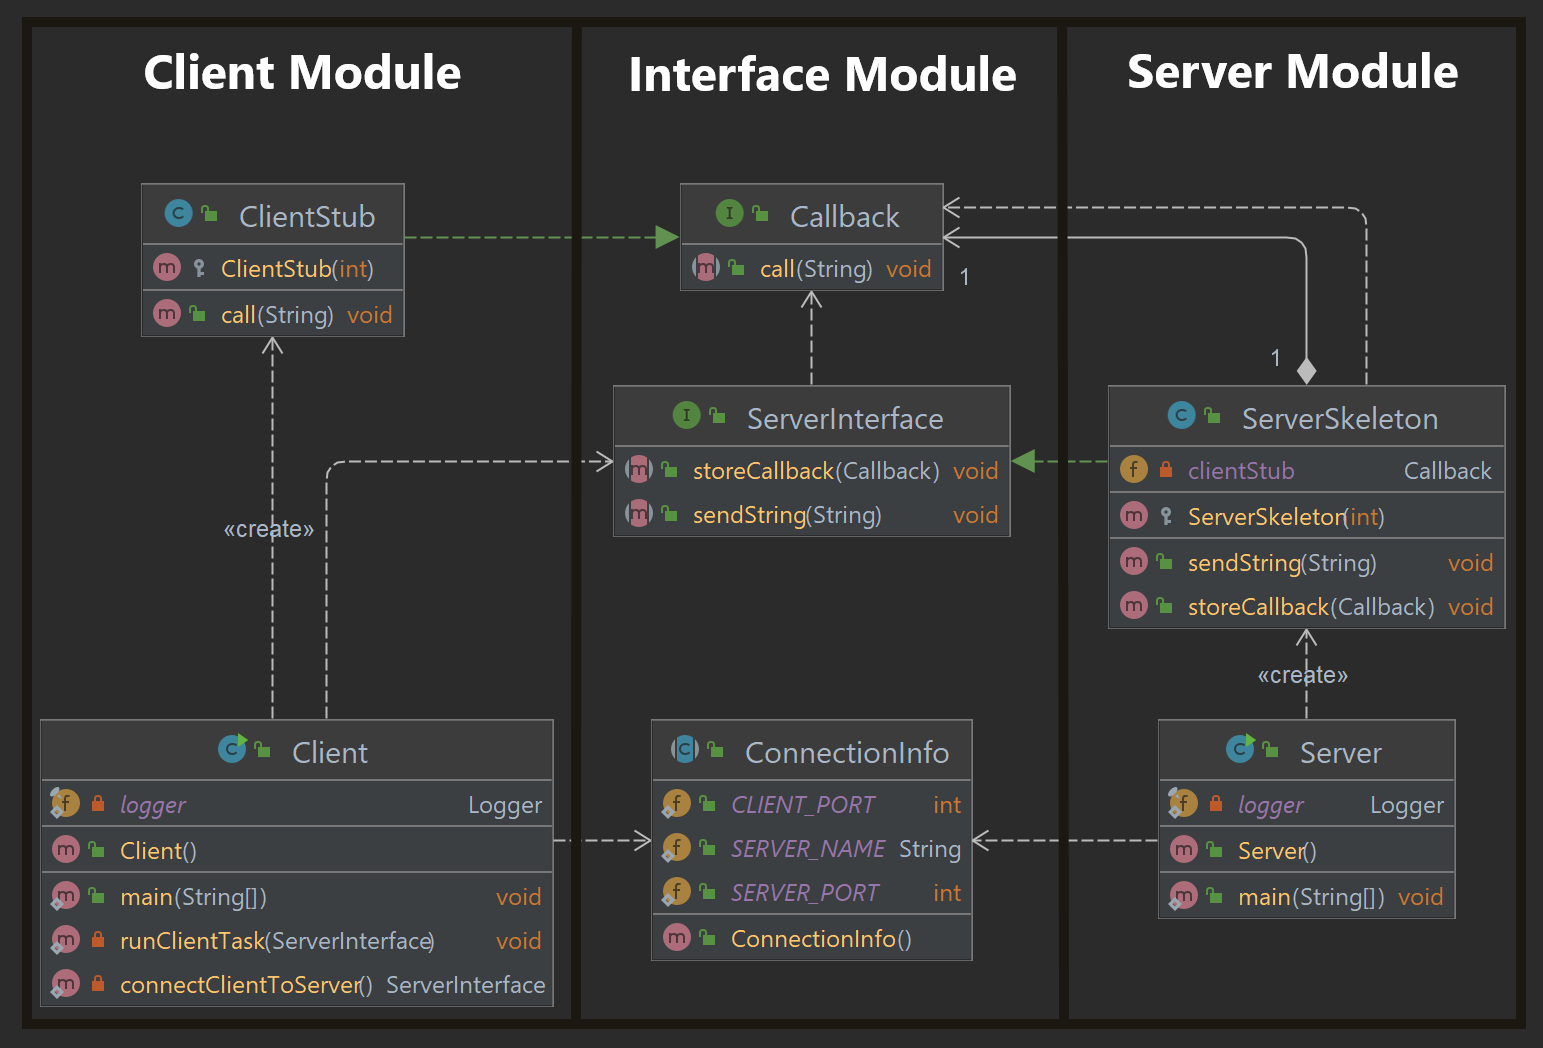
The Server provides a skeleton with an implemented RMI Interface. This interface can be used from the Client. To use a bidirectional communication, the client provides a stub with the callback interface. With this stub the server can send its answer to the client.
Note: Watch out for the extended classes, because they are the key for RMI.
Class Diagram
Note: Modules can be independent projects where the client and server each have the interface dependency.
Usage and Output
- Start Server main()
- Start Client main()
Server Output:
INFORMATION: Server is started!

Received message: Greetings from Client!
Received message: Greetings from Client!
Received message: Greetings from Client!
Client Output:
Received callback: Client is registered for callback!
Received callback: Server received the message!
Received callback: Server received the message!
Received callback: Server received the message!
System Requirements:
- Java
- Maven
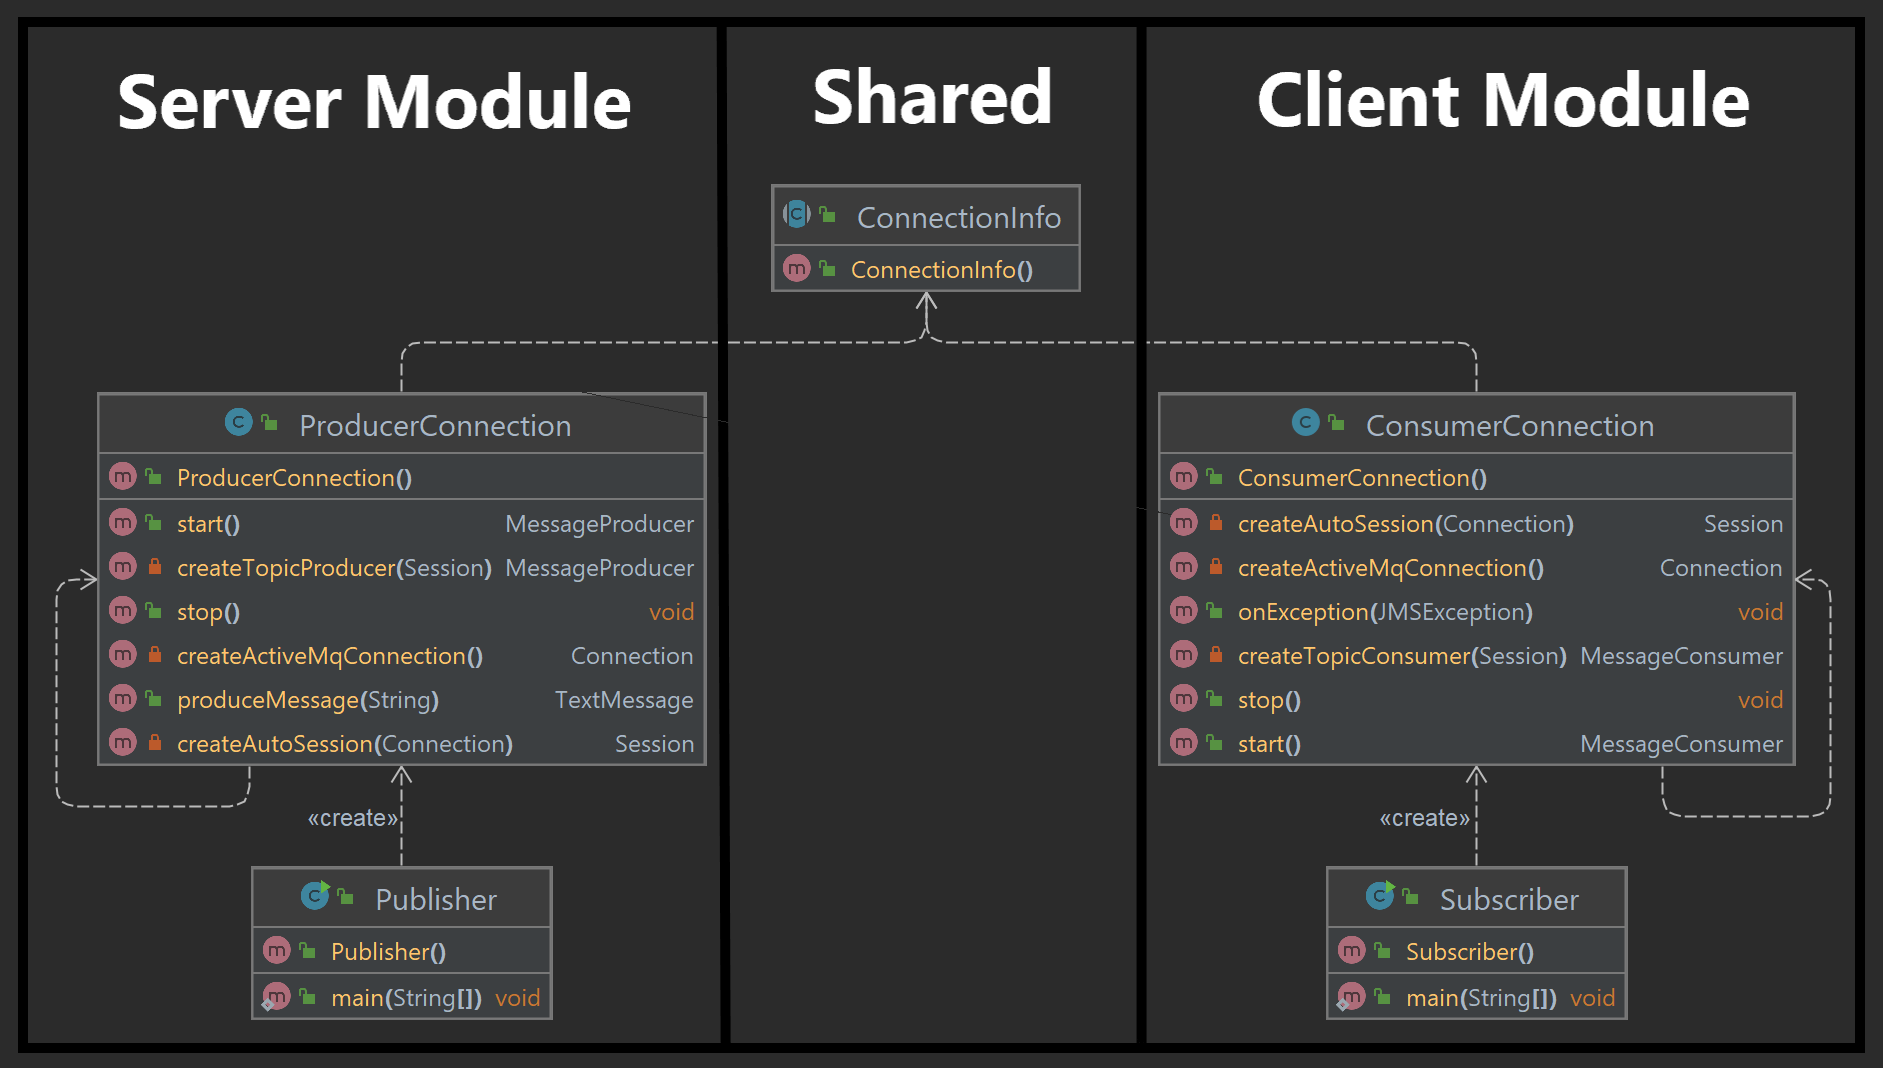
The controller show a small usage of the Publisher and Subscriber concept of MQTT. The communication goes over a topic on a ActiveMQ Broker.
Usage and Output
- Run
activemq start - Start Subscriber main()
- Start Publisher main()
Publisher Output:
Log Date Time server_module.ProducerConnection start
INFO: Started Connection.
Sent message: Hello! at: 1653930520109
Sent message: Hello! at: 1653930521130
Sent message: Hello! at: 1653930522132
Sent message: Hello! at: 1653930523147
Sent message: Hello! at: 1653930524159
Sent message: Hello! at: 1653930525170
Sent message: Hello! at: 1653930526177
Sent message: Hello! at: 1653930527186
Sent message: Hello! at: 1653930528190
Sent message: Hello! at: 1653930529191
Log Date Time server_module.ProducerConnection stop
INFO: Stopped Connection.
Subscriber Output:
Log Date Time client_module.ConsumerConnection start
INFO: Started Connection.
Received: Hello! at: 1653930520109
Received: Hello! at: 1653930521130
Received: Hello! at: 1653930522132
Received: Hello! at: 1653930523147
Received: Hello! at: 1653930524159
Received: Hello! at: 1653930525170
Received: Hello! at: 1653930526177
Received: Hello! at: 1653930527186
Received: Hello! at: 1653930528190
Received: Hello! at: 1653930529191
Received: null
Log Date Time client_module.ConsumerConnection stop
INFO: Stopped Connection.
System Requirements:
- Java
- Maven
- ActiveMQ
A small example for multi threading is the calculation of Pi in the context of the Monte Carlo problem. New issues like deadlocks and race conditions need to be addressed in manual multi threading.
Usage and Output
- Start Application main()
Note: The example was done with compromised processor configuration.
Output:
INFO: Calculate 1.0E8 drops in circle.
INFO: Calculated pi: 3.1414568

Single thread result: 3.1414568
Single thread time: 7.5117718 seconds

INFO: Submitted job: 1
INFO: Submitted job: 2
INFO: Calculate 2.5E7 drops in circle.
INFO: Calculate 2.5E7 drops in circle.
INFO: Submitted job: 3
INFO: Submitted job: 4
INFO: Calculate 2.5E7 drops in circle.
INFO: Calculate 2.5E7 drops in circle.
INFO: Calculated pi: 3.14164704
INFO: Joined result: 1
INFO: Calculated pi: 3.14135488
INFO: Joined result: 2
INFO: Calculated pi: 3.14119488
INFO: Joined result: 3
INFO: Calculated pi: 3.14165968
INFO: Joined result: 4

Multi thread result: 3.14146412
Multi thread time: 36.5720642 seconds
System Requirements:
- Java
- Maven
📂 REST API
Monolithic REST API application with Spring Boot.
| Table of Content |
|---|
| code |
| configuration |
| dependencies |
| docker compose |
Usage
Development:
- Provide the
MySQL-Serverand theActiveMQ-Brokeron the ports described in the configuration. - Run ShopApplication main()
- Open API Documentation on http://localhost:8080/swagger-ui/
Production:
cd ./REST_APIdocker-compose up(first start has sometimes race-conditions, with initial exceptions please restart again)- Open API Documentation on http://localhost:8080/swagger-ui/
System Requirements:
- Java
- Maven
- ActiveMQ
- MySQL
- (Docker)
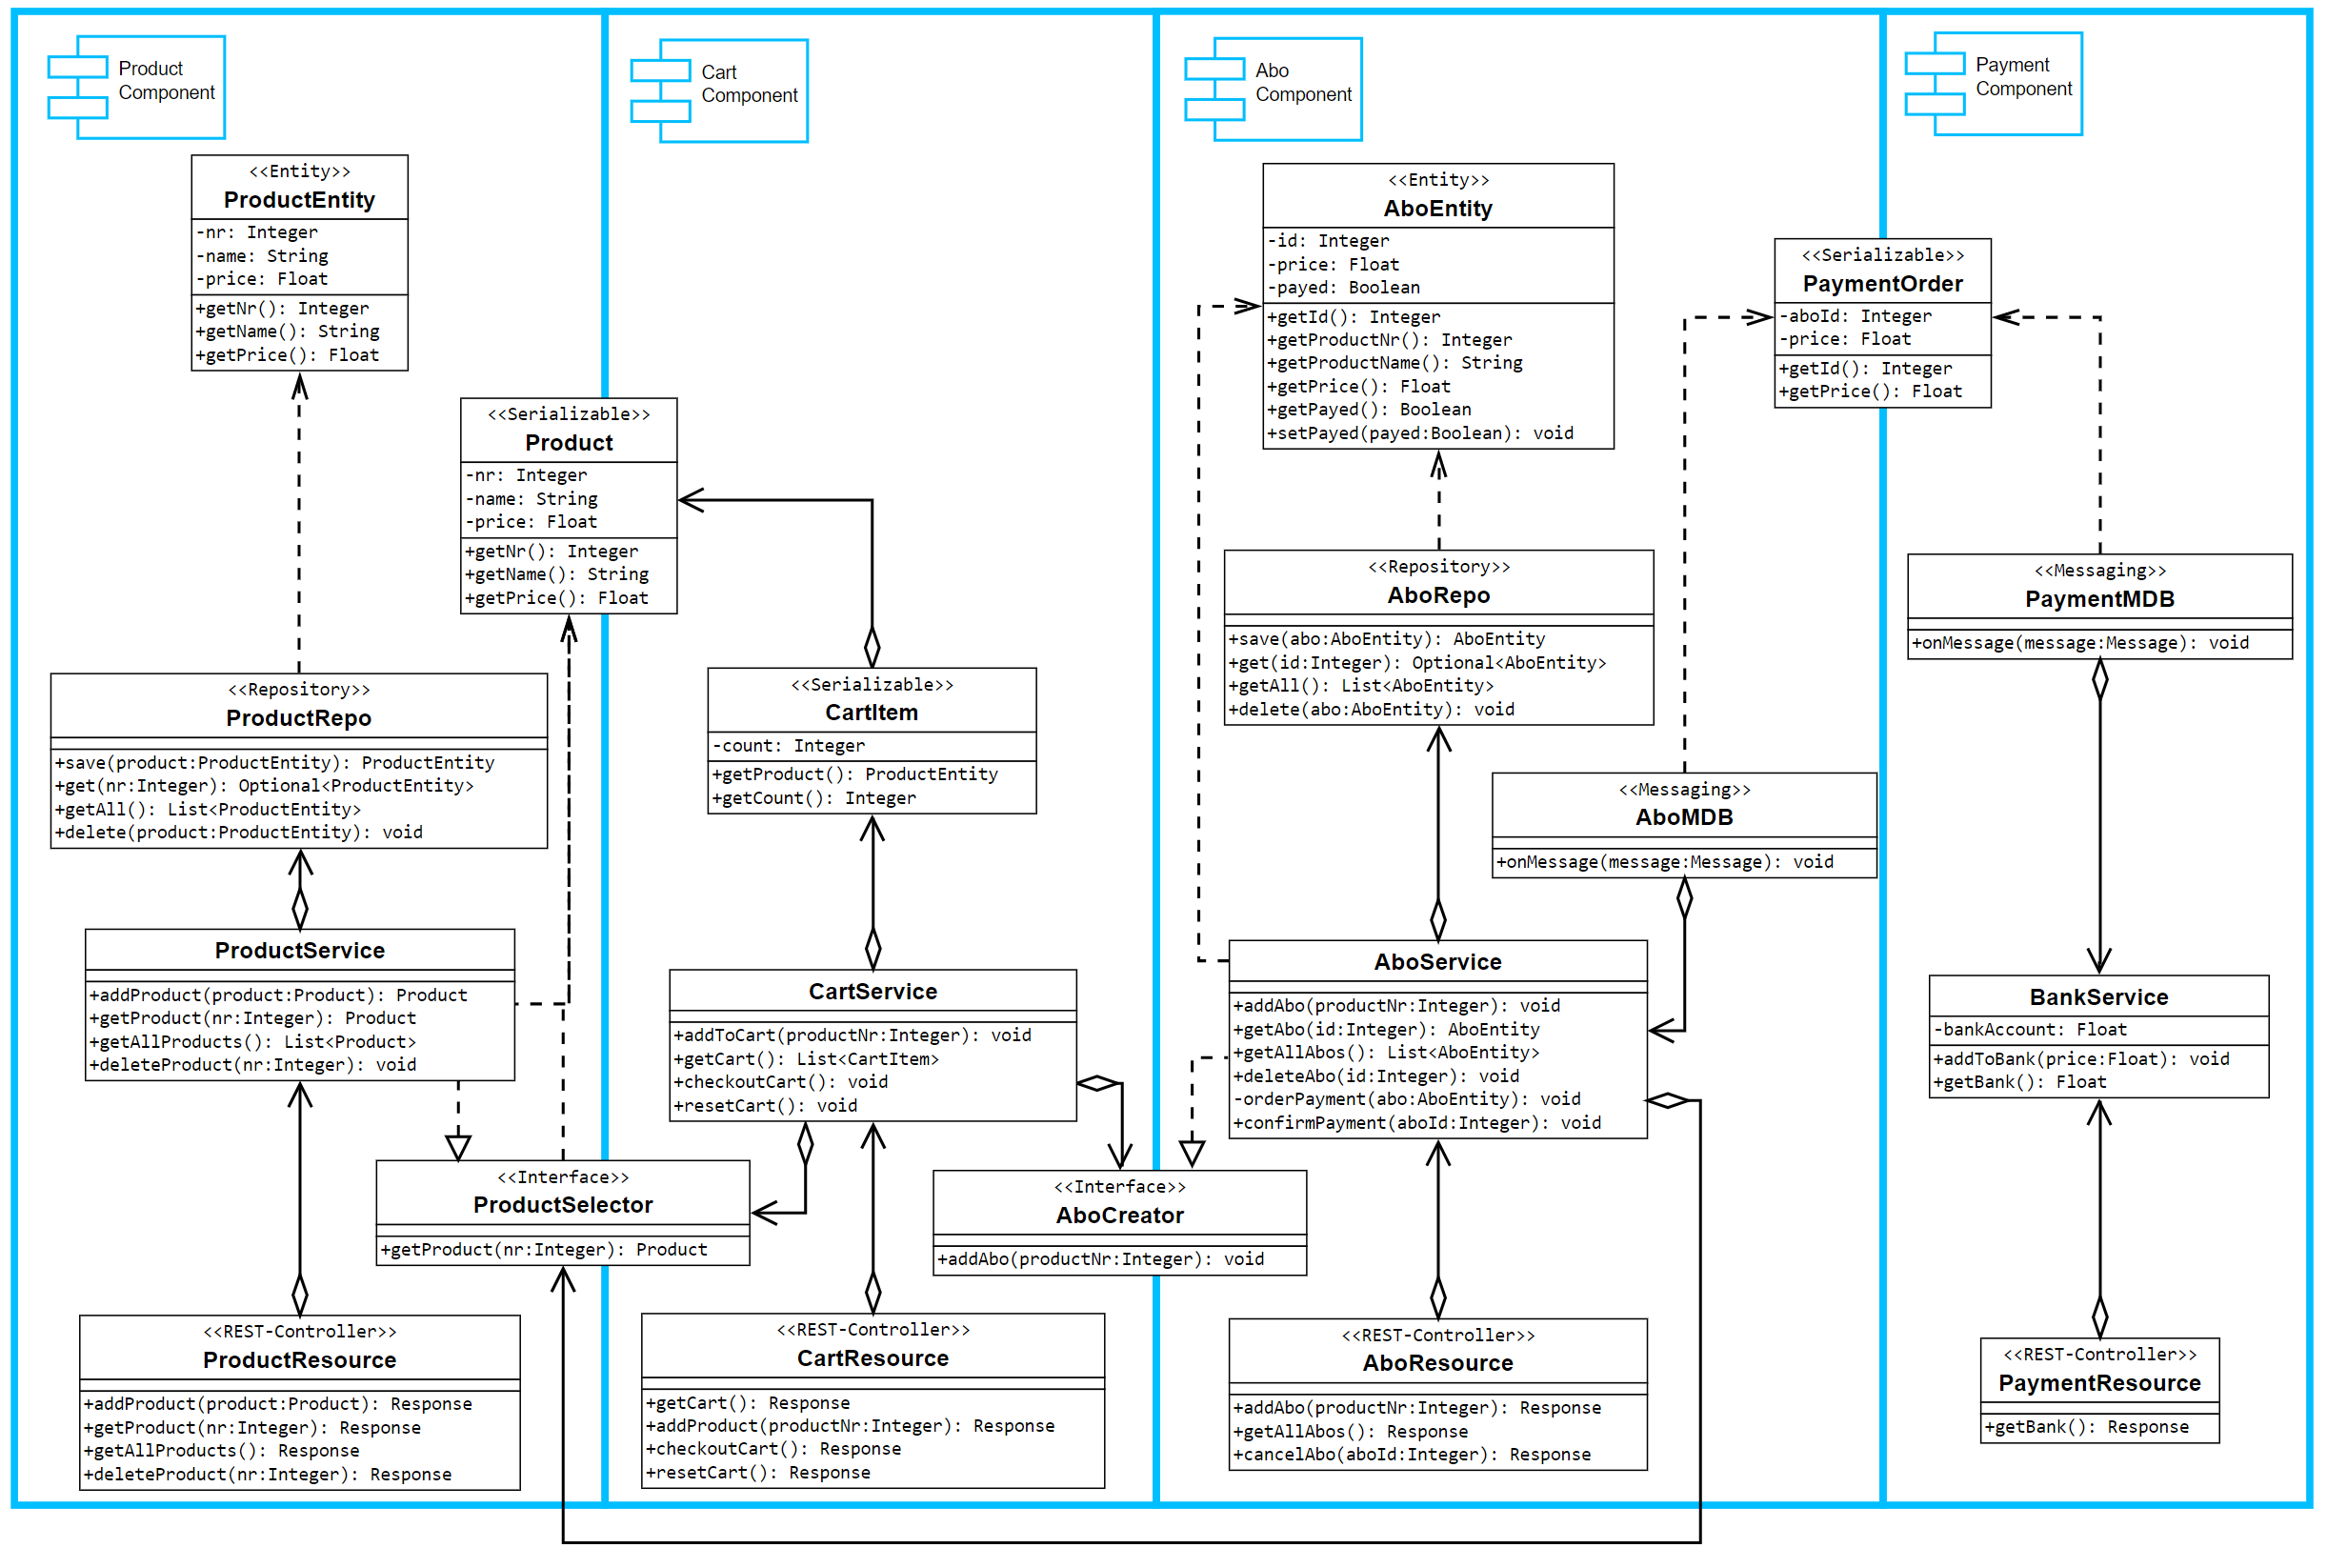
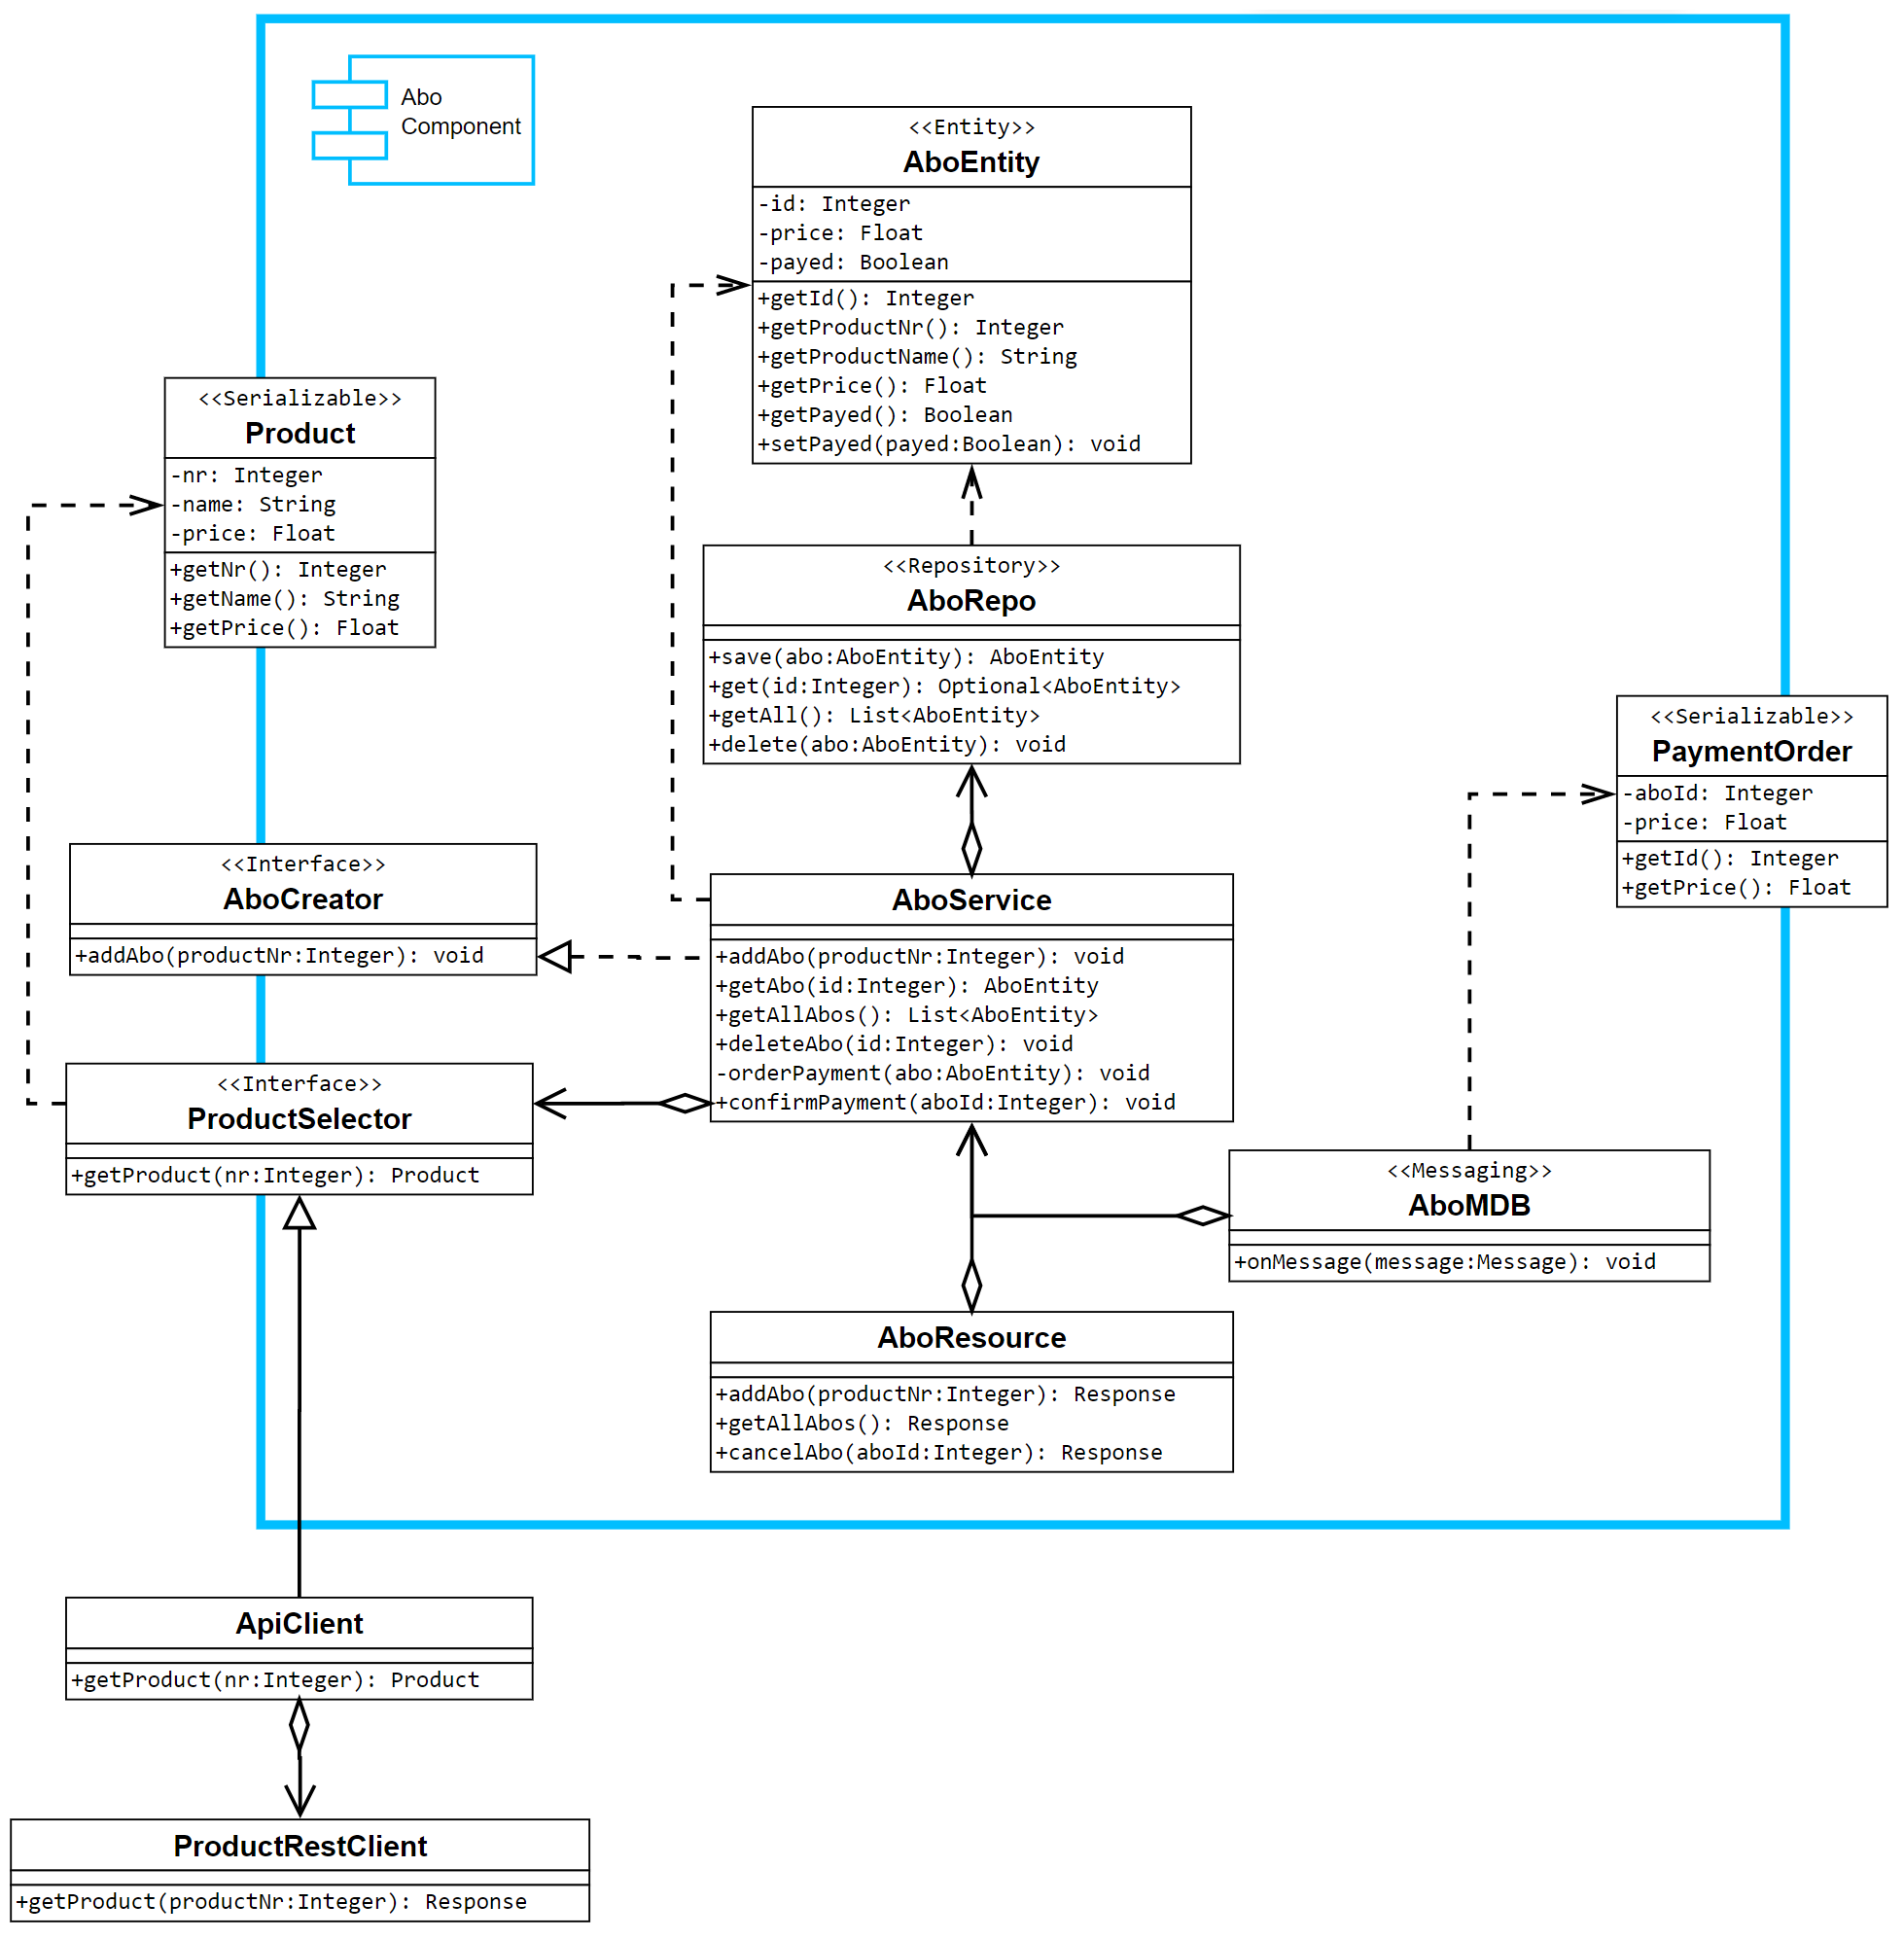
Microservices for an application with Spring Boot. Transformed from the monolithic REST-API. Service Modules are as
independent as possible.
Usage
cd ./REST_Microservices- Start Microservice Cluster with
docker-compose up(first start has sometimes race-conditions, with initial exceptions please restart again) - Open Service API Documentations
System Requirements:
- Java
- Maven
- ActiveMQ
- MySQL
- Docker
Angular 13-Frontend for all REST APIs. Make sure to set the correct Backend-URL in
the environment.
The application represents a shop for products that need frequent payments. The user can add or delete available products, put them into the cart and checkout the cart. The frequent payments will be done in the background and the bank will stack up with the abonnements.
| Angular |
|---|
| app root |
| backend connector |
| dependencies |
| dockerfile |
Keep in mind there is no real error handling implemented. Keep an eye on the console (Browser F12) if there are some issues.
Usage
Change to the directory: cd ./REST_Client_UI
Development Server:
Run npm install to install the dependencies and ng serve for a dev server. Navigate
to http://localhost:4200/. The app will automatically reload if you change any of the source
files.
Docker Container:
- Run
docker build -t client-ui:latest . - Start with
docker run -p 4200:4200 --name client-ui client-ui:latest - Open http://localhost:4200/ in the browser.
System Requirements:
- NodeJS
- Docker
An advanced topic for microservices is the deployment on a Kubernetes Cluster for the container orchestration. To get
an idea of Kubernetes, a small demo with MiniKube will be explained.
MiniKube provides a Master Node and Worker Node on the local machine. It requires another virtual machine
manager
such as Docker, Hyper-V or VirtualBox to do that.
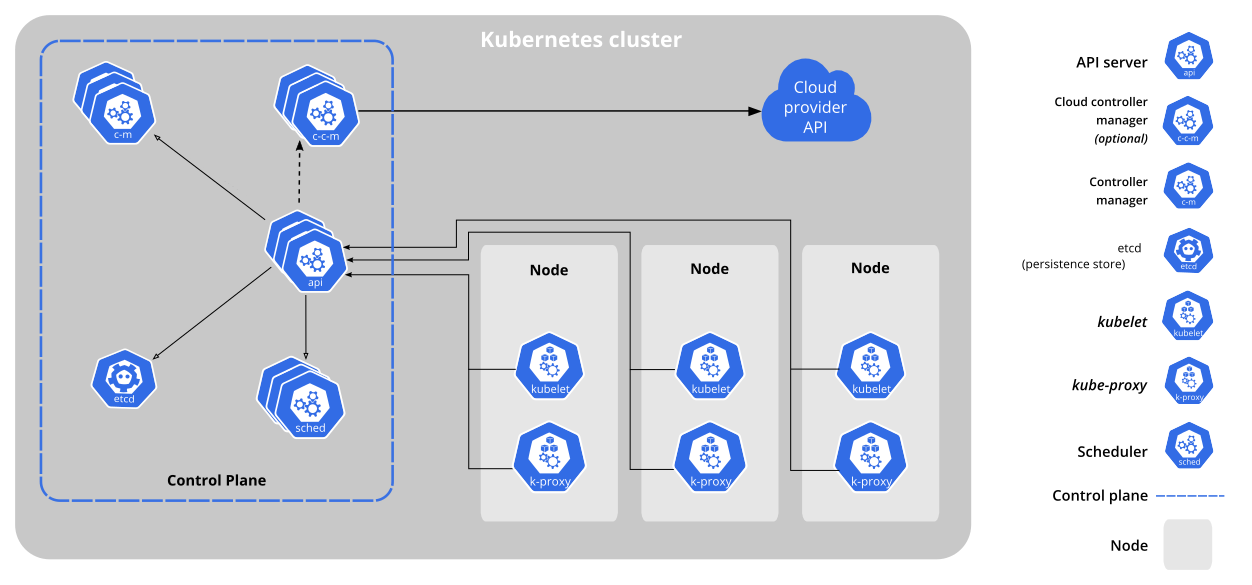
In general the Master Node provides services like an API Server, Scheduler or Controller Manager. The
Worker Nodes run the Pods with the Containers and are managed by the master.
For the communication with the API Server of the Cluster, the UI or CLI of Kubernetes can be used as clients. The
CLI is provided by Kubectl and already installed with MiniKube.
Follow the Official Kubernetes Installation Guide with a comfortable description.
Quick Kubernetes Installation Guide
- Install the
minikube.exe - Test command:
kubectl version - If the command is unknown: (otherwise the installation is finished)
- Set System Environment Variables:
- Edit >
PATH> New:C:\Program Files\Kubernetes\Minikube
Follow the Official Helm Installation Guide with a comfortable description.
Quick Helm Installation Guide
- Download the last Helm Release
- Unpack it and move the binary to
C:\Program Files\Helm - Set System Environment Variables:
- Edit >
PATH> New:C:\Program Files\Helm - Test command:
helm version
System Requirements:
- Docker
Run following commands to start the cluster:
minikube startminikube statusminikube dashboard
Additional commands:
- Start in debug mode:
minikube start --alsologtostderr - Stop the cluster:
minikube delete - Basic Controls
The deployment could be done with the Kubectl CLI to access the Kubernetes API Server. This produces a lot of
effort for multiple services and applications. To make things easier, Helm can
be used.
Helm is a tool that provides a Manager for Helm Charts that bundle YAML Files with different configurations.
In combination with the Templating Feature, blueprints can be created to make configurations easier. The values from
the Helm Charts will get injected into the final deployment configuration for Kubernetes.
In a nutshell each YAML Files for a Pod gets bundled into a Helm Chart to simplify the configuration and to make it reusable.
Helm 2 vs. 3
In Helm 2 a Tiller Service was implemented in the Kubernetes Cluster. It enabled Release Management to upgrade
or rollback in between different versions of the deployment. Because this service had too much power, it became a
security issue. Therefore, Helm 3 removed Tiller for more security with the loss of the release management.
Helm Chart Structure
Create new chart: helm create MyChart
MyChart/
   Chart.yaml     --> meta information
   values.yaml    --> values for the template files
   charts/        --> chart dependencies
   templates/     --> actual template files
   configs/       --> config maps for applications
To deploy the application on the local MiniKube, the containers need to be build fist with the docker-image-build.sh. Then the Helm Chart can be packaged:
The Helm Chart will be available and explained in the future
helm package HelmChartAfter that we can install the archive file on the running Kubernetes Cluster:
helm install release1 HelmChart-0.1.0.tgz- Download: Java 11+
- Install the executable
- Set System Environment Variables:
- New:
JAVA_HOME=C:\Program Files\Java\jdk-11 - Edit >
PATH> New:%JAVA_HOME%\bin - Test command:
java -version
- Download: Maven 3.6.3+
- Unzip it to:
C:\Program Files\maven - Set System Environment Variables:
- New:
MAVEN_HOME=C:\Program Files\maven - Edit >
PATH> New:%MAVEN_HOME%\bin - Test:
$ mvn -v
- Download: ActiveMQ 5.17+
- Unzip it to:
C:\Program Files\activemq - Set System Environment Variables:
- Edit >
PATH> New:C:\Program Files\activemq\bin - Test command:
activemq start - Admin page: http://localhost:8161/admin with
admin,admincredentials.
- Download: MySQL 8 Server
- Install the executable
- Select
Server only - Default
rootpassword:password(not for productive DB!)
- Download: NodeJS
- Install the executable
- Install the Angular CLI:
npm install -g @angular/cli@13.3.9
- Download: Docker Desktop
- Install the executable
