A lightweight, memory-safe, and blazingly fast Rust-based type-1 research hypervisor with hooks for Intel VT-x, focused on studying the core concepts of virtualization.
Note: The Illusion hypervisor (Windows UEFI Blue Pill Type-1 Hypervisor in Rust) is more stable, supports more features, and is overall better designed. The Matrix hypervisor (Windows Kernel Blue Pill Type-2 Hypervisor in Rust) is an older, experimental version and is not intended for production use. Both projects serve as templates to help people get started with hypervisor development in Rust.
- ✅ Hidden System Call (Syscall) Hooks Via System Service Descriptor Table (SSDT).
- ✅ Hidden Kernel Inline Hooks.
- ✅ Hidden Model Specific Registers (MSR) Hooks.
- ❌ Hidden Interrupt Descriptor Table (IDT) Hooks.
- ❌ Hidden Hardware Debug Register Breakpoints.
- ✅ Extended Page Tables (EPT).
- ✅ Memory Type Range Registers (MTRRs).
- ❌ Intel Processor Trace (PT).
- ❌ Support for running as a nested hypervisor under Microsoft Hyper-V (Type-2) with Virtualization Based Security (VBS) Enabled.
- ❌ Support for running as the primary hypervisor on top of Microsoft Hyper-V (Type-1) with Virtualization Based Security (VBS) Enabled.
- ✅ VM Exit Handling:
ExceptionOrNmi (#GP, #PF, #BP, #UD)(0),InitSignal(3),StartupIpi(4),Cpuid(10),Getsec(11),Hlt(12),Invd(13),Vmcall(18),Vmclear(19),Vmlaunch(20),Vmptrld(21),Vmptrst(22),Vmresume(24),Vmxon(27),Vmxoff(26),Rdmsr(31),Wrmsr(32),MonitorTrapFlag(37),Rdtsc(49),EptViolation(48),EptMisconfiguration(50),Invept(53),Invvpid(55),Xsetbv(55).
- ❌ Neither basic nor advanced techniques to evade hypervisor detection will be implemented in the public version of this hypervisor.
- ✅ Intel processors with VT-x and Extended Page Tables (EPT) support.
- ❌ AMD processors with AMD-V (SVM) and Nested Page Tables (NPT) support.
- ✅ Windows 10 - Windows 11, x64 only.
- Install Rust from here.
- Install cargo-make:
cargo install cargo-make.
- Debug:
cargo make build-debug. - Release:
cargo make build-release.
-
Build the Project
Follow the build instructions provided in the previous sections to compile the project.
-
Set Up VMware Workstation
Configure VMware Workstation to boot into the firmware setup on the next boot and to use the physical USB drive as the boot device:
- Add a Hard Disk:
- Go to
VM -> Settings -> Hardware -> Add -> Hard Disk -> Next -> SCSI or NVMe (Recommended) -> Next -> Use a physical disk (for advanced users) -> Next -> Device: PhysicalDrive1 and Usage: Use entire disk -> Next -> Finish.
- Go to
- Add a Serial Port:
- Go to
VM -> Settings -> Add Serial Port -> Finish. - Select
Use output file: C:\Users\memN0ps\Documents\GitHub\illusion-rs\logs.txtto direct the Serial Port output from COM1 to thelogs.txtfile. (You can choose any location, but the preference is within the project directory).
- Go to
- Boot Options:
- If you're not using the automated PowerShell script, start the VM by clicking
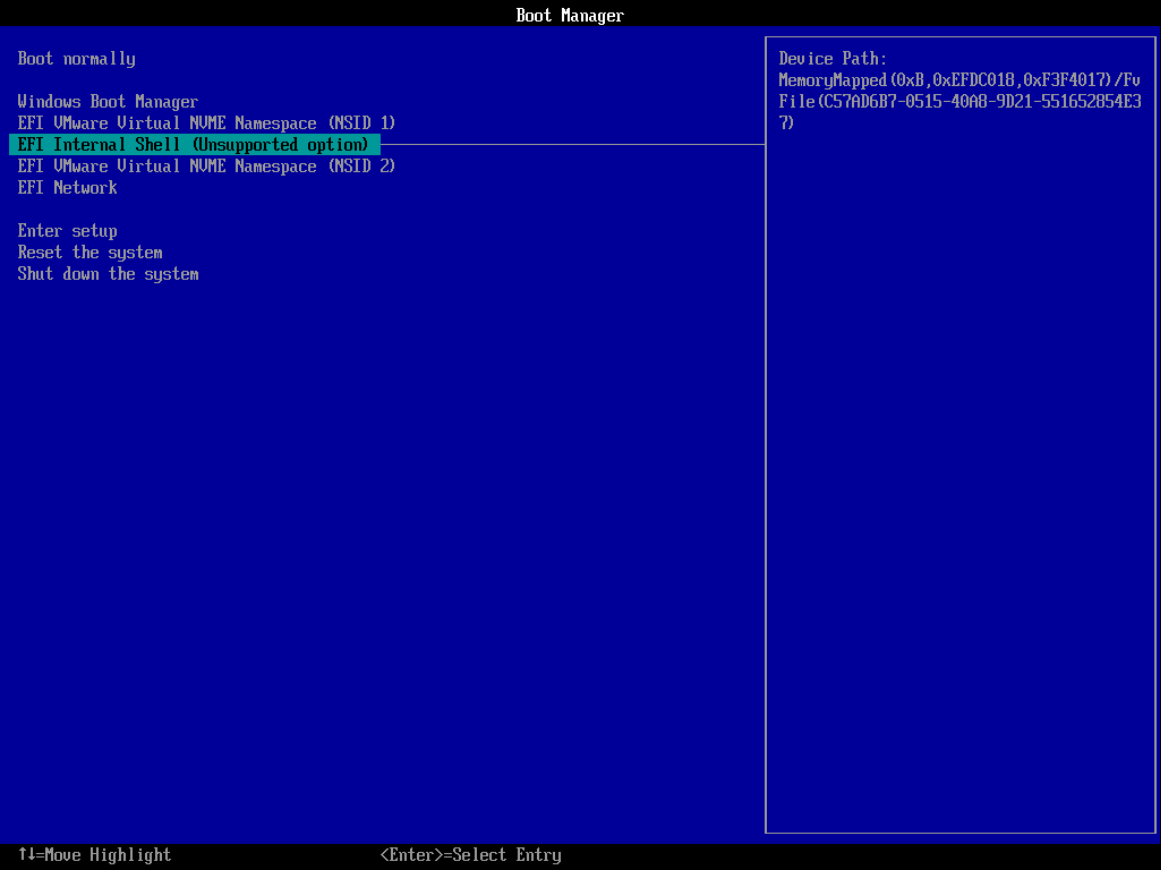
Power On to Firmware. - Select
Internal Shell (Unsupported option)orEFI VMware Virtual SCSI Hard Drive (1.0).
- If you're not using the automated PowerShell script, start the VM by clicking
- Add a Hard Disk:
-
Run the PowerShell Script
Execute the following PowerShell script to automate the setup process. Make sure to modify the paths according to your environment.
### Change paths according to your environment ###

# Set build type to either 'debug' or 'release'
$buildType = "debug" # Use this line for a debug build
# $buildType = "release" # Uncomment this line and comment the above for a release build

# Define the file path to copy all EFI files based on the build type
$efiFilePaths = ".\target\x86_64-unknown-uefi\$buildType\*.efi"

# Define the destination path on the USB drive D:\
$usbFilePath = "D:\"

# Define the path to the VMX file
$vmxPath = "C:\Users\memN0ps\Documents\Virtual Machines\Class_Windows\Class_Windows.vmx"

# Define the path to the vmrun.exe file
$vmrunPath = "C:\Program Files (x86)\VMware\VMware Workstation\vmrun.exe"

# Define the path to the log file
$logFilePath = ".\logs.txt"

# Copy all EFI applications to the D:\ drive
Copy-Item -Path $efiFilePaths -Destination $usbFilePath

# Print the contents of the D:\ drive to verify the copy operation
Get-ChildItem -Path D:\ -Recurse

# Append configuration to the VMX file for booting into firmware setup on next boot
Add-Content -Path $vmxPath -Value "bios.forceSetupOnce = `"TRUE`""

# Check if the log file exists and delete it if it does
if (Test-Path $logFilePath) {
    Remove-Item $logFilePath -Force
    Write-Host "Log file $logFilePath deleted."
}

# Start the VMware VM and open the GUI. Attempt to boot to firmware (if supported).
& "$vmrunPath" -T ws start "$vmxPath" gui

# Wait for the log file to be created (e.g., by another process) before proceeding to tail it
while (-not (Test-Path $logFilePath)) {
    Start-Sleep -Seconds 1
    Write-Host "Waiting for log file to be created..."
}

# Tail the log file to display live updates from the start
Write-Host "Monitoring log file from the start for updates..."
Get-Content -Path $logFilePath -Wait
-
Navigate to the USB Drive
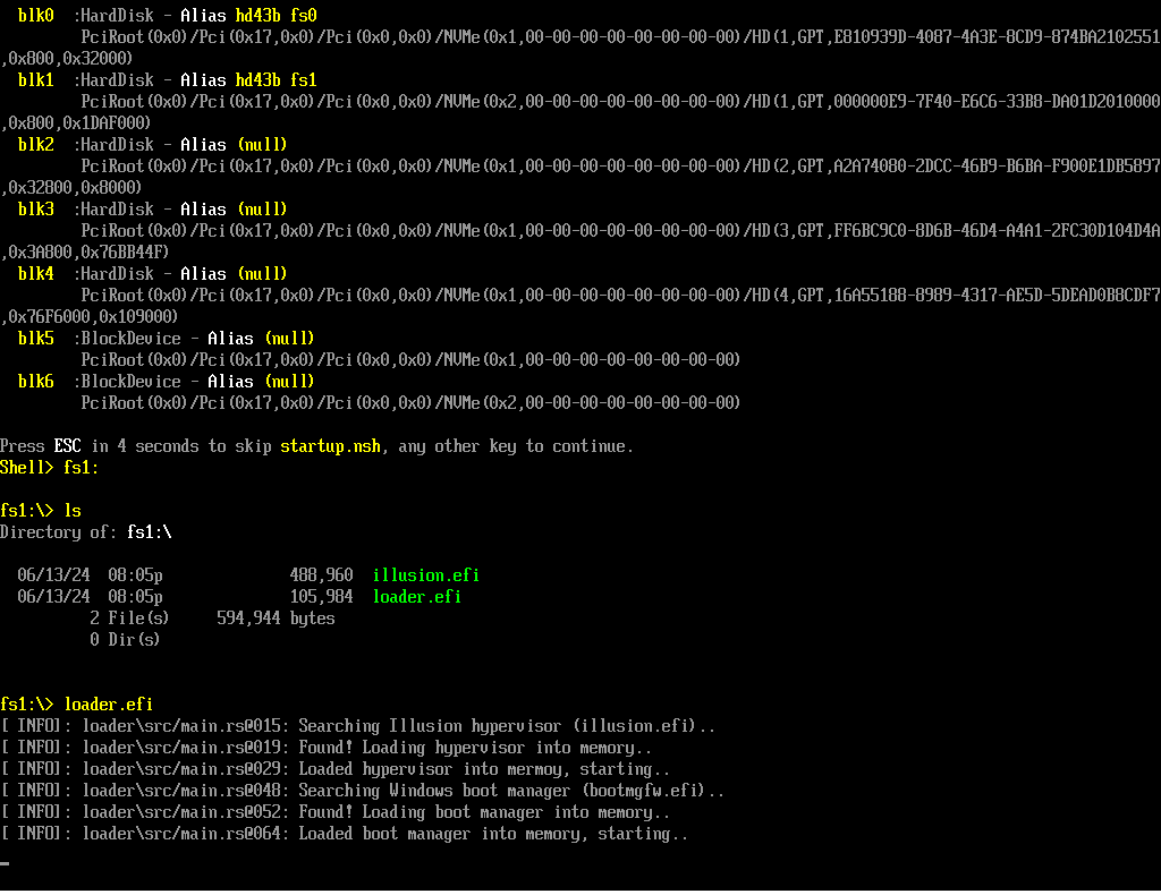
In the UEFI Shell, navigate to the USB drive and run the
loader.efifile.
-
Start the Hypervisor
The hypervisor will start, followed by the Windows Boot Manager (
bootmgfw.efi) to boot into Windows. -
Interact with the Hypervisor
Once Windows boots, use
client.exeto interact with the hypervisor and perform various operations, such as Hidden EPT hooks.
Big thanks to the amazing people and resources that have shaped this project. A special shout-out to everyone listed below. While I didn't use all these resources in my work, they've been goldmines of information, super helpful for anyone diving into hypervisor development, including me.
-
Daax Rynd (@daaximus): For his outstanding free series on hypervisor development, which is one of the best resources available and has greatly influenced my work with its thorough research and clear explanations. His support and answers to my questions were invaluable in getting me started with hypervisor development:
-
Satoshi Tanda (@tandasat): Satoshi Tanda's guidance, projects, and structured training programs have been incredibly helpful. His detailed explanations and contributions on GitHub have significantly enhanced my understanding, making him a great mentor throughout my journey:
- Hypervisor Development for Security Researchers.
- Hypervisor 101 in Rust.
- Additional Projects: Hello-VT-rp, DdiMon, HyperPlatform, MiniVisorPkg.
-
Jess (@jessiep_): For his invaluable support and collaboration in several areas of this project, providing essential insights and expertise, and for his quick responses to my questions.
-
Drew (@drew): For his help, guidance, and quick responses to my questions in various aspects of hypervisor development.
-
Sina Karvandi (@Intel80x86): For his detailed free Hypervisor From Scratch series:
-
Matthias (@not-matthias): For his impactful work on the amd_hypervisor project, which greatly inspired and influenced this research.
-
Nick Peterson (@everdox) and Aidan Khoury (@ajkhoury): For their insightful explorations into hypervisor introspection and syscall hooking:
-
Secret Club: Insights into anti-cheat systems and hypervisor detection, which also inspired this project:
-
Other Essential Resources:
- Intel's Software Developer's Manual.
- Maurice Heumann's (@momo5502) Detecting Hypervisor-Assisted Hooking.
- Guided Hacking's x64 Virtual Address Translation on YouTube.
- UnKnoWnCheaTs forum post by @namazso.
- RVM1.5, Barbervisor, rustyvisor, orange_slice, mythril, uhyve, maystorm.
- AMD-V Hypervisor Development by Back Engineering, bluepill by @_xeroxz.
- hvpp by @wbenny.
- HyperHide by @Air14.
- How AetherVisor works under the hood by M3ll0wN1ght.
- Rust library to use x86 (amd64) specific functionality and registers (x86 crate for Rust).
- DarthTon's HyperBone (based on the legendary Alex Ionescu's version) on UnknownCheats.
- Joanna Rutkowska: Pioneering the Blue Pill Hypervisor Concept, one of the earliest proofs of concept.
Special thanks to:
- Daax Rynd.
- Satoshi Tanda (@tandasat).
- Drew (@drew).
- iPower (@iPower).
- Namazso (@namazso).
- Jess (@jessiep_).
- Matthias @not-matthias.
- @felix-rs / @joshuа.
- Ryan McCrystal / @rmccrystal.
- Jim Colerick (@vmprotect).
- Xitan (@xitan).
This project is licensed under the MIT License. For more information, see the MIT License details.


