This doc described the steps of deploying Tars framework, aimed to make users have a whole cognition of deploy, running and test Tars framework.
If you use Tars for production environment, the deployment steps is similar, but you need pay more attention to fault-tolerant. You can join us for discussion, the QQ group code is 579079160.
| Software | Software requirements |
|---|---|
| linux kernel version: | 2.6.18 or later (Dependent OS) |
| gcc version: | 4.8.2 or later、glibc-devel(Dependent c++ framework tools) |
| bison version: | 2.5 or later(Dependent c++ framework tools) |
| flex version: | 2.5 or later(Dependent c++ framework tools) |
| cmake version: | 2.8.8 or later(Dependent c++ framework tools) |
| mysql version: | 4.1.17 or later(dependency of framework running) |
| rapidjson version: | 1.0.2 or later(dependency of C++ framework) |
| nvm version: | 0.33.11 or later(Dependent web management system) |
| node version: | 8.11.3 or later(Dependent web management system) |
Hardware requirements: a machine running Linux.
If you don't have glibc, please install it first.
For example, run this command in Centos:
yum install glibc-devel
Cmake is the tool for compile tars.
Download cmake-2.8.8 source code, unzip:
tar zxvf cmake-2.8.8.tar.gz
Enter directory:
cd cmake-2.8.8
Steps as following(may sudo root first ):
./bootstrap
make
make install
Before installation, check whether ncurses and zlib have been installed. Execute these commands if not exist:
yum install ncurses-devel
yum install zlib-devel
set the installation directory, switch to user root.
cd /usr/local
mkdir mysql-5.6.26
chown ${normal user}:${normal user} ./mysql-5.6.26
ln -s /usr/local/mysql-5.6.26 /usr/local/mysql
Download mysql source (mysql-5.6.26), set charset to utf-8.
cmake . -DCMAKE_INSTALL_PREFIX=/usr/local/mysql-5.6.26 -DWITH_INNOBASE_STORAGE_ENGINE=1 -DMYSQL_USER=mysql -DDEFAULT_CHARSET=utf8 -DDEFAULT_COLLATION=utf8_general_ci
make
make install
Attention: If you use C++ to develop Tars service, please compile mysql as static library.
Now you can compile Tars framework of C++ version.
If you need build runtime environment for Tars framework, pelease switch to mysql administrator user and config mysql with following steps:
yum install perl
cd /usr/local/mysql
useradd mysql
rm -rf /usr/local/mysql/data
mkdir -p /data/mysql-data
ln -s /data/mysql-data /usr/local/mysql/data
chown -R mysql:mysql /data/mysql-data /usr/local/mysql/data
cp support-files/mysql.server /etc/init.d/mysql
yum install -y perl-Module-Install.noarch
perl scripts/mysql_install_db --user=mysql
vim /usr/local/mysql/my.cnf
Here is an example of my.cnf: **Tips: As the system will load /etc/my.cnf first,you may delect the /etc/my.cnf or copy the essential information from the following example and paste to /ect/my.cnf. Otherwise it will not work.
[mysqld]

# Remove leading # and set to the amount of RAM for the most important data
# cache in MySQL. Start at 70% of total RAM for dedicated server, else 10%.
innodb_buffer_pool_size = 128M

# Remove leading # to turn on a very important data integrity option: logging
# changes to the binary log between backups.
log_bin

# These are commonly set, remove the # and set as required.
basedir = /usr/local/mysql
datadir = /usr/local/mysql/data
# port = .....
# server_id = .....
socket = /tmp/mysql.sock

bind-address={$your machine ip}

# Remove leading # to set options mainly useful for reporting servers.
# The server defaults are faster for transactions and fast SELECTs.
# Adjust sizes as needed, experiment to find the optimal values.
join_buffer_size = 128M
sort_buffer_size = 2M
read_rnd_buffer_size = 2M

sql_mode=NO_ENGINE_SUBSTITUTION,STRICT_TRANS_TABLES
Start mysql
service mysql start
chkconfig mysql on
Stop mysql
service mysql stop
Add mysql execution path to environment variable for path.
vim /etc/profile
PATH=$PATH:/usr/local/mysql/bin
export PATH
Modify root's password
./bin/mysqladmin -u root password 'root@appinside'
./bin/mysqladmin -u root -h ${hostname} password 'root@appinside'
Add mysql dynamic library path to environment variable for path.
vim /etc/ld.so.conf
/usr/local/mysql/lib/
ldconfig
========================
The master-slave configuration for mysql can be found in internet.
Grant authority to master
GRANT REPLICATION SLAVE ON *.* to 'mysql-sync'@'%' identified by 'sync@appinside'
Configure slave for replication
change master to master_host='${slave Ip}',master_user='mysql-sync',master_password='sync@appinside' ,master_log_file='iZ94orl0ix4Z-bin.000004',master_log_pos=611;
stop slave
start slave
show master status\G;
show slave status\G;
For linux:
Nvm script installation provided by the official website
Execute the following command
wget -qO- https://raw.githubusercontent.com/creationix/nvm/v0.33.11/install.sh | bash
source ~/.bashrc
Install node and process manager pm2 for node applications with load function
nvm install v8.11.3
npm install -g pm2 --registry=https://registry.npm.taobao.org
Download TarsFramework source
Then change to build.
cd {$source_folder}/build
chmod u+x build.sh
./build.sh prepare
./build.sh all
Be care that the default mysql lib path which Tars use is /usr/local/mysql/ . If mysql is installed in different path, please modify the file CMakeLists.txt in build directory before compile.
Recompile if needed
./build.sh cleanall
./build.sh all
Change to user root, create the installation directory.
cd /usr/local
mkdir tars
chown ${normal user}:${normal user} ./tars/
installation
cd {$source_folder}/build
./build.sh install or make install
The default install path is /usr/local/tars/cpp。
If you want to install on different path:
**modify tarscpp/CMakeLists.txt**
**modify TARS_PATH in tarscpp/servant/makefile/makefile.tars**
**modify DEMO_PATH in tarscpp/servant/script/create_tars_server.sh**
grant all on *.* to 'tars'@'%' identified by 'tars2015' with grant option;
grant all on *.* to 'tars'@'localhost' identified by 'tars2015' with grant option;
grant all on *.* to 'tars'@'${hostname}' identified by 'tars2015' with grant option;
flush privileges;
Attention: Modify ${'localhost'} to real hostname from /etc/hosts.
Search the ip in the script under framework/sql,and replace with the above ip.
sed -i "s/192.168.2.131/${your machine ip}/g" `grep 192.168.2.131 -rl ./*`
sed -i "s/db.tars.com/${your machine ip}/g" `grep db.tars.com -rl ./*`
sed -i "s/10.120.129.226/${your machine ip}/g" `grep 10.120.129.226 -rl ./*`
Execute
chmod u+x exec-sql.sh
./exec-sql.sh
After execution of the script, there will be three databases created: db_tars, tars_stat and tars_property.
db_tars is the core database for framework, it consists of services info, service templates and service configuration, etc. tars_stat is the database for service monitor data.
tars_property is the database for service properties monitor data.
There are two kinds of framework services: One is basic core service(required), must be deployed by yourself. The other is basic general service, must be patched by management system.
The basic core services:
tarsAdminRegistry, tarsregistry, tarsnode, tarsconfig, tarspatch
The basic general services:
tarsstat, tarsproperty,tarsnotify, tarslog,tarsquerystat,tarsqueryproperty
First get the core services package, change to build directory and input:
make framework-tar
Framework.tgz will be created in current directory It contains tarsAdminRegistry, tarsregistry, tarsnode, tarsconfig and tarspatch deployment files.
Then make the general service package:
make tarsstat-tar
make tarsnotify-tar
make tarsproperty-tar
make tarslog-tar
make tarsquerystat-tar
make tarsqueryproperty-tar
The patch package can be deploy after the patch of management platform, see details in chapter 4.4
Change to user root, and create the deploy directory for basic service:
cd /usr/local/app
mkdir tars
chown ${normal user}:${normal user} ./tars/
Copy the framework service package to /usr/local/app/tars/ and unzip:
cp build/framework.tgz /usr/local/app/tars/
cd /usr/local/app/tars
tar xzfv framework.tgz
Modify the configuration file in corresponding conf directory for each service, pay attention to modify the ip address to your host's address:
cd /usr/local/app/tars
sed -i "s/192.168.2.131/${your_machine_ip}/g" `grep 192.168.2.131 -rl ./*`
sed -i "s/db.tars.com/${your_machine_ip}/g" `grep db.tars.com -rl ./*`
sed -i "s/registry.tars.com/${your_machine_ip}/g" `grep registry.tars.com -rl ./*`
sed -i "s/web.tars.com/${your_machine_ip}/g" `grep web.tars.com -rl ./*`
Execute tars_install.sh script in directory /usr/local/app/tars/ to start tars framework service:
chmod u+x tars_install.sh
tars_install.sh
If services are deployed on different machines, you need to deal with tars_install.sh script things manually.
Deploy management platform and launch web management platform to deploy tarspatch (the management platform and tarspatch must in the same machine), change to user root and execute:
tarspatch/util/init.sh
Play attention, after executing of above script, check if rsync alive.
Deploy tarspatch on management platform. Deploy tarsconfig on management platform.
you need configure monitor for tarsnode by crontab, ensure it'll be launched after crash:
* * * * * /usr/local/app/tars/tarsnode/util/monitor.sh
After success of basic core service installation, if you need to deploy tars-based service on different machine, install tarsnode first.
If you only deploy service on a single machine, ignore this section.
The details are similar to those described in last section. Change to user root, create the directory for deploy service in, as following:
cd /usr/local/app
mkdir tars
chown ${normal user}:${normal user} ./tars/
Copy the framework service package to /usr/local/app/tars/:
cp build/framework.tgz /usr/local/app/tars/
cd /usr/local/app/tars
tar xzfv framework.tgz
Modify the configuration file in corresponding conf directory for each service, don't forget to modify the ip address to your host's address:
cd /usr/local/app/tars
sed -i "s/192.168.2.131/${your_machine_ip}/g" `grep 192.168.2.131 -rl ./*`
sed -i "s/db.tars.com/${your_machine_ip}/g" `grep db.tars.com -rl ./*`
sed -i "s/registry.tars.com/${your_machine_ip}/g" `grep registry.tars.com -rl ./*`
sed -i "s/web.tars.com/${your_machine_ip}/g" `grep web.tars.com -rl ./*`
chmod u+x tarsnode_install.sh
tarsnode_install.sh
Configure a checking crontab for tarsnode,ensuring it's always alive:
* * * * * /usr/local/app/tars/tarsnode/util/monitor.sh
The name of the directory where management system source code in is web
Modify the configuration file and change the IP address in the configuration file to the local IP address, as follows:
cd web
sed -i 's/db.tars.com/${your_machine_ip}/g' config/webConf.js
sed -i 's/registry.tars.com/${your_machine_ip}/g' config/tars.conf
Install web management page dependencies, start web
cd web
npm install --registry=https://registry.npm.taobao.org
npm run prd
Create log directory
mkdir -p /data/log/tars
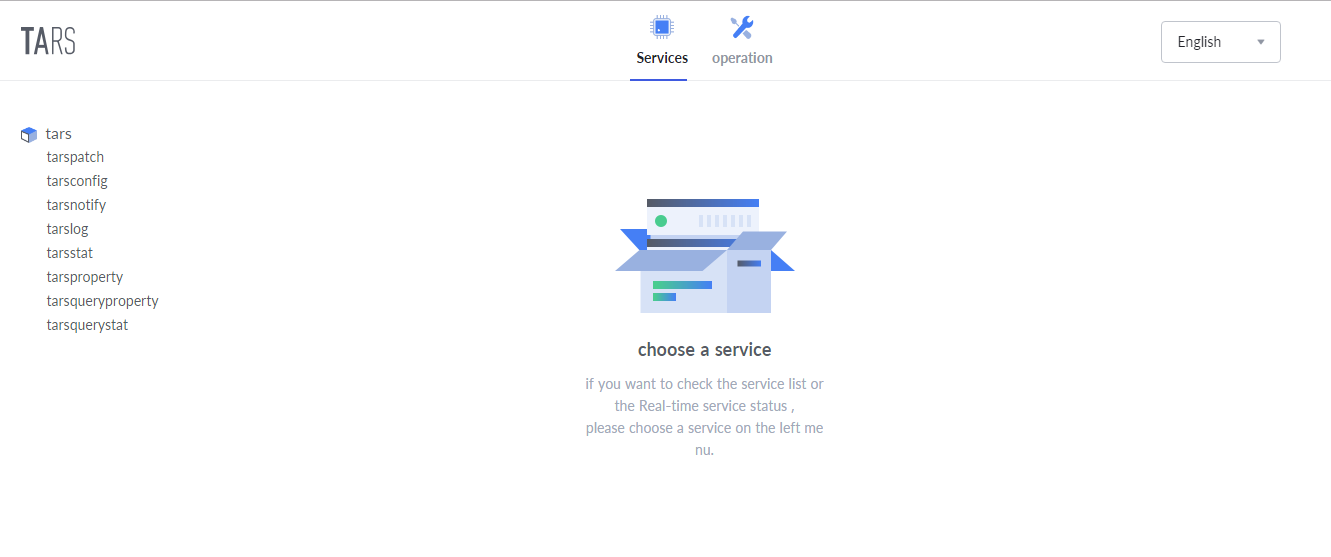
Visit the website, input ${your machine ip}:3000 into browser:
**Tips:There are some *.tgz files under the path of /usr/local/app/TarsFramework/build,such as tarslog.tgz, tarsnotify.tgz and so on. There are the patch package for the following services.
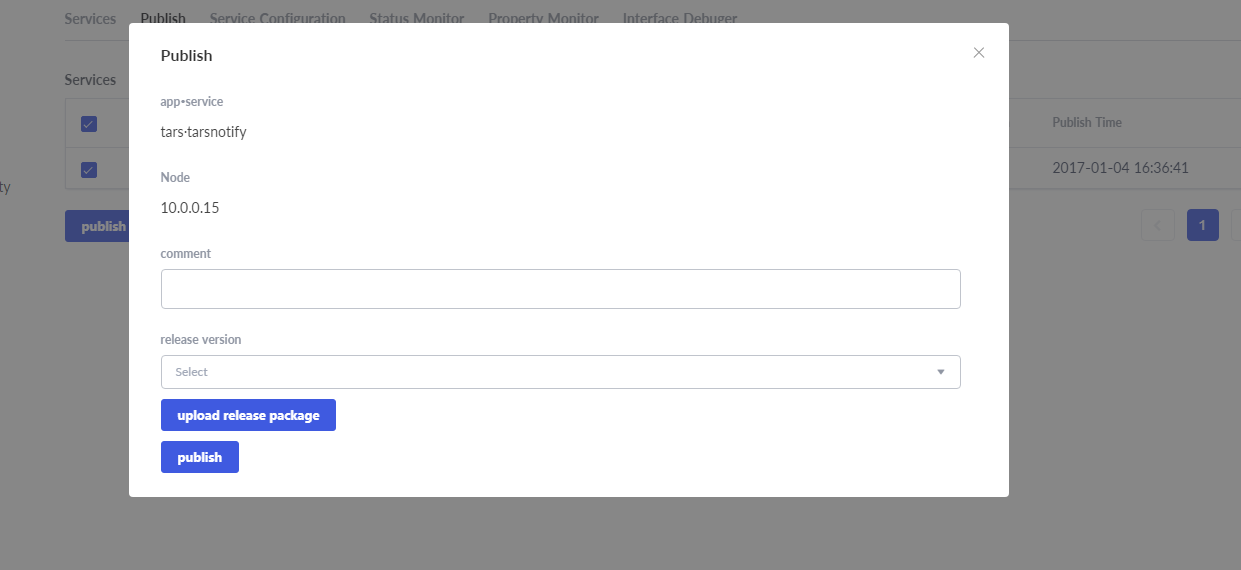
By default, tarsnofity is ready when install core basic service:
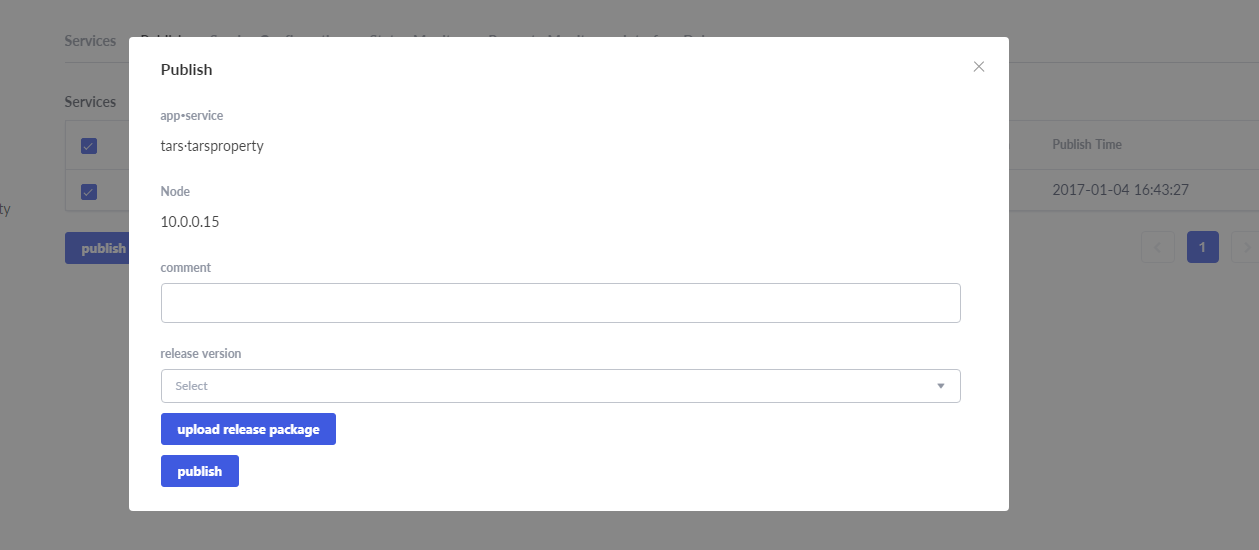
Upload patch package:
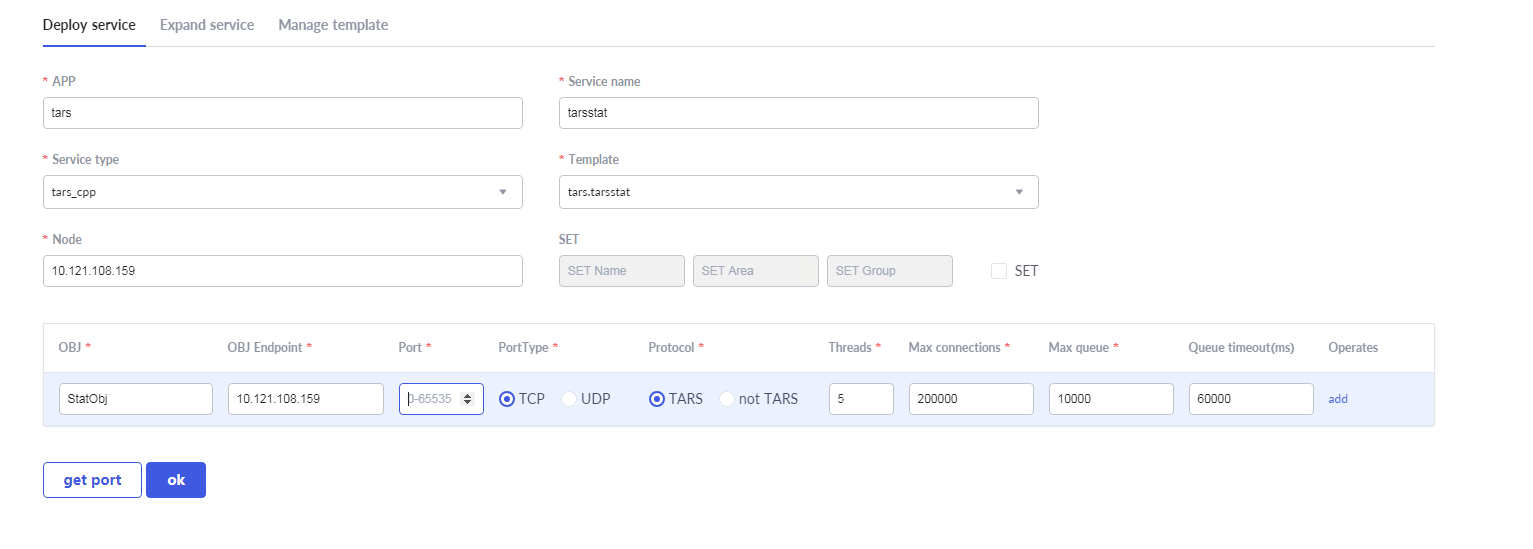
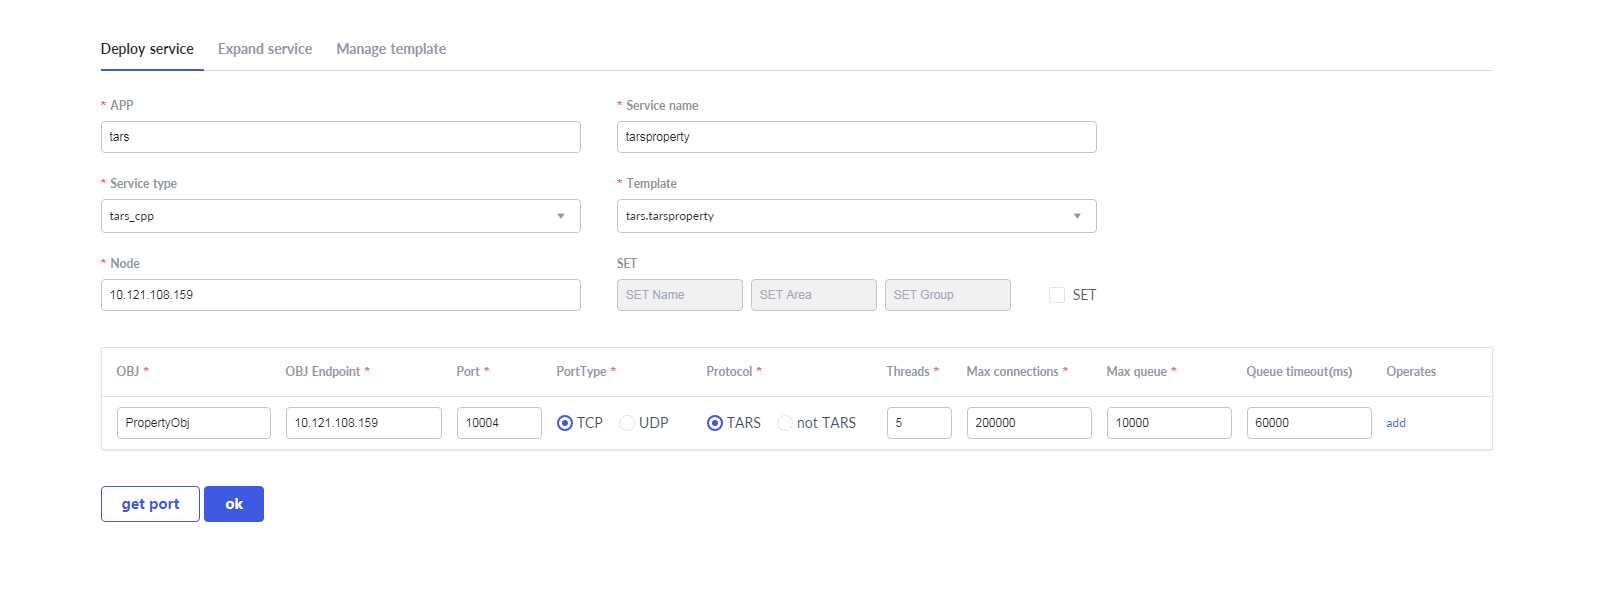
Deploy message:
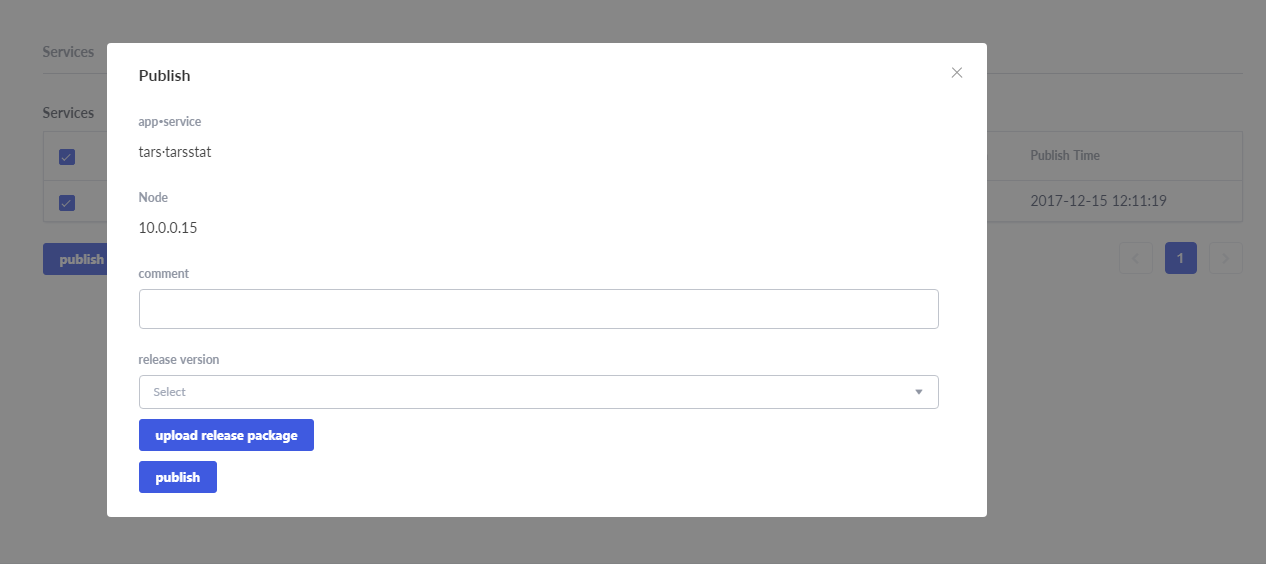
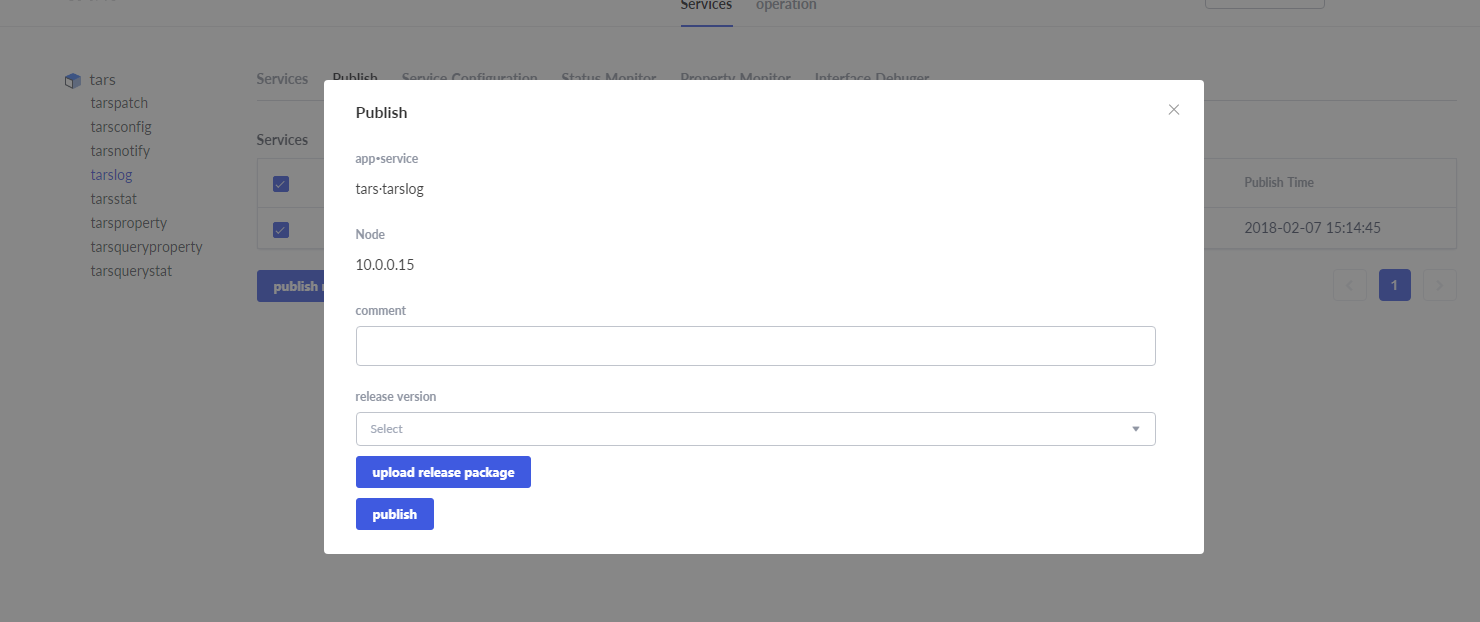
Upload patch package:
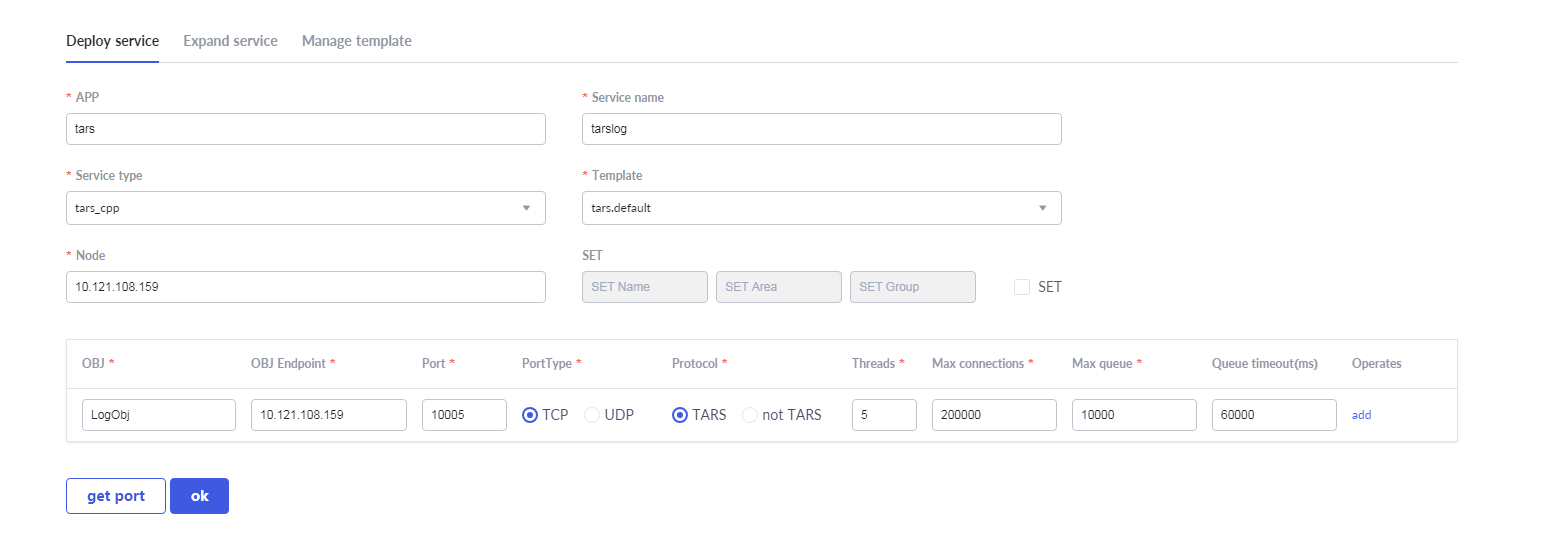
Deployment message:
Upload patch package:
Deployment message:
Upload patch package:
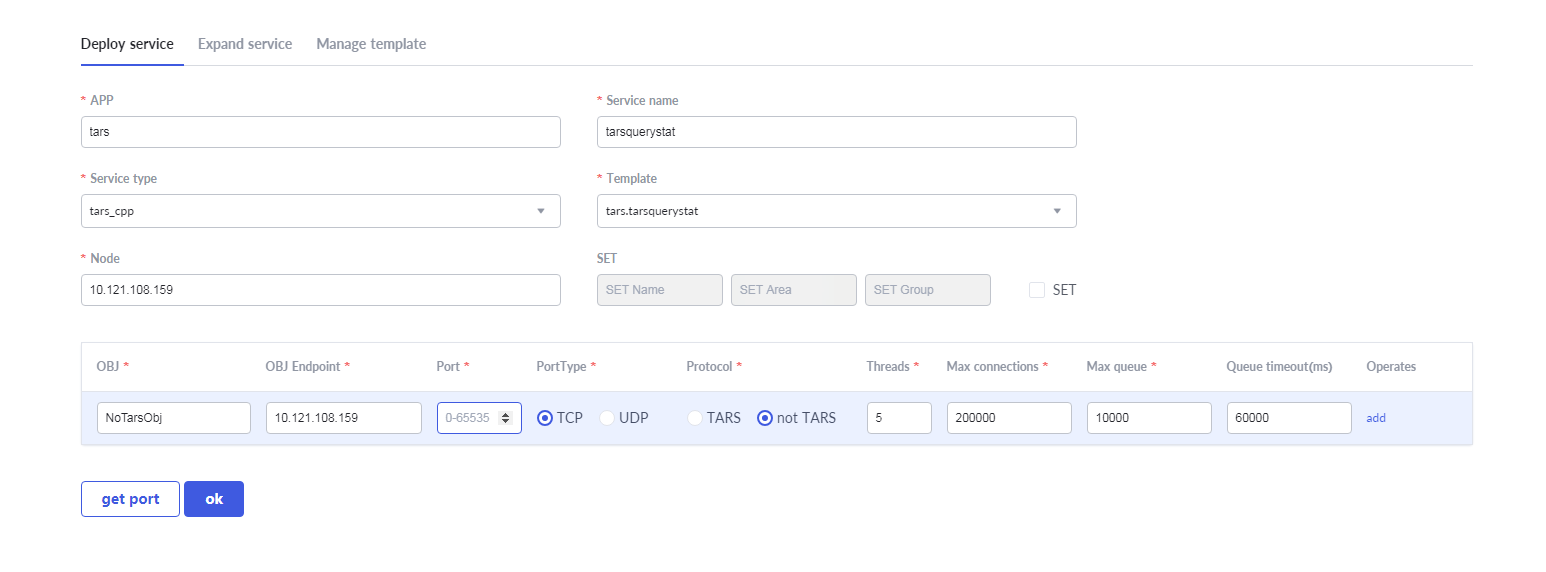
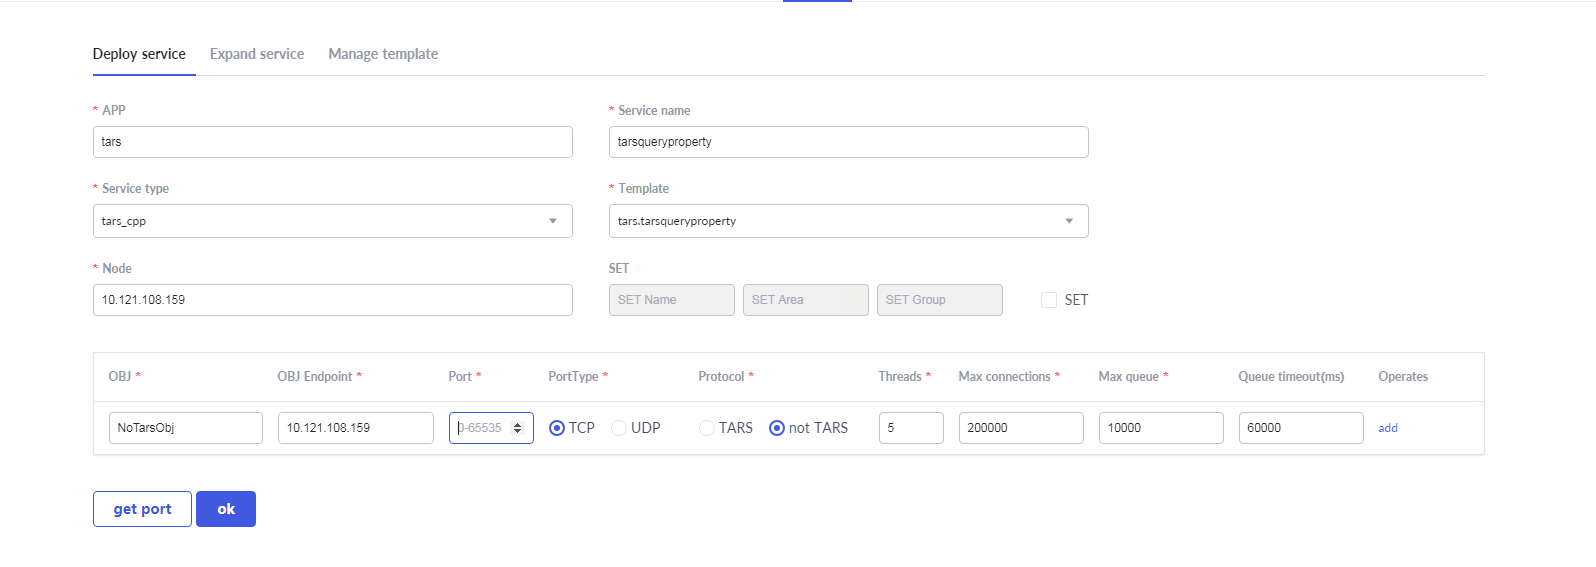
Deployment message: Pay attention: please select non-Tars protocol, because web platform use json protocol to get service monitor info.
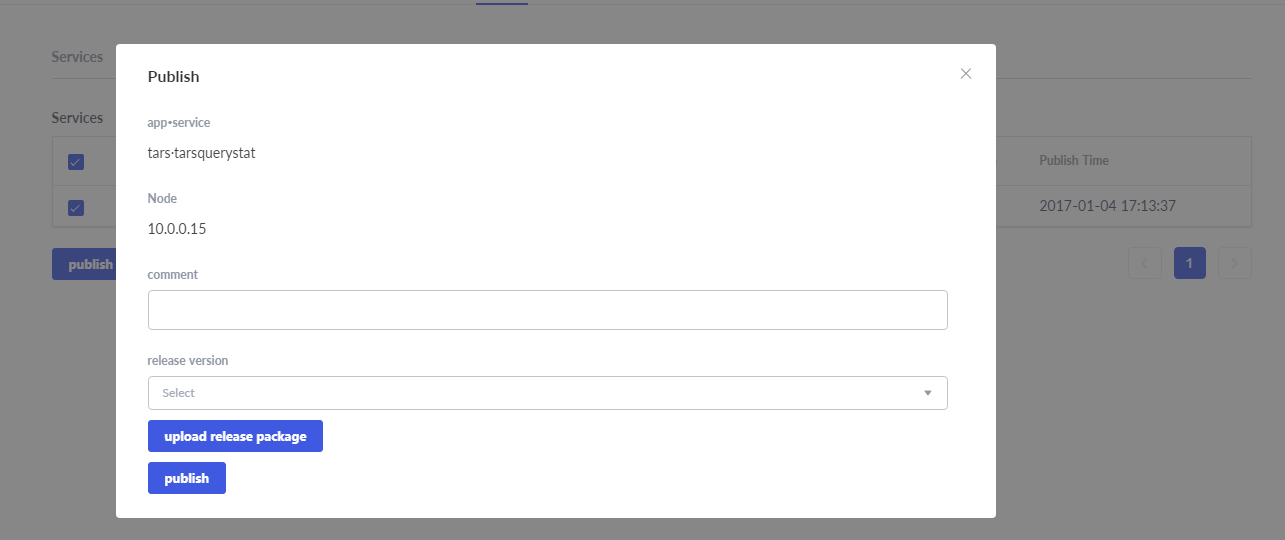
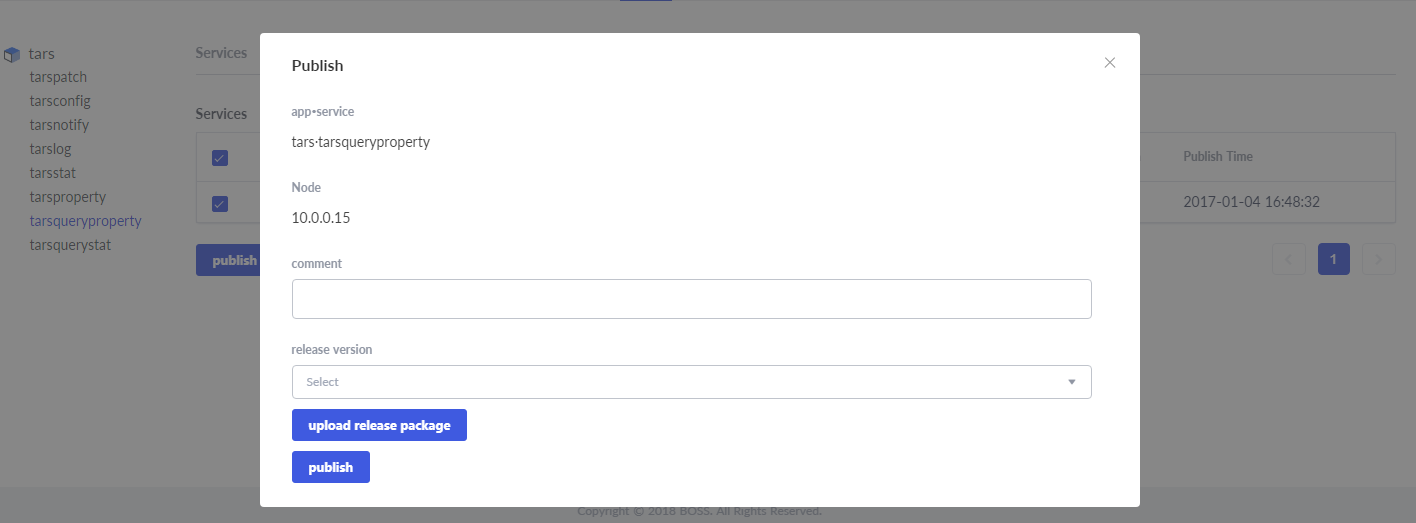
Upload patch package:
Deployment message: Pay attention: please select non-Tars protocol, because web platform use json protocol to get service monitor info.
Upload patch package:
Finally,there are some paths you may need to check for troubleshooting once the system doesn't work as you wish. (1) /usr/local/app/TarsWeb/log (2) /usr/local/app/tars/app_log/tars
Please refer to https://github.com/TarsCloud/Tars/tree/master/deploy
