This package converts the thumbnail that PrusaSlicer/OrcaSlicer bakes into the g-code file into the format that is read by the Neptune printers.
Modified image example:
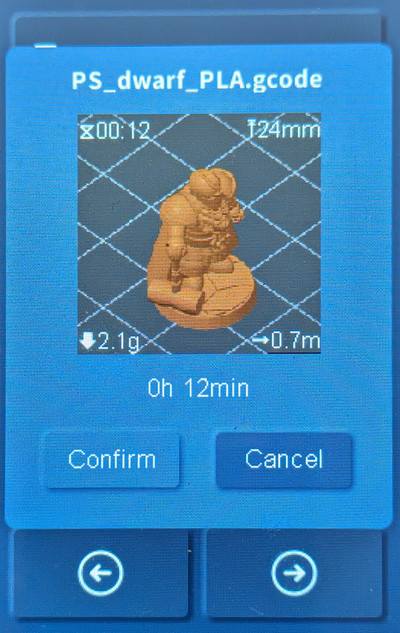
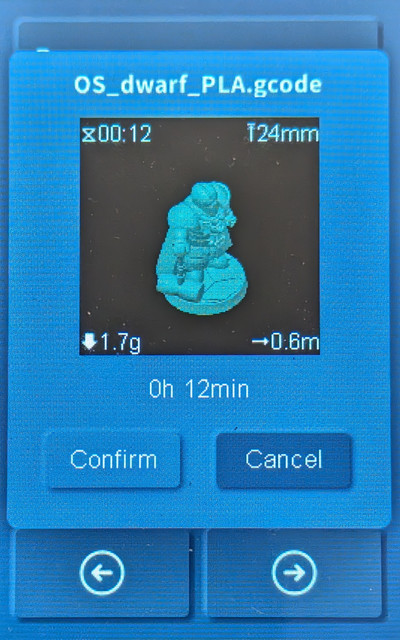
Photos of Neptune 4 screen (left -- from PrusaSlicer, right -- from OrcaSlicer):
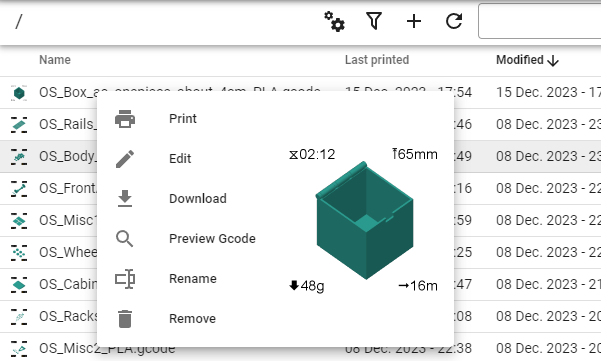
Example of modified image in Klipper UI (light theme):
I was not happy with previous implementations so tried to make it better. But ended up re-writing it :-)
Notable changes:
- Faster: it does not read all file content into memory, which is vital for big g-code files;
- Easier installation: image size should only be specified in slicer's printer settings and the script accepts PNG and JPG;
- More information on thumbnail: print duration, used filament weight, used filament length and model height;
- Better texts quality: texts added after image resizing, font size and texts positions adjusted automatically;
- Adjust g-code so completed percentage and remaining time are displayed correctly under the thumbnail (you need to tick "Support remaining times" checkbox in Printer Settings);
- Adjust original image that is displayed in Klipper UI (light and dark themes both supported);
- Supports PrusaSlicer and OrcaSlicer (the later one needed some additional tweaks to all above works).
- Download the latest release;
- Unzip the executable and put it to desired location.
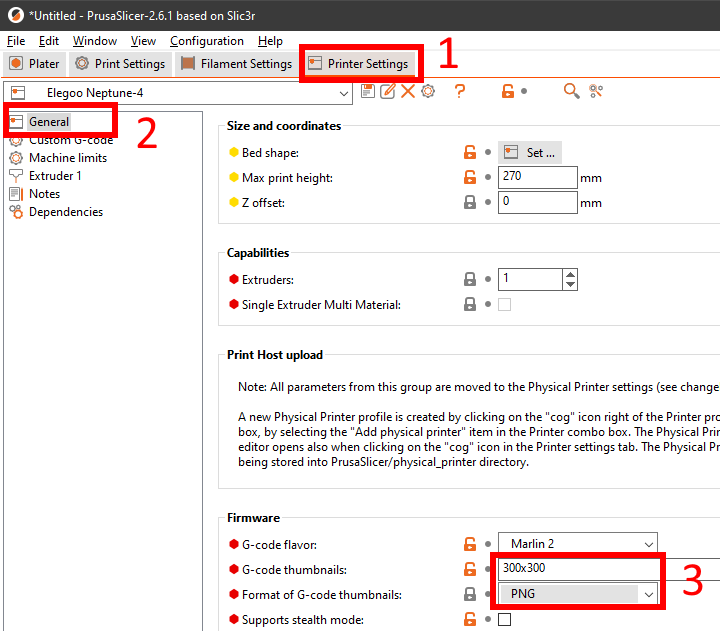
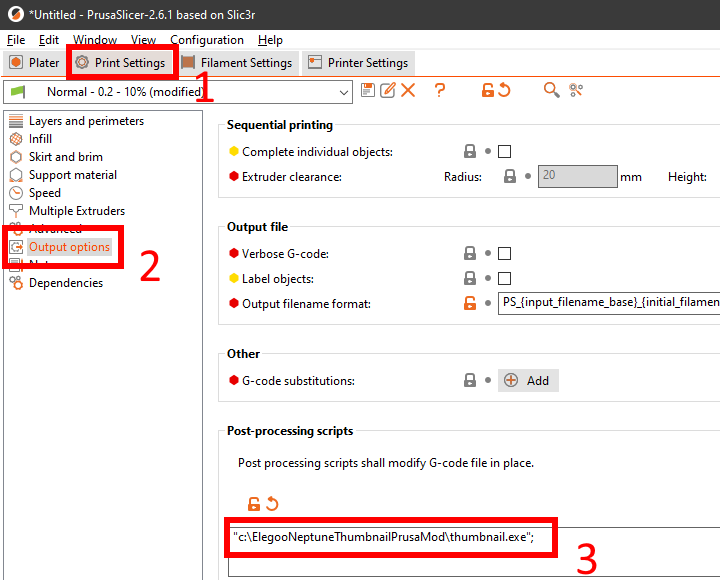
Printer Settings/General/G-code thumbnails-- put something like300x300;Printer Settings/General/Format of G-code thumbnailsselectPNGorJPG:Print Settings/Output options/Post-processing scripts- specify path to executable:"C:\Path\Where\You\Put\thumbnail.exe";:
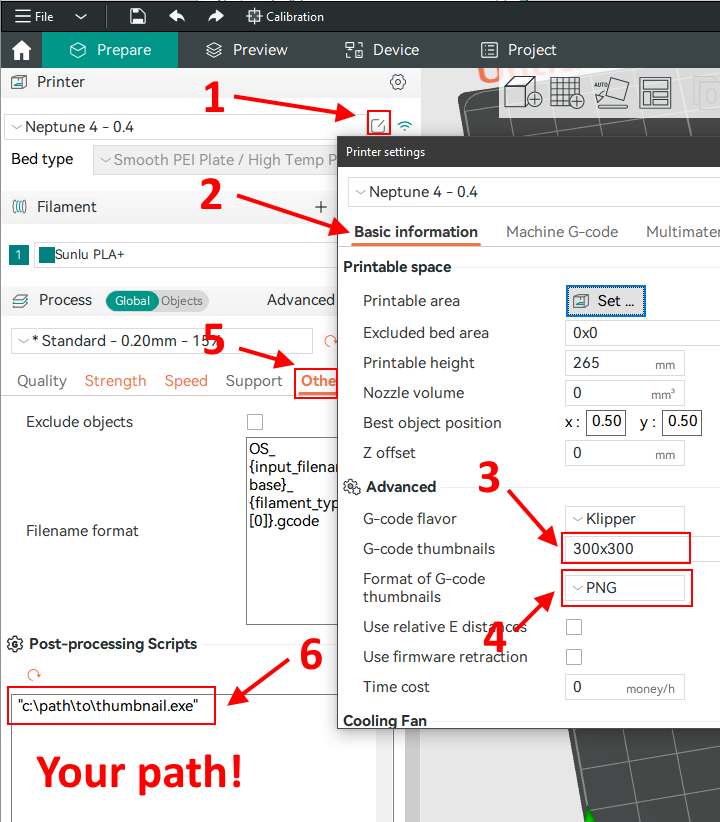
Printer Settings/Basic information/G-code thumbnails-- put something like300x300;Printer Settings/Basic information/Format of G-code thumbnailsselectPNGorJPG;Print Settings/Others/Post-processing Scripts- specify path to executable:"C:\Path\Where\You\Put\thumbnail.exe";:
PrusaSlicer/OrcaSlicer should now run the thumbnail.exe when you export your g-code.
In case of issues - check thumbnail.log.
If you do not specify any options, the first thumbnail from g-code file that is bigger than 100x100 will be used: decoded, resized, encoded into new format and injected back into g-code file.
If PrusaSlicer/OrcaSlicer is configured to add more than one thumbnail into g-code file, you can specify what thumbnail the script should use with option:
--image_size WIDTHxHEIGHT
If you do not want to run the supplied executable (as myself), you can always run the Python script directly:
- Install Python (remember directory where you installed it);
- Clone the repo (or download
thumbnail.py+lib_col_pic.pyand put them into the same folder); - In
Post-processing scriptsput"C:\Path\Where\You\Installed\python.exe" "C:\Path\Where\You\Put\thumbnail.py"; - Or, to hide the terminal window:
"C:\Path\Where\You\Installed\pythonw.exe" "C:\Path\Where\You\Put\thumbnail.py";
- Install Python (remember directory where you installed it);
- Install pyinstaller:
pip install pyinstaller; - Clone the repo;
- Open console, navigate to the repo folder and run
pyinstaller build.specor just run suppliedbuild.bat=>thumbnail.exewill be created indistfolder.
Works with these printers:
- NEPTUNE 3 PRO
- NEPTUNE 3 PLUS
- NEPTUNE 3 MAX
- NEPTUNE 4
- NEPTUNE 4 PRO
- NEPTUNE 4 PLUS
- NEPTUNE 4 MAX
Use the --old_printer argument for these printers:
- NEPTUNE 2
- NEPTUNE 2D
- NEPTUNE 2S
- NEPTUNE X
Tested with PrusaSlicer 2.6.1/2.7.0, OrcaSlicer 1.8.0/1.8.1/1.9.0/1.9.1 on Neptune 4.
--short_duration_formatUse short format for print duration: 1d 23:45 instead of 1d 23h 45m 56s. Who need these seconds, really?--debugPut additional debug information into log file (thumbnail.log) and save resized images in program folder. I will ask you to run with the option and supply log in case you face any issues.--old_printerGenerate thumbnails for Neptune 2 series printers & older--image_size 200x200Without this option the first thumbnail that is bigger than 100x100px from g-code file will be used. If specified, the script will try to find in g-code thumbnail with the specified image size. Script will report error if such thumbnail is not found. So I'd recommend not to use the option at all and only specify size 300x300 in 'Printer Settings'.--update_original_imageOriginal image (that is used by Klipper) is also modified with text info--original_image_light_themeOriginal image will be adjusted for light Klipper's theme (without this option it is adjusted for dark theme that is the default Klipper theme)
To add script's command line option in PrusaSlicer/OrcaSlicer, make sure you wrap them in double quotes:
"C:\ElegooNeptuneThumbnailPrusaMod\thumbnail.exe" "--image_size" "300x300";
fifonik
This repository is based on:
- TheJMaster28/ElegooNeptuneThumbnailPrusa
- Molodos/ElegooNeptuneThumbnails-Prusa
- sigathi/ElegooN3Thumbnail
Therefore it is released under the AGPL v3 license.


