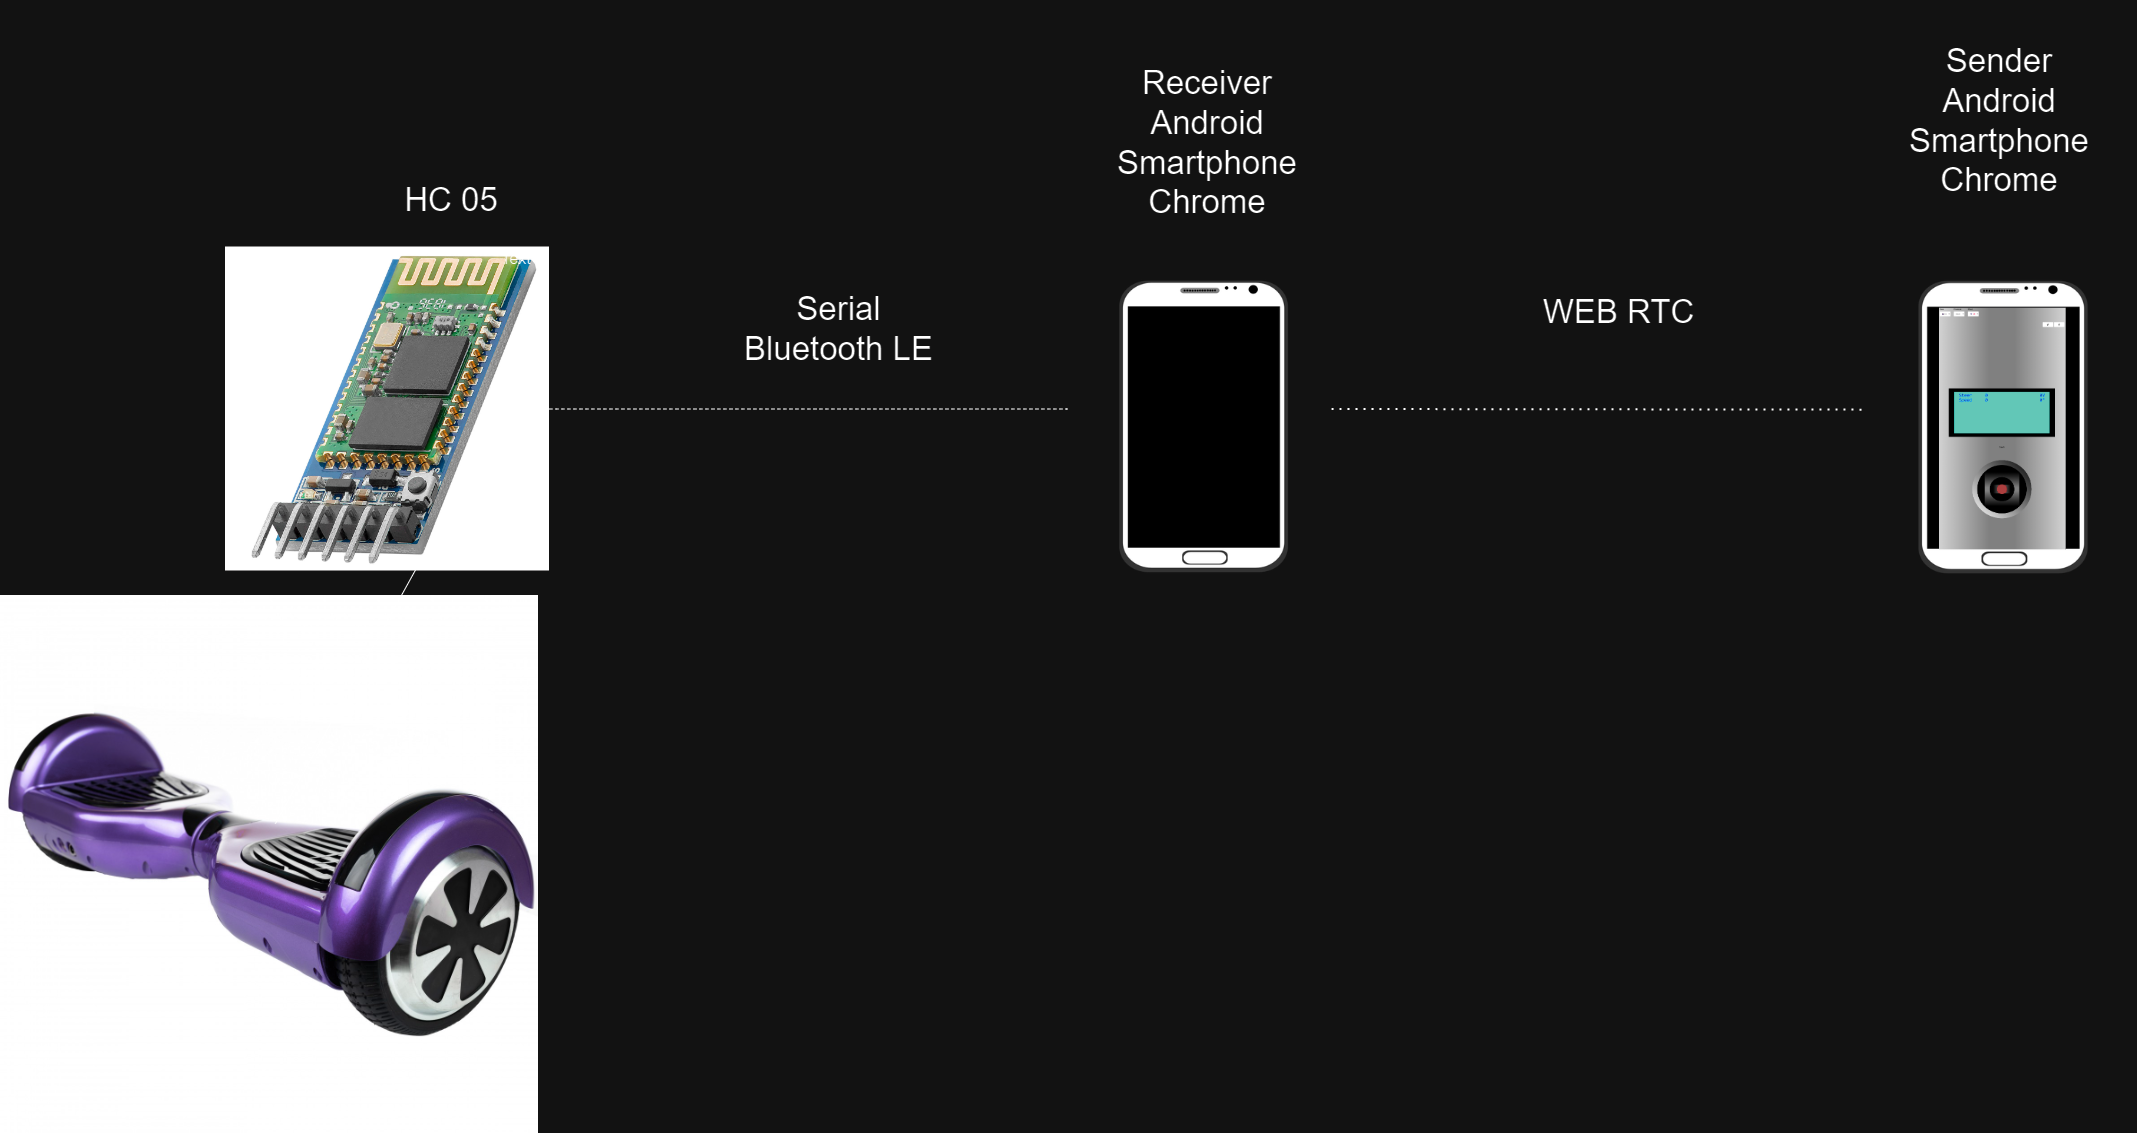
 This modified version of Hoverboard-Web-Serial-Control allows to use two instances of the control website:
https://fivef.github.io/Hoverboard-Web-Serial-Control/
One started on a receiver Android device and one on a sender Android device. The Joystick commands get forwarded to the receiver device via WebRTC and the receiver device sends the data to the Hoverboard (Via Serial/Blueooth LE serial)
- Sending of the joystick control data via webrtc.
- currently the RTC peer id is fixed. We need to create a new id and display it on the receiver. It has to be entered on the sender side.
- save RTC peer id in cookie on both sides to allow seamless reconnection.
- Fix button for RTC server
- Forwarding of the data via bluetooth
- Forwarding of the data via serial
Web tool to control hoverboard, log and plot output data through a simple webpage.
The tool doesn't need installation and is accessible via this link.
https://candas1.github.io/Hoverboard-Web-Serial-Control/
It works with USART serial protocol and USART DEBUG in following firmware:
https://github.com/EmanuelFeru/hoverboard-firmware-hack-FOC
The APIs are only supported on chromium based browsers like Chrome or Edge.
From a computer, you can use both WEB Serial API and WEB Bluetooth API.
From mobile, only WEB Bluetooth API is supported (not supported on IOS).
The tool is using Web Serial API to connect to the hoverboard through a COM port of your PC(FTDI,Bluetooth 2.0,...).
Select the required baud rate, click on connect button, and select the COM port corresponding to your FTDI/Bluetooth 2.0 device(e.g. HC-05).
The tool is using Web Bluetooth API to connect to Bluetooth BLE devices (e.g. AT-09, HM-10...).
Make sure you configured your BLE device with the right baud rate.
Click on connect button and select the right BLE device.
Serial over Classic bluetooth is not supported by this API yet but might be implemented in the future.
This view let's you visualize incoming Ascii and Binary messages:
- Pausing will stop automatic scrolling
If stats are enabled, you can visualize following information:
- Buffer write and read offset
- Number of successful messages
- Skipped Bytes
- Errors
In Ascii mode, commands can also be sent (can be used with debug protocol of FOC firmware)
If hoverboard is communicating through ASCII Serial debug (parameter DEBUG_SERIAL_USARTX should be enabled), messages in following format will be parsed and displayed in the log and in the chart.
in1:345 in2:1337 cmdR:0 cmdL:0 BatADC:0 BatV:0 TempADC:0 Temp:0\n
Other messages (first word not containing ':' ) will be simply displayed in the log.
For use when parameter FEEDBACK_SERIAL_USARTX is enabled in FOC Firmware.
Feedback is received through this Binary Serial Protocol.
Messages are being parsed and checksum is validated to discard transmission errors.
Parsed data is displayed in the log and in the graph.
This view let's you visualize a plot of received values:
- click on the legend to hide/show the values
- pause and scroll left to see old values
If subplots are enabled, each value will be visualized on a different axis.
This view will display a virtual RC remote to control the hoverboard if you use variant USART or IBUS.
You can use the mixer setting to assign the desired joystick.
For use when parameter CONTROL_SERIAL_USARTX is enabled in FOC Firmware, with the USART variant or DUAL INPUTS.
It will not work with parameter SIDEBOARD_SERIAL_USARTX as it's a different protocol(See Hovercar protocol).
The tool sends binary commands to control the hoverboard (Speed/steer) via the virtual controller with this Binary Serial Protocol.
For use when parameter SIDEBOARD_SERIAL_USARTX is enabled in FOC Firmware, with the Hovercar variant, USART variant, or DUAL INPUTS.
The tool sends binary commands to control the hoverboard via the virtual controller with this Binary Serial Protocol:
- Speed (Vertical axis of the joystick selected in the mixer)
- Steer (Horizontal axis of the joystick selected in the mixer)
- ON/OFF : to switch back to control with pedals(ADC) when using Hovercar variant in dual input mode
- Type : let's you switch between Commutation, Sinoisoidale and FOC
- Mode : let's you switch between Torque, Speed and Voltage mode
- FW : let's turn Field Weakening ON and OFF
For use with the IBUS variant or DUAL INPUTS of FOC firmware.
The tool sends Flysky Ibus frames to control the hoverboard via the virtual controller:
- Speed (Vertical axis of the joystick selected in the mixer) (channel 1)
- Steer (Horizontal axis of the joystick selected in the mixer) (channel 2)
- Switch A (channel 7)
- Switch B (channel 8)
- Switch C (channel 9)
- Switch D (channel 10)
Please note that FOC firmware is only using joytick values.
This mode is not working with BLE yet because of limitation of message size (20 bytes). It will probably be fixed when Chrome team implements Exchange MTU
-
Bluetooth
- Improve stability, automatically reconnect
-
Terminal view
- Possibility to select a different protocol for sending and receiving (e.g. sending UART binary but receiving ASCII debug
- Auto autoscroll
- App is freezing when returning to the terminal view and too many logs accumulated
-
Chart view
- Hidding a chart variable in subplot mode should hide the corresponding axis also
- Possibility to dowload csv file
-
Control view
- Possibility to use Sideboard protocol for sending commands
- Switches for sideboard/ibus protocol
- Hold mode to hold command even after release of the joystick during tests
-
Dash view
- Power consumption missing from FOC firmware (alternate protocol)
- Battery capacity in %
- Setting for wheel radius to have accurate speed KM/H
-
New views
- Interface for configuring the firmware (missing in firmware also)
- Settings view to be able to customize the tool ( refresh frequencies, serial frame structure, ... )