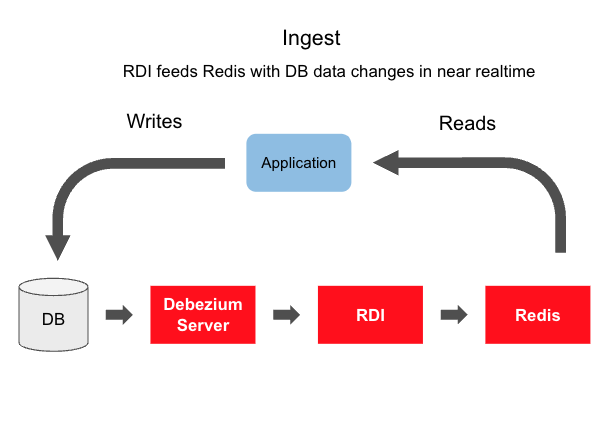
Caching patterns are well known techniques to access and keep data up to date in your caching layer.
One of the biggest challenges, it's to have data in the cache with the same state of the data in to the persistent datastore, that is the database.
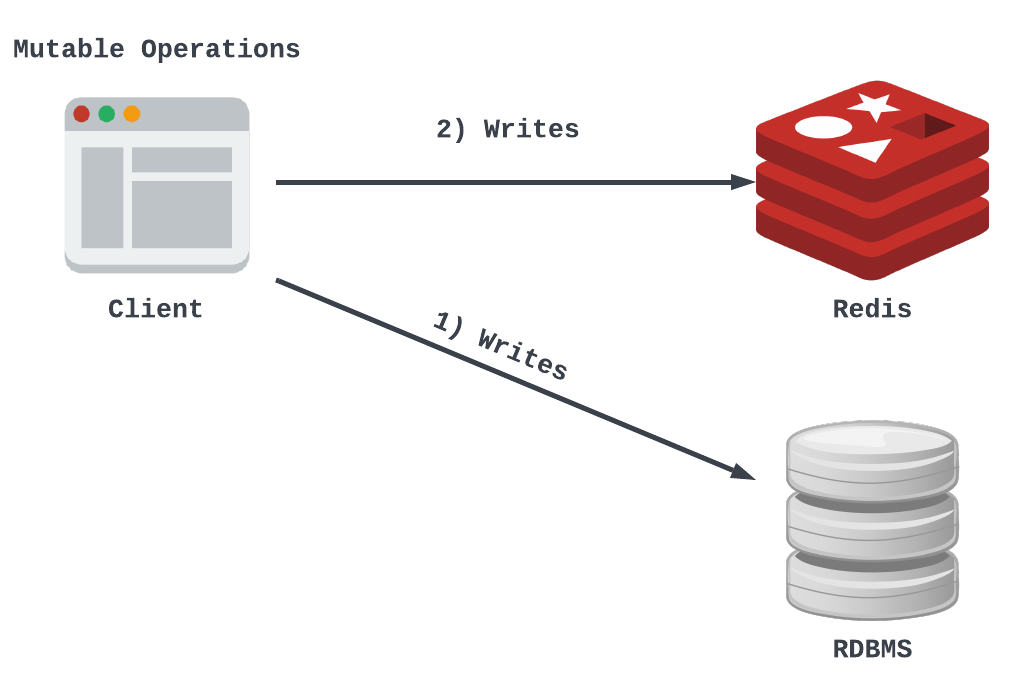
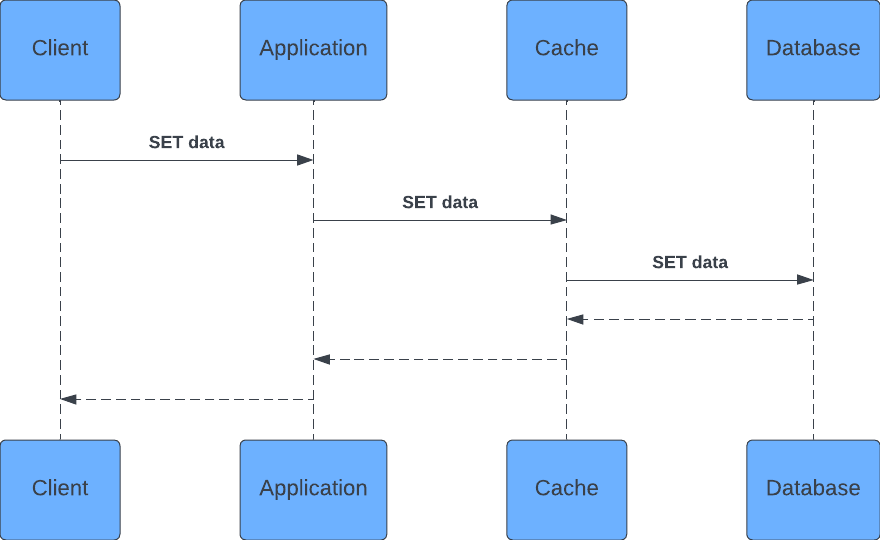
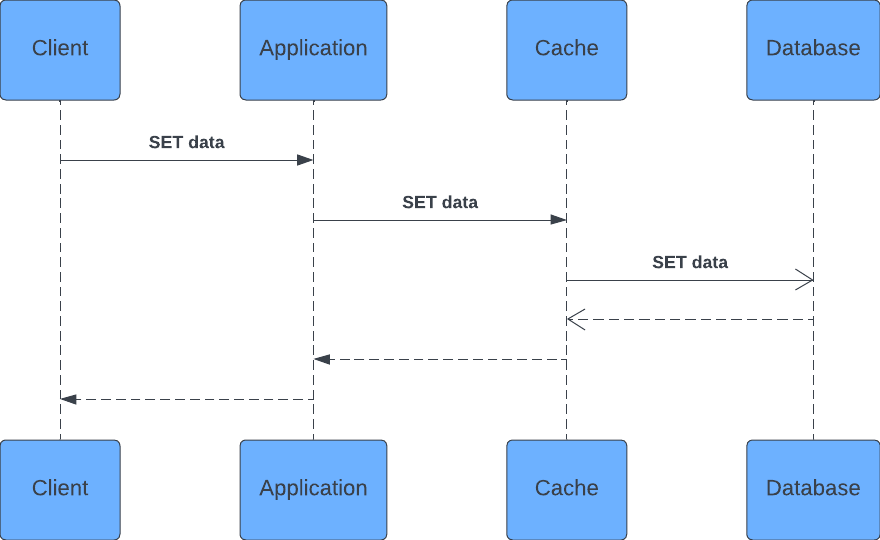
Most of the time, the synchronization between the cache and database is done at application level by implementing a dual write. Unfortunately this technique is just another problem to solve, in fact if one of the two writes fails, you might end up with inconsistent data.
Here is an example of a high level architecture for a dual write:
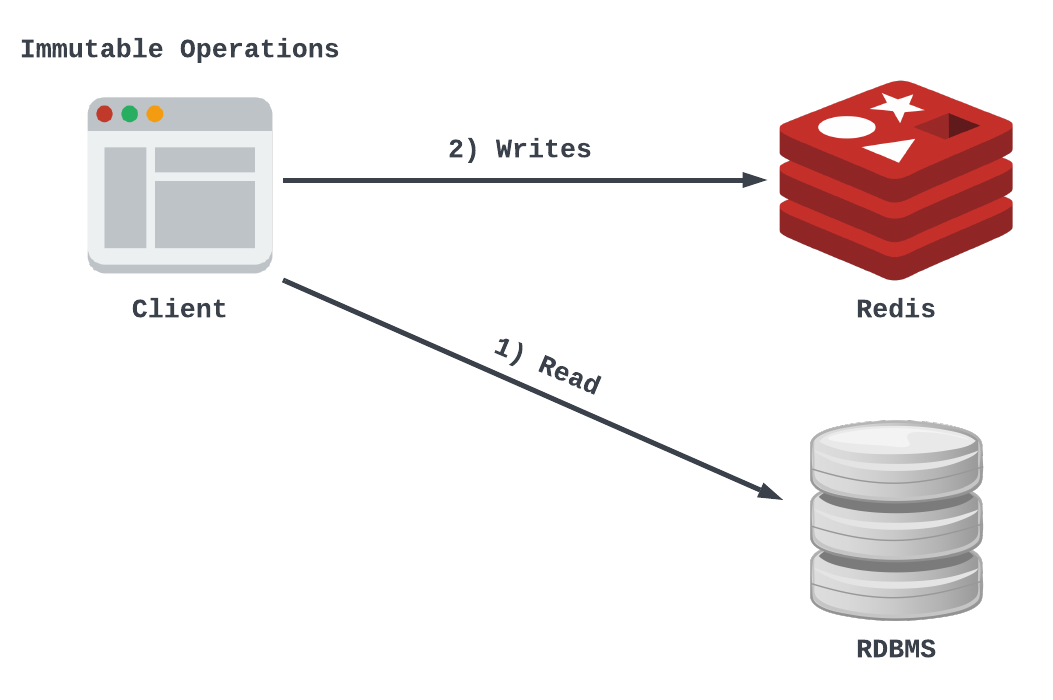
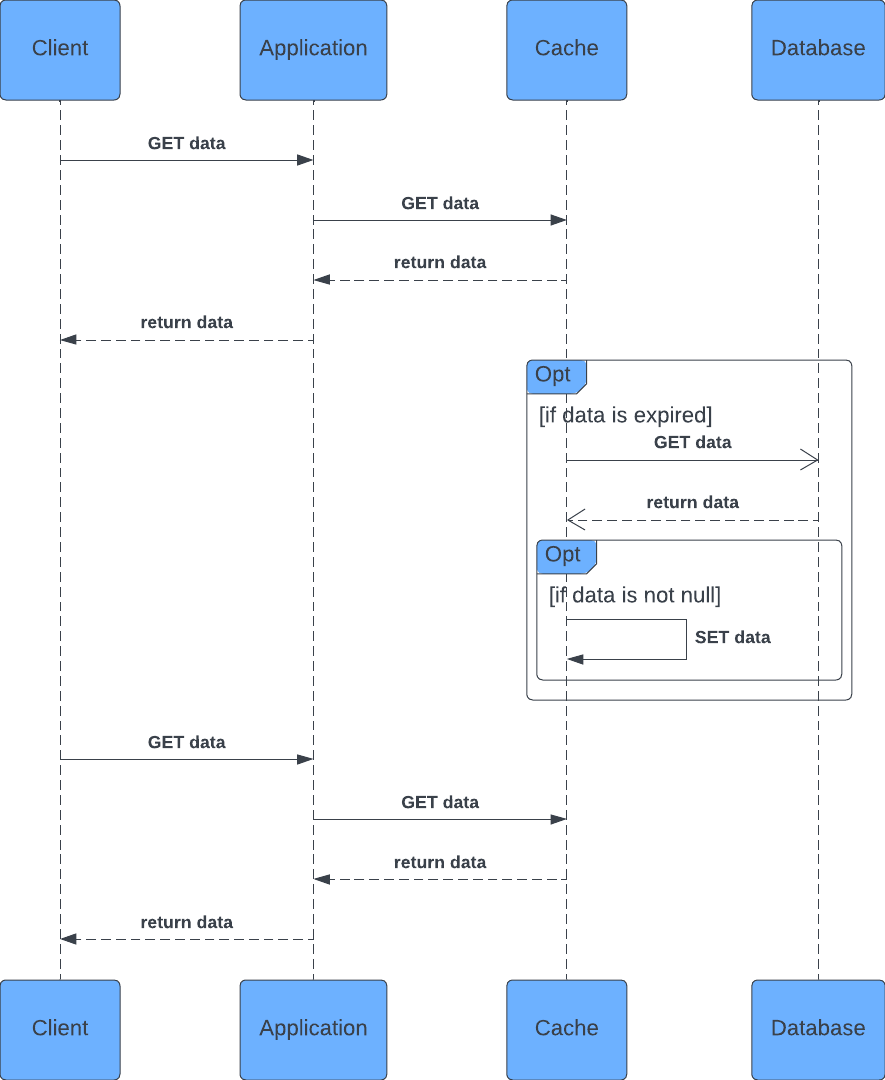
In case of reading data, the application needs to check if the data is available in cache, and if not, the application has to fetch ("1") the data from the database, put ("2") into the cache and then send it back to the requester. This technique is known with name of Cache-Aside or Lazy-Loading pattern, that will be also describe in the next section.
Here is an example of a high level architecture for such pattern:
In the next section I'll explain the most common patterns and how to implement them efficiently using Java 11, Redis and MySQL (it can be any database).
For sake of simplicity, the architecture will be based on Linux containers, using the Docker format image and Docker Compose to run them all together.
Here is the list of the most common used caching patterns:
- Cache-Aside (Lazy-loading)
- Read-Through
- Write-Through
- Write-Behind (Write-back)
- Refresh-Ahead
- Read-Replica
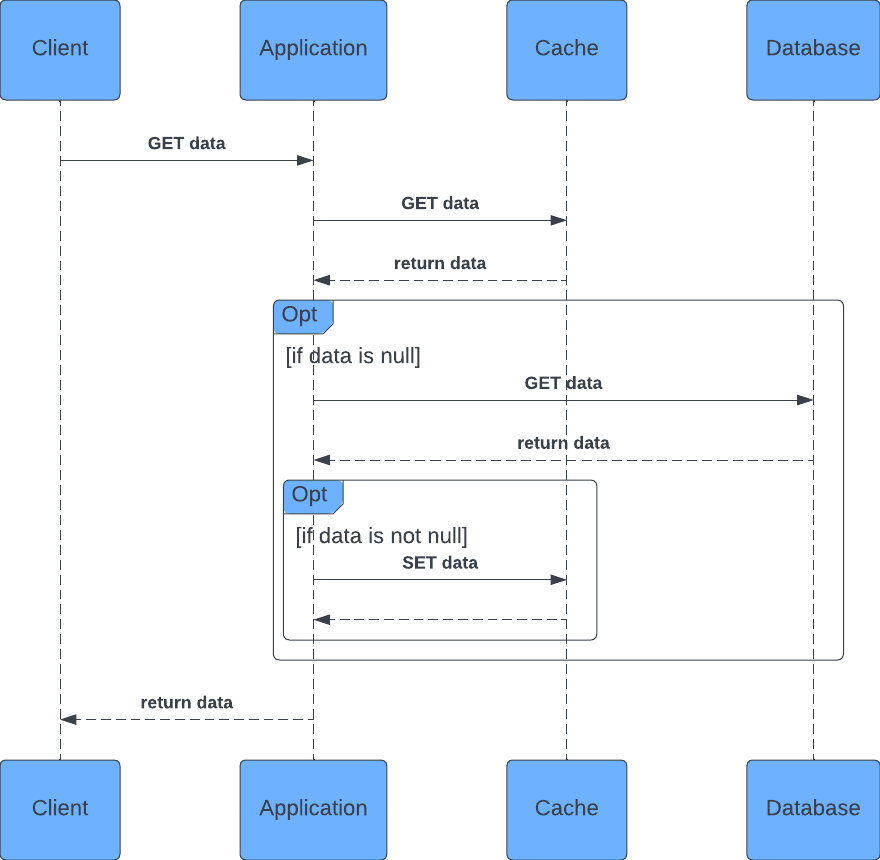
This pattern describes how the data should be retrieved. The application layer, the service, first checks if the data is available into the Redis cache.
If the data is available, it gets returned immediately to the requester.
If the data is not available, the service looks for it into the database. Once the data is retrieved from the database, it gets also set into the cache for later use, and finally returned to the requester.
More detail in the Caching at application layer section.
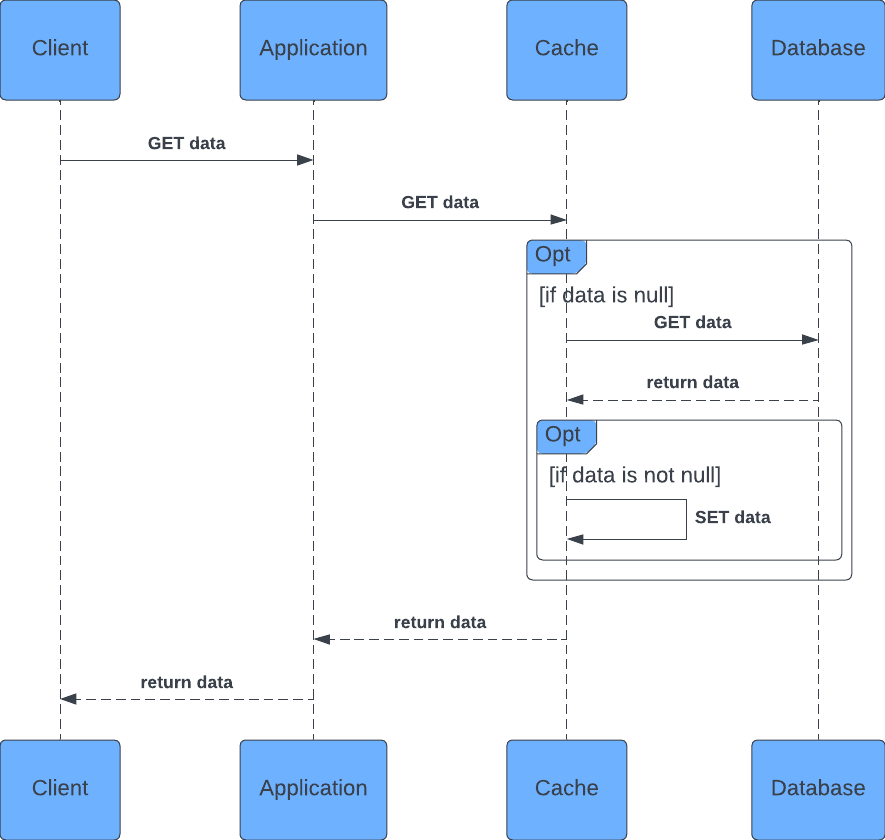
This pattern describes how the data should be retrieved. The application layer, the service, only connects to the Redis cache, without ever connecting to the database.
Thus, the service requests the data from the Redis cache. The caching layer, Redis, first checks if it has the data.
If the data is available, it gets returned immediately to the service.
If the data is not available, Redis looks for it into the database. Once the data is retrieved from the database, it gets set into the cache for later use, and finally returned to the service, and then to the requester.
More detail in the demo section.
This pattern describes how the data should be stored.
The application layer, the service, only connects to the Redis cache, without ever connecting to the database.
Thus, the service sends the data to be written into the Redis cache. The caching layer, Redis, stores the data, and then sends the data to be written into the database as well.
Then entire chain is synchronous.
This pattern could also be implemented at application layer, but it would end up in implementing the dual write, an anti-pattern.
More detail in the demo section.
This pattern describes how the data should be stored.
The application layer, the service, only connects to the Redis cache, without ever connecting to the database.
Thus, the service sends the data to be written into the Redis cache. The caching layer, Redis, stores the data, and then sends the data to be written into the database as well.
The last step of the chain is asynchronous, that is Redis calling the persistence layer.
Again, this pattern could also be implemented at application layer, but it would end up in implementing the dual write, an anti-pattern.
More detail in the demo section.
The Refresh-Ahead cache strategy, also known as Read-Ahead, involves pre-emptively refreshing cached data before it becomes stale. By refreshing the data before it expires, and doing so asynchronously, end-users can avoid experiencing any delay caused by the refresh.
Additionally, this approach can help prevent a Cache Stampede from occurring.
More detail in the demo section.
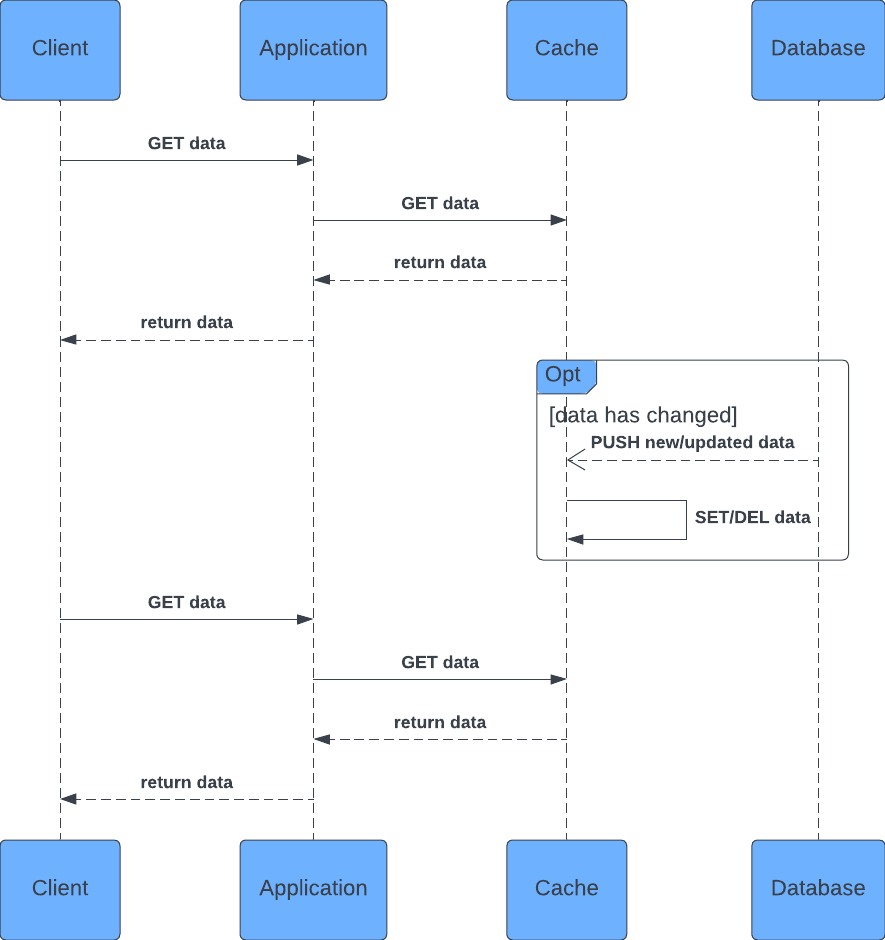
This pattern describes how the data can be updated automatically from the database to the caching layer.
In database management, a read replica is a copy of a database that is created for the purpose of serving read-only queries, such as SELECT statements. A read replica is typically created to offload read traffic from the primary database and to distribute read queries across multiple copies of the data, which can improve query performance and scalability.
That's why a caching system can be used as rad replica, to boost overall performance and scalability.
It's worth noting that read replicas are typically asynchronous, which means that there may be some delay between when data is written to the primary database and when it becomes available on the read replica, that is the caching layer. However, this delay is usually minimal and is generally outweighed by the benefits of improved read performance and scalability.
More detail in the demo section.
The caching layer is basically composed by two main components:
- Redis
- RedisGears
Redis is the well known in-memory multi-model database, that is used as distributed cache, primary database, pubsub, streams, and so on.
Redis provides a way to add custom logic (your code) into its engine, by using RedisGears, which is a serverless engine.
As a Serverless engine, RedisGears supports three programming languages:
- C
- Python
- JVM (Java, Scala)
JavaScript is coming soon...
However, if you still want the whole control to be at application layer, Spring and its caching capabilities, that is what you are looking for.
Redis (the Company) provides an enterprise grade Data Integration & Transformation product called Redis Data Integration for Redis Enterprise.
Detailed information are available at the following link:
Using Spring is the key point to easy the entire process, without adding any custom logic to Redis.
The integration between the application and Redis is delegated to Spring using its
@EnableCaching annotation,
and by specifying Redis as its cache layer into the application.properties, as follows:
spring.cache.type=redis
spring.redis.client-type=jedis
spring.redis.cluster.max-redirects= # Maximum number of redirects to follow when executing commands across the cluster.
spring.redis.cluster.nodes= # Comma-separated list of "host:port" pairs to bootstrap from.
spring.redis.database=0 # Database index used by the connection factory.
spring.redis.url= # Connection URL, will override host, port and password (user will be ignored), e.g. redis://user:password@example.com:6379
spring.redis.host=localhost # Redis server host.
spring.redis.password= # Login password of the redis server.
spring.redis.ssl=false # Enable SSL support.
spring.redis.pool.max-active=8 # Max number of connections that can be allocated by the pool at a given time. Use a negative value for no limit.
spring.redis.pool.max-idle=8 # Max number of "idle" connections in the pool. Use a negative value to indicate an unlimited number of idle connections.
spring.redis.pool.max-wait=-1 # Maximum amount of time (in milliseconds) a connection allocation should block before throwing an exception when the pool is exhausted. Use a negative value to block indefinitely.
spring.redis.pool.min-idle=0 # Target for the minimum number of idle connections to maintain in the pool. This setting only has an effect if it is positive.
spring.redis.port=6379 # Redis server port.
spring.redis.sentinel.master= # Name of Redis server.
spring.redis.sentinel.nodes= # Comma-separated list of host:port pairs.
spring.redis.timeout=0 # Connection timeout in milliseconds.
At service layer, whenever the persistence layer is invoked, Spring can automatically cache any kind of operation (save, update, delete), thus keeping the caching layer always aligned with the database.
@Service
@CacheConfig(cacheNames={"actors"})
public class ActorService {

    private final ActorRepository repository;

    public ActorService(ActorRepository repository) {
        this.repository = repository;
    }

    @Cacheable(unless="#result == null")
    public Optional<Actor> findById(Long id) {
        return repository.findById(id);
    }

    @Cacheable(unless="#result == null")
    public List<Actor> findAll() {
        return repository.findAll();
    }

    @CachePut(key = "#result.id", unless = "#result == null")
    public Actor save(Actor actor) {
        return repository.save(actor);
    }

    @CacheEvict
    public void deleteById(Long id) {
        repository.deleteById(id);
    }

    @CacheEvict
    public void deleteAll() {
        repository.deleteAll();
    }
}In Spring Framework, @Cacheable is an annotation that you can use to cache the results of a method.
When you add this annotation to a method, Spring will check if the method has already been called with the same arguments.
If it has, Spring will return the cached result instead of executing the method again.
In Spring Framework, @CachePut is another caching annotation that you can use to update the cached value for a method.
Unlike @Cacheable, which only reads from the cache, @CachePut will always execute the method and update the cache with the new result.
In Spring Framework, @CacheEvict is a caching annotation that you can use to remove an entry from the cache.
When you annotate a method with @CacheEvict, Spring will remove the cached value for the method's input arguments from the specified cache.
It shouldn't be too complex. The demo is based on git and Docker Compose, which should be already in your environment, if not, follow the instructions for your specific OS at the following links:
- https://git-scm.com/book/en/v2/Getting-Started-Installing-Git
- https://docs.docker.com/compose/install/
Clone the git repository as follows:
git clone git@github.com:foogaro/redis-gears-for-caching-patterns.git
cd redis-gears-for-caching-patternsRun the services using Docker Compose, as follows:
docker-compose up
[+] Running 4/4
 ⠿ Network redis-gears-for-caching-patterns_redis-workshop  Created                                                                                                                                                                      0.3s
 ⠿ Container mysql                                          Created                                                                                                                                                                      0.3s
 ⠿ Container redis                                          Created                                                                                                                                                                      0.3s
 ⠿ Container redis-setup                                    Created                                                                                                                                                                      0.2s
Attaching to mysql, redis, redis-setup
mysql        | 2023-01-29 15:07:48+00:00 [Note] [Entrypoint]: Entrypoint script for MySQL Server 8.0.31-1.el8 started.
mysql        | 2023-01-29 15:07:49+00:00 [Note] [Entrypoint]: Switching to dedicated user 'mysql'
mysql        | 2023-01-29 15:07:49+00:00 [Note] [Entrypoint]: Entrypoint script for MySQL Server 8.0.31-1.el8 started.
redis        | 1:C 29 Jan 2023 15:07:49.668 # oO0OoO0OoO0Oo Redis is starting oO0OoO0OoO0Oo
redis        | 1:C 29 Jan 2023 15:07:49.669 # Redis version=6.2.5, bits=64, commit=00000000, modified=0, pid=1, just started
redis        | 1:C 29 Jan 2023 15:07:49.669 # Configuration loaded
redis        | 1:M 29 Jan 2023 15:07:49.671 * monotonic clock: POSIX clock_gettime
redis        |                 _._
redis        |            _.-``__ ''-._
redis        |       _.-``    `.  `_.  ''-._           Redis 6.2.5 (00000000/0) 64 bit
redis        |   .-`` .-```.  ```\/    _.,_ ''-._
redis        |  (    '      ,       .-`  | `,    )     Running in standalone mode
redis        |  |`-._`-...-` __...-.``-._|'` _.-'|     Port: 6379
redis        |  |    `-._   `._    /     _.-'    |     PID: 1
redis        |   `-._    `-._  `-./  _.-'    _.-'
redis        |  |`-._`-._    `-.__.-'    _.-'_.-'|
redis        |  |    `-._`-._        _.-'_.-'    |           https://redis.io
redis        |   `-._    `-._`-.__.-'_.-'    _.-'
redis        |  |`-._`-._    `-.__.-'    _.-'_.-'|
redis        |  |    `-._`-._        _.-'_.-'    |
redis        |   `-._    `-._`-.__.-'_.-'    _.-'
redis        |       `-._    `-.__.-'    _.-'
redis        |           `-._        _.-'
redis        |               `-.__.-'
redis        |
redis        | 1:M 29 Jan 2023 15:07:49.675 # Server initialized
redis        | 1:M 29 Jan 2023 15:07:49.699 * <rg> RedisGears version 1.2.5, git_sha=2fc2cca83faea6ece258a2dbd37df4d1862cc995, compiled_os=linux-bullseye-x64

...

redis        | 1:M 29 Jan 2023 15:07:51.833 * <module> JAVA_GEARS: PersonWriteBehind.onRegistered - registrationId: 0000000000000000000000000000000000000000-1
redis-setup  | OK
redis        | 1:M 29 Jan 2023 15:07:52.328 * <module> JAVA_GEARS: PersonWriteThrough.onRegistered - registrationId: 0000000000000000000000000000000000000000-4
redis-setup  | OK
redis        | 1:M 29 Jan 2023 15:07:52.949 * <module> JAVA_GEARS: PersonReadThrough.onRegistered - registrationId: 0000000000000000000000000000000000000000-7
redis-setup  | OK
redis        | 1:M 29 Jan 2023 15:07:53.298 * <module> JAVA_GEARS: PersonRefreshAhead.onRegistered - registrationId: 0000000000000000000000000000000000000000-10
redis-setup  | OK
redis-setup exited with code 0
mysql        | 2023-01-29T15:07:53.748652Z 6 [Warning] [MY-010453] [Server] root@localhost is created with an empty password ! Please consider switching off the --initialize-insecure option.
mysql        | 2023-01-29 15:07:57+00:00 [Note] [Entrypoint]: Database files initialized
mysql        | 2023-01-29 15:07:57+00:00 [Note] [Entrypoint]: Starting temporary server
mysql        | 2023-01-29T15:07:57.386721Z 0 [Warning] [MY-011068] [Server] The syntax '--skip-host-cache' is deprecated and will be removed in a future release. Please use SET GLOBAL host_cache_size=0 instead.
mysql        | 2023-01-29T15:07:57.393679Z 0 [System] [MY-010116] [Server] /usr/sbin/mysqld (mysqld 8.0.31) starting as process 131
mysql        | 2023-01-29T15:07:57.418124Z 1 [System] [MY-013576] [InnoDB] InnoDB initialization has started.
mysql        | 2023-01-29T15:07:57.839713Z 1 [System] [MY-013577] [InnoDB] InnoDB initialization has ended.
mysql        | 2023-01-29T15:07:58.285047Z 0 [Warning] [MY-010068] [Server] CA certificate ca.pem is self signed.
mysql        | 2023-01-29T15:07:58.285159Z 0 [System] [MY-013602] [Server] Channel mysql_main configured to support TLS. Encrypted connections are now supported for this channel.
mysql        | 2023-01-29T15:07:58.289186Z 0 [Warning] [MY-011810] [Server] Insecure configuration for --pid-file: Location '/var/run/mysqld' in the path is accessible to all OS users. Consider choosing a different directory.
mysql        | 2023-01-29T15:07:58.327323Z 0 [System] [MY-011323] [Server] X Plugin ready for connections. Socket: /var/run/mysqld/mysqlx.sock
mysql        | 2023-01-29T15:07:58.327467Z 0 [System] [MY-010931] [Server] /usr/sbin/mysqld: ready for connections. Version: '8.0.31'  socket: '/var/run/mysqld/mysqld.sock'  port: 0  MySQL Community Server - GPL.

...

mysql        | 2023-01-29T15:08:05.144020Z 0 [System] [MY-011323] [Server] X Plugin ready for connections. Bind-address: '::' port: 33060, socket: /var/run/mysqld/mysqlx.sock
mysql | 2023-01-29T15:08:05.144198Z 0 [System] [MY-010931] [Server] /usr/sbin/mysqld: ready for connections. Version: '8.0.31' socket: '/var/run/mysqld/mysqld.sock' port: 3306 MySQL Community Server - GPL.Check that the containers are up and running by exposing the appropriate ports; 6379 for Redis and 3306 for MySQL, as follows:
docker ps
CONTAINER ID   IMAGE                        COMMAND                  CREATED          STATUS          PORTS                               NAMES
cd7b62e58a69   redislabs/redisgears:1.2.5   "docker-entrypoint.s…"   17 minutes ago   Up 17 minutes   0.0.0.0:6379->6379/tcp              redis
b344c5d25cf9 mysql:8.0.31 "docker-entrypoint.s…" 17 minutes ago Up 17 minutes 0.0.0.0:3306->3306/tcp, 33060/tcp mysqlThe patter Write-Through implies that the data inserted into the cache are also propagated to the database in a synchronous way. The client will have to wait the entire data flow to happen before receiving the reply from Redis. Might be seconds.
To do this, let's enter a key-value pair of type HASH data structure, by connecting to the redis container and using the redis-cli tool, as follows:
docker exec -it redis /bin/bash
root@cd7b62e58a69:/data# redis-cli
127.0.0.1:6379> keys *
(empty list or set)
127.0.0.1:6379> hset person:1 name Luigi lastname Fugaro age 44
Executing command...
(integer) 3
127.0.0.1:6379> keys *
1) "person:1"
127.0.0.1:6379> type person:1
"hash"
127.0.0.1:6379> hmget person:1 name lastname age
1) "Luigi"
2) "Fugaro"
3) "44"
127.0.0.1:6379>
In the log of the redis service there should be the following entries:
redis        | 1:M 29 Jan 2023 15:18:03.656 * <module> JAVA_GEARS: PersonWriteThrough.Record: [{"key":"person:1","event":"hset","type":3,"stringVal":null,"hashVal":{"name":"Luigi","age":"44","lastname":"Fugaro"},"listVal":null,"setVal":null}]
redis        | Jan 29, 2023 3:18:05 PM org.hibernate.engine.jdbc.dialect.internal.DialectFactoryImpl logSelectedDialect
redis        | INFO: HHH000400: Using dialect: org.hibernate.dialect.MySQLDialect
Which means the PersonWriteThrough was triggered and its logic was executed by inserting the cache value as record into the table person in MySQL.
Let's check the database, by connecting to it and listing the records of the table person, as follows:
docker exec -it mysql mysql -u root -proot
mysql: [Warning] Using a password on the command line interface can be insecure.
Welcome to the MySQL monitor.  Commands end with ; or \g.
Your MySQL connection id is 9
Server version: 8.0.31 MySQL Community Server - GPL

Copyright (c) 2000, 2022, Oracle and/or its affiliates.

Oracle is a registered trademark of Oracle Corporation and/or its
affiliates. Other names may be trademarks of their respective
owners.

Type 'help;' or '\h' for help. Type '\c' to clear the current input statement.

mysql> show databases;
+--------------------+
| Database           |
+--------------------+
| information_schema |
| mysql              |
| performance_schema |
| sys                |
| vdt                |
+--------------------+
5 rows in set (0.03 sec)

mysql> use vdt;
Reading table information for completion of table and column names
You can turn off this feature to get a quicker startup with -A

Database changed
mysql> show tables;
+---------------+
| Tables_in_vdt |
+---------------+
| person        |
+---------------+
1 row in set (0.01 sec)

mysql> select * from person;
+----+-------+----------+------+
| id | name  | lastname | age  |
+----+-------+----------+------+
|  1 | Luigi | Fugaro   |   44 |
+----+-------+----------+------+
1 row in set (0.00 sec)

mysql>
All looks good!
The pattern Write-Behind implies that the data inserted into the cache are also propagated to the database in an asynchronous way. The client will immediately receive the reply from Redis. Might be sub-millisecond.
Because you cannot have a Write-Through and a Write-Behind strategy at the same time for the same entity, to do the test I set the keyPattern of the class com.foogaro.data.cache.PersonWriteBehind to "developer:*", so the new entry will bound to it.
To do this, let's enter a key-value pair of type HASH data structure, by connecting to the redis container and using the redis-cli tool, as follows:
docker exec -it redis /bin/bash
root@cd7b62e58a69:/data# redis-cli
127.0.0.1:6379> keys *
(empty list or set)
127.0.0.1:6379> hset developer:2 name Luigi lastname Fugaro age 44
(integer) 3
127.0.0.1:6379> keys *
1) "developer:2"
2) "person:1"
127.0.0.1:6379> type developer:2
"hash"
127.0.0.1:6379> hmget developer:2 name lastname age
1) "Luigi"
2) "Fugaro"
3) "44"
127.0.0.1:6379>
In the log of the redis service there should be the following entries:
redis        | 1:M 29 Jan 2023 15:53:45.580 * <module> JAVA_GEARS: PersonWriteBehind.Record: [{"key":"developer:2","event":"hset","type":3,"stringVal":null,"hashVal":{"name":"Luigi","age":"44","lastname":"Fugaro"},"listVal":null,"setVal":null}]
redis        | Jan 29, 2023 3:53:47 PM org.hibernate.engine.jdbc.dialect.internal.DialectFactoryImpl logSelectedDialect
redis        | INFO: HHH000400: Using dialect: org.hibernate.dialect.MySQLDialect
Which means the PersonWriteBehind was triggered and its logic was executed by inserting the cache value as record into the table person in MySQL.
Let's check the database, by connecting to it and listing the records of the table person, as follows:
docker exec -it mysql mysql -u root -proot
mysql: [Warning] Using a password on the command line interface can be insecure.
Welcome to the MySQL monitor.  Commands end with ; or \g.
Your MySQL connection id is 9
Server version: 8.0.31 MySQL Community Server - GPL

Copyright (c) 2000, 2022, Oracle and/or its affiliates.

Oracle is a registered trademark of Oracle Corporation and/or its
affiliates. Other names may be trademarks of their respective
owners.

Type 'help;' or '\h' for help. Type '\c' to clear the current input statement.

mysql> show databases;
+--------------------+
| Database           |
+--------------------+
| information_schema |
| mysql              |
| performance_schema |
| sys                |
| vdt                |
+--------------------+
5 rows in set (0.03 sec)

mysql> use vdt;
Reading table information for completion of table and column names
You can turn off this feature to get a quicker startup with -A

Database changed
mysql> show tables;
+---------------+
| Tables_in_vdt |
+---------------+
| person        |
+---------------+
1 row in set (0.01 sec)

mysql> select * from person;
+----+-------+----------+------+
| id | name  | lastname | age  |
+----+-------+----------+------+
|  1 | Luigi | Fugaro   |   44 |
|  2 | Luigi | Fugaro   |   44 |
+----+-------+----------+------+
2 rows in set (0.00 sec)

mysql>
All looks good!
The pattern Read-Through implies that when a data is requested from the cache, and it's not available, the data will be fetched directly from the database, synchronously, put it into the cache and returned to the client. The latter will have to wait the entire data flow to happen before receiving the reply from Redis. Might be seconds.
To do this, let's try to read the value for key "person:2", which shouldn't be found as we entered "developer:2".
Let's connect to the redis container and using the redis-cli tool, as follows:
docker exec -it redis /bin/bash
root@cd7b62e58a69:/data# redis-cli
127.0.0.1:6379> keys *
1) "developer:2"
2) "person:1"
127.0.0.1:6379>  hmget person:2 name lastname age
1) "Luigi"
2) "Fugaro"
3) "44"
127.0.0.1:6379> keys *
1) "person:2"
2) "developer:2"
3) "person:1"
127.0.0.1:6379>
In the log of the redis service there should be the following entries:
redis        | 1:M 29 Jan 2023 16:31:36.601 * <module> JAVA_GEARS: PersonReadThrough.Record: [{"key":"person:2","event":"keymiss","type":-1,"stringVal":null,"hashVal":null,"listVal":null,"setVal":null}]
redis        | Jan 29, 2023 4:31:37 PM org.hibernate.engine.jdbc.dialect.internal.DialectFactoryImpl logSelectedDialect
redis        | INFO: HHH000400: Using dialect: org.hibernate.dialect.MySQLDialect
Which means the PersonReadThrough was triggered and its logic was executed by fetching the value from the table person in MySQL with ID "2".
All looks good!
The purpose of the pattern Refresh-Ahead is to keep the data up-to-date. An example could be to refresh new/updated data for all those entries that were kept into the cache for too long, by using a time-to-live (TTL) on the key.
To do this, let's try to add a TTL of 5 seconds to the key "person:2", and wait for the expiration time, so that the key gets deleted from the cache.
Let's connect to the redis container and using the redis-cli tool, as follows:
docker exec -it redis /bin/bash
root@cd7b62e58a69:/data# redis-cli
127.0.0.1:6379> keys *
1) "developer:2"
2) "person:1"
127.0.0.1:6379> expire person:2 5
(integer) 1
127.0.0.1:6379>
In the log of the redis service there should be the following entries:
redis        | 1:M 29 Jan 2023 16:41:11.553 * <module> JAVA_GEARS: PersonRefreshAhead.Record: [{"key":"person:2","event":"expired","type":-1,"stringVal":null,"hashVal":null,"listVal":null,"setVal":null}]
redis        | Jan 29, 2023 4:41:12 PM org.hibernate.engine.jdbc.dialect.internal.DialectFactoryImpl logSelectedDialect
redis        | INFO: HHH000400: Using dialect: org.hibernate.dialect.MySQLDialect
Which means the PersonRefreshAhead was triggered and its logic was executed by fetching the value from the table person in MySQL with ID "2" and put it back into the cache.
The logic is almost the same as per the Read-Through patterns, except for the fact that the patterns gets triggered on the expired event and not on the keymiss event.
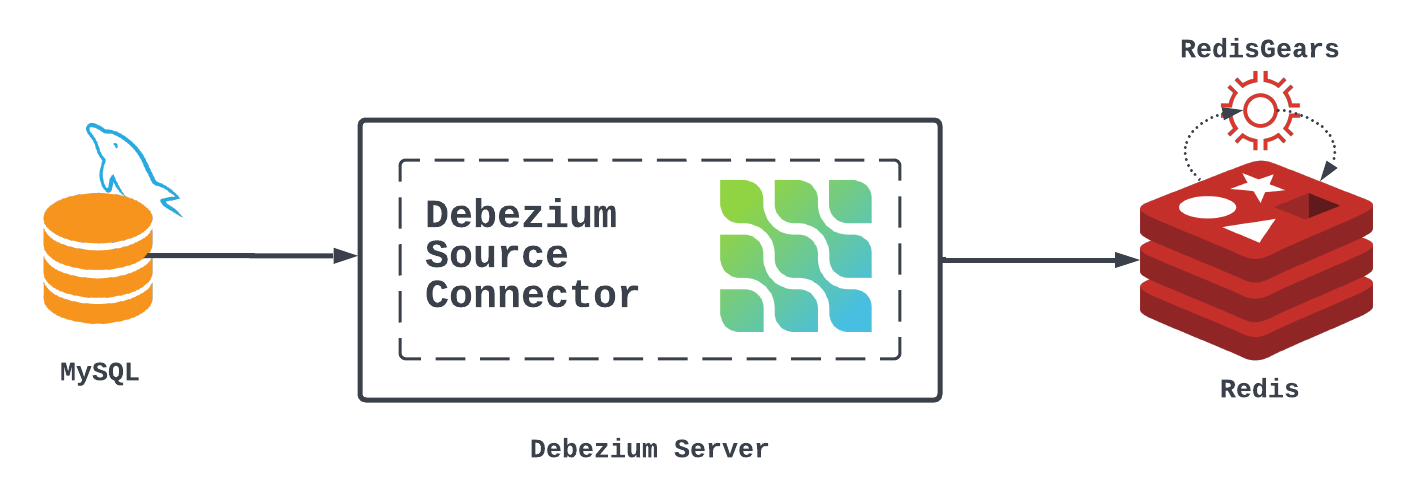
The pattern Read-Replica comes from the Change Data Capture software design principals. Its goal is to detect changes from the source databases and push them to other systems, such as a caching layer, using message notification.
The solution is based on Debezium, a well known open-source project sponsored by Red Hat ®©™, which provides many connectors (aka Source Connectors), to detect changes happening in the source databases (PostgreSQL, MySQL, Oracle, MS SQL Server, DB2, MongoDB, Cassandra, Vitess, Spanner). In addition to the Source Connectors, Debezium provides even more Sink Connectors, whose goal is to push those changes to other systems.
Debezium provides the Redis Sink Connector, which is used in this demo.
The following Docker configuration has been added to the docker-compose.yaml file:
debezium:
  image: debezium/server
  container_name: debezium
  restart: "no"
  depends_on:
    - redis
  entrypoint: [ "echo", "Service debezium temporary disabled" ]
  env_file: ./.env
  environment:
    - MYSQL_ROOT_PASSWORD=$MYSQLDB_ROOT_PASSWORD
    - MYSQL_DATABASE=$MYSQLDB_DATABASE
  ports:
    - $DEBEZIUM_LOCAL_PORT:$DEBEZIUM_DOCKER_PORT
  volumes:
    - ./debezium-conf:/debezium/conf
    - ./debezium-data:/debezium/data
  networks:
  - demo
You may have noticed the presence of the entrypoint statement as a trick to temporary disable Debezium when demoing the Write-* patterns.
To show the Read-Replica pattern in action, just comment the entrypoint statement, and everything should work as expected.
debezium:
  image: debezium/server
  container_name: debezium
  restart: "no"
  depends_on:
    - redis
#  entrypoint: [ "echo", "Service debezium temporary disabled" ]
  env_file: ./.env
  environment:
    - MYSQL_ROOT_PASSWORD=$MYSQLDB_ROOT_PASSWORD
    - MYSQL_DATABASE=$MYSQLDB_DATABASE
  ports:
    - $DEBEZIUM_LOCAL_PORT:$DEBEZIUM_DOCKER_PORT
  volumes:
    - ./debezium-conf:/debezium/conf
    - ./debezium-data:/debezium/data
  networks:
  - demo
Let's start everything with docker-compose up, and you should see now the Debezium service starting up, as follows:
debezium     | SLF4J: Class path contains multiple SLF4J bindings.
debezium     | SLF4J: Found binding in [jar:file:/debezium/lib/slf4j-jboss-logmanager-1.2.0.Final.jar!/org/slf4j/impl/StaticLoggerBinder.class]
debezium     | SLF4J: Found binding in [jar:file:/debezium/lib/logback-classic-1.2.10.jar!/org/slf4j/impl/StaticLoggerBinder.class]
debezium     | SLF4J: See http://www.slf4j.org/codes.html#multiple_bindings for an explanation.
debezium     | SLF4J: Actual binding is of type [org.slf4j.impl.Slf4jLoggerFactory]
debezium     |        __       __                 _
debezium     |   ____/ /___   / /_   ___  ____   (_)__  __ ____ ___
debezium     |  / __  // _ \ / __ \ / _ \/_  /  / // / / // __ `__ \
debezium     | / /_/ //  __// /_/ //  __/ / /_ / // /_/ // / / / / /
debezium     | \__,_/ \___//_.___/ \___/ /___//_/ \__,_//_/ /_/ /_/
debezium     |
debezium     |
debezium     |
debezium     |                       Powered by Quarkus 2.14.0.Final

...

debezium     | 2023-02-01 17:13:38,460 INFO  [io.deb.con.mys.MySqlStreamingChangeEventSource] (blc-mysql:3306) Connected to MySQL binlog at mysql:3306, starting at MySqlOffsetContext [sourceInfoSchema=Schema{io.debezium.connector.mysql.Source:STRUCT}, sourceInfo=SourceInfo [currentGtid=null, currentBinlogFilename=mysql-bin.000003, currentBinlogPosition=1815, currentRowNumber=0, serverId=0, sourceTime=2023-02-01T17:13:38.190Z, threadId=-1, currentQuery=null, tableIds=[vdt.person], databaseName=vdt], snapshotCompleted=true, transactionContext=TransactionContext [currentTransactionId=null, perTableEventCount={}, totalEventCount=0], restartGtidSet=9687809c-a253-11ed-b30d-0242ac200002:1-12, currentGtidSet=9687809c-a253-11ed-b30d-0242ac200002:1-12, restartBinlogFilename=mysql-bin.000003, restartBinlogPosition=1815, restartRowsToSkip=0, restartEventsToSkip=0, currentEventLengthInBytes=0, inTransaction=false, transactionId=null, incrementalSnapshotContext =IncrementalSnapshotContext [windowOpened=false, chunkEndPosition=null, dataCollectionsToSnapshot=[], lastEventKeySent=null, maximumKey=null]]
debezium     | 2023-02-01 17:13:38,463 INFO  [io.deb.con.mys.MySqlStreamingChangeEventSource] (debezium-mysqlconnector-vdt-change-event-source-coordinator) Waiting for keepalive thread to start
debezium     | 2023-02-01 17:13:38,468 INFO  [io.deb.uti.Threads] (blc-mysql:3306) Creating thread debezium-mysqlconnector-vdt-binlog-client
debezium     | 2023-02-01 17:13:38,570 INFO  [io.deb.con.mys.MySqlStreamingChangeEventSource] (debezium-mysqlconnector-vdt-change-event-source-coordinator) Keepalive thread is running
In case you have problems, try to delete the mysql-data folder from your host, and try again.
Let's check on Redis what we have:
docker exec -it redis /bin/bash
root@7093c6289bbc:/data# redis-cli
127.0.0.1:6379> keys *
1) "metadata:debezium:offsets"
2) "vdt"
3) "metadata:debezium:schema_history"
127.0.0.1:6379>
Debezium already has the logic to use Redis, both as internal storage and to push the changes to.
Let's add a new record for the table Person into MySQL, by connecting to the MySQL, as follows:
docker exec -it mysql mysql -u root -proot
mysql> use vdt;

Database changed
mysql> select * from person;
Empty set (0.00 sec)

mysql> INSERT INTO person VALUES (1, 'Luigi','Fugaro',44);
Query OK, 1 row affected (0.02 sec)

mysql> select * from person;
+----+-----------+----------+------+
| id | firstname | lastname | age  |
+----+-----------+----------+------+
|  1 | Luigi     | Fugaro   |   44 |
+----+-----------+----------+------+
1 row in set (0.00 sec)

mysql>
Debezium should have detected the changes, that is the insert, and stored the metadata into Redis. Redis then should have picked those info up and processed them by inserting a new key into the cache.
Let's see...
In the log of the redis and debezium services, there should be the following entries:
debezium     | 2023-02-01 17:16:06,413 INFO  [io.deb.con.com.BaseSourceTask] (pool-7-thread-1) 9 records sent during previous 00:02:31.55, last recorded offset of {server=vdt} partition is {transaction_id=null, ts_sec=1675271766, file=mysql-bin.000003, pos=1894, gtids=9687809c-a253-11ed-b30d-0242ac200002:1-12, row=1, server_id=1, event=3}
redis        | 1:M 01 Feb 2023 17:16:06.777 * <module> JAVA_GEARS: PersonReadReplica.onProcessEvent.Record: [{"key":"vdt.vdt.person","event":"xadd","type":7,"stringVal":null,"hashVal":null,"listVal":null,"setVal":null}]
redis        | 1:M 01 Feb 2023 17:16:06.781 * <module> JAVA_GEARS: PersonReadReplica.onProcessEvent.key: vdt.vdt.person
redis        | 1:M 01 Feb 2023 17:16:06.793 * <module> JAVA_GEARS: PersonReadReplica.onProcessEvent.response[0]: [Ljava.lang.Object;@1c305386
redis        | 1:M 01 Feb 2023 17:16:06.795 * <module> JAVA_GEARS: List item: vdt.vdt.person
redis        | 1:M 01 Feb 2023 17:16:06.795 * <module> JAVA_GEARS: List item: 1675271766422-0
redis        | 1:M 01 Feb 2023 17:16:06.795 * <module> JAVA_GEARS: List item: {"schema":{"type":"struct","fields":[{"type":"int32","optional":false,"field":"id"}],"optional":false,"name":"vdt.vdt.person.Key"},"payload":{"id":1}}
redis        | 1:M 01 Feb 2023 17:16:06.795 * <module> JAVA_GEARS: List item: {"schema":{"type":"struct","fields":[{"type":"struct","fields":[{"type":"int32","optional":false,"field":"id"},{"type":"string","optional":true,"field":"firstname"},{"type":"string","optional":true,"field":"lastname"},{"type":"int32","optional":true,"field":"age"}],"optional":true,"name":"vdt.vdt.person.Value","field":"before"},{"type":"struct","fields":[{"type":"int32","optional":false,"field":"id"},{"type":"string","optional":true,"field":"firstname"},{"type":"string","optional":true,"field":"lastname"},{"type":"int32","optional":true,"field":"age"}],"optional":true,"name":"vdt.vdt.person.Value","field":"after"},{"type":"struct","fields":[{"type":"string","optional":false,"field":"version"},{"type":"string","optional":false,"field":"connector"},{"type":"string","optional":false,"field":"name"},{"type":"int64","optional":false,"field":"ts_ms"},{"type":"string","optional":true,"name":"io.debezium.data.Enum","version":1,"parameters":{"allowed":"true,last,false,incremental"},"de
redis        | 1:M 01 Feb 2023 17:16:06.888 * <module> JAVA_GEARS: PersonReadReplica.processPayload.person: Person{id=1, firstname='Luigi', lastname='Fugaro', age=44}
redis        | 1:M 01 Feb 2023 17:16:06.898 * <module> JAVA_GEARS: PersonReadReplica.processPayload.response: 4
redis        | 1:M 01 Feb 2023 17:16:06.898 * <module> JAVA_GEARS: PersonReadReplica.onProcessEvent.GearsBuilder.executeArray [Ljava.lang.Object;@1c305386
All looks good.
Inside redis:
127.0.0.1:6379> keys *
1) "vdt.vdt.person"
2) "metadata:debezium:offsets"
3) "metadata:debezium:schema_history"
4) "vdt"
5) "person:1"
Two more keys were added.
Key person:1 is the key which represent the corresponding record in MySQL, which is what we wanted:
127.0.0.1:6379> hmget person:1 id firstname lastname age
1) "1"
2) "Luigi"
3) "Fugaro"
4) "44"
MySQL's tables are mapped 1:1 to Redis streams, so key vdt.vdt.person is the key generated and used by Debezium to store event information for the person table, and that key is of type Redis Stream:
127.0.0.1:6379> type vdt.vdt.person
stream
127.0.0.1:6379> xread count 1 streams vdt.vdt.person 0
1) 1) "vdt.vdt.person"
   2) 1) 1) "1675271766422-0"
         2) 1) "{\"schema\":{\"type\":\"struct\",\"fields\":[{\"type\":\"int32\",\"optional\":false,\"field\":\"id\"}],\"optional\":false,\"name\":\"vdt.vdt.person.Key\"},\"payload\":{\"id\":1}}"
            2) "{\"schema\":{\"type\":\"struct\",\"fields\":[{\"type\":\"struct\",\"fields\":[{\"type\":\"int32\",\"optional\":false,\"field\":\"id\"},{\"type\":\"string\",\"optional\":true,\"field\":\"firstname\"},{\"type\":\"string\",\"optional\":true,\"field\":\"lastname\"},{\"type\":\"int32\",\"optional\":true,\"field\":\"age\"}],\"optional\":true,\"name\":\"vdt.vdt.person.Value\",\"field\":\"before\"},{\"type\":\"struct\",\"fields\":[{\"type\":\"int32\",\"optional\":false,\"field\":\"id\"},{\"type\":\"string\",\"optional\":true,\"field\":\"firstname\"},{\"type\":\"string\",\"optional\":true,\"field\":\"lastname\"},{\"type\":\"int32\",\"optional\":true,\"field\":\"age\"}],\"optional\":true,\"name\":\"vdt.vdt.person.Value\",\"field\":\"after\"},{\"type\":\"struct\",\"fields\":[{\"type\":\"string\",\"optional\":false,\"field\":\"version\"},{\"type\":\"string\",\"optional\":false,\"field\":\"connector\"},{\"type\":\"string\",\"optional\":false,\"field\":\"name\"},{\"type\":\"int64\",\"optional\":false,\"field\":\"ts_ms\"},{\"type\":\"string\",\"optional\":true,\"name\":\"io.debezium.data.Enum\",\"version\":1,\"parameters\":{\"allowed\":\"true,last,false,incremental\"},\"default\":\"false\",\"field\":\"snapshot\"},{\"type\":\"string\",\"optional\":false,\"field\":\"db\"},{\"type\":\"string\",\"optional\":true,\"field\":\"sequence\"},{\"type\":\"string\",\"optional\":true,\"field\":\"table\"},{\"type\":\"int64\",\"optional\":false,\"field\":\"server_id\"},{\"type\":\"string\",\"optional\":true,\"field\":\"gtid\"},{\"type\":\"string\",\"optional\":false,\"field\":\"file\"},{\"type\":\"int64\",\"optional\":false,\"field\":\"pos\"},{\"type\":\"int32\",\"optional\":false,\"field\":\"row\"},{\"type\":\"int64\",\"optional\":true,\"field\":\"thread\"},{\"type\":\"string\",\"optional\":true,\"field\":\"query\"}],\"optional\":false,\"name\":\"io.debezium.connector.mysql.Source\",\"field\":\"source\"},{\"type\":\"string\",\"optional\":false,\"field\":\"op\"},{\"type\":\"int64\",\"optional\":true,\"field\":\"ts_ms\"},{\"type\":\"struct\",\"fields\":[{\"type\":\"string\",\"optional\":false,\"field\":\"id\"},{\"type\":\"int64\",\"optional\":false,\"field\":\"total_order\"},{\"type\":\"int64\",\"optional\":false,\"field\":\"data_collection_order\"}],\"optional\":true,\"name\":\"event.block\",\"version\":1,\"field\":\"transaction\"}],\"optional\":false,\"name\":\"vdt.vdt.person.Envelope\",\"version\":1},\"payload\":{\"before\":null,\"after\":{\"id\":1,\"firstname\":\"Luigi\",\"lastname\":\"Fugaro\",\"age\":44},\"source\":{\"version\":\"2.2.0.Alpha1\",\"connector\":\"mysql\",\"name\":\"vdt\",\"ts_ms\":1675271766000,\"snapshot\":\"false\",\"db\":\"vdt\",\"sequence\":null,\"table\":\"person\",\"server_id\":1,\"gtid\":\"9687809c-a253-11ed-b30d-0242ac200002:13\",\"file\":\"mysql-bin.000003\",\"pos\":2105,\"row\":0,\"thread\":17,\"query\":null},\"op\":\"c\",\"ts_ms\":1675271766219,\"transaction\":null}}"
And as we read the stream using the XREAD command above, what we get is:
- the name of the stream;
- the timestamp of the generated event (Redis adds also a sequence number, that is used for entries created in the same millisecond. Since the sequence number is 64 bit wide, in practical terms there is no limit to the number of entries that can be generated within the same millisecond).
- a JSON document referencing the metadata about the impacted primary key on the database side;
- a JSON document referencing the changes of state, with a before and after state snapshots at columns grained level.
By processing the event and its payload you can clearly understand which key you need to manage in Redis, if it's a new key (insert), old key (update), or a delete operation, in that case payload-before would be not null and payload-after would be null.
If you didn't notice, there is no Kafka cluster running, that's because the architecture used Debezium Server, and the reliability of the event store is implemented directly in Redis as persistent data store.
The fact that Redis is also the caching layer, easy the logic to update application's caches.
That's all Folks.
