pilight supports various 433MHz devices. This node hides the complexity to manage 433MHz switches via pilight in Node-Red. Just drag and drop a pilight switch node into the flow editor, create a pilight server configuration and pass true or false to turn the switch on or off.
A node-red plight switch can be used to turn a pilight switch on and off. It's identified via it's pilight device name. For example the following pilight device definition
"PO1": {
       "protocol": [ "pollin" ],
                   "id": [{
                             "systemcode": 31,
                             "unitcode": 1
                       }],
                   "state": "off"
       }
defines a switch with device name PO1.
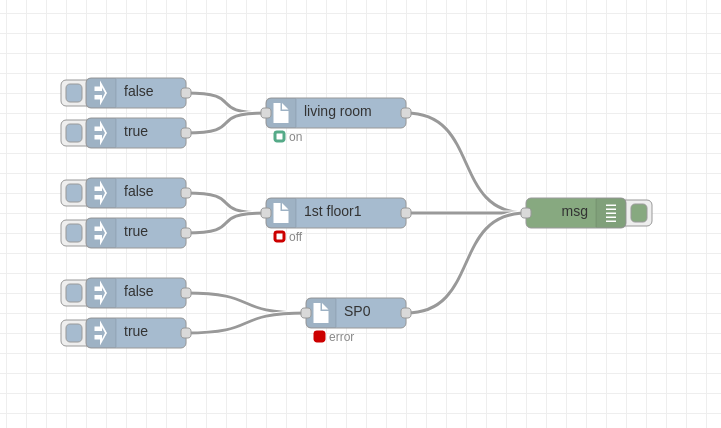
In following flow there are three pilight switches defined. One in on and the other is off. They can be turned on or off by sending true or false to the switch node. The last one is in error state because the pilight device selected initially does not exist any more on the pilight server.
- A config node holds the hostname/ip of the pilight host and the port
- A switch node has a free format node name and a device name which identifies the pilight switch device
- During startup all available pilight switch devices are retrieved from pilight server and can be used as device names in nodes via a drop down list
- A flag on the node shows the state of the switch (on, off, error or undefined)
- Actual status of switches is retrieved from pilight server when node-red starts up and initializes the switch nodes
- When a node is created the pilight device is selected from a dropdown list of all defined pilight switches
- Default name for a pilight switch is the device name.
- git clone this repository on your system
- Install pilight switches with
npm install ~/github.com/framps/node-red-contrib-pilight_switches - Drag and drop node
pilight switchesinto the flow editor - Double click on the node and create a configuration node for pilight-switches. Add the hostname and port (usually 5001) of your pilight server.
- If this is the first pilight switch used
- Deploy the switch and the switch will go into error state.
- Edit the switch and select a pilight device from the dropdown list.
- Update the pilight switch name
- Deploy the updated switch to update the state of the pilight switch with the current state
- If this is another pilight switch used
- Edit the switch and select a pilight device from the dropdown list.
- Update the pilight switch name
- Deploy the updated switch to update the state of the pilight switch with the current state
- Pass
trueorfalseinto the node to turn the switch on or off.
msg.payload can be true or false to turn the switch on or off. All other input is ignored.
msg={
  "request": request,
  "response": response,
  "payload": status
}
- request: REST request sent to pilight
- response: REST response from pilight
- status: state of the switch (on, off, undefined or error)
- When the first pilight switch instance with the pilight server config was created there is no retrieval done of the existing devices from the pilight server. This retrieval will be triggered when the first pilight switch is deployed. Then the switch will go into error state first because no device was selected for the switch. Next the switch has to be updated and a device from the drop down list be selected to retrieve the current switch status on the pilight server and set the switch to state on or off. If a deployed pilight switch exist already the device list is available immediately.
- Even multiple pilight server configs can be defined and used by the switches only one pilight switch can be used as of now.
- Solve initial device list retrieval (Shortcut 1.)
- Support multiple pilight servers (Shortcut 2.)
