To get started with this course, clone this repo and follow these commands:
- cd into the
appfolder - Run
npm installat the root of your directory - Run
npm run startto start the project - Start coding!
If you use VSCode to build your app, we included a list of suggested extensions that will help you build this project! Once you open this project in VSCode, you will see a popup asking if you want to download the recommended extensions :).
For each asset create 2 files: 0.png and 0.json
Simple .json with creator wallet address:
{
  "name": "NAME_OF_NFT",
  "symbol": "",
  "image": "0.png",
  "properties": {
    "files": [
      {
        "uri": "0.png",
        "type": "image/png"
      }
    ],
    "creators": [
      {
        "address": "INSERT_YOUR_WALLET_ADDRESS_HERE",
        "share": 100
      }
    ]
  }
}
Be sure to change certain attributes for each .json: name, image, uri.
Set the address by your own preferences.
solana-keygen new --outfile ~/.config/solana/devnet.json
solana config set --keypair ~/.config/solana/devnet.json
run
solana balanceto get the local solana wallet balance
runsolana airdrop 2to gain 2 SOL for developing purposes
Create new file config.json in project ~/root .
Important to change:
price,number,solTreasuryAccount,goLiveDate,storage
Note: default storage isarweave
ts-node ~/metaplex/js/packages/cli/src/candy-machine-v2-cli.ts upload -e devnet -k ~/.config/solana/devnet.json -cp config.json ./assets
ts-node ~/metaplex/js/packages/cli/src/candy-machine-v2-cli.ts verify_upload -e devnet -k ~/.config/solana/devnet.json
If needed, update the config.json and run this command
ts-node ~/metaplex/js/packages/cli/src/candy-machine-v2-cli.ts update_candy_machine -e devnet -k ~/.config/solana/devnet.json -cp config.json
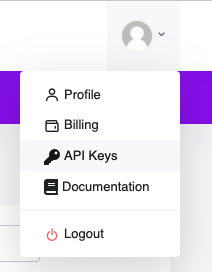
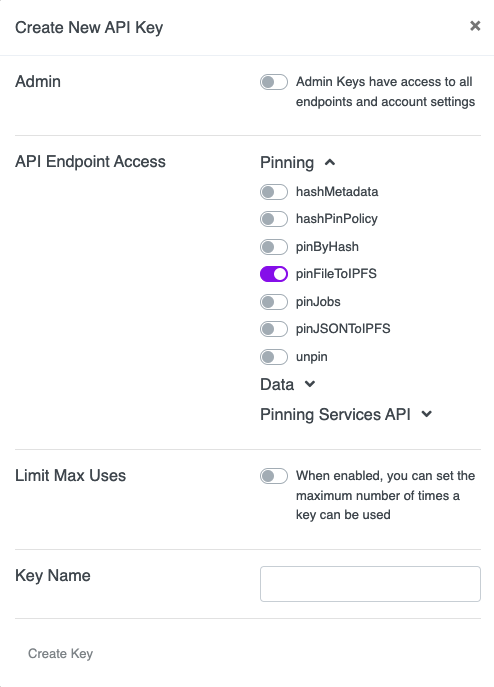
- Go to Pinata and create New API Key
Make sure pinFileToIPFS access is enabled
- Copy everything from popup
Need to copy API Key, API Secret, JWT.
- Update
config.jsonfile
Change: ipfs, ipfsInfuraProjectId, ipfsInfuraSecret.
Add new attributes: pinataJwt, pinataGateway.
{
  "price": 0.1,
  "number": 3,
  "gatekeeper": null,
  "solTreasuryAccount": "<YOUR WALLET ADDRESS>",
  "splTokenAccount": null,
  "splToken": null,
  "goLiveDate": "01 Apr 2022 00:00:00 GMT",
  "endSettings": null,
  "whitelistMintSettings": null,
  "hiddenSettings": null,
  "storage": "ipfs",
  "pinataJwt": "<YOUR PINATA JWT TOKEN>",
  "pinataGateway": "null",
  "ipfsInfuraProjectId": "<YOUR PINATA API KEY>",
  "ipfsInfuraSecret": "<YOUR PINATA API SECRET>",
  "awsS3Bucket": null,
  "noRetainAuthority": false,
  "noMutable": false
}
- Upload to IPFS
Delete your .cache folder (if exist) and run the upload command again:
ts-node ~/metaplex/js/packages/cli/src/candy-machine-v2-cli.ts upload -e devnet -k ~/.config/solana/devnet.json -cp config.json ./assets


