Now works with Zotero 7.
ZeNotes is a Zotero plugin that will help you manage and visualize your notes. It is helpfull if you intend to make a systematic review directly on your Zotero using notes and pdf annotations. This tool will help you organize your notes on Zotero. It will show you on a table what you have been writing. You can edit your notes right on the table or add new notes. On the latest versions, you can add translations of your notes using Google or DeepL. You can also apply a generative AI prompts (Bard and ChatGPT for the moment) to a cell, a row, or the entire table. These actions are also available right in the pdf reader of Zotero.
- After installing the plugin, restart Zotero (This will import your preferences from previous versions)
- Select the collection you are working on
- Head to ZeNotes > Settings
- In settings, scroll down to "Load and save"
- Click on the dropdown and choose the preference you want to apply to the current collection
- Preferences from Zotero 6 are imported automatically and their names will start with Z6. "Z6 default" will hold your last preference on Zotero 6.
- Click "Import preferences" to apply the selected preference to the current collection
- Head to the release page: https://github.com/frianasoa/Ze-Notes/releases/
- Download the latest version of the ".xpi" file. Please right click and "save as" if your browser tries to install it and fail.
- Open your Zotero. On the menu, click “Tools → Add-Ons” to open a window.
- Drag the .xpi file for the plugin onto that window.
- Alternatively, you can click on the clog on the top right corner, then click "Install Add-on From File", choose the file and open.
- Restart your Zotero.
Form more on Add-ons see this page https://www.zotero.org/support/plugins
-
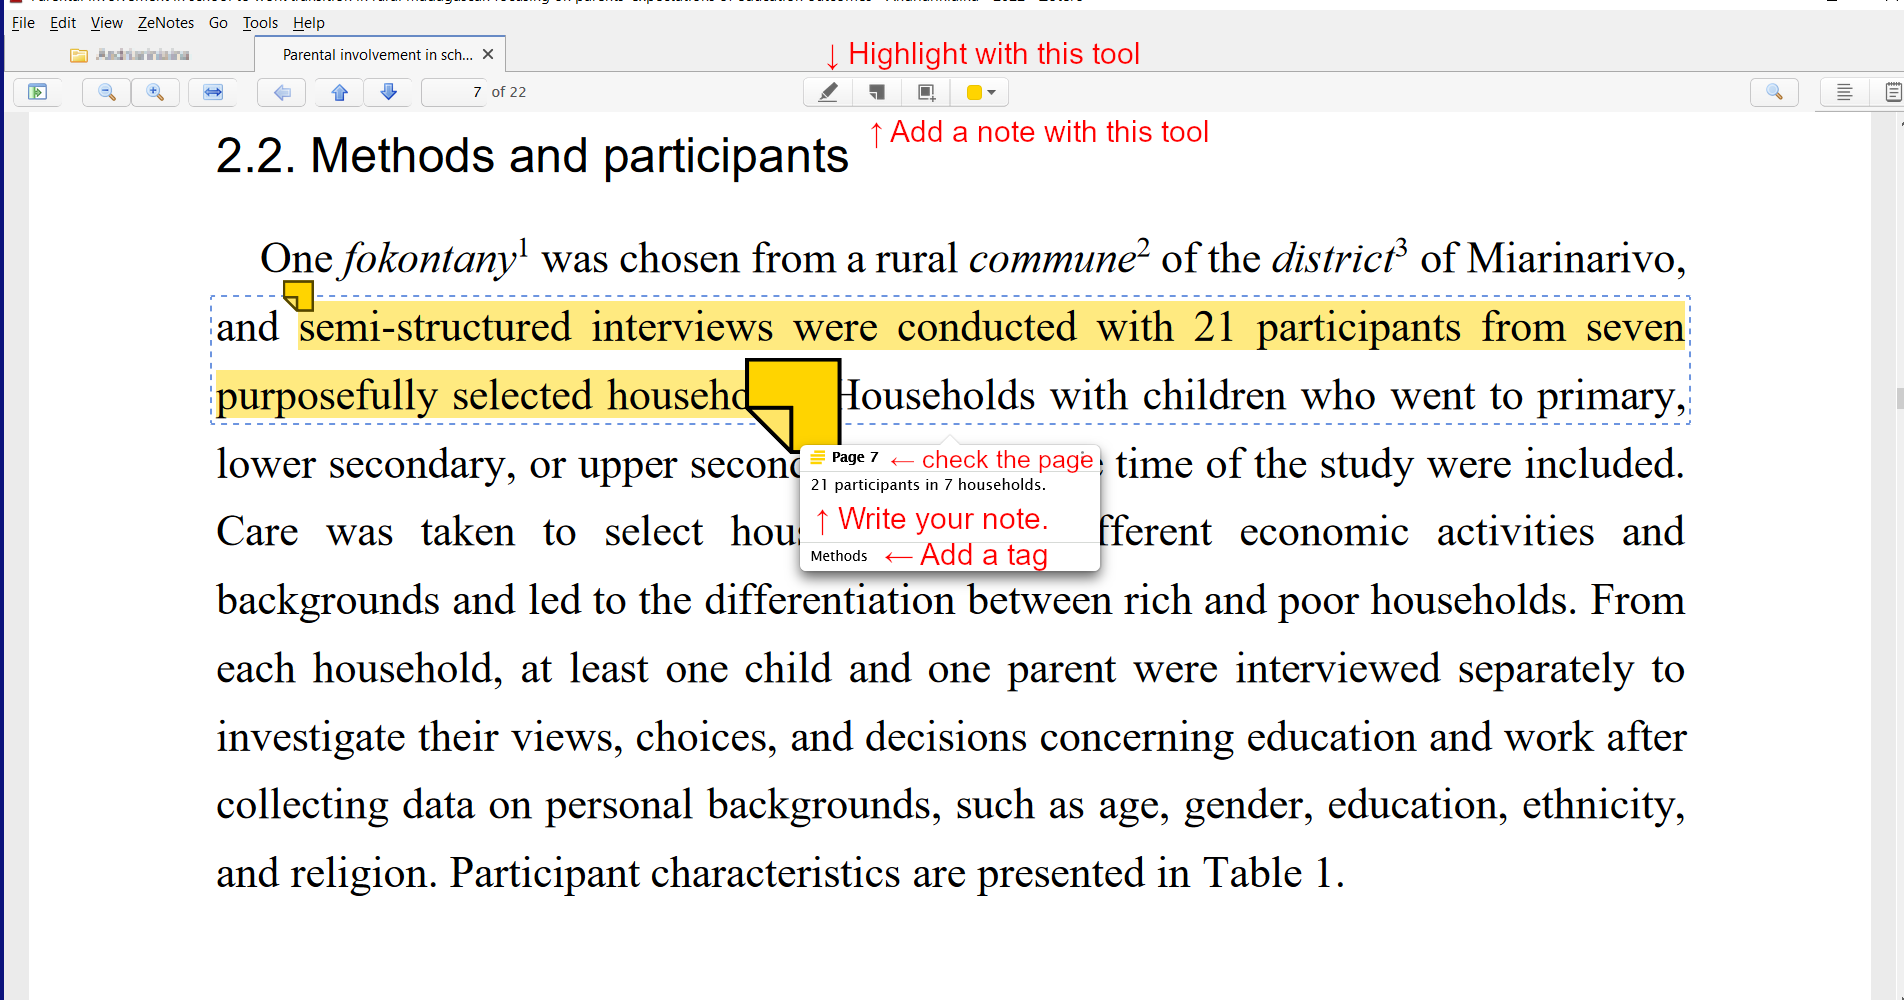
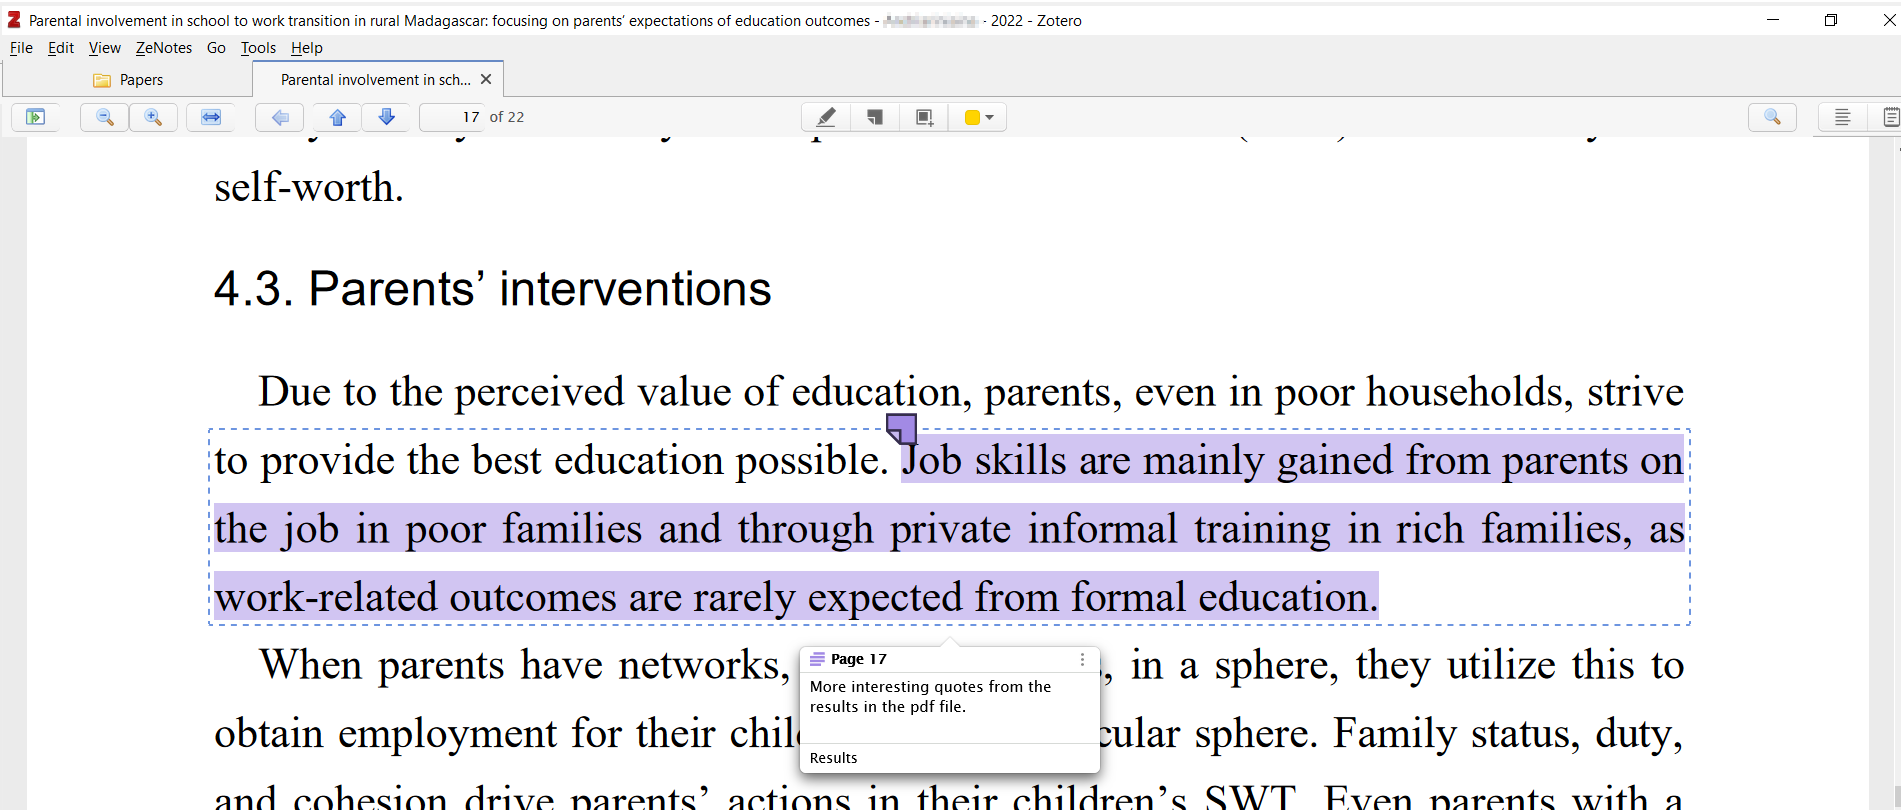
Or add annotations directly on an attached pdf file [You need to use Zotero pdf reader if you want to use annotations].
-
To each note or annotation, add a tag.
- Right click on a particular collection or on "My Library". Then, click "ZeNotes - My notes in collection" from the context menu.
- Alternatively, select a particular collection or "My Library", then on the menu "ZeNotes > Notes".

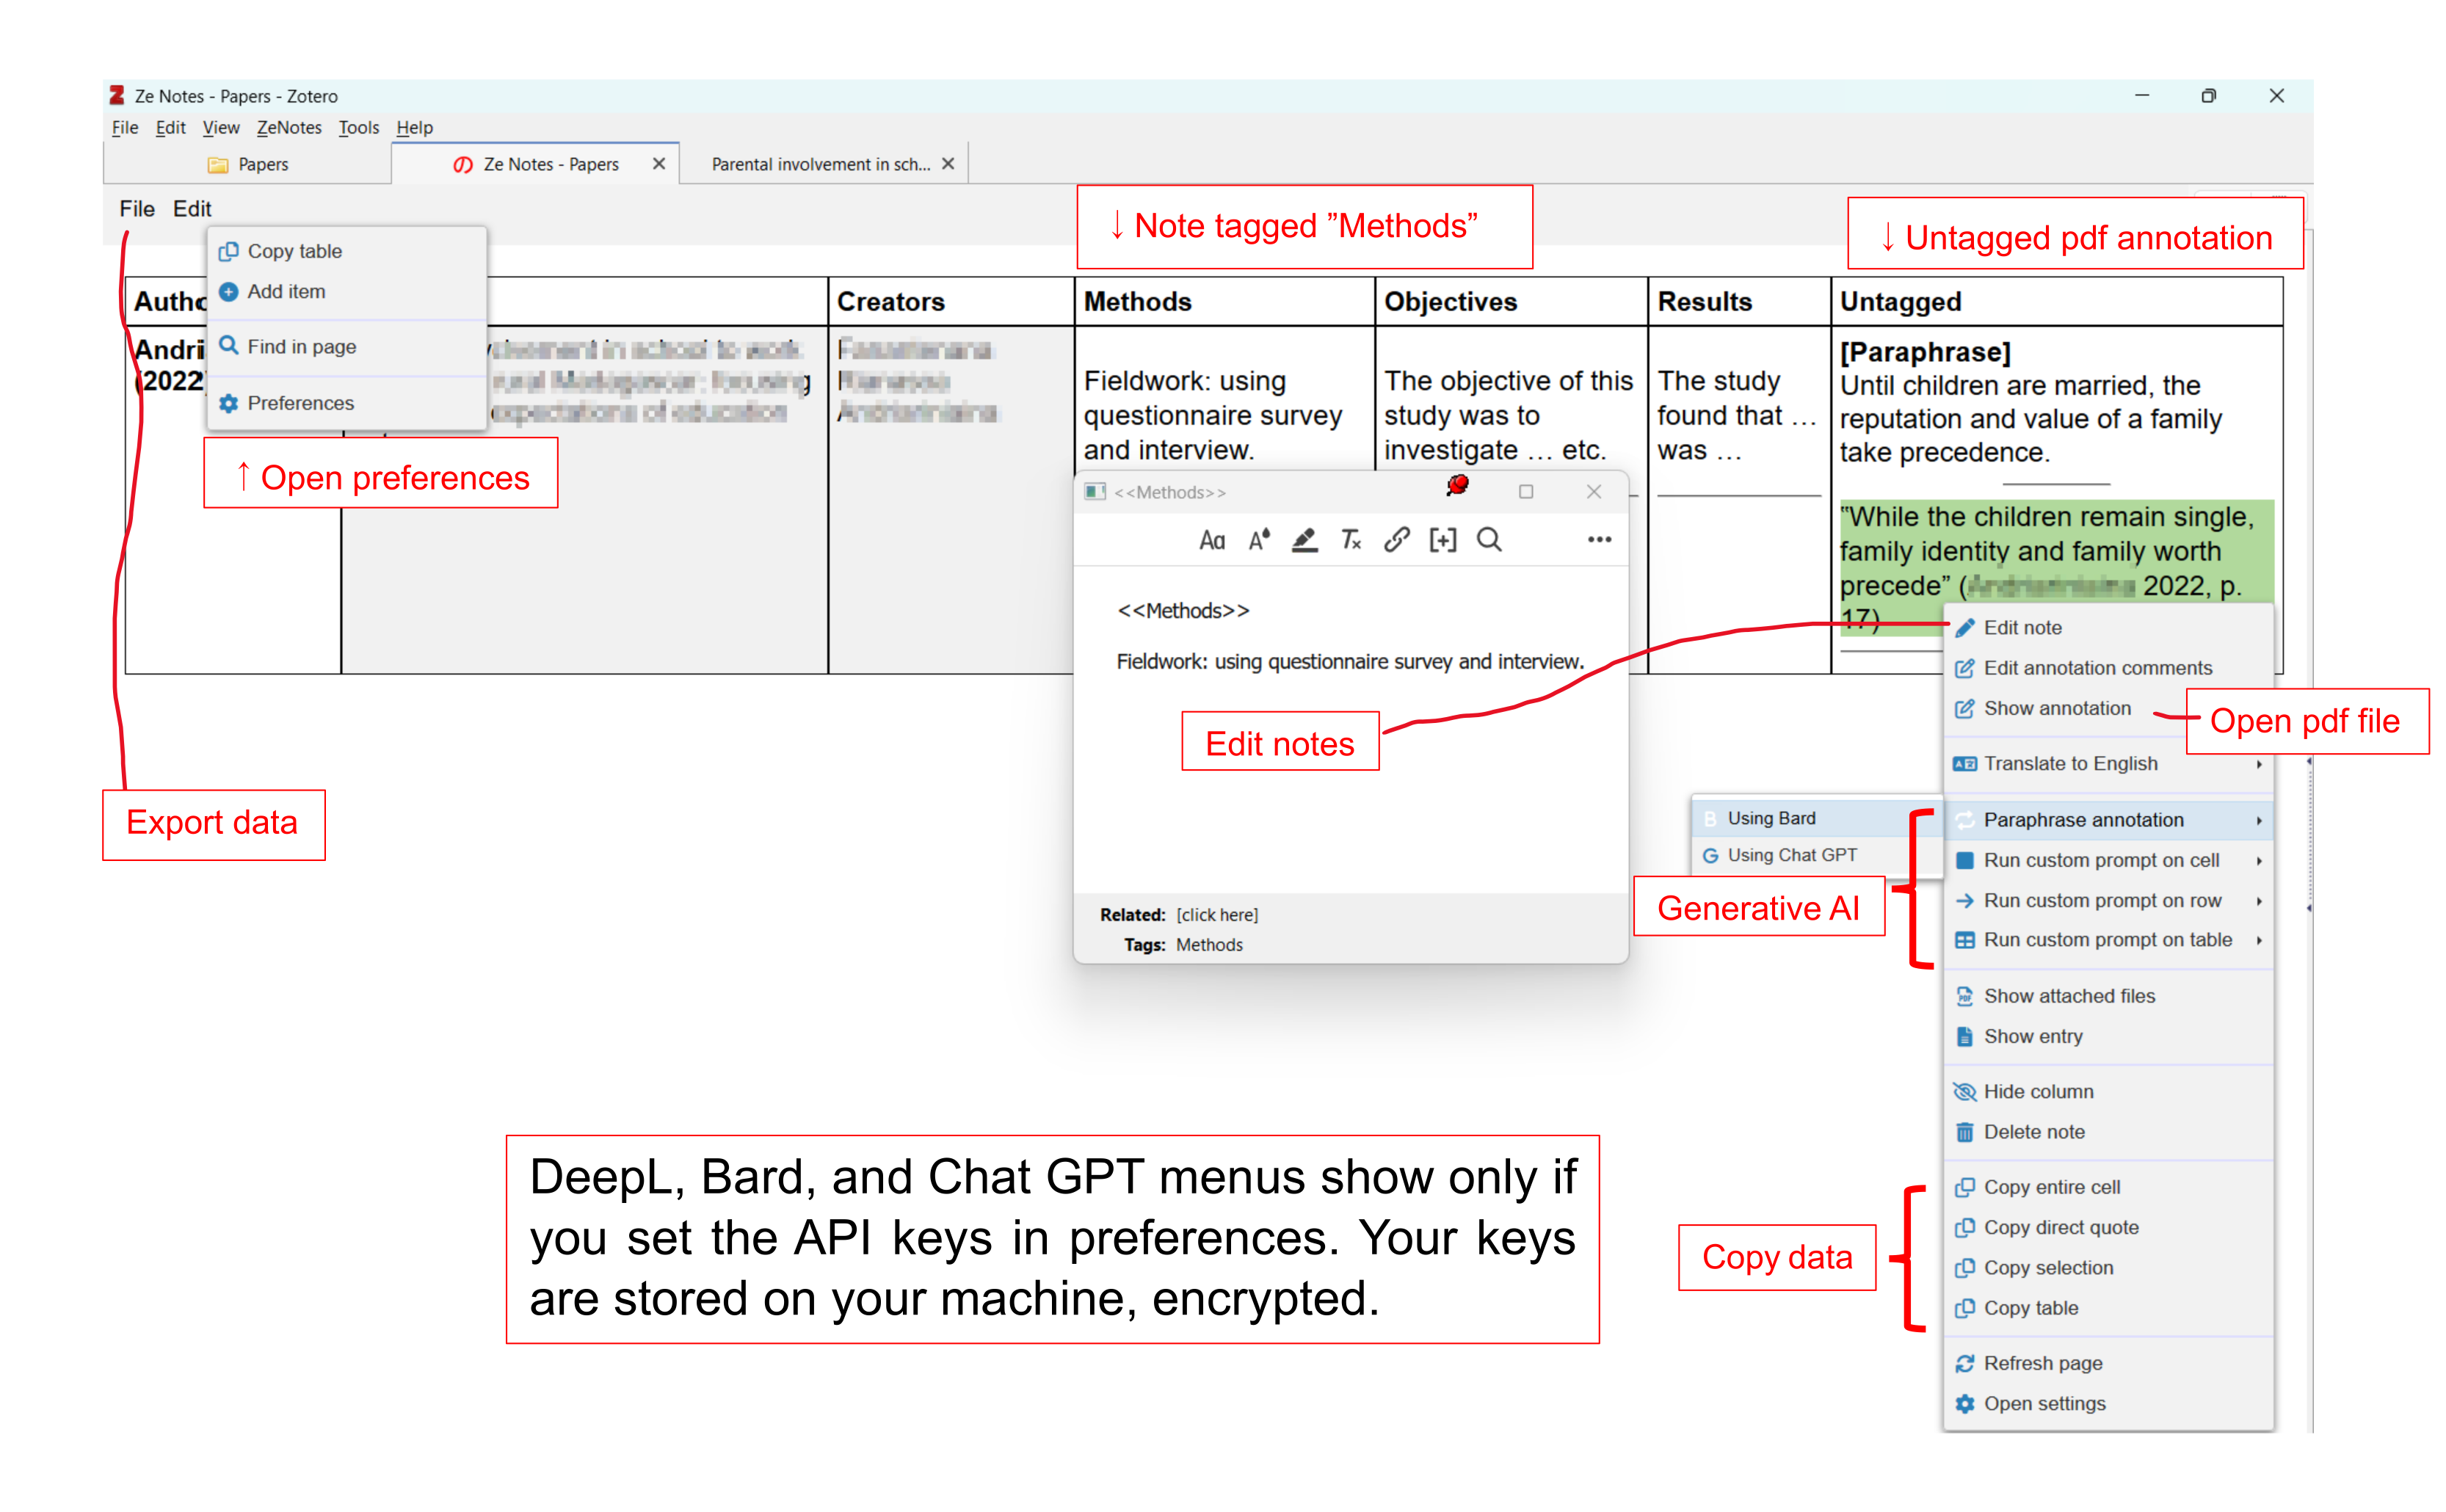
- A table should be displayed.
- You can edit your notes normally in Zotero or right click on an item in the table to see your options.
-
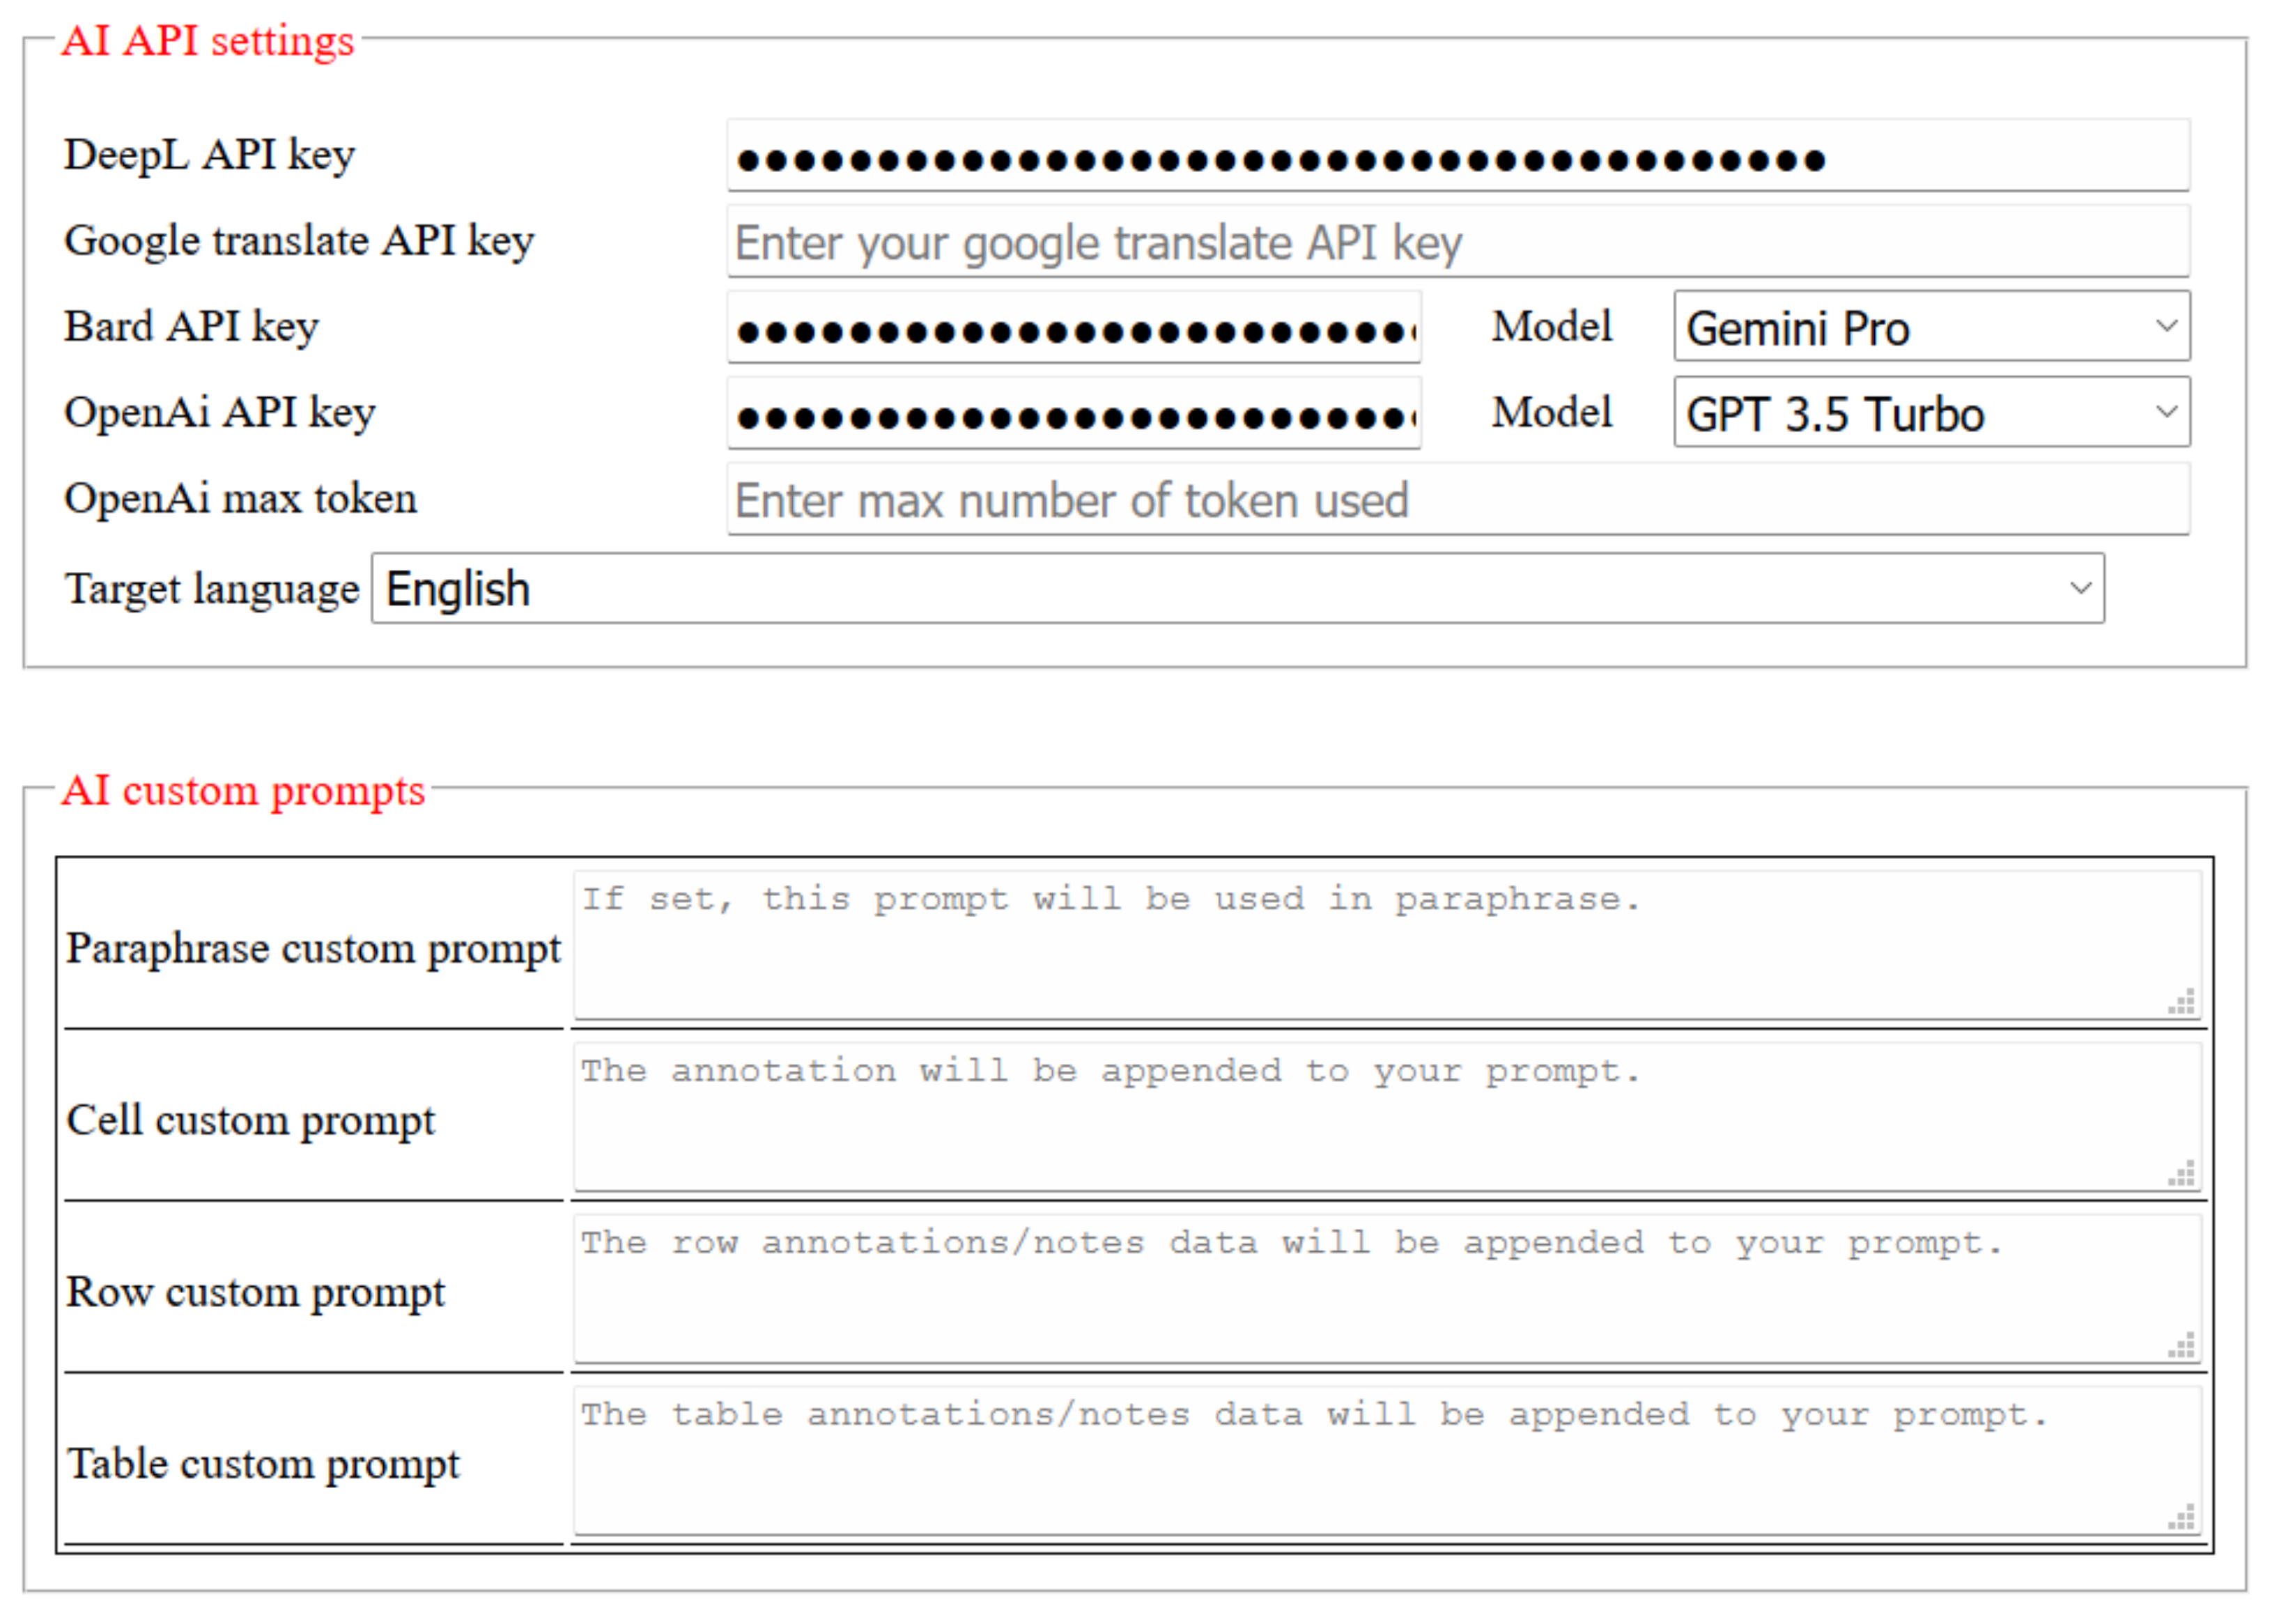
Go to ZeNotes > Settings > Global Settings > AI API Settings
-
Insert your API Key
-
Display your notes and right click on an annotation. The menu "Paraphrase annotation" will be available. Choose Bard or ChatGPT depending on the API key you have. It will paraphrase the excerpt selected in the PDF file.
-
Here are some links to access Google Ai Studio (Bard) [Can be used for free so far] [If it does not work, search the internet. These things move so fast]. https://ai.google.dev/pricing https://makersuite.google.com
-
For Open Ai (ChatGPT), head to https://platform.openai.com/api-keys. You will be asked to sign up. If you have never signed up (ChatGPT on the web included), you may get some free credits at the beginning (they expire). Otherwise you will need to buy some credits to be able to use the API. Please be warned that Open AI credits expire after 1 year if not used (at the time of writing. Please always check.). Do not try to create multiple accounts using the same email and/or mobile phone, you might get banned.
-
For DeepL API key, head to https://www.deepl.com/account/plan after you sign up. They will ask you for your credit card details even for the free plan.
From v0.8.8, it is possible to use a custom API. It can be used to paraphrase, translate, or trigger other custom actions. Below is an example setting for openai ChatGPT gpt-4o-mini. This is an advanced feature. Please make sure you know what you are doing. Please let me know your use case in the "issues" if it is not covered here. I will address them when I have time.
- Go to ZeNotes > Settings > Custom Generative AI
- Name: [Name you want to see in menu]
- Model: gpt-4o-mini
- Custom API key: [Your api key]
- Method: POST
- API URL: https://api.openai.com/v1/chat/completions
- Headers: For security reasons, do not input your api key directly to this box. Instead, insert it to the "Custom API key" box above and use ${apikey} here.
	{
	 "Authorization": "Bearer ${apikey}",
	  "Content-Type": "application/json"
	}
- Payload: model is provided in setting. Prompts are provided by the system, or the user settings for custom prompts. Sentence is the input from Ze-Notes (selected text, etc.).
	{
	  "model": "${model}",
	  "max_tokens": 400,
	  "messages": [
		{"role": "system", "content": "You are an academic assistant."},
		{"role": "user", "content": "${prompts}"},
		{"role": "user", "content": "${sentence}"}
	  ]
	}
- Translator: the variable data contains the results of your request to your server. Translator function should return a list. You could say "[data]" if your result is a string instead of json to get a list of size 1. The following function returns a list of contents.
data.choices.map(function(e){return e.message.content})
- The data is submitted as json body.
- To open preference, go to menu "Edit > Preferences" of the ZeNotes window. Alternatively go to menu "ZeNotes > Settings" of the Zotero main window.
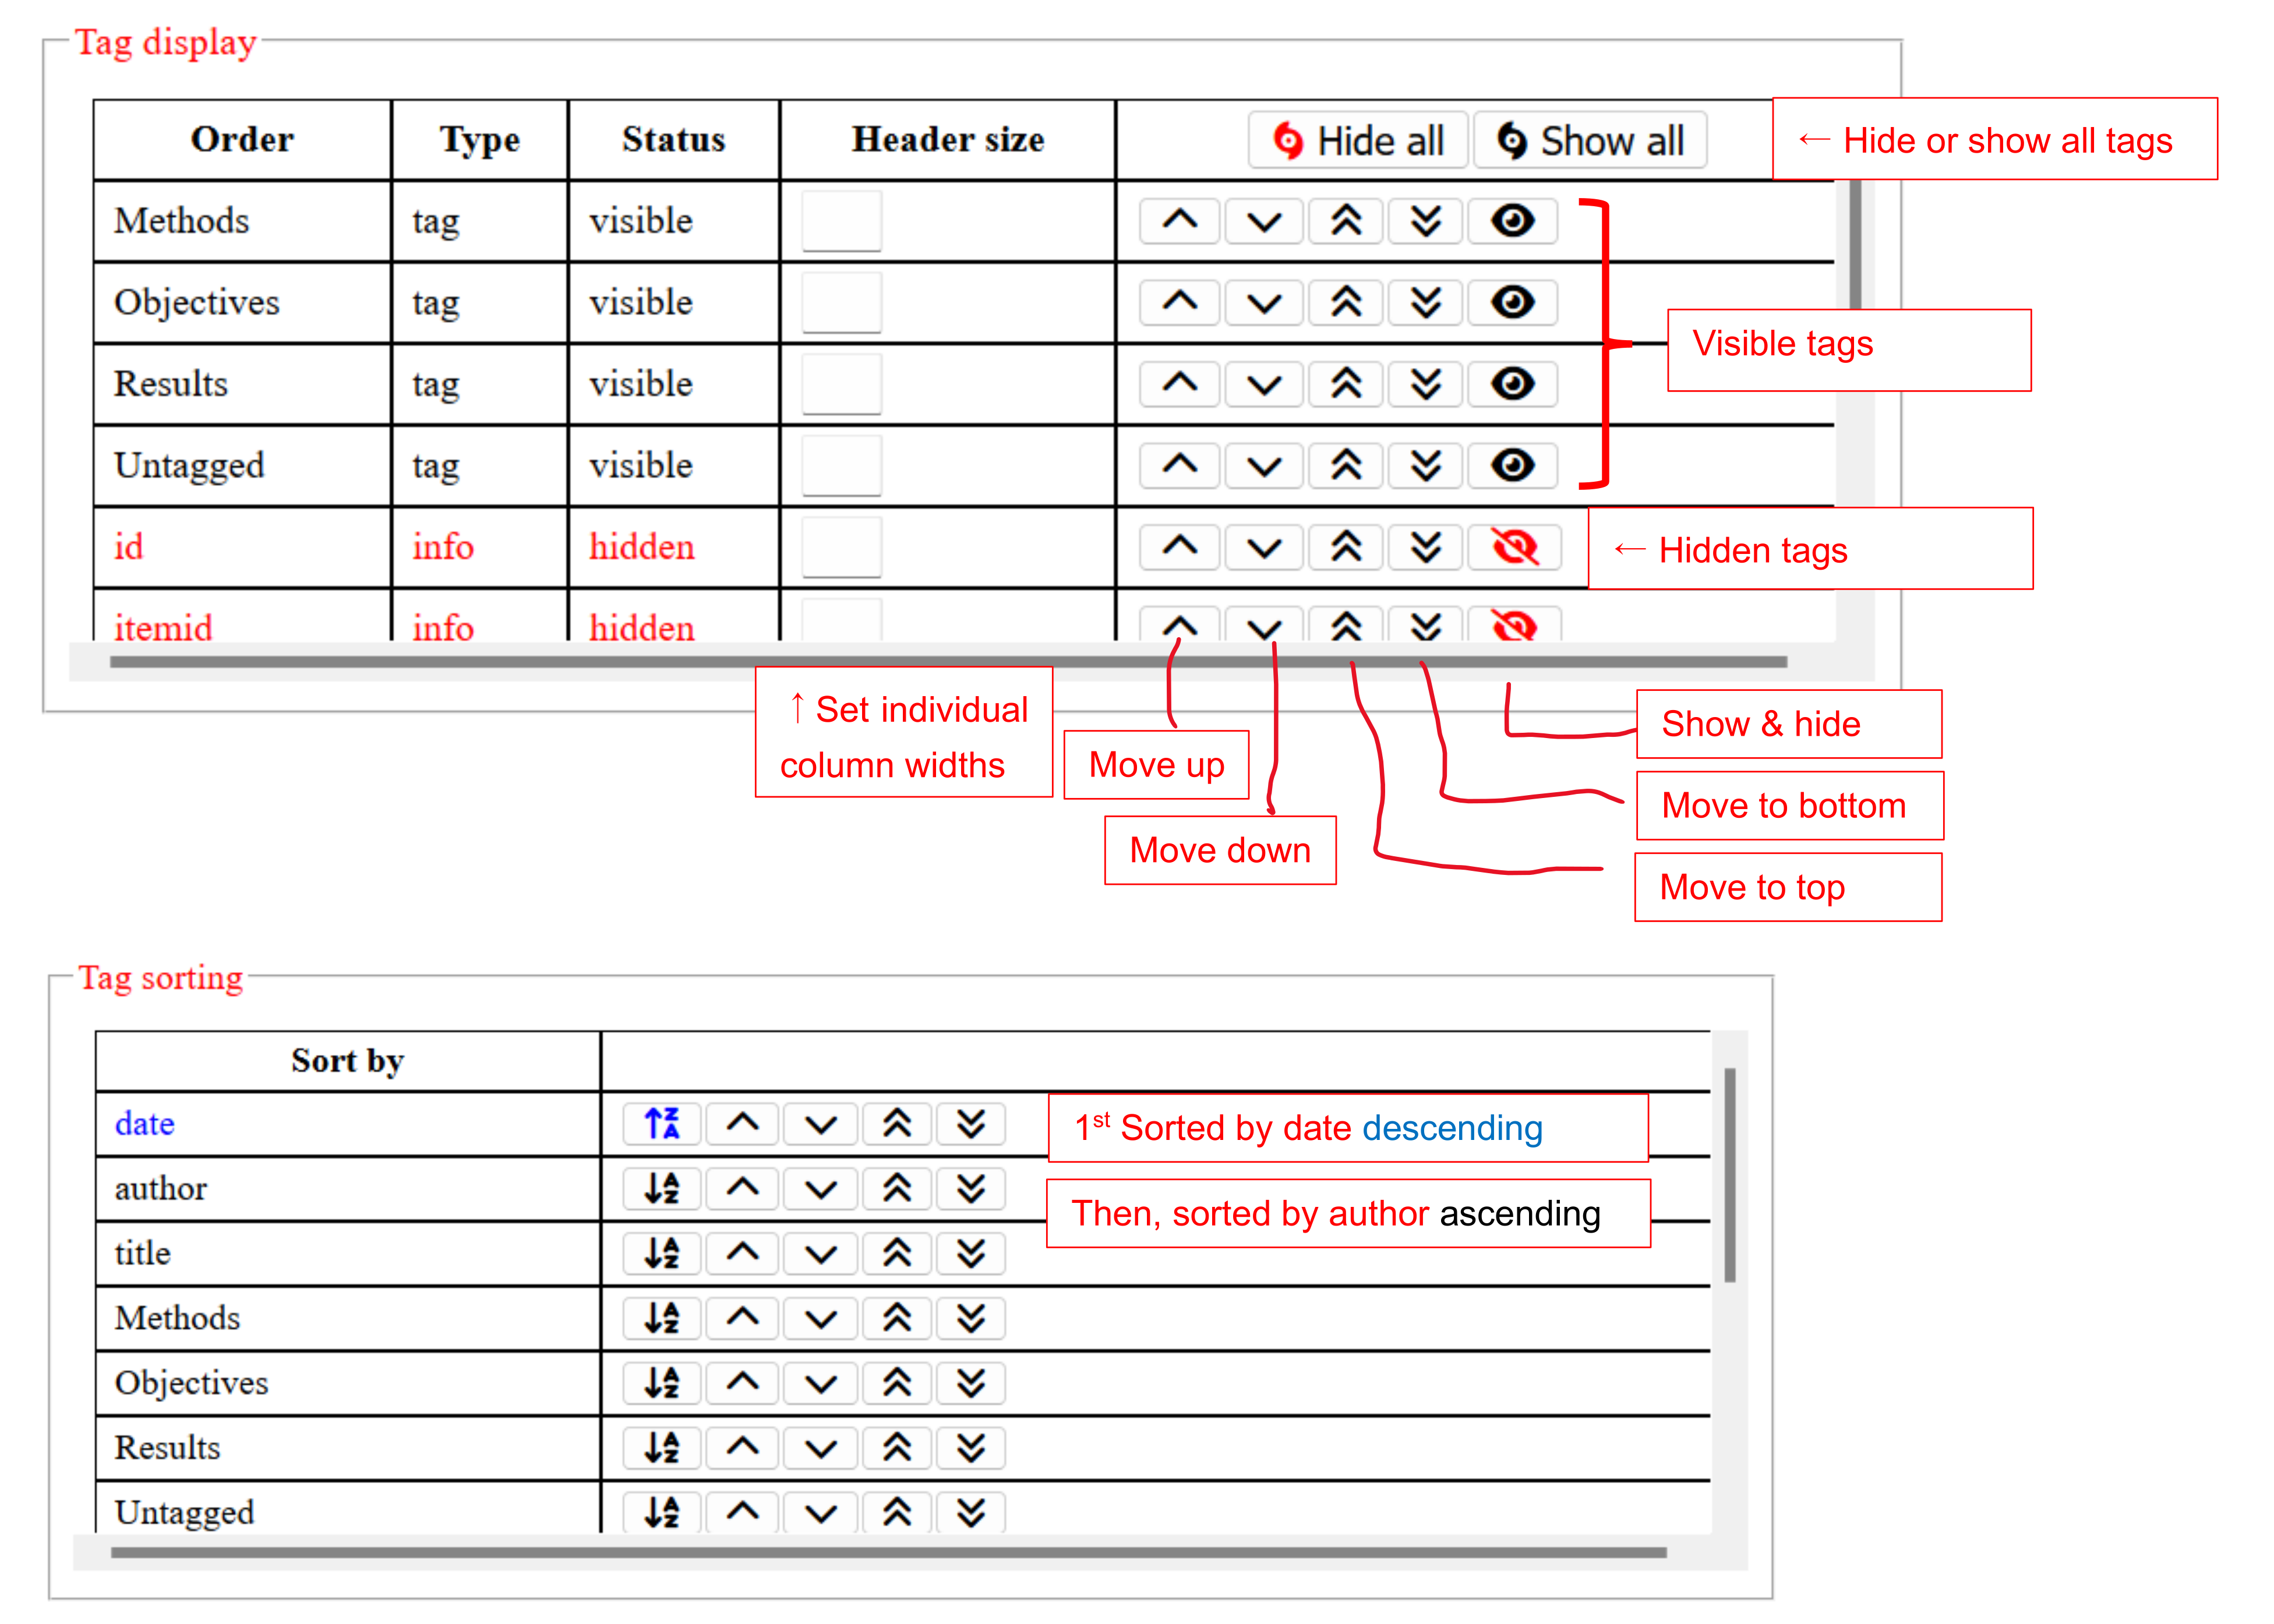
- Select the tags you will be using as columns. You can hide the ones you do not need.
- You can choose the tags on which you want to sort the results. Click on the icon a->z or z-> to change how you want to sort.
- The current layout is automatically saved for the current (selected) selection.
- Click "OK" when you finish and the table will reload.
Extra menus are available for each API you set (contextmenu: when you write click on the table or on an annotation in the pdf reader). For Bard and Open AI, you can set the models you want to use. You can set the maximum token used for OpenAI as well.
The plugin has simple default prompt for each action. You can set your own in "AI custom prompts". Remember that when you change them, the menus would mean something completely different from the label (If you change paraphrase prompt into something else for example).
Last, you can set the language for Google and DeepL translation the label of the contextmenu will change accordingly.
These global settings apply to the plugin as a whole.
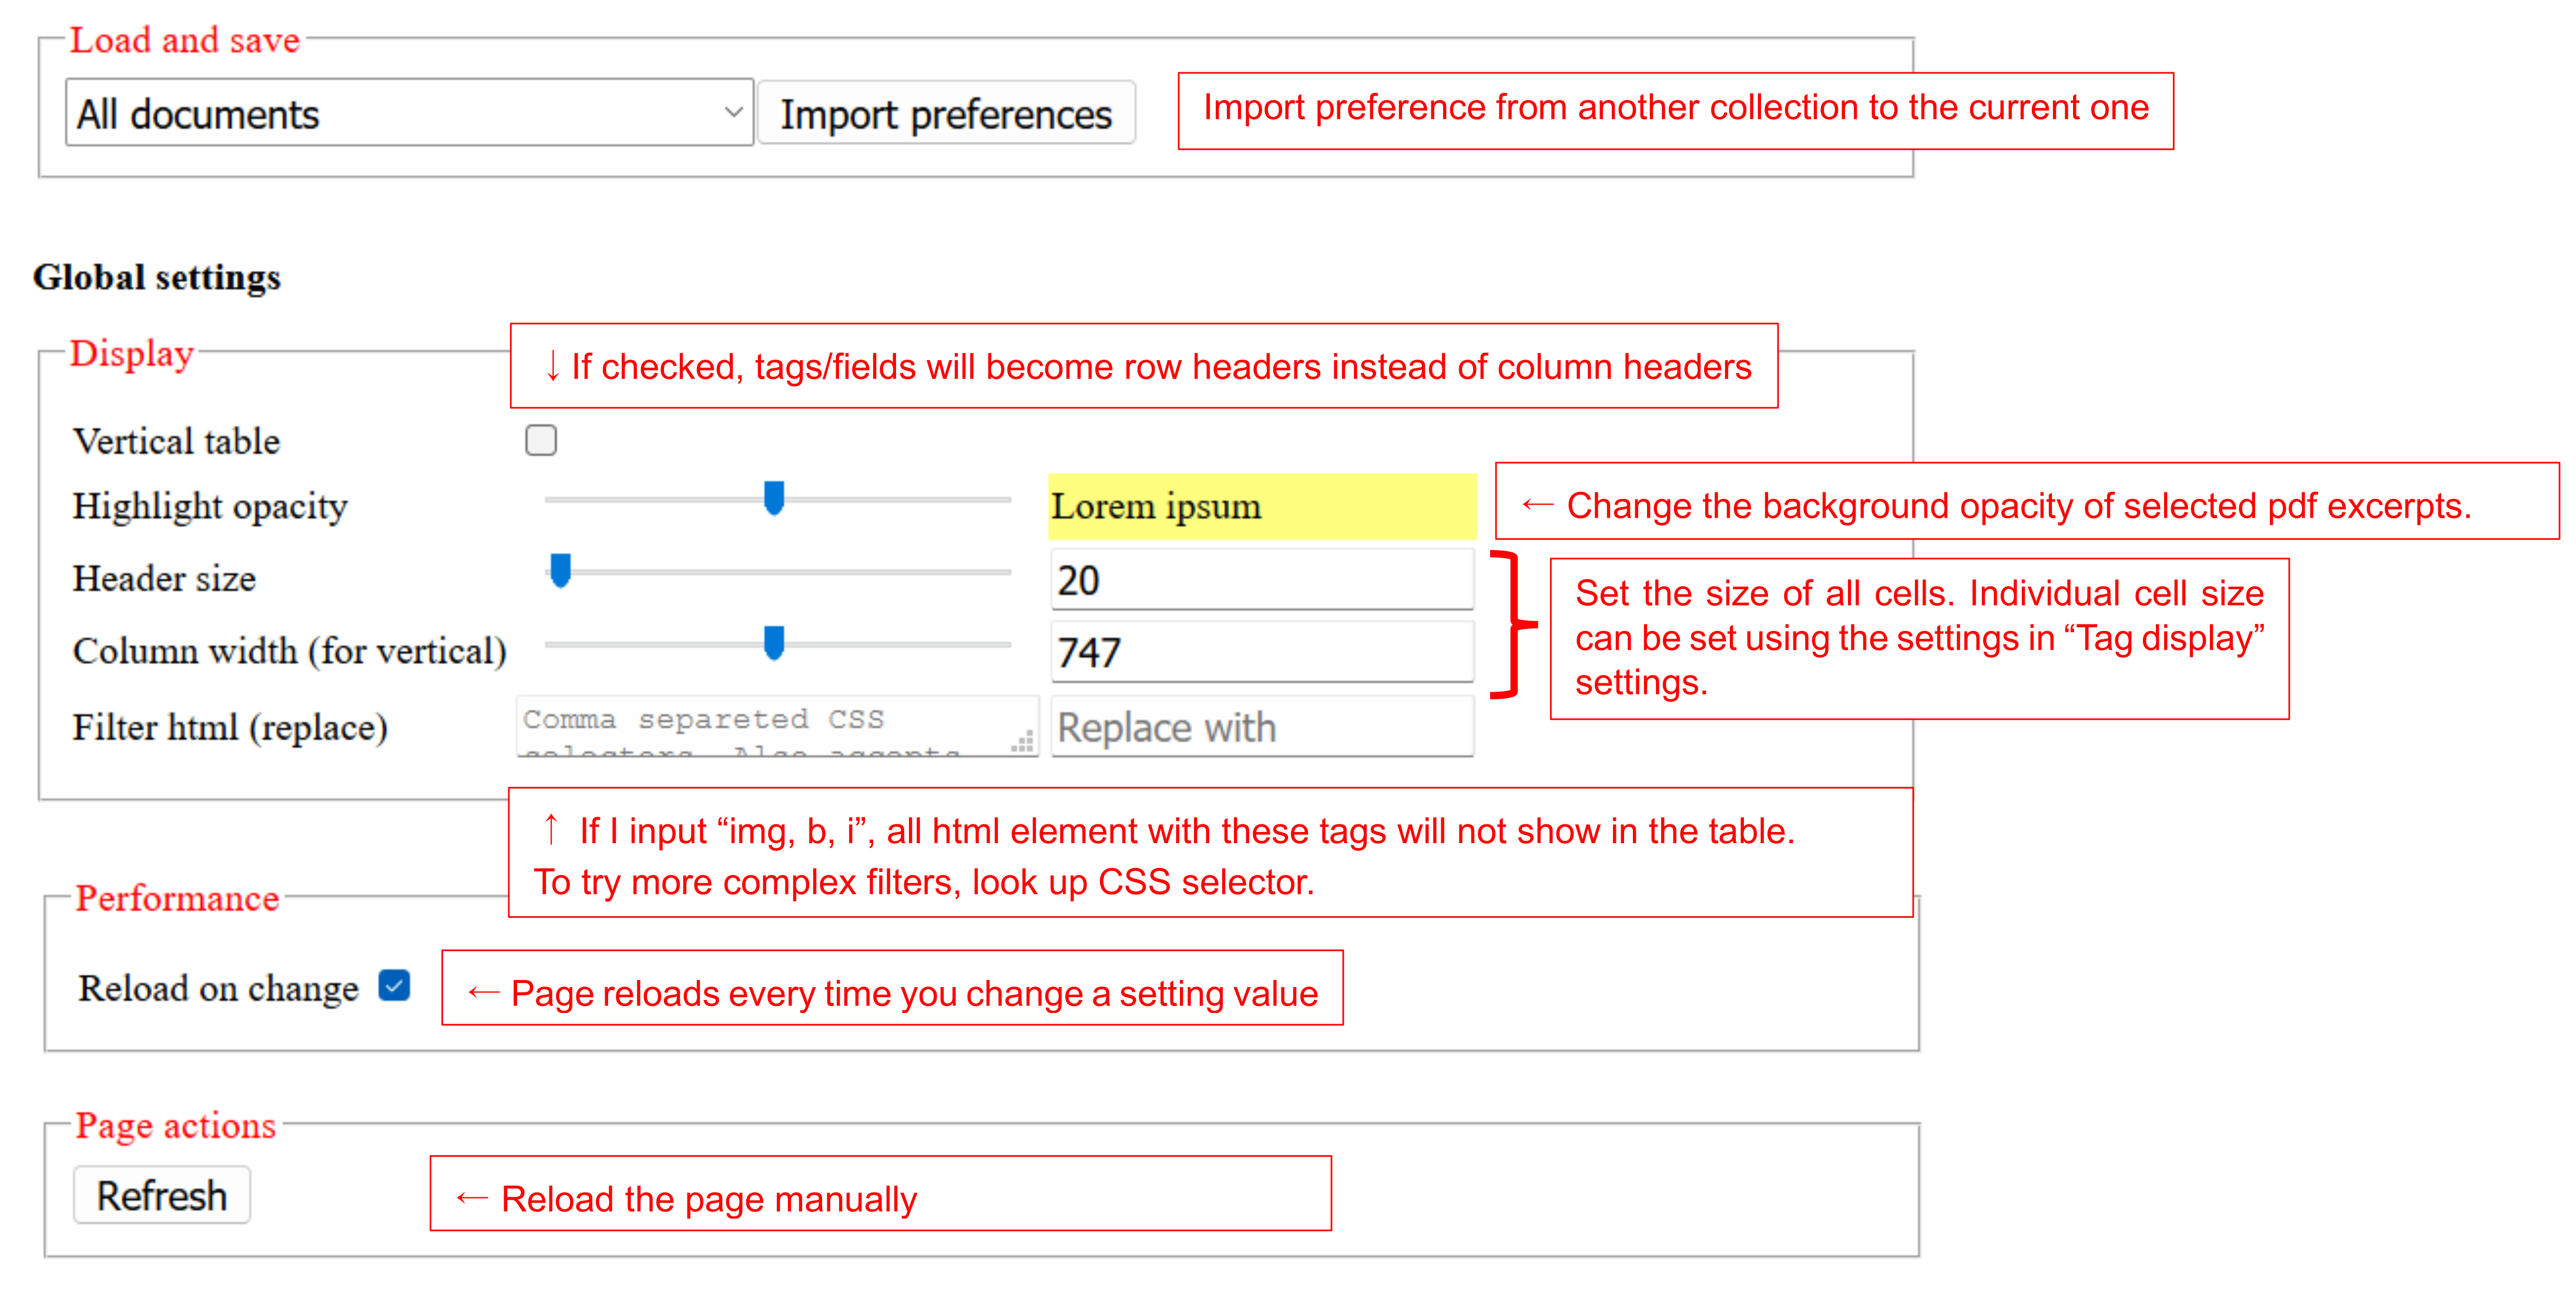
Font settings was added. You can use this to zoom in and out of your table with the shortcut "Ctrl + Mouse wheel" or "Ctrl + Plus/Minus"
- Create a folder (collection) to add all the papers you want to review (you can also use an existing folder).
- Add notes to each entry of the folder. It is also possible to add annotations directly inside a pdf attachment.
- To each note or annotation, add a tag according to its content (e.g. Objectives, Methods, Results, Discussions, Comments, ... ). If you do not add a tag, the note or annotation will be tagged "Untagged".
- Right click on the folder you work on and open "ZeNotes - My notes in collection" to see all your notes in the current collection. All your notes will be shown in a table with the tags as column headers. You can choose "vertical table" if you want to display them as row headers instead.
- You may right click on the table cells to see what actions are available (Edit, remove columns, etc, ...). You can also drag and drop the headers.
- Go to tools and settings to control the columns (tags) you want to show or hide. You may also sort the results. The setting you choose will be saved automatically for each collection.
- Use Google translate or DeepL to translate your annotations. You can apply a generative AI prompt to each cell as well.
- Export your notes to MS Word, Excel or CSV format.
- You may share your data using Dropbox©.
⚠️ Please note that this does not sync your database, but instead, overwrites the data inside a collection.- Importing will not work as intented if you have multiple users working (writing) on the same collection. For that, you may need to use group libraries and buy some storage on Zotero.
-
First, create and set your Dropbox App for your research group. You will need to do this only once. You may start from here https://www.dropbox.com/developers. I cannot provide support for this but please make sure to limit the app to "App folder" only.
-
Then, get your Dropbox "refresh token". Please check the Dropbox API documentation. You may start from here https://www.dropboxforum.com/t5/Dropbox-API-Support-Feedback/Get-refresh-token-from-access-token/m-p/596755/highlight/true#M27728
-
Head to Dropbox "App Console" and retrieve your client ID and "client secret".
-
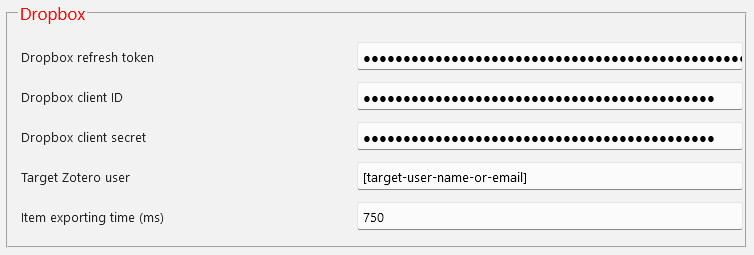
Head to ZeNotes settings > Dropbox
- Set all the values retrieved from Dropbox.
- Target Zotero user will be the username or email of the person you want to send your data to. (You need to ask them what they use for logging in in Zotero).
⚠️ Be careful when you set this to yourself as ZeNotes will overwrite the data on the Dropbox folder when exporting and overwrites the data on your Zotero when importing. - "Item exporting time" is the time (in milliseconds) it takes your computer to export one item. This is a hacky way to wait for all your data to be exported before uploading to Dropbox. In its current version, Zotero does not know when it finishes exporting items. On my computer I put 750, but you may make it bigger depending on the performance of your computer.
-
Share the settings above with your trusted research teammates.
-
Right click on a collection you want to export or import. You will find new menu items there "Export to Dropbox", "Import from Dropbox". You need to close and open Zotero after the settings.
-
Last, be careful who you share your API information with.
- Before utilizing any of the API introduced above, please carefully review the terms of service, usage guidelines, and agreements associated on their official websites.


