![]()
Open access lab experience as an introduction to the development of Linux/FreeRTOS device drivers for hardware accelerators.
The idea comes from the EMNESS initiative, with the goal to structure an innovative academic curriculum on reliability and hardware security. This material was originally developed as part of an assignment of the Operating Systems course (04JEZOQ) delivered at Politecnico di Torino by Prof. Stefano Di Carlo and Prof. Alessio Carpegna.
Fabio Scatozza, Isacco Delpero, Leonardo Cerruti, Claudio Capobianchi, Saman Alipour, Abdul Rehman, and Stephano Perera
-
Collect and organize material
-
Platform design
-
simple AXI4 Lite interconnection
-
AXI4 Stream + Lite interconnection to leverage stream-hashing capabilities of the crypto core
TODO convert crypto core protocol to AXI4 Stream
-
-
Baremetal self-test
-
polling synchronization
-
interrupt synchronization
-
-
PetaLinux project
-
polling synchronization
Note: while polling the process is uninterruptible. Programmer's errors could result in an unresponsive system.
Possible Fix: implement the polling delay with
msleep_interruptible()at the expense of performance. -
interrupt synchronization
-
-
Lab experience
- Contributors
- Project Advancement
- Contents
- What is this?
- Getting Started
- Deploy from Release
- Usage (TUL PYNQ-Z2 board)
- The Lab Experience
- The algorithm
- The Programmer's Model
- Exercises
- Exercise 1 - Testing all the driver functionalities
- Exercise 2 - Checking the correctness of the digest from the crypto core
- Exercise 3 - TCP server
- Exercise 4 - File comparison using multithreading and semaphores
- Exercise 5 - Password finder from a hash
- Exercise 6 - Pipe secure comunication
- Exercise 7 - Client and Server
- Exercise 8 - Possible attacks
- The Driver
- License
- Sources
The aim of this lab experience is to work on an environment made of a processor and an external hardware accelerator that implements the SHA 256 algorithm in an efficient way. The crypto core is described in VHDL, so that it can be implemented on a FPGA. Some memory-mapped registers have been designed: to make the system work, it is sufficient to connect these registers to processor bus and to assign them proper addresses.
To develop the proposed exercises, it is required to install Linux operating system on the processor, so that the external device can be accessed by using the device driver we developed. Some tools to install Linux on a processing system can be easily found online. For example, if working on a Xilinx board, Linux OS can be installed through PetaLinux tool. The exercises require the knowledge of the main system programming methods on Linux (system calls, files management, shared memory, pipes, message passing, threads, semaphores): to learn more about these topics you can find some useful material in the provided sources.
The project targets the TUL PYNQ-Z2 board, but other all programmable SoC architectures can be used by adapting the flow according to the vendor's documentation. The steps listed below guide you through the development steps, from the design of the platform up to the compilation of the loadable kernel module.
To quickly setup the lab environment, download the latest release. Unpack it and jump to Deploy from Release.
Before moving on, make sure to have the following tools available:
- Vivado and Vitis design environments
- Cable Drivers
- PetaLinux
- any Serial Communication Program of your choice
Detailed installation instructions are available in the documentation portal; for a simple installation have a look at the AMD Unified Installer. Notice that on Windows, Install Cable Drivers is an optional selection in the installer; for linux instead, a dedicated script is provided within Vivado install directory.
Then, run a clone:
git clone https://github.com/fscatox/emness_sha256.git
and change into the newly created project directory:
cd /path/to/emness_sha256
AMD hardware designs are created with Vivado and exported in the proprietary xsa file format,
which can then be used by both Vitis and PetaLinux. The process is automated with a TCL script;
while in the root project directory, run:
vivado -source scripts/main_vivado.tcl
The output is generated in the out/ folder. Notice that the critical warnings concerning the
PCW_UIPARAM_DDR_DQS_TO_CLK_DELAY parameters are hardware errata.
Inside src/ip/hdl you can examine
the RTL description of the open source crypto core retrieved from Jonny Doin's
project. Although it's a stream hash engine, for simplicity it's wrapped as an
AXI4 peripheral with a Lite interface: this is where the peripheral register file and the
synchronization mechanisms are implemented.
After having packaged the IP core, the platform is assembled by picking modules from the Vivado catalogue and wrapped as the top entity.

Before tackling the linux development problem, a simple baremetal driver and a self-test programs
are given in src/ip/api to test the hardware platform.
-
Open Vitis and specify a workspace directory.
-
Create a New Application Project and choose the tab for creating a new platform from hardware, namely
out/EmnessSha256.xsa. Keep the default selection to generate the boot components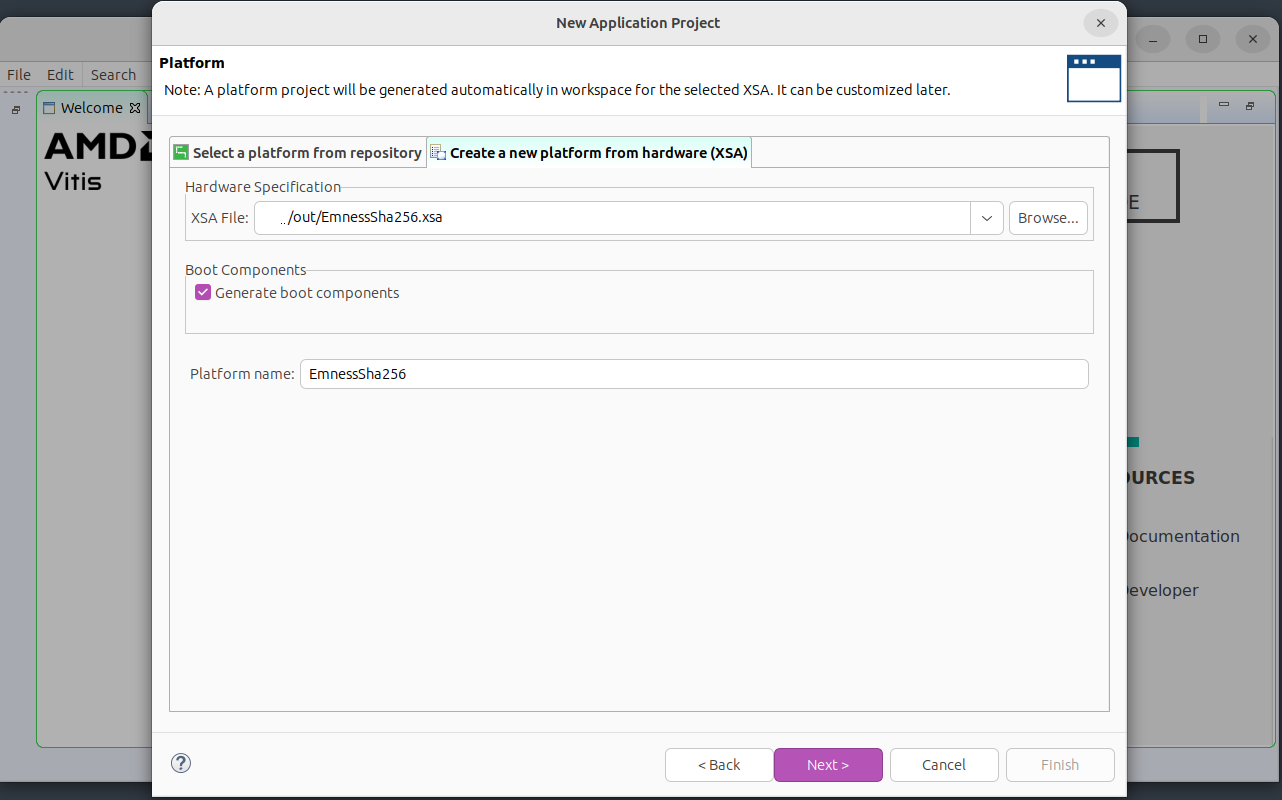
-
Enter a name for the project and keep the default selection of a single target processor core.
-
Pick the Empty Application (C) and finish the wizard.
-
In the Explorer tab, under
<project-name>_system/<project-name>right click onsrcand select Import Sources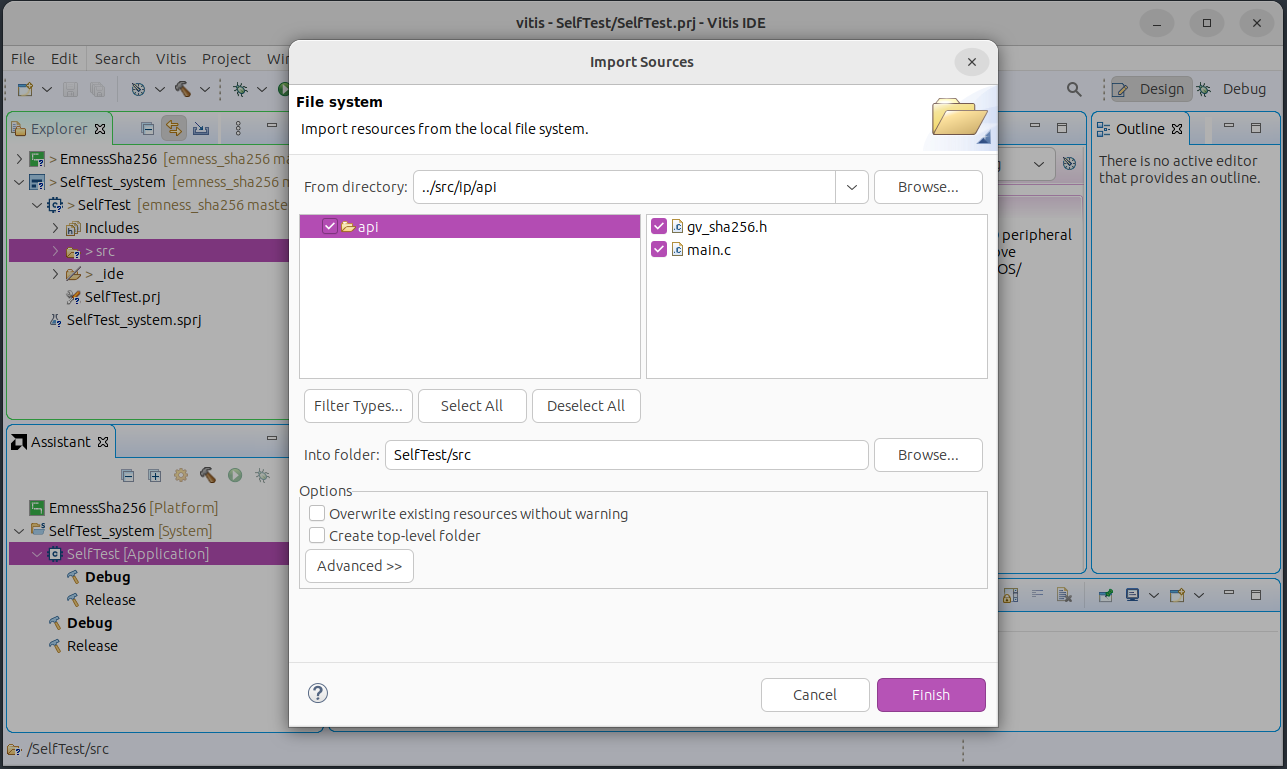
-
In the Assistant tab, select the
<project-name>_systementry and hit Run. The expected output is:################################ # gv_sha256 self test # NIST-ADDITIONAL-SHA256: n. 7 ################################ Starting polling test... Hash: D29751F2_649B32FF_572B5E0A_9F541EA6_60A50F94_FF0BEEDF_B0B692B9_24CC8025 Test passed... ################################ Starting interrupt test... Configuration done... Hash: D29751F2_649B32FF_572B5E0A_9F541EA6_60A50F94_FF0BEEDF_B0B692B9_24CC8025 Test passed...


The PetaLinux flow is extensively documented in the reference guide UG1144. The steps for a custom hardware platform are summarized in the table below.
| Design Step | Tool |
|---|---|
| Create a PetaLinux project | petalinux-create -t project |
| Initialize a PetaLinux project (for custom hardware only) | petalinux-config--get-hw-description |
| Configure the Linux kernel | petalinux-config -c kernel |
| Configure the root filesystem | petalinux-config -c rootfs |
| Create user components | petalinux-create -t COMPONENT |
| Build the system | petalinux-build |
| Package for deploying the system | petalinux-package |
-
Setup PetaLinux environment
source <petaLinux_tool_install_dir>/settings.sh -
Starting from the project root directory, create a PetaLinux project for custom hardware
 petalinux-create --type project --template zynq --name sha256peta
 cd sha256peta
 petalinux-config --get-hw-description ../out/EmnessSha256.xsa
A configuration menu opens. To make the root file system retain changes and to enable maximum usage of available DDR memory, we are using the EXT4 format for a separate rootfs partition, and FAT32 in the boot partition.
→ DTG Settings → Kernel Bootargs:
-
change generate boot args automatically to NO
-
update user set kernel bootargs to
earlycon console=ttyPS0,115200 clk_ignore_unused root=/dev/mmcblk0p2 rw rootwait cma=512M
→ Image Packaging Configuration:
- change root filesystem type to EXT4
-
-
Customize the kernel by launching:
petalinux-config -c kernel→ CPU Power Management: CPU IDLE causes the processors to get into IDLE state when the processor is not in use. During project development it can be disabled to avoid interactions with debug subsystems.
- change CPU Frequency scaling to NO
- change CPU Idle to NO
→ Device Drivers:
-
change On-Chip Interconnect management support to YES
-
→ Reset Controller Support:
- change Simple Reset Controller Driver to YES
-
→ Userspace I/O drivers:
- change Userspace I/O platform driver with generic IRQ handling to YES
- change Userspace platform driver with generic irq and dynamic memory to YES
- change Xilinx AI Engine driver to YES
-
Customize the root file system by launching:
petalinux-config -c rootfs→ Filesystem Packages → misc → packagegroup-core-buildessential: to include basic development tools, such as
gcc:- change packagegroup-core-buildessential to YES
- change packagegroup-core-buildessential-dev to YES
→ Filesystem Packages → console → network → openssh: to provide network access to the board:
- change openssh to YES
- change openssh-sshd to YES
- change openssh-sftp-server to YES
- change openssh-scp to YES
→ Image Features:
- change package-management to YES
- change debug-tweaks to YES
-
Build the system by launching:
petalinux-build -
Customize the device tree. In your favorite text editor, starting from PetaLinux project root, open:
components/plnx_workspace/device-tree/device-tree/pl.dtsiIf the
interruptsattribute line is:interrupts = <0 29 4>;a further step is needed to change the sensitivity to rising edge, encoded in the last of the three numbers. Starting from PetaLinux project root, open:
/project-spec/meta-user/recipes-bsp/device-tree/files/system-user.dtsithen, paste the
amba_plnode description fromcomponents/plnx_workspace/device-tree/device-tree/pl.dtsiand change theinterruptsattribute line to:interrupts = <0 29 1>;Then rebuild the device tree and the entire system:
 petalinux-build -c device-tree
 petalinux-build
If you want to make sure that the changes was applied, starting from the PetaLinux project root change to:
images/linuxThen extract the device tree:
dumpimage -T flat_dt -p 1 -o device_tree_out.dtb image.uband de-compile it in a human-readable format:
dtc -I dtb -O dts -o device_tree_out.dts device_tree_out.dtbFinally, you can open
device_tree_out.dtsand locate theamba_pldevice node. -
Create the custom kernel module by launching:
petalinux-create -t modules --name sha256Starting from PetaLinux project root, change to the newly created module directory:
cd project-spec/meta-user/recipes-modules/sha256To cross-compile the kernel module, first copy the provided module sources:
cp ../../../../../src/lkm/sha256* ./filesThen, edit the bitbake recipe
./sha256.bbby changing:SRC_URI = "file://Makefile \ file://sha256.c \ file://COPYING \ "into:
 SRC_URI = "file://Makefile \
            file://sha256.c \
            file://sha256.h \
            file://COPYING \
           "
Finally, launch:
petalinux-build -c sha256The compiled module is located somewhere within the PetaLinux folder; from the PetaLinux project root
find -name "sha256.ko"should tell you exactly where.
-
Package for deploying the system. The preliminary step is to partition the SD card:
-
~ 200 MB for the FAT32 bootable partition
-
the remaining space as EXT4 root file system partition
Feel free to use any tool you'd like, the UG1144 manual suggests a procedure employing
fdisk.To generate the files suitable to deployment from SD card, from the PetaLinux project root change into:
images/linux/run:
petalinux-package --boot --fsbl zynq_fsbl.elf --fpga system.bit --u-boot --forceThen:
-
copy
BOOT.BIN,image.ub, andboot.scrto the bootable partition -
extract
rootfs.tar.gzto the root file system partition; assuming the partition is mounted in/media/rootfs, the command would be:sudo tar xvfp rootfs.tar.gz -C /media/rootfs -
copy the module to
/media/rootfs/home/root. You will have it available when booting up the system.
-
As a preliminary step, partition the SD card with the following scheme:
- ~ 200 MB for the FAT32 bootable partition
- the remaining space as EXT4 root file system partition
Feel free to use any tool you'd like, the UG1144 manual suggests a procedure
employing fdisk.
After having downloaded the release, unpack it and then:
-
copy
BOOT.BIN,image.ub, andboot.scrto the bootable partition -
extract
rootfs.tar.gzto the root file system partition; assuming the partition is mounted in/media/rootfs, the command would be:sudo tar xvfp rootfs.tar.gz -C /media/rootfs
Access to the board is made possible through serial port or SSH. The former through a usb port
(USB protocol is converted to serial one thanks to FTDI FT2232HQ chip), the latter an ethernet
one and allows multiple remote connections; during our tests we used a point-to-point connection.
Pick a tool depending on your needs; picocom and PuTTY are quite popular choices.
Serial terminal settings:
- Port: depends on remote system, command
ls /devshows the available devices, the board is usually/dev/ttyUSBx - Baud rate: 115200
- Data bits: 8
- Stop bits: 1
- Partity check: none
- Flow control: none
Once the serial connection is established, a command prompt appears: if you set up the system
using the published release, enter both user and password as root. You will find both the
self test program and the compiled kernel module in the root folder.
To load the kernel module from the root folder:
insmod sha256.koloads the module automatically selecting polling synchronization.insmod sha256.ko irq_enable=yloads the module selecting interrupt synchronization.
SSH settings:
- IP: Board IP address
- Port: 22
- User: root
- Password: root
Now it's your turn! Read the next sections then dive into the exercises. Strive to devise
efficient, elegant and innovative solutions and if feel stuck, have a look at
solutions.
The algorithm is the SHA-256 (Secure Hash Algorithm 256), one of the cryptographic hash functions designed
by the United States National Security Agency (NSA). All the SHA algorithms work in a similar way: they
take as input a message of indefinite length (for example, a file content) and they deliver as output a
digest (or hash) on a fixed number of bytes. The input message is divided into blocks and each block is then
divided into words. SHA-256 requires blocks of 512 bits (64 bytes), divided into 16 32-bit words. The message
length (on 64 bits) is appended at the end of the message (thus the maximum length of the message is equal to
The hash is on 256 bits (32 bytes), divided into 8 32-bit words. One message block at a time is sent to the algorithm: the hash computed for each block is used as the starting point to compute the hash for the following block. The hash for the first block is computed starting from an initial hash, defined by the algorithm standard (it is obtained by taking the first 32 bits of the fractional parts of the square root of the first 8 prime numbers). After last block is read, the algorithm provides the final hash.
Cryptographic functions like the SHA-256 can be used for a lot of applications, for example to verify the integrity of a message or file, to verify the correctness of a password or to reliably identify a file. They are called secure because, for a given algorithm, it is computationally infeasible:
- to find a message that corresponds to a given message digest, or
- to find two different messages that produce the same message digest.
To learn more about how the algorithm is implemented it is suggested to have a look to the algorithm standard.

If programming in a bare metal environment, the accelerator must be accessed through the following memory-mapped registers: CSR is the control & status register, WXX registers are used to store the 512-bit block, while HX registers store the computed digest.
| Register Name | Bit Field and Description | ||||||||||||||||||||
|---|---|---|---|---|---|---|---|---|---|---|---|---|---|---|---|---|---|---|---|---|---|
| CSR |
DONE: read-only bit raised by the crypto core when the hash computation of the entire message has terminated. BLOCKREAD: read-only bit raised by the crypto core when an entire block has been read (it is not raised if the block is the last one); it is automatically cleared when writing '1' on WR. IENABLE: this bit must be set by the programmer if he wants to use interrupts. WR: this bit must be set to '1' to tell the core that a new block is available in the registers; it is automatically cleared after all the words have been read by the core. LAST: this bit must be set by the programmer before writing '1' on WR to indicate that the block the core is going to read is the last one; it is automatically cleared when writing '1' on NEWHASH. LASTWORD: 4 bits to indicate VALIDBYTE: 2 bits to indicate how many bytes are part of the message in last word ("00" if all bytes are valid). NEWHASH: this bit must be set before starting the computation of a new hash to reset the crypto core; it is automatically cleared after one clock cycle. COREENABLE: this bit must be set to enable the crypto core. |
||||||||||||||||||||
| WXX | W0: most significant word of the 512-bit block W15: least significant word of the 512 bit block. |
||||||||||||||||||||
| HX | H7: most significant word of the 256-bit hash H0: least significant word of the 256-bit hash |
If programming in a Linux environment, there is no need of knowing the registers: the driver provides all the functionalities to compute the hash of a message or a concatenation of more messages. Like all device drivers in Linux, it is sufficient to use some system calls:
- open(): it enables the core.
- close(): it disables the core.
- ioctl(): to choose between concatenated (writing 1) or non-concatenated mode. (writing 0). Please remember to always disable concatenation mode when it is no more required.
- lseek(): allows to reset the core (if final position == 0) or to add some bytes filled with 0s (if final position > current position).
- write(): to send the message from which the hash must be computed. Writing a number of bytes equal to 0 allows some special functionalities (summarized in the graph).
- read(): to read the computed hash; if this system call is invoked while the core is still computing the hash, it waits until the result is available (unless O_NONBLOCK was set while opening the file).
The following graph summarize how to use the system calls to send the message to the core, in both concatenated and non-concatenated mode.

Objective:
Develop a C program to perform a comprehensive self-test for a driver implementing the SHA256 hashing algorithm. The self-test program should rigorously validate the correctness and integrity of the SHA256 hashing algorithm under various scenarios, ensuring its robustness and reliability.
Test Functions:
Write: This is the basic instruction, where a word is written and a hash is read back.
Concatenation: This test function will focus on testing the concatenation functionality of the SHA256 driver. It will write multiple data blocks to the driver and verify the resulting hash values. This test ensures that the SHA256 algorithm handles the concatenation of data correctly and produces accurate hash outputs.
With_Seek: The With_Seek test function will evaluate the SHA256 driver's behavior when performing forward seeks in the data stream. It will write data blocks with forward seeks to different positions in the source file, validating the hash values at each seek position. Forward seek will result in a 0 padding while backward seed (rewind) will work as reset and generate the new_hash signal. This test ensures that the SHA256 algorithm can handle data writes with seeks accurately.
Without_Seek: The Without_Seek test function will verify the SHA256 driver's capability to handle data writes without seeks. It will write data blocks sequentially without any seeks, ensuring the integrity of the hashing algorithm under continuous data input scenarios.
Multi-Threading and Mutex:
To ensure accurate and synchronized execution of the self-test process, the program will utilize multi-threading with pthread library. Specifically, the program will create three threads, each executing one of the three test functions (concatenation, With_Seek, and Without_Seek). The purpose of multi-threading is to parallelize the self-test, allowing simultaneous testing of different aspects of the SHA256 driver, which can significantly speed up the overall self-test process.
A pthread_mutex_t variable named mutex will be used to implement mutual exclusion. The mutex will act as a synchronization mechanism to prevent potential data races and ensure that each test function executes exclusively without interfering with the others. Before executing a test function, the corresponding thread will lock the mutex using pthread_mutex_lock, ensuring exclusive access. Once the test function completes, the thread will unlock the mutex using pthread_mutex_unlock, allowing the next thread to proceed.
Explanation:
The purpose of the self-test program is to validate the correct implementation and functionality of the SHA256 driver. By running the test functions under different scenarios and comparing the generated hash values with precomputed hash values, the program can ensure that the SHA256 algorithm produces consistent and accurate results.
Multi-threading enhances the efficiency of the self-test process by concurrently executing the test functions. Each thread independently tests a specific aspect of the SHA256 driver, leading to a faster overall self-test. The mutex ensures that each test function executes atomically without interference, preventing race conditions and guaranteeing the reliability of the test results.
Write a C program that computes the hash of a file in two different ways: by using the accelerator and by using Linux command "sha256sum". The file is of unknown size, so dynamic memory allocation must be used while reading it. After having stored the file content into a buffer, a fork() system call must be executed: the child process must invoke "sha256sum" command through a execl() system call (and redirect the output to a file named hash.txt), whereas the parent process must access the external crypto core and then wait for the child termination. Then the two hashes are read and compared: a success (if they are equal) or failure (if they are different) message must be printed on the screen. Finally, hash.txt file must be removed by invoking "rm" Linux command through system() system call.
Develop a program that constructs a TCP server using the socket system call. A TCP server is a type of network server that uses the TCP protocol for communication. TCP is one of the core protocols of the Internet Protocol Suite and provides reliable, ordered, and error-checked delivery of data between networked devices.
The socket system call allows the program to establish a communication endpoint, commonly known as a socket, that can send and receive data over a network.
The program should accept the number of clients as a parameter and be capable of concurrently handling multiple clients using multithreading. Each client's thread should wait for a termination message; otherwise, it should listen for client input. There is no timeout set for each client's connection.
Additionally, the program should provide the following functionalities for a shared folder on the server:
-
List Directories: Use the "ls" command to retrieve a list of directories inside the shared folder.
-
Make Directory: Utilize the "system" system call "mkdir" to create a new directory within the shared folder.
-
Download Content: Enable the download of text file contents while verifying its integrity using the SHA256 checksum. for the SHA256 you have to use the core through driver. This functionality should utilize two separate threads: one for reading the file's content and another for calculating the hash. The second thread should execute after the first one, and synchronization should be achieved using a semaphore.
To prevent concurrent access to files in the shared folder by multiple clients, employ a mutex and also use mutex to prevent multiple access to the crypto core.
Write a program that receives a list of files as input from command line (The number of files shouldn't be specified "a priori") and checks that they are equal. In particular the program must generate multiple threads (one for each file), that open the files, calculate the hashes using the provided hardware accellerator and returns it. Notice that the device is one, so the threads must have a semaphore to decide when to calculate the hash. Try to use the write with concatenation function for sending the files' content to the core. The hash comparison can be done in the main.
Improvement: Try to keep everything generic and consider all input lenghts unknown
Write a program who tries to find the correct password, recognising it from the expected hash. This program must read a list of password attempts from a file and the expected hash from another file, both given by command line. It then creates multiple threads (one per password attempt). Each thread calculates the hash of one password attempt using the device driver (/dev/sha256) and compares the calculated hash with the expected one. The program must then return the original password.
Hint: use the return values of the threads.
Objective:
The objective of this C program is to demonstrate secure communication between parent and child processes using a named pipe ('aPipe') and custom SHA-256 hashing for data integrity verification. The program aims to establish a secure communication channel between the parent and child processes, ensuring that data is transmitted accurately.
Explanation:
- Named Pipe Creation: The program begins by creating a named pipe using the mkfifo() function. The named pipe is used for interprocess communication between the parent and child processes.
- Parent Process: User Input: The parent process prompts the user to enter a message. Write to Pipe: The entered message is then sent to the child process through the named pipe using the write() function.
- Child Process: Read from Pipe: The child process reads the message sent by the parent processfrom the named pipe using the read() function. SHA-256 Hash Calculation: A custom SHA-256 implementation is used to calculate the SHA-256 hash of the received message. Write Hash to Pipe: The calculated hash is sent back to the parent process through the named pipe using the write() function.
- Parent Process (Continued): Read Hash from Pipe: The parent process reads the received hash from the named pipe using the read() function. SHA-256 Hash Verification: The program calculates the SHA-256 hash of the original message entered by the user. Data Integrity Check: The received hash is compared with the expected hash. If they match, data integrity is verified, and a success message is displayed otherwise, a failure message is shown.
- Error Handling: The program handles various potential errors, such as pipe creation failure, read/write errors, and hash calculation errors. Proper error messages are displayed to the user.
- Secure Communication: The program adheres to best practices for secure communication by using appropriate permissions for the named pipe and ensuring secure data transmission between the parent and child processes. By accomplishing these objectives, the program exemplifies a secure communication mechanism between parent and child processes, ensuring the integrity of transmitted data using custom SHA-256 hashing.
In order to simulate a login operation write two C programs, representing server and client. The former waits for email and password given by the client and after having verified that email is present in a pre-formed database, calculates the hash of the password and compare it with the other hashes in the database. The latter waits instead for server response, which can be "email not found", "wrong password" or "access granted". Enrich server capabilities using an arbitrary number of threads which represent the maximum number contemporary login attempts to the server. Simulate that using multiple executions of the same client executable file. Remember that in the server is present only one crypto core. (Hint: execute server first and then use different thread id as client argument for every client instantiation).
Objective: try to get the driver not working
Approach 1: Can you think of any pitfall related to SHA256_IOC_WCAT command?
Approach 2: Try to develop a non working version of the driver starting from the original version. The hacked version of the hash driver should not generate any error such that the user doesn't get warned but just get wrong hash results.
Hint: Try to modify the read or write function of the driver in order to make wrong data.
Not only in general purpose systems but especially in embedded systems, it's fundamental to
encapsulate the knowledge of hardware as mush as possible, providing a simple and uniform interface
to be used at higher levels of abstraction.
In Linux, this is achieved by virtualizing most of the resources as files, which allows applications
to manipulate them with the same set of system calls available for normal files: open(), read(),
write(), close(), etc.
This framework relies on the Virtual File System (VFS), which abstracts the underlying file system
implementation providing the low-level functions used internally by file system calls and run in
kernel space, being Linux based on a monolithic kernel.
This latter mechanism is crucial to handle peripherals: the knowledge about how the
peripheral works is hidden in the device driver, a C module that provides an implementation for
those low-level functions supported by the VFS. As a consequence, once the device has been made
available as a special file in the /dev directory of the root file system, when executing
a file system call, the VFS appropriately binds those functions to their implementation in the
driver.
Linux recognizes three classes of devices:
-
character devices, accessed as stream of sequential words as in a conventional files. This is the case of our crypto core
-
block devices, accessed only as multiples of a byte-block
-
network interfaces, in charge of sending and receiving data packets through the subsystem of the kernel
The devices are identified with numbers internally split into:
-
major number, which indicates the family of the device
-
minor number, which allows differentiating among multiple instances of a major device type
and the problem of assigning these numbers can be solved either statically or dynamically.
The device file, also called device nodes, are the entry point for applications to communicate with
kernel space and hardware peripherals. Device nodes can be created manually as it was done in the
past, but recent kernel versions provide an API to perform it automatically. This requires the
device to be registered in a class, seen as a directory inside /sys.
Peripherals connected to buses like PCI and USB can tell the system what they are as well as what resources they exhibit and where to find them, because of the enumeration support built in the protocol. For plenty of devices, such as SoC sub-modules, this is not available and the Platform Device is the kernel mechanism for dealing with non-discoverability.
A platform device is represented in code by a struct platform_device and is meant to be connected to
a software abstraction that behaves like a statically enumerated bus, the platform bus. The driver
of a platform device must declare itself as such by registering with the platform bus and is
represented by a struct platform driver:
    static struct platform_driver sha256_driver = {
      .driver = {
        .name = DRIVER_NAME,
        .owner = THIS_MODULE,
        .of_match_table     = sha256_of_match,
      },
      .probe                = sha256Probe,
      .remove               = sha256Remove,
    };
Once the platform device has registered itself:
    static int __init sha256Init(void) {

      ...

      /* register the driver */
      if ((rc = platform_driver_register(&sha256_driver)) < 0) {
        PR_ALERT("failed platform driver registration");

        return rc;
      }

      ...

    }
The platform bus code performs the binding based on the .driver member: if a compatible platform
device gets discovered, the platform driver function probe() is invoked and receives as argument
the representation of the device:
    struct platform_device {
        const char *name;
        int	id;
        bool id_auto;
        struct device dev;
        u64 platform_dma_mask;
        struct device_dma_parameters dma_parms;
        u32	num_resources;
        struct resource	*resource;

        const struct platform_device_id	*id_entry;
        /*
         * Driver name to force a match.  Do not set directly, because core
         * frees it.  Use driver_set_override() to set or clear it.
         */
        const char *driver_override;

        /* MFD cell pointer */
        struct mfd_cell *mfd_cell;

        /* arch specific additions */
        struct pdev_archdata	archdata;
    };
As a result, the programmer can rely on the resource array to learn where the various resources
are, most notably: memory mapped segments and interrupt lines.
The Platform Device scheme moves the problem out of programmers' hands and to whoever deals with creating the descriptions for the devices present on the system, the system-specific "board files". Therefore, a kernel built around a certain board file lacks the flexibility to boot on any other system.
The alternative are Device Trees, textual descriptions of a system's hardware configuration passed to the kernel at boot-time to learn about the system is being run on.
    / {
        amba_pl: amba_pl {
            #address-cells = <1>;
            #size-cells = <1>;
            compatible = "simple-bus";
            ranges ;
            gv_sha256_0: gv_sha256@43c00000 {
                clock-names = "s00_axi_aclk";
                clocks = <&clkc 15>;
                compatible = "xlnx,gv-sha256-1.0";
                interrupt-names = "sha256_irq";
                interrupt-parent = <&intc>;
                interrupts = <0 29 1>;
                reg = <0x43c00000 0x10000>;
                xlnx,s00-axi-addr-width = <0x7>;
                xlnx,s00-axi-data-width = <0x20>;
            };
        };
    };
In a device tree, platform devices are either direct children of the root or attached to a simple bus: when the kernel processes the device tree, the node contains the information that gets
abstracted into the struct platform_device.
The platform driver can specify the platform devices it services with a match table:
static struct of_device_id sha256_of_match[] = {
  { .compatible  = "xlnx,gv-sha256-1.0", },
  { /* end of list */ },
};
Code: GNU GPLv2
Documentation: CC BY-NC 4.0