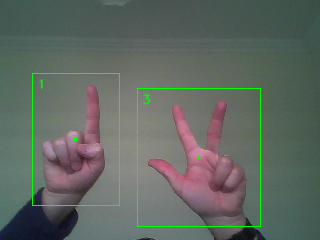
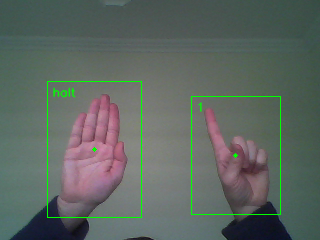
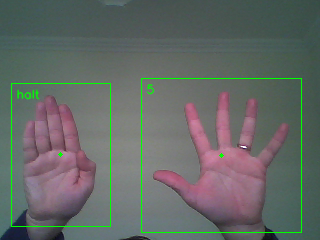
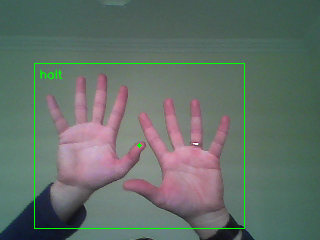
The project presents a full solution for capturing, retraining and classifieing images with SVM and HOG features. Currently the tranined file can detect and classify multiple hand gestures, pictures below. The last picture shows the scenario where detections are overlapping, in this case the classification is not possible (if like in this case) no similar scenario was trained previously.
|
|
|
|
|---|
The flow of the detection and classifications, starts with low level filtering (skin color detector), followed by a contour selector. Role of the contour selector is to identify the regions of interest (ROI) where the object for classification can be found. Image patches like below are collected and stored in directories for a database creation. Images are normalized before saveings, to obtain better detection performance.

|

|

|

|

|

|

|

|
|---|
After creating a sufficiently big database ~100 pictures/class, the SVM training can start. It Will take only a few seconds and an xml file will be saved which holds everything needed for further detections.
From Command line:
usage: gesture_detector.py [-h] -l labelfile [-t trainedfile] [-cmd commands]
                           [-d detectionswindow] [-c cameraid] [-s samplesize]
                           [-dir traindirectory] [-dd detectiondir]
                           [-ani annotatedimages] [-sf saveframe]
                           [-sp savepatches] [-cal calibration]

optional arguments:
  -h, --help            show this help message and exit
  -l labelfile          label file, like ./label.txt
  -t trainedfile        file which holds the trained values like, ./data.xml
  -cmd commands         commands available for processing: [retrain,
                        savedetections, creatlabelfile, run], default=run
  -d detectionswindow   show/ hide detection window [0,1], default=0
  -c cameraid           use different camera ID, default=0
  -s samplesize         select the training sample size, default=96
  -dir traindirectory   directory with ordered pictures per detection classes
  -dd detectiondir      directory to save the detections or image patches for
                        training set creation
  -ani annotatedimages  save annotated images, [0,1] default=0
  -sf saveframe         save original camera frames, [0,1] default=0
  -sp savepatches       save image detections (patches), [0,1] default=0
  -cal calibration      reclalibrate skin color detection, [0,1] default=0
1. Create a directory structure to store the files
2. Create labels file
3. Capture and copy files under the desired folders
4. Instruct software for retraining
Is recommended to start from the root of the python file, and create a directory like "data", then create under these folder directories equivalent to the classes that are needed for the classification part. Similar to below.
├── data
│   ├── 0
│   ├── 1
│   ├── 2
│   ├── _2
│   ├── 3
│   ├── 4
│   ├── 5
│   ├── face
│   ├── halt
│   ├── ok
│   ├── tmp
The tool itself provides means for saving image regions, this is fitting to the needs. First, we need the label file, then the rest is easy.
python3 ./gesture_detector.py -l ./labels.txt -cmd creatlabelfile -dir ./data
Now, label file was created, contect is somethng like this:
#1,_2,/home/test/data/_2
2,5,/home/test/data/5
3,face,/home/test/data/face
4,2,/home/test/data/2
5,ok,/home/test/data/ok
#6,tmp,/home/test/data/tmp
7,4,/home/test/data/4
8,0,/home/test/data/0
9,1,/home/test/data/1
10,halt,/home/test/data/halt
11,3,/home/test/data/3
Unneeded directories like "tmp" - used to store temporary images, can be commented on, the label loader will skip it. The format is simple, the first element is the UID (unique identifier), label name - edit it to whatever wants to show on detections. Last is the directory for the specific label.
Use the following command to save images into a temp directory:
python3 ./gesture_detector.py -l ./labels.txt -t -dd ./data/tmp -sf 1 -sp 1
This will capture regions for detection and the frames on which the regions were detected. If just patches are needed use just -sp 1 command. Now, comes the hard work of selecting and copying the specific image patches under the desired directories.
Use the following command for retrain:
python3 ./gesture_detector.py -l ./labels.txt -t ./data.xml -cmd retrain
When everything has gone well with the re-train, the software starts automatically. The data.xml will be automatically saved, therefore for next run only:
python3 ./gesture_detector.py -l ./labels.txt -t ./data.xml
Detection performance is mainly driven by the color filterer. Different skin tones or even changing the object traced can be easily set, in the following code section:
# pre-processing
objPP = clPreProcessing(img0, False, 155, 30, 100)
There is a simple tool to obtain the desired color, try this out.
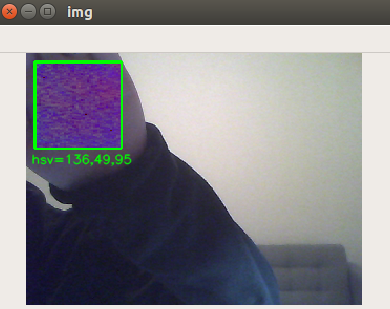
In some cases, a skin color detector does not provide consistent detection. Recalibration could be the solution. Values are stored in the labels file. To start the calibration process invokes the python file with the following arguments:
python3 ./gesture_detector.py -l ./labels.txt -t data.xml -cal 1
A small calibration window will appear, the object with the desired color to be detected shall be placed to cover the full window. On real time the HSV calibration values will be dispeayed, if the values are stabilized, press "c" button from the keyboard
|
|---|
Implement validation function and detection accuracy for fine tunings.
/Enjoy.