- Introduction
- Openweather API Key
- Create RDS Instance
- Install Dependencies On ec2 and AWS CLI Configuration
- Remotely SSH Visual Studio Code to AWS ec2
- Create Dag
- Usage
Apache Airflow is an open-source platform used for orchestrating and scheduling workflows of tasks and data pipelines. Previously, I outlined some basic processes of building a Python ETL pipeline with airflow on AWS EC2 in repository Airflow_ETL. In this repository, we will learn how to parallelize tasks. We will run airflow on AWS EC2 and use AWS RDS Postgres instance database as the database.
The high-level architecture of this project is as below:

Create RDS Instance
-
Open your AWS RDS console -> Click
Create database-> ChoosePostgreSQLas your Engine options -> SelectFree Tiertemplate -> Set your DB instance identifier -> Set up yourMaster password-> Selectdb.t3.microfor instance configuration -> ChoosePublic accessasYes-> Set up yourVPC security group, add5432as Database port -> FinishCreate database -
Once you created your RDS instance, click into the
VPC security groupsyou set previsouly and edit inbound rules, make sure port5432was added.
Obtain an API key
This part was covered in my previvous repository Airflow_ETL.
Commands used when installing dependencies on ec2
- For this part I will provide the command I used for the dependencies installation. Make sure you created an ec2 instance beforehand, having the security group and private key set up or created,
make sure port
8080and5432is listened to, I usedt2.mediumas instance type andubuntuas OS, once you SSH your ec2, run the command below to install dependencies as needed:
Update and install packages:
sudo apt update
sudo apt install python3-pip
sudo apt install python3.10-venv
Create a new virtual environment named airflow_venv:
python3 -m venv airflow_venv
Activate your virtual environment (Unix/macOS):
source airflow_venv/bin/activate
For Windows system, use the below command instead to activate:
.\airflow_venv\Scripts\activate.bat
Then install the necessary packages inside the virtual environment:
sudo pip install fsspec
sudo pip install pandas
sudo pip install s3fs
sudo pip install apache-airflow
sudo pip install apache-airflow-providers-postgres
Lastly, you can run this command to run Apache Airflow in standalone mode:
airflow standalone
- Go to your instance to copy your
Public IPv4 DNSto your browser and add:8080at the end, then you'll see this login page:
-
Use username and password shows in terminal to login your airflow account.
-
In order to use PostgreSQL on ec2, you need to install PostgreSQL clients, steps and commands are available on this PostgreSQL website.
Create the file repository configuration:
sudo sh -c 'echo "deb https://apt.postgresql.org/pub/repos/apt $(lsb_release -cs)-pgdg main" > /etc/apt/sources.list.d/pgdg.list'
Import the repository signing key:
sudo sh -c 'echo "deb https://apt.postgresql.org/pub/repos/apt $(lsb_release -cs)-pgdg main" > /etc/apt/sources.list.d/pgdg.list'
Update the package lists:
sudo apt-get update
Install the latest version of PostgreSQL:
sudo apt-get -y install postgresql
Before you can use Amazon S3 with your RDS for PostgreSQL DB instance, you need to install the aws_s3 extension.
- To install the aws_s3 extension, you can follow the steps on Amazon AWS Documentation:
- Use psql (or pgAdmin) to connect to the RDS for PostgreSQL DB instance as a user that has
rds_superuserprivileges. If you kept the default name during the setup process, you connect as postgres.
psql -host {your-rds-endpoint} -p 5432 -U postgres -W
Enter your master password for your RDS DB.
Once it's connected, enter \list to see the list of database you have, you'll see a database named postgres which is a default one as below:
- To install the extension, run the following command.
postgres=> CREATE EXTENSION aws_s3 CASCADE;
- Install awscli and configure it:
sudo apt install awscli
Now, what we need is called Access key and Secret key. Go to your Security credentials, click Create access key, then you can save your Access key and Secret key somewhere.
aws configure
Type in your Access key, Secret Access key, Default region key, etcs as prompted.
- Once you created your s3 Bucket for this project, should set up access to the Amazon S3 bucket, you can use an IAM role to access an Amazon S3 bucket to give an RDS for PostgreSQL DB instance access to Amazon S3 through an IAM role.
Enter \q to quit postgres, copy this command in your terminal (For Linux, macOS, or Unix), remember to change your policy name and s3 Bucket name
aws iam create-policy \
   --policy-name your-policy-name \
   --policy-document '{
     "Version": "2012-10-17",
     "Statement": [
       {
         "Sid": "s3import",
         "Action": [
           "s3:GetObject",
           "s3:ListBucket"
         ],
         "Effect": "Allow",
         "Resource": [
           "arn:aws:s3:::your-s3-bucket",
           "arn:aws:s3:::your-s3-bucket/*"
         ]
       }
     ]
   }'
For Windows:
aws iam create-policy ^
   --policy-name rds-s3-import-policy ^
   --policy-document '{
     "Version": "2012-10-17",
     "Statement": [
       {
         "Sid": "s3import",
         "Action": [
           "s3:GetObject",
           "s3:ListBucket"
         ],
         "Effect": "Allow",
         "Resource": [
           "arn:aws:s3:::your-s3-bucket",
           "arn:aws:s3:::your-s3-bucket/*"
         ]
       }
     ]
   }'
- Create an IAM role. You do this so Amazon RDS can assume this IAM role to access your Amazon S3 buckets. For Linux, macOS, or Unix:
aws iam create-role \
   --role-name your-role-name \
   --assume-role-policy-document '{
     "Version": "2012-10-17",
     "Statement": [
       {
         "Effect": "Allow",
         "Principal": {
            "Service": "rds.amazonaws.com"
          },
         "Action": "sts:AssumeRole"
       }
     ]
   }'
For Windows:
aws iam create-role ^
   --role-name rds-s3-import-role ^
   --assume-role-policy-document '{
     "Version": "2012-10-17",
     "Statement": [
       {
         "Effect": "Allow",
         "Principal": {
            "Service": "rds.amazonaws.com"
          },
         "Action": "sts:AssumeRole"
       }
     ]
   }'
- Attach the IAM policy that you created to the IAM role that you created.
For Linux, macOS, or Unix:
aws iam attach-role-policy \
   --policy-arn your-policy-arn \
   --role-name your-role-name
For Windows:
aws iam attach-role-policy ^
   --policy-arn your-policy-arn ^
   --role-name your-role-name
- Add the IAM role to the DB instance by AWS CLI.
For Linux, macOS, or Unix:
aws rds add-role-to-db-instance \
   --db-instance-identifier my-db-instance \
   --feature-name s3Import \
   --role-arn your-role-arn   \
   --region your-region
For Windows:
aws rds add-role-to-db-instance ^
   --db-instance-identifier my-db-instance ^
   --feature-name s3Import ^
   --role-arn your-role-arn ^
   --region your-region
To acquire Policy ARN, go to IAM -> Policies -> your-policy, ARN would be available inside the Policy details.
Before we start the Dag building, import the .csv file us_city.csv to your s3 bucket.
How to remotely SSH (connect) Visual Studio Code to AWS EC2:
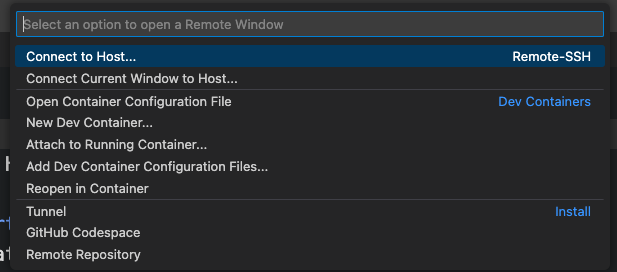
- Click the button at the left bottom to open a remote window:
- Connect host:
-
Once you get into the remote machine folder
Home/Ubuntu, open the file.sshinside your local user folder. -
Edit your config file inside
.ssh, which should follow this pattern:
Host your-instance-name
    Hostname Public-IPv4-address
    User ubuntu
    IdentifyFile your-key-pair-pem-path
- Make a Python file inside airflow folder, say
weatherapi_dag.pyand make the necessary import.
from airflow import DAG
from datetime import timedelta, datetime
from airflow.operators.dummy_operator import DummyOperator
from airflow.utils.task_group import TaskGroup
from airflow.providers.postgres.operators.postgres import PostgresOperator
from airflow.providers.http.sensors.http import HttpSensor
import json
from airflow.providers.http.operators.http import SimpleHttpOperator
from airflow.operators.python import PythonOperator
import pandas as pd
from airflow.providers.postgres.hooks.postgres import PostgresHook

// DAG and Default Arguments
default_args = {
    'owner': 'airflow',
    'depends_on_past': False,
    'start_date': datetime(2023, 1, 8),
    'email': ['youremail@domain.com'],
    'email_on_failure': False,
    'email_on_retry': False,
    'retries': 2,
    'retry_delay': timedelta(minutes=2)
}

with DAG('weather_dag_2',
        default_args=default_args,
        schedule_interval = '@daily',
        catchup=False) as dag:

        start_pipeline = DummyOperator(
            task_id = 'tsk_start_pipeline'
        )

        join_data = PostgresOperator(
                task_id='task_join_data',
                postgres_conn_id = "postgres_conn",
                sql= '''SELECT
                    FROM weather_data w
                    INNER JOIN city_look_up c
                        ON w.city = c.city
                ;
                '''
            )

        load_joined_data = PythonOperator(
            task_id= 'task_load_joined_data',
            python_callable=save_joined_data_s3
            )

        end_pipeline = DummyOperator(
                task_id = 'task_end_pipeline'
        )

        with TaskGroup(group_id = 'group_a', tooltip= "Extract_from_S3_and_weatherapi") as group_A:
            create_table_1 = PostgresOperator(
                task_id='tsk_create_table_1',
                postgres_conn_id = "postgres_conn",
                sql= '''
                    CREATE TABLE IF NOT EXISTS city_look_up (
                    city TEXT NOT NULL,
                    state TEXT NOT NULL,
                    census_2020 numeric NOT NULL,
                    land_Area_sq_mile_2020 numeric NOT NULL
                );
                '''
            )
// Declare Task Dependencies
        create_table_1 >> truncate_table >> uploadS3_to_postgres
        create_table_2 >> is_houston_weather_api_ready >> extract_houston_weather_data >> transform_load_houston_weather_data >> load_weather_data
    start_pipeline >> group_A >> join_data >> load_joined_data >> end_pipeline
The weather API availability check must pass is_weather_api_ready before the weather data can be fetched extract_weather_data.
Once the data is successfully fetched, it is then transformed and loaded transform_load_weather_data.
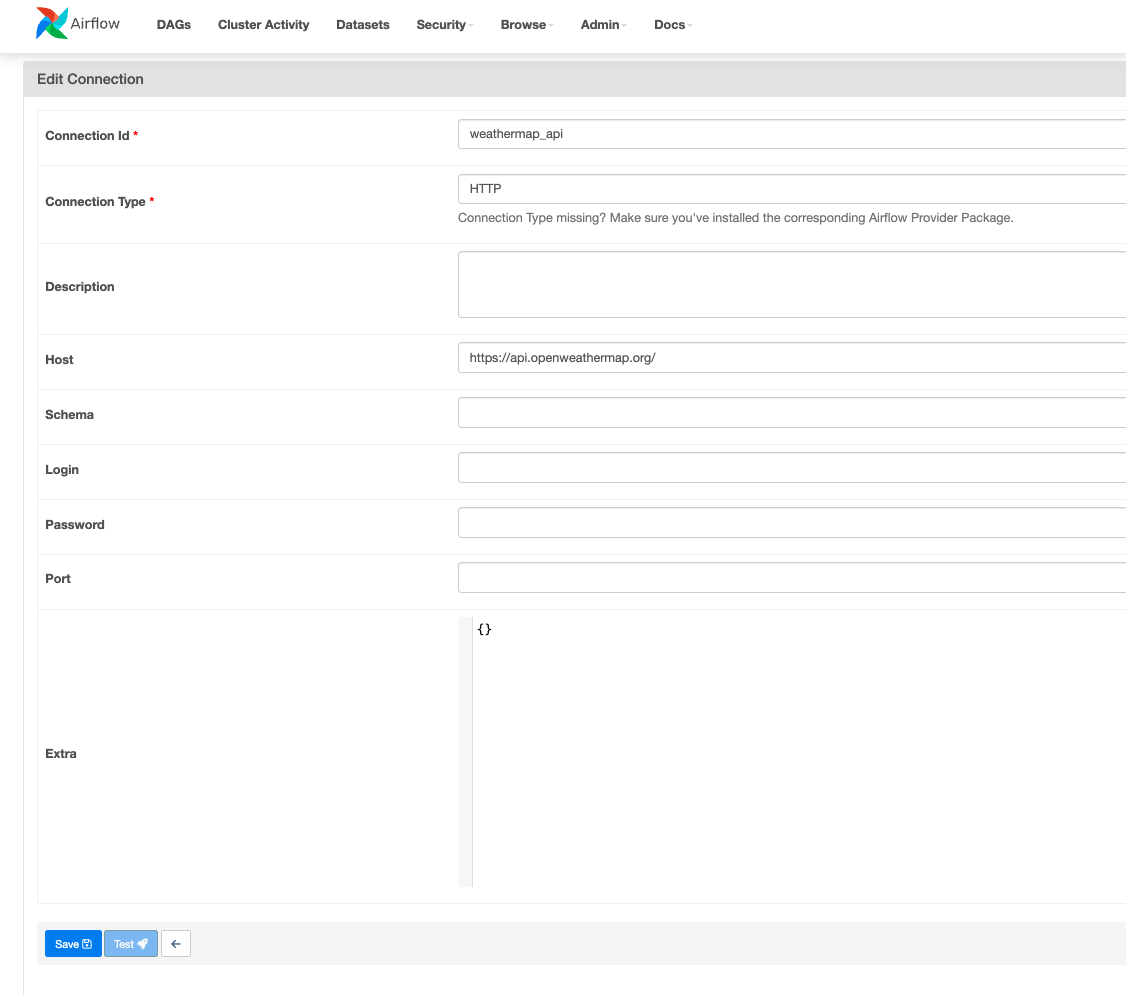
- Set the host as the RDS endpoint in Airflow's connection settings allows Airflow to correctly and securely target the specific Amazon RDS instance where your database is hosted.
Go to Airflow Admin -> connections -> edit Connection Id, Connection Type, Host, Login, Password, Port as needed.
Here, Host should be filled in with your RDS instance endpoint, Login should be postgres, Password is what you set up for RDS master password before, Port is 5432.
You will see the Airflow connection setting page as below:

Make sure the Connection Id is identical to the variable postgres_conn_id in your code.
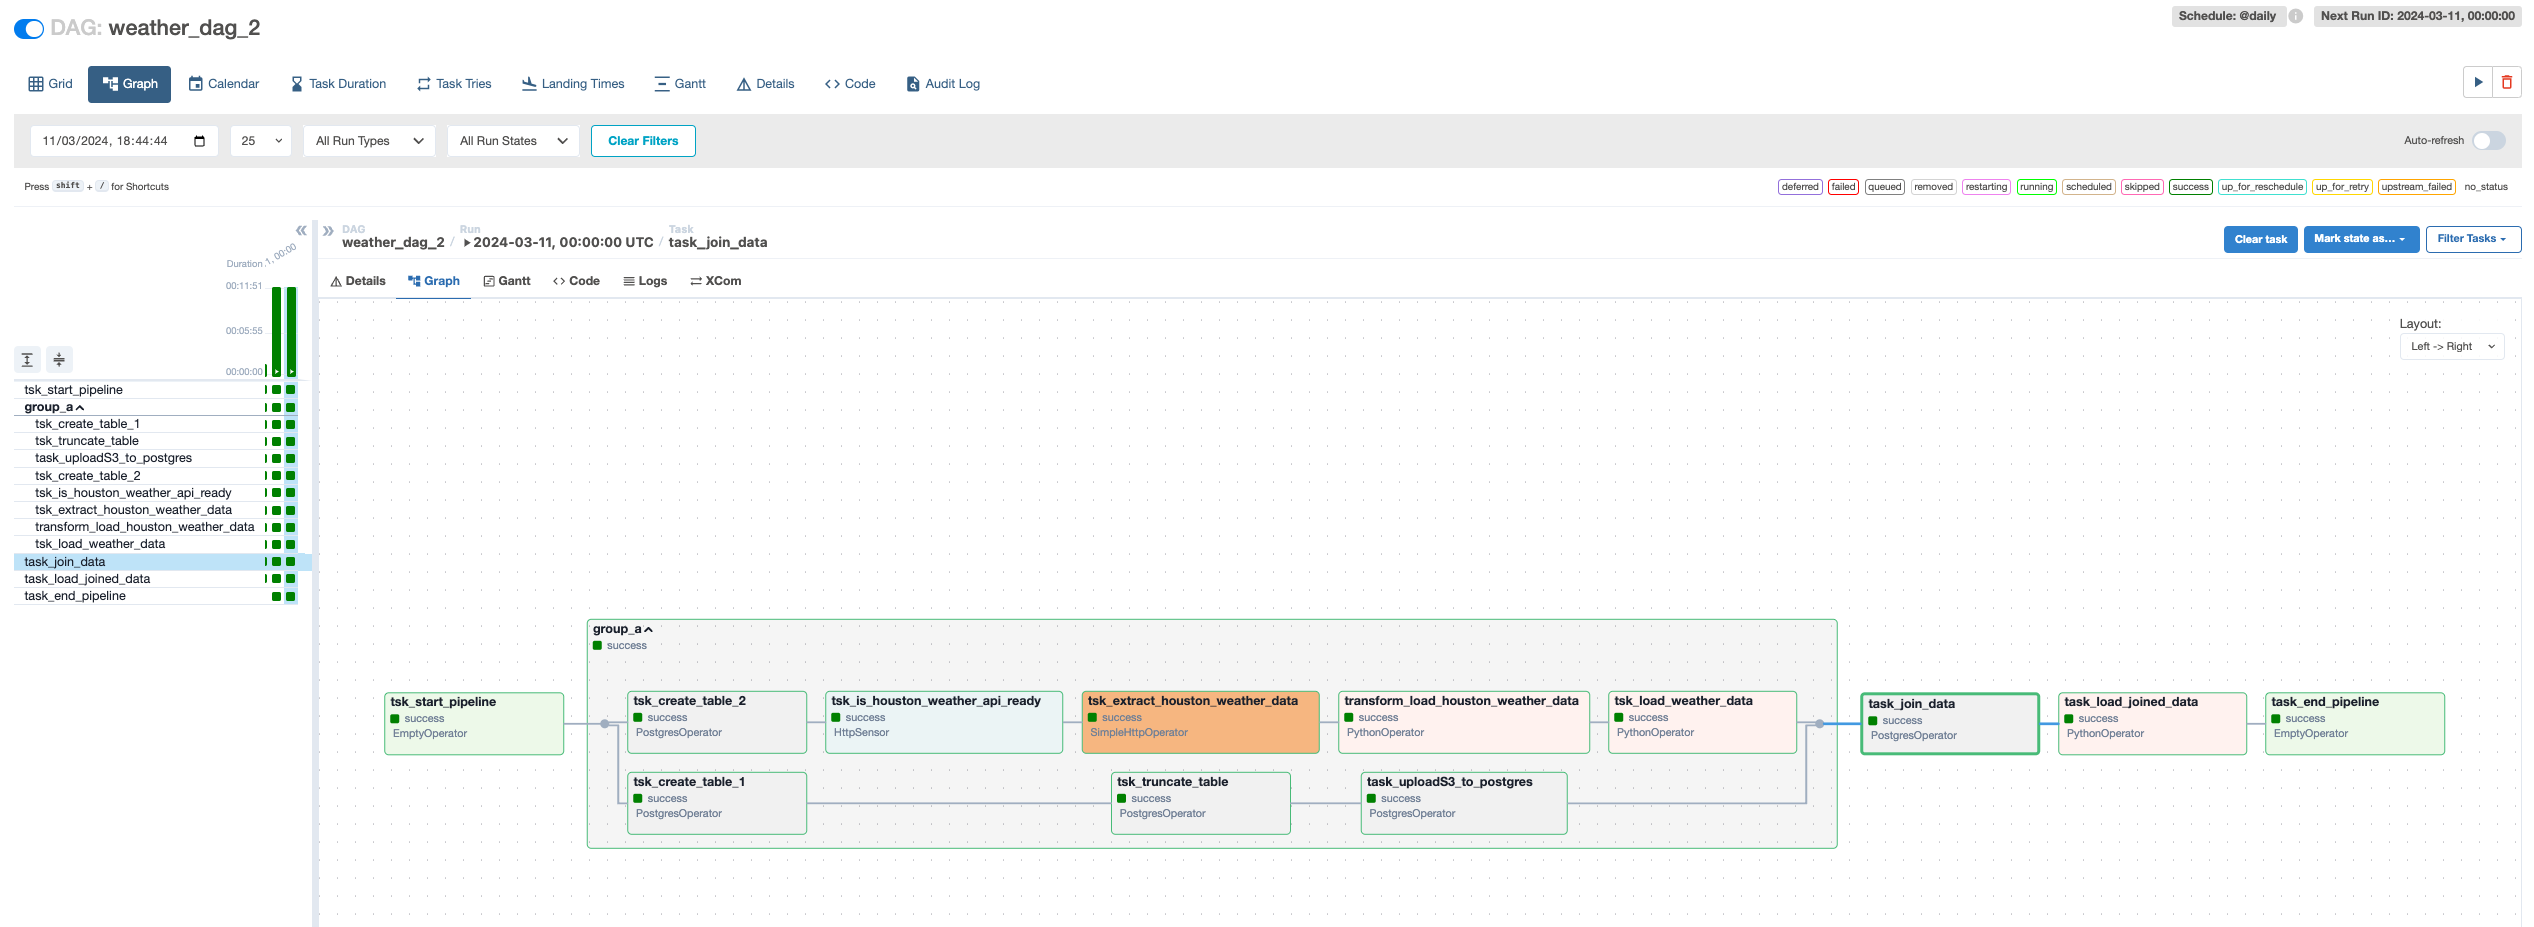
3 . Then you'll see the Dag graph below:

- start_pipeline → group_A:
The start_pipeline is a DummyOperator that signifies the start of the DAG. It does not perform any action but serves as a starting point in the workflow.
group_A is a TaskGroup which means it contains multiple tasks grouped for organizational purposes. The tasks within this group will start once the start_pipeline task is completed.
-
Within
group_A: -
create_table_1 → truncate_table → uploadS3_to_postgres:
create_table_1usesPostgresOperatorto create acity_look_uptable if it doesn’t exist.truncate_tableis then responsible for clearing this table to prepare for new data insertion.uploadS3_to_postgresloads data from an S3 CSV file into thecity_look_uptable. -
create_table_2 → is_houston_weather_api_ready → extract_houston_weather_data → transform_load_houston_weather_data → load_weather_data:
create_table_2 creates another table called weather_data.
is_houston_weather_api_ready is an HttpSensor that waits until the OpenWeather API is available for Houston's weather data.
extract_houston_weather_data fetches the weather data from the OpenWeather API.
transform_load_houston_weather_data uses a PythonOperator to transform the weather data using the transform_load_data function.
load_weather_data loads the transformed weather data into the weather_data table in PostgreSQL.
- group_A → join_data:
Once all tasks in group_A have been completed, the join_data task is executed.
join_data performs an SQL JOIN operation between the weather_data and city_look_up tables and selects relevant columns.
- join_data → load_joined_data:
After join_data is completed, load_joined_data takes over.
load_joined_data uses a PythonOperator to call the save_joined_data_s3 function, which saves the joined data to a CSV file in an S3 bucket.
- load_joined_data → end_pipeline:
The end_pipeline is another DummyOperator indicating the end of the DAG process after load_joined_data has successfully saved the joined data to S3.
- Make sure you set up the http_conn_id variable inside Airflow's connection configurations as below, which allows you to manage HTTP connections centrally, including endpoints, credentials, and other HTTP-related settings. The endpoint part in the code can be found from your Openweather API account.
- Then, you'll see the graph status updated as below:


