Customer Engagement sample application 

This application demonstrates how the Watson Assistant service (formerly Conversation) can be adapted to use Tone Analyzer's Customer Engagement feature along with intents and entities in a simple chat interface.

Demo: http://customer-engagement-bot.mybluemix.net/
For more information on the Watson Assistant (Conversation) service, see the detailed documentation. For more information on the Tone Analyzer Service, see the detailed documentation.
Deploying the application
If you want to experiment with the application or use it as a basis for building your own application, you need to deploy it in your own environment. You can then explore the files, make changes, and see how those changes affect the running application. After making modifications, you can deploy your modified version of the application to IBM Cloud.
Before you begin
-
You must have a IBM Cloud account, and your account must have available space for at least 1 application and 2 services. To register for a IBM Cloud account, go to https://console.bluemix.net/registration/. Your IBM Cloud console shows your available space.
-
You must also have the following prerequisites installed:
- the Node.js runtime (including the npm package manager)
- the Cloud Foundry command-line client
Getting the files
-
Download the customer engagement bot application code to your computer. You can do this in either of the following ways:
-
Download the .zip file of the GitHub repository and extract the files to a local directory, OR
-
Use GitHub to clone the repository locally
-
Setting up the Watson Assistant (formerly Conversation) service
-
Make sure you have logged into your account using Cloud Foundry. For more information, see the Watson Developer Cloud documentation.
-
Create an instance of the Watson Assistant (Conversation) service in the IBM cloud (our CLI is being updated, for now, use the
create-service conversationcommand):cf create-service conversation <service_plan> <service_instance_name>
Notes:
- <service_plan>: options include
free,standardorpremium. - <service_instance_name>: this is a unique name of your choosing.
For example:
cf create-service conversation free watson-assistant-ce-tone
- <service_plan>: options include
-
Create a service key:
cf create-service-key <service_instance> <service_key>
For example:
cf create-service-key watson-assistant-ce-tone watson-assistant-ce-tone-key
Setting up the Tone Analyzer service
-
Create an instance of the Tone Analyzer service in the IBM cloud:
cf create-service tone_analyzer <service_plan> <service_instance_name>
<service_plan>options include standard and premium. Please note that either of these options will incur a cost.For example:
cf create-service tone_analyzer standard tone-analyzer-ce-tone
-
Create a service key:
cf create-service-key <service_instance> <service_key>
For example:
cf create-service-key tone-analyzer-ce-tone tone-analyzer-ce-tone-key
Importing the Watson Assistant workspace
-
In your browser, navigate to your Bluemix console.
-
From the Dashboard tab, click the newly created Watson Assistant (Conversation) service in the Services list. It'll have the name you gave it in the previous step (e.g.,
<service_instance_name>).
The Service Details page opens.
-
Click the Launch tool button.

The Watson Assistant (Conversation) service tool opens.
-
Click Import to add the customer engagement workspace. When prompted, specify the location of the workspace JSON file in your local copy of the application project:
<project_root>/customer-engagement-bot/training/ce-workspace.json -
Select Everything (Intents, Entities, and Dialog) and then click Import. The customer engagement workspace is created.
- If you have any problems uploading the workspace using Chrome, please try another browser such as Firefox or Safari.


Configuring the application environment
-
At the command line, navigate to the local project directory (
<project_root>/customer-engagement-bot). -
Copy the
.env.examplefile to a new.envfile. Open this file in a text editor.
cp .env.example .env-
Retrieve the credentials from the service key:
cf service-key <service_instance_name> <service_key>
For example:
cf service-key watson-assistant-ce-tone watson-assistant-ce-tone-key
The output from this command is a JSON object, as in this example:
{ "password": "87iT7aqpvU7l", "url": "https://gateway.watsonplatform.net/conversation/api", "username": "ca2905e6-7b5d-4408-9192-e4d54d13e604" } -
In the JSON output, find the values for the
passwordandusernamekeys. Paste these values (not including the quotation marks) into theWATSON_ASSISTANT_PASSWORDandWATSON_ASSISTANT_USERNAMEvariables in the.envfile:ASSISTANT_USERNAME=ca2905e6-7b5d-4408-9192-e4d54d83e604 ASSISTANT_PASSWORD=87iT7aqpvU7l
Do the same for the Tone Analyzer service, and paste the values into the TONE_ANALYZER_PASSWORD and TONE_ANALYZER_USERNAME variables in the .env file
TONE_ANALYZER_USERNAME=mhl715fg-y6h5-2113-6540-ytr78nhs8u64
TONE_ANALYZER_PASSWORD=124GHaq31M9l
Leave the .env file open in your text editor.
-
In your Bluemix console, open the Watson Assistant service instance where you imported the workspace.
-
Click the menu icon in the upper right corner of the workspace tile, and then select View details.

The tile shows the workspace details.
-
Click the
 icon next to the workspace ID to copy the workspace ID to the clipboard.
 -
Back on your local system, paste the workspace ID into the WORKSPACE_ID variable in the
.envfile you previously created. At this point, your.envfile should look like the following: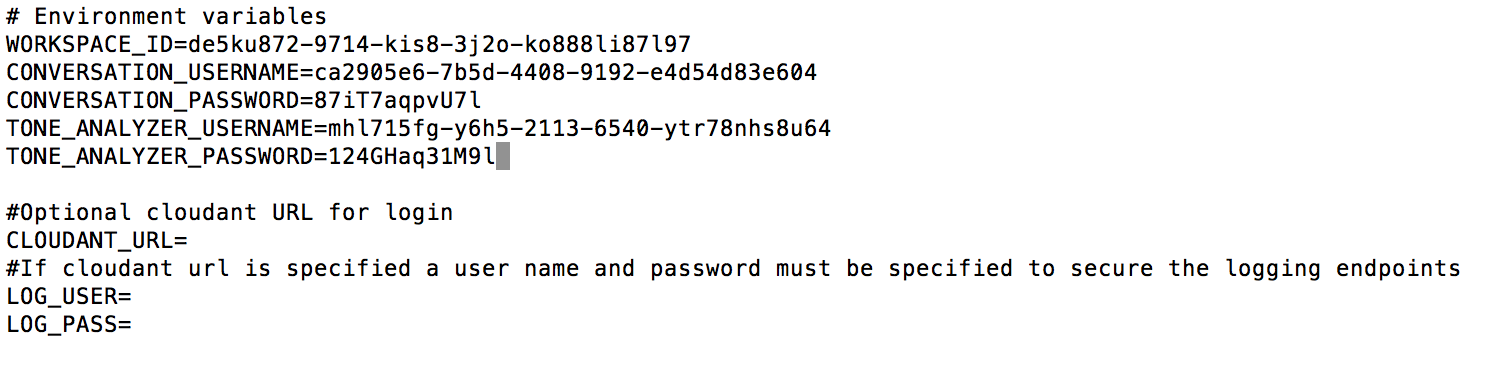


Save and close the file.
-
Install the demo application package into the local Node.js runtime environment:
npm install
-
Start the application:
npm start
The application is now deployed and running on the local system. Go to http://localhost:3000 in your browser to try it out.
Optional: Deploying from the local system to Bluemix
If you want to subsequently deploy your local version of the application to the Bluemix cloud, you can use Cloud Foundry.
-
In the project root directory, open the
manifest.ymlfile in a text editor. -
Specify the following values in the file:
-
In the
applicationssection of themanifest.ymlfile, change thenamevalue to a unique name for your version of the demo application. -
In the
servicessection, specify the name of the Watson Assistant service instance you created for the demo application. If you do not remember the service name, use thecf servicescommand to list all services you have created. -
In the
envsection, add theWORKSPACE_IDenvironment variable, specifying the value from the.envfile.
The following example shows a modified
manifest.ymlfile:--- declared-services: watson-assistant-ce-tone: label: conversation plan: free tone-analyzer-ce-tone: label: tone_analyzer plan: standard applications: - name: watson-assistant-ce-tone command: npm start path: . memory: 256M instances: 1 services: - watson-assistant-ce-tone - tone-analyzer-ce-tone env: NPM_CONFIG_PRODUCTION: false WORKSPACE_ID: fdeab5e4-0ebe-4183-8d30-6e5557a6d842
-
-
Save and close the
manifest.ymlfile. -
Push the application to Bluemix:
cf push
When the command finishes processing, your application is deployed and running on Bluemix. You can access it using the URL specified in the command output.
What to do next
After you have the application installed and running, experiment with it to see how it responds to your input.
Modifying the application
After you have the application deployed and running, you can explore the source files and make changes. Try the following:
-
Modify the .js files to change the application logic.
-
Modify the .html file to change the appearance of the application page.
-
Use the Watson Assistant tool to train the service for new intents, or to modify the dialog flow. For more information, see the Watson Assistant service documentation.
What does the Customer Engagement Bot application do?
The application interface is designed for chatting with a customer engagement bot. Based on a previous laptop purchase, the bot asks how the experience has been and responds accordingly if given a negative or positive response.
The chat interface is in the left panel of the UI, and the JSON response object returned by the Watson Assistant service in the right panel. Your input is run against a small set of sample data trained with the following intents:
yes
no
refund: get a refund on current laptop
restart: restart the conversation at any point
tradeIn: replace current laptop with another one
thanks
greeting
The dialog is also trained on two types of entities:
design
size
weight
These intents and entities help the bot understand variations your input.
Below you can find some sample interactions:

In order to integrate the Tone Analyzer with the Watson Assistant service (formerly Conversation), the following approach was taken:
- Intercept the user's message. Before sending it to the Watson Assistant service, invoke the Tone Analyzer Service. See the call to
toneDetection.invokeToneAsyncin theinvokeToneConversationfunction in app.js. - Parse the JSON response object from the Tone Analyzer Service, and add appropriate variables to the context object of the JSON payload to be sent to the Watson Assistant service. See the
updateUserTonefunction in tone_detection.js. - Send the user input, along with the updated context object in the payload to the Watson Assistant service. See the call to
conversation.messagein theinvokeToneConversationfunction in app.js.
You can see the JSON response object from the Watson Assistant service in the right hand panel.

In the conversation template, alternative bot responses were encoded based on the user's emotional tone. For example:

Troubleshooting
If you encounter a problem, you can check the logs for more information. To see the logs, run the cf logs command:
cf logs <application-name> --recentLicense
This sample code is licensed under Apache 2.0. Full license text is available in LICENSE.
Contributing
See CONTRIBUTING.
Open Source @ IBM
Find more open source projects on the IBM Github Page.