If you're starting a brand new project, we recommend you clone the example repository, as it already has all the basic configuration setup.
Your first step should be to run the following command on your node folder:
yarn add @vtex/payment-provider
Afterwards, go to your package.json and make sure it has been added as a dependency with the correct version:
"@vtex/payment-provider": "1.x",
Also check in the package.json is the version of vtex/api, which should be listed in the devDependencies as follows:
"@vtex/api": "6.x",
(When linking your app, this version might get updated to a later 6.x version, which is fine.)
In case it's not listed as a devDependency, run the following command on your node folder:
yarn add -D @vtex/api
Lastly, in your manifest.json, you should check the builders section, in which you must include the paymentProvider in it's current version:
"builders": {
    "node": "6.x",
    "paymentProvider": "1.x"
  },
Note: This will add policies to callback the Payment Gateway APIs and also expose Payment Provider protocol routes.
Now, in order to create your service, you must implement your payment provider connector and the service itself. To help you with them, we created the following:
This is an abstract class with the signatures of the routes functions required in your connector, according to the protocol.
You must create a new class extending the PaymentProvider, which must implement a function for each route. The functions will receive the request body (when there is one) as a parameter and the response must be returned as an object, such as the example shown below:
import {
	PaymentProvider,
	// ...
} from '@vtex/payment-provider'

class YourPaymentConnector extends PaymentProvider {

	// ... implementation of the other routes functions
}
Typescript should automatically check for typing errors, but if you need, you can check the requests and responses signatures here.
In order to specify which payment methods the connector will accept to process, you need to create a folder named paymentProvider using the following folder structure
node
paymentProvider
manifest.json
Then, inside paymentProvider folder you must create a file named configuration.json
node
paymentProvider
   |--configuration.json
manifest.json
Next, declare the accepted payment methods, for instance:
{
  "name": "MyConnector",
  "paymentMethods": [
    {
      "name": "Visa",
      "allowsSplit": "onCapture"
    },
    {
      "name": "American Express",
      "allowsSplit": "onCapture"
    },
    {
      "name": "Diners",
      "allowsSplit": "onCapture"
    },
    {
      "name": "Elo",
      "allowsSplit": "onCapture"
    },
    {
      "name": "Hipercard",
      "allowsSplit": "onCapture"
    },
    {
      "name": "Mastercard",
      "allowsSplit": "onCapture"
    },
    {
      "name": "BankInvoice",
      "allowsSplit": "onAuthorize"
    }
  ]
}
By doing this you don't need to declare /manifest or /payment-methods route, it will be implemented automatically by the builder.
Detailed flow here

You can also override the default generated routes by redeclaring it on service.json
{
  "memory": 256,
  "ttl": 10,
  "timeout": 10,
  "minReplicas": 2,
  "maxReplicas": 3,
  "routes": {
    "authorize": {
      "path": "/_v/api/my-connector/payments",
      "public": true
    },
    "cancel": {
      "path": "/_v/api/my-connector/payments/:paymentId/cancellations",
      "public": true
    },
    "settle": {
      "path": "/_v/api/my-connector/payments/:paymentId/settlements",
      "public": true
    },
    "refund": {
      "path": "/_v/api/my-connector/payments/:paymentId/refunds",
      "public": true
    },
    "inbound": {
      "path": "/_v/api/my-connector/payments/:paymentId/inbound/hooks",
      "public": true
    },
  }
}
Then you must specify which is the new serviceUrl on paymentProvider/configuration.json
{
  "name": "MyConnector",
  "serviceUrl": "/_v/api/my-connector",
  "paymentMethods": [
    {
      "name": "Visa",
      "allowsSplit": "onCapture"
    },
    {
      "name": "American Express",
      "allowsSplit": "onCapture"
    },
    {
      "name": "Diners",
      "allowsSplit": "onCapture"
    },
    {
      "name": "Elo",
      "allowsSplit": "onCapture"
    },
    {
      "name": "Hipercard",
      "allowsSplit": "onCapture"
    },
    {
      "name": "Mastercard",
      "allowsSplit": "onCapture"
    },
    {
      "name": "BankInvoice",
      "allowsSplit": "onAuthorize"
    }
  ]
}
!! Prefer using default generated routes !!
The manifest route is special, it is automatically generated by the builder, our payment gateway exposes it as a proxy of your app.
Generally speaking, the manifest route makes no difference at runtime, and if you have a use case to override the default route tell us.
But, if you want to override it anyway you have to add special parameters on it,
{
  "memory": 256,
  "ttl": 10,
  "timeout": 10,
  "minReplicas": 2,
  "maxReplicas": 3,
  "routes": {
    "manifest": {
        "path": "/_v/api/my-connector/manifest",
        "handler": "vtex.payment-gateway@1.x/providerManifest",
        "headers": {
          "x-provider-app": "$appVendor.$appName@$appVersion",
        },
        "public": true
      }
  }
}
Pay attention on x-provider-app it should be updated every time that your major changes,
Example
vtex.payment-provider-example@1.2.3should bevtex.payment-provider-example@1.2.3
The same applies to payment-methods route
You can also omit the handler and headers parameters, by doing it you will need to implement it by your own
Along with manifest fields (paymentMethods and customFields) there are another configurable options,
- serviceUrl (required, default: auto-generated for IO Connectors)
- A valid url (can include relative paths)
- implementsOAuth (default: false)
- true - The provider implements the configuration flow supporting OAuth.
- false - The provider dosnt implements the configuration flow
- implementsSplit (default: false)
- true - The provider implements can receive recipients on payment flow (capture or authorization)
- false - The provider doesn't implements the split flow
- usesProviderHeadersName (default: true, for IOConnectors it should be true)
- true - The provider will reiceve appKey and appToken headers as
"x-provider-api-appKey"&"x-provider-api-appToken" - false - The provider will reiceve appKey and appToken headers as
"x-vtex-api-appKey"&"x-vtex-api-appToken"
- true - The provider will reiceve appKey and appToken headers as
- usesAntifraud (default: false)
- true - The provider can be used along antifrauds.
- false - The provider can't be used along antifrauds
- usesBankInvoiceEnglishName (default: false)
- name (required)
- The connector name
- usesSecureProxy (default: true)
- true - The provider can process payment without being PCI-Certified, the connector will receive a secureProxyUrl on createPayment flow, and the card encrypted data.
- false - The provider MUST be a PCI-Certified entity, and we should receive the AoC containing the provided serviceUrl.
An async callback is required in order to develop your connector according to the protocol, so we built a function, which can be invoked like shown below:
this.callback(request, data)Where the request is the param you receive in the function and the data is what you want to be sent back.
This is a class that extends the Service from @vtex/api. You must invoke it passing the developed connector as a property of the first parameter and it will automatically setup the required routes for you.
import {
	PaymentProviderService,
} from '@vtex/payment-provider'

new PaymentProviderService({
	connector: YourPaymentConnector,
})
By default, the Payment Provider Service declares the following routes:
- /payment-methods
- /manifest
- /payments
- /settlements
- /refunds
- /cancellations
- /inbounds
If your service requires any extra routes, you must declare them separately and use them as parameters:
new PaymentProviderService({
routes: newRoutes,
connector: YourPaymentConnector,
})
```
If your connector requires any extra clients, you must also pass them in the parameters along with the connector:
```tsx
new PaymentProviderService({
clients: NewClients,
connector: YourPaymentConnector,
})Those who aren't PCI-certified, could use Secure Proxy to make calls to a PCI-Certified endpoint.
Important: The endpoint must be allowed by VTEX Secure Proxy by sending the AOC with the wanted endpoint.
In order to make calls over our Secure Proxy, you must:
- Extend SecureExternalClient abstract class
import { SecureExternalClient } from '@vtex/payment-provider'
import type {
  InstanceOptions,
  IOContext
} from '@vtex/api'
export class MyPCICertifiedClient extends SecureExternalClient {
  constructor(protected context: IOContext, options?: InstanceOptions) {
    super('http://my-pci-certified-domain.com', context, options)
  }
 ...
}
This means that VTEX allows 'http://my-pci-certified-domain.com' as one of the trusted destinations by receiving its AOC.
- Set secure proxy URL on the request that you want to be proxied
import { SecureExternalClient, CardAuthorization } from '@vtex/payment-provider'
import type {
  InstanceOptions,
  IOContext,
  RequestConfig,
} from '@vtex/api'

export class MyPCICertifiedClient extends SecureExternalClient {
  constructor(protected context: IOContext, options?: InstanceOptions) {
    super('http://my-pci-certified-domain.com', context, options)
  }

 public myPCIEndpoint = (cardRequest: CardAuthorization) => {

    return this.http.post(
		  'my-pci-endpoint',
      {
          holder: cardRequest.holderToken,
          number: cardRequest.numberToken,
			 		expiration: cardRequest.expiration,
					csc: cardRequest.cscToken
      },
      {
        headers: {
          Authorization: 'my-pci-endpoint-authorization',
        },
        secureProxy: cardRequest.secureProxyUrl,
      } as RequestConfig
    )
  }
}
Note: SecureProxyURL is received on createPayment flow
Now that we have a new connector ready to be use, we can test it entirely in the production flow using your store's checkout.
!! The account MUST be ALLOWED to use IO Connectors !!
!! For processing NEW payment methods, their creation must be requested !!
Ask for this in the #team-dev-payments slack channel
A prerequisite for this step is to have products for sale at your store for testing
- Launch a beta version of your connector, e.g.
vtex.payment-provider-test@0.1.0-beta - Install the beta version on
masterworkspace (wait ~1 hour) - Go to https://${account}.myvtex.com/admin/pci-gateway/#/affiliations/vtex-payment-provider-test-v0/
The format is: ${vendor}-${appName}-${appMajor}

-
Change the toggle configuration to
Test -
Click save and refresh page
-
Enter again in the saved configuration and you will notice that a new field appears, called
workspace -
Set the
workspaceas you wish (you can leave it asmaster)

- Configure a payment condition with your newly created connector and wait 10 minutes to appear on checkout!
The publication process is made via app store, more info on how to do that here:
Submitting your app in the VTEX app store
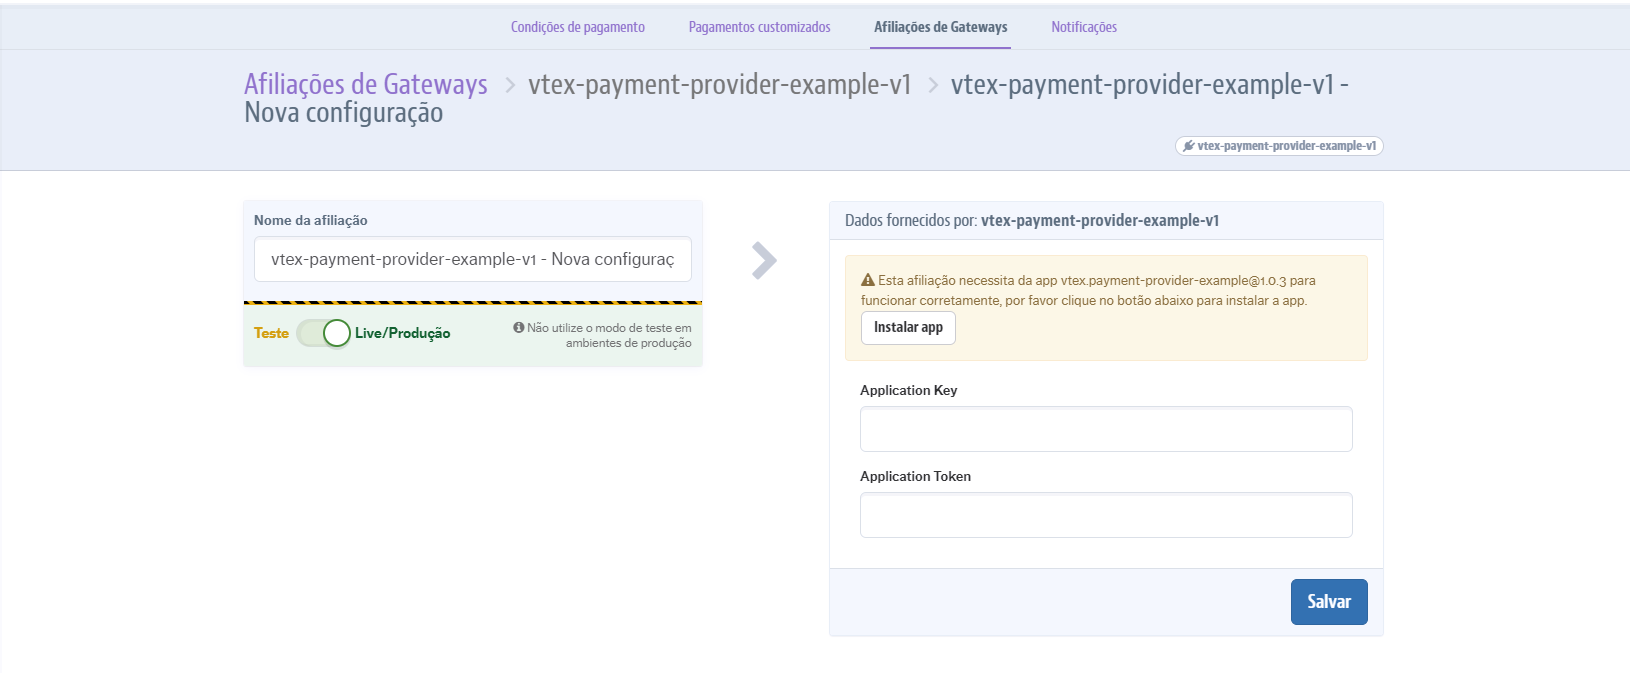
After the homolog step is complete, your app needs to be installed in the account that wants to use it, and after that, a new affiliation will be available to configure it.
The app should be available at apps.vtex.com.