This tutorial will help get you started with the TELUS LTE-M IoT Starter Kit, giving you some background on the kit and walking you through the entire process of getting the Kit configured to send data to your own Microsoft Azure instance.
The Kit Consists of 3 Parts:
- BG96 shield Cat.M1/NB1 & EGPRS module with added support for GPS A 2FF SIM connector accommodates the TELUS Starter SIM that is included in the kit for connecting to the internet via TELUS’ virtual dedicated IoT network
- X-NUCLEO-IKS01A2 sensor board for the STM32 It is equipped with Arduino UNO R3 connector layout and is designed around the LSM6DSL 3D accelerometer and 3D gyroscope, the LSM303AGR 3D accelerometer and 3D magnetometer, the HTS221 humidity and temperature sensor and the LPS22HB pressure sensor
- NUCLEO L496ZG-P MCU The NUCLEO-L496ZG micro-controller board is fitted with an STM32L496ZG micro-controller, clocked at 80 MHz, with 1MB Flash memory, 320 KB RAM (for development flexibility), up to 115 GPIOs, an on-board ST-LINK/V2-1 debugger/programmer, and multiple expansion interfaces (USB OTG host interface, ArduinoTM Uno V3 compatible expansion headers and ST Morpho headers), and is supported by comprehensive STM32 free software libraries and examples.
ARM Mbed OS is a free, open-source embedded operating system designed specifically for the "things" in the Internet of Things.
It includes all the features you need to develop a connected product based on an ARM Cortex-M microcontroller, including security, connectivity, an RTOS, and drivers for sensors and I/O devices.
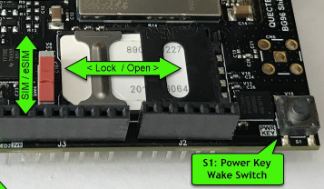
The BG96 and X-NUCLEO-IKS01A2 are already connected to each other in the box. Ensure that the switch is in the SIM position. Some important parts of the board are below:
Ensure the SIM switch is in the SIM position, and the SIM is inserted with the notch close to the switch.
Image used from element14 Blog
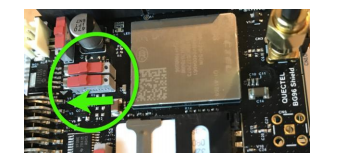
Also, please ensure that the Rx/Tx slide switches are set as shown (maroon switches away from the BG96 chip:
Image used from element14 Blog
Connect the BG96 with sensor module to the L496 MCU so it looks like below:
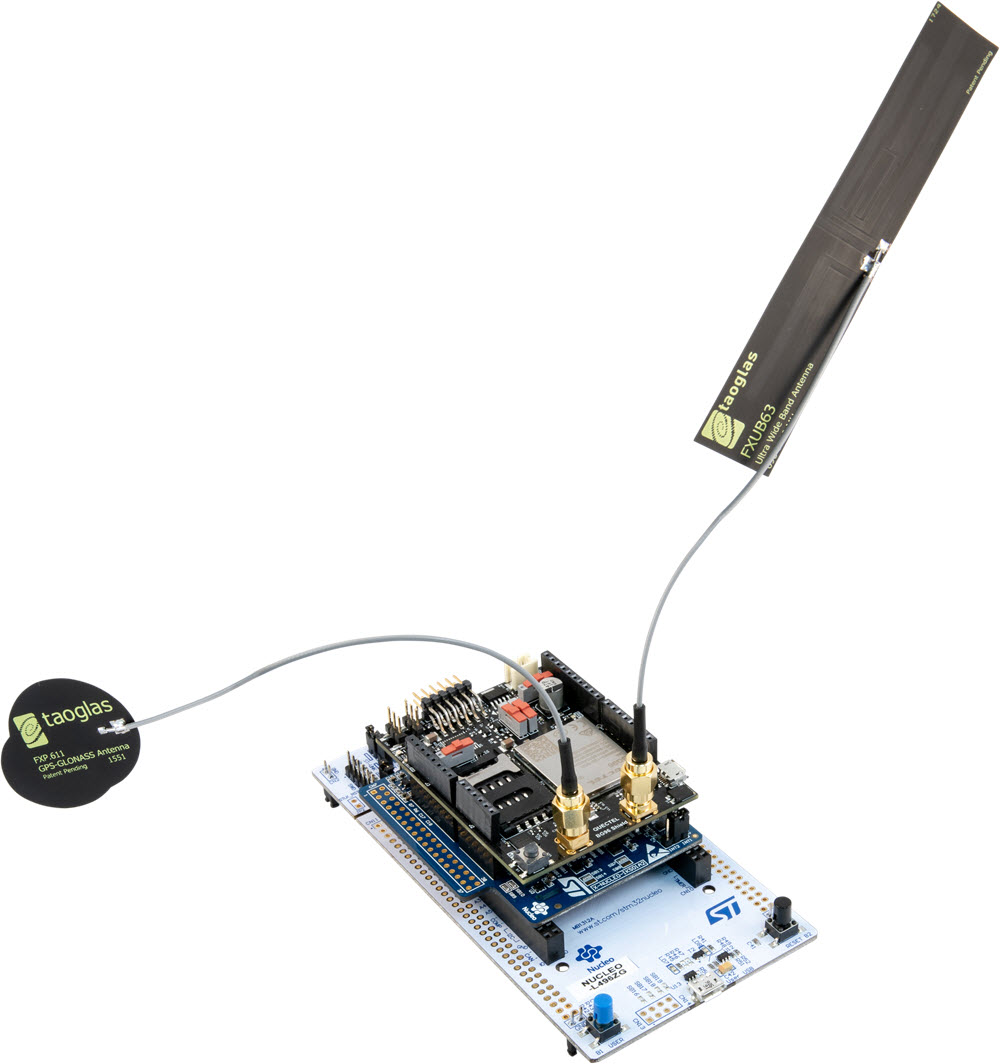 Image used from element14 Blog
Now your hardware is ready to be connected and programmed.
There are several tools we’ll need to use throughout this tutorial, so let’s start by installing everything we can at this point:
- Git
- Mercurial
- Python 2.7 (already built into MacOS)
- GNU ARM Embedded Toolchain
- Azure Command-Line Tools
Add Python to your user or systems PATH environment variable
TIP Python 2 is required for this tutorial, if you have both Python 2 and 3 installed you can substitute python in the command-line with py -2 for the remainder of this tutorial which will ensure Python 2 is being used*
PIP is a command-line tool that installs Python packages, it is the standard for installing requirements for Python projects and we will need to use it to gather dependencies before we can compile the MBED-OS.
- From the command-line run the following command to retrieve the PIP install script:
curl https://bootstrap.pypa.io/get-pip.py -o get-pip.py
- Run the following command to retrieve and install PIP:
python get-pip.py
Verify PIP is installed correctly and ensure your Python setuptools package is up-to-date by running the following command:
python -m pip install --upgrade setuptools- If you encounter errors with the above command, try appending
--userand re-run
That's all for PIP for now, we'll reference it again a bit later.
The mbed-cli is hosted on github and built in Python, so we can download it using git and compile using Python, now that we have made sure both are installed on our computer.
From the command-line:
git clone https://github.com/ARMmbed/mbed-cli.gitcd mbed-clipython setup.py install
Now you should be able to run the mbed command from your command-line, you may need to relaunch your terminal for it to work. In Windows you may need to instead run python -m mbed.
Avnet has created a client for the TELUS IoT starter kit that, with a couple of configuration tweaks, is ready to compile and load onto your IoT board.
Get the client downloaded by running the following from the command-line, this will create a folder with loads of files, so be sure to run the command in a folder that works for you:
mbed import https://github.com/Avnet/azure-iot-mbed-clientNote: In Windows you may need to prepend that command withpython -m
The import will take a while, and we can’t do too much more with the client until we get Azure up and running, so let’s jump over to Azure to get things rolling on that side.
Microsoft’s Azure is incredibly useful cloud platform that has built-in support for IoT and allows for simple integration with several other services. If you don’t already have an Azure account you can sign up for a free trial which comes bundled with $250 of free credits: https://azure.microsoft.com/en-ca/
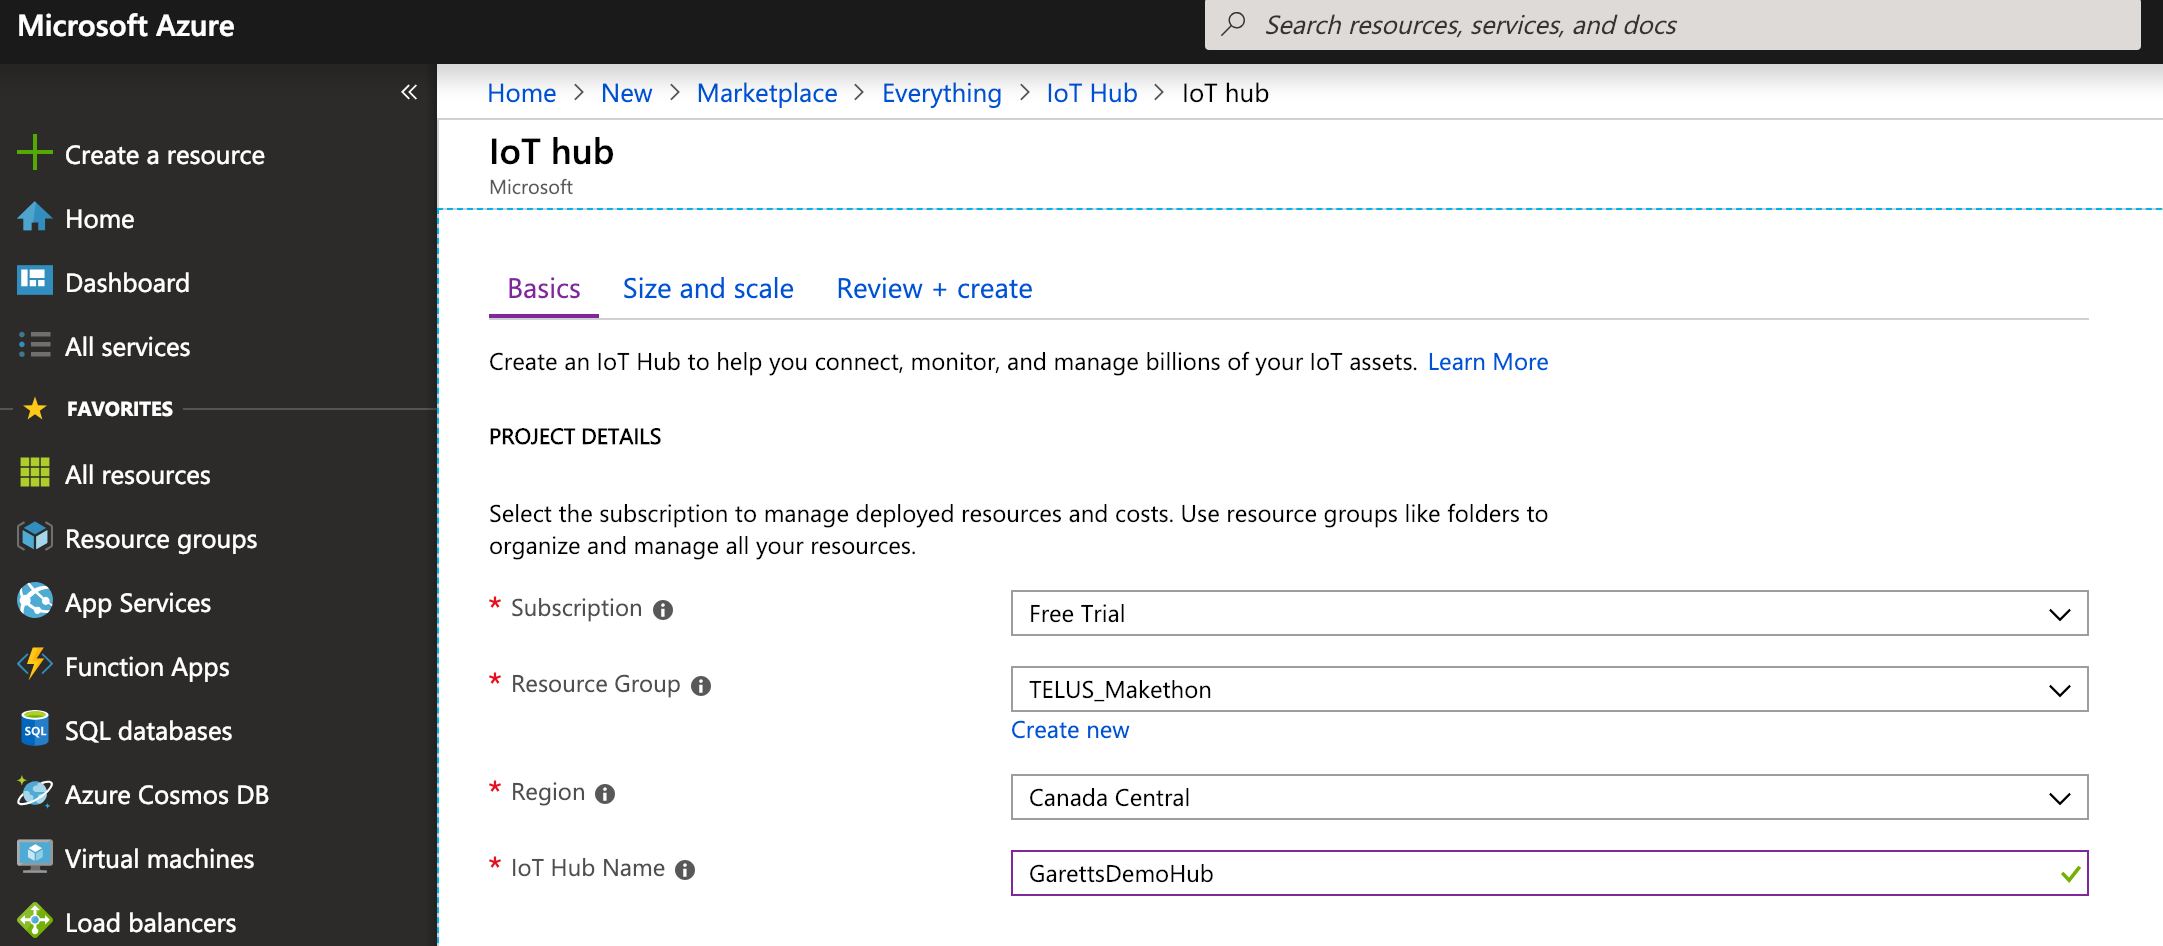
Once you have your account created you can proceed to create a new IoT Hub from your Azure dashboard using the “Create New Resource” function:
Give your IoT a unique name, place it in the Canada East region and make sure your Subscription is set to “Free Trial”. Your new IoT Hub should look similar to this:
Proceed to “Review and Create” then create your instance. This may take a couple of minutes.
Now our IoT Hub is created! This will be our central location for all our IoT devices to connect and send whatever data we have configured them to relay, and gives us a single point to read and action on that data. Azure has security built-in, all communications between our IoT devices to Azure will be secured and visibility to that data is also protected. As a next step we are going to retrieve keys that we can use to securely transport and monitor the data being sent between our IoT devices and our newly created Azure IoT Hub.
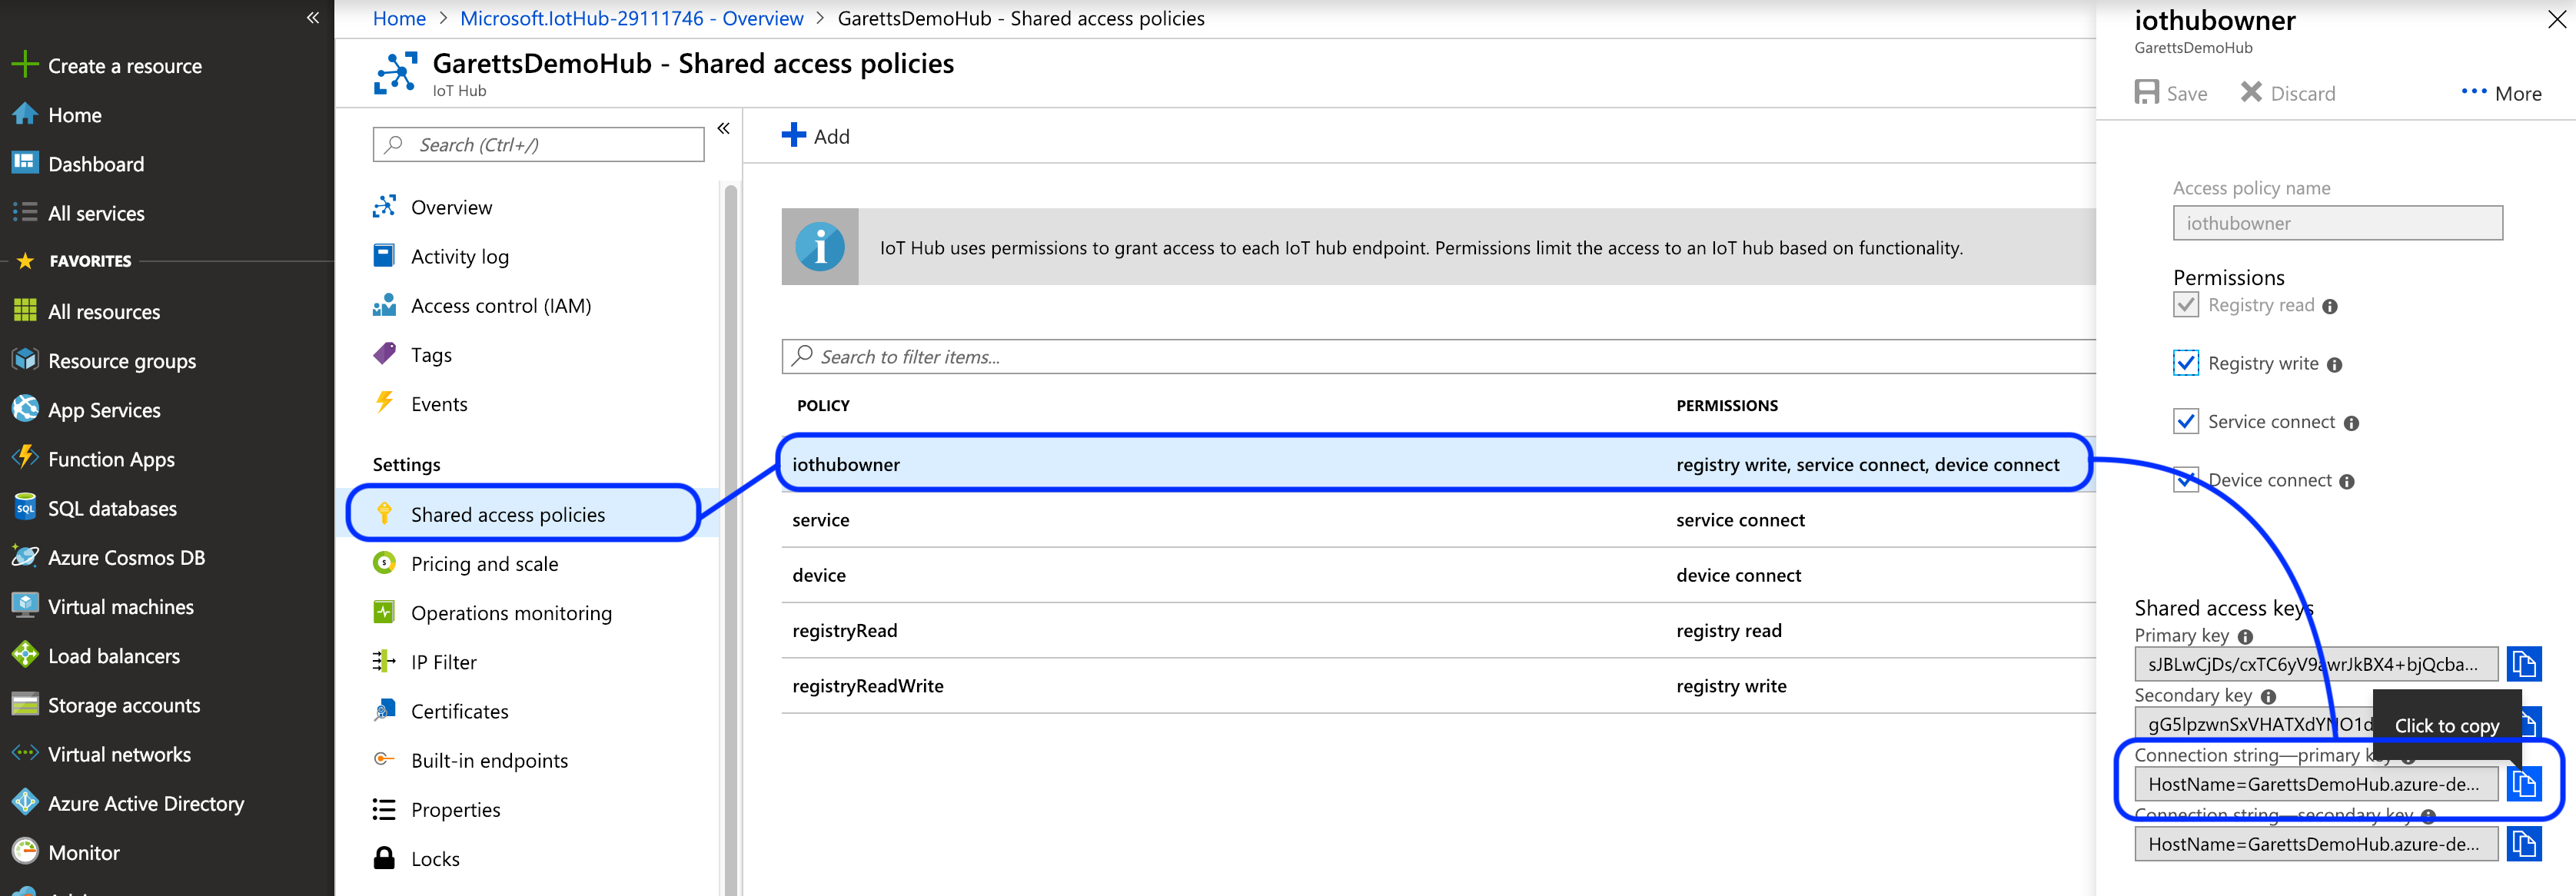
Open your newly created IoT Hub instance, then select “Shared Access Policies” from the left-hand pane which will bring up a list of pre-created policies, select the one labeled “iothubowner”. A new right-hand pane will appear with a list of “Shared access keys”. Copy the one labeled “Connection string - primary key” and store it someplace safe for later.
The primary key we just copied can be used from the Azure command-line to monitor all traffic being sent from our IoT devices to the Hub. We will come back to the key once we have the IoT device configured, for now there’s nothing being sent to the Hub, so monitoring would be a bit boring…
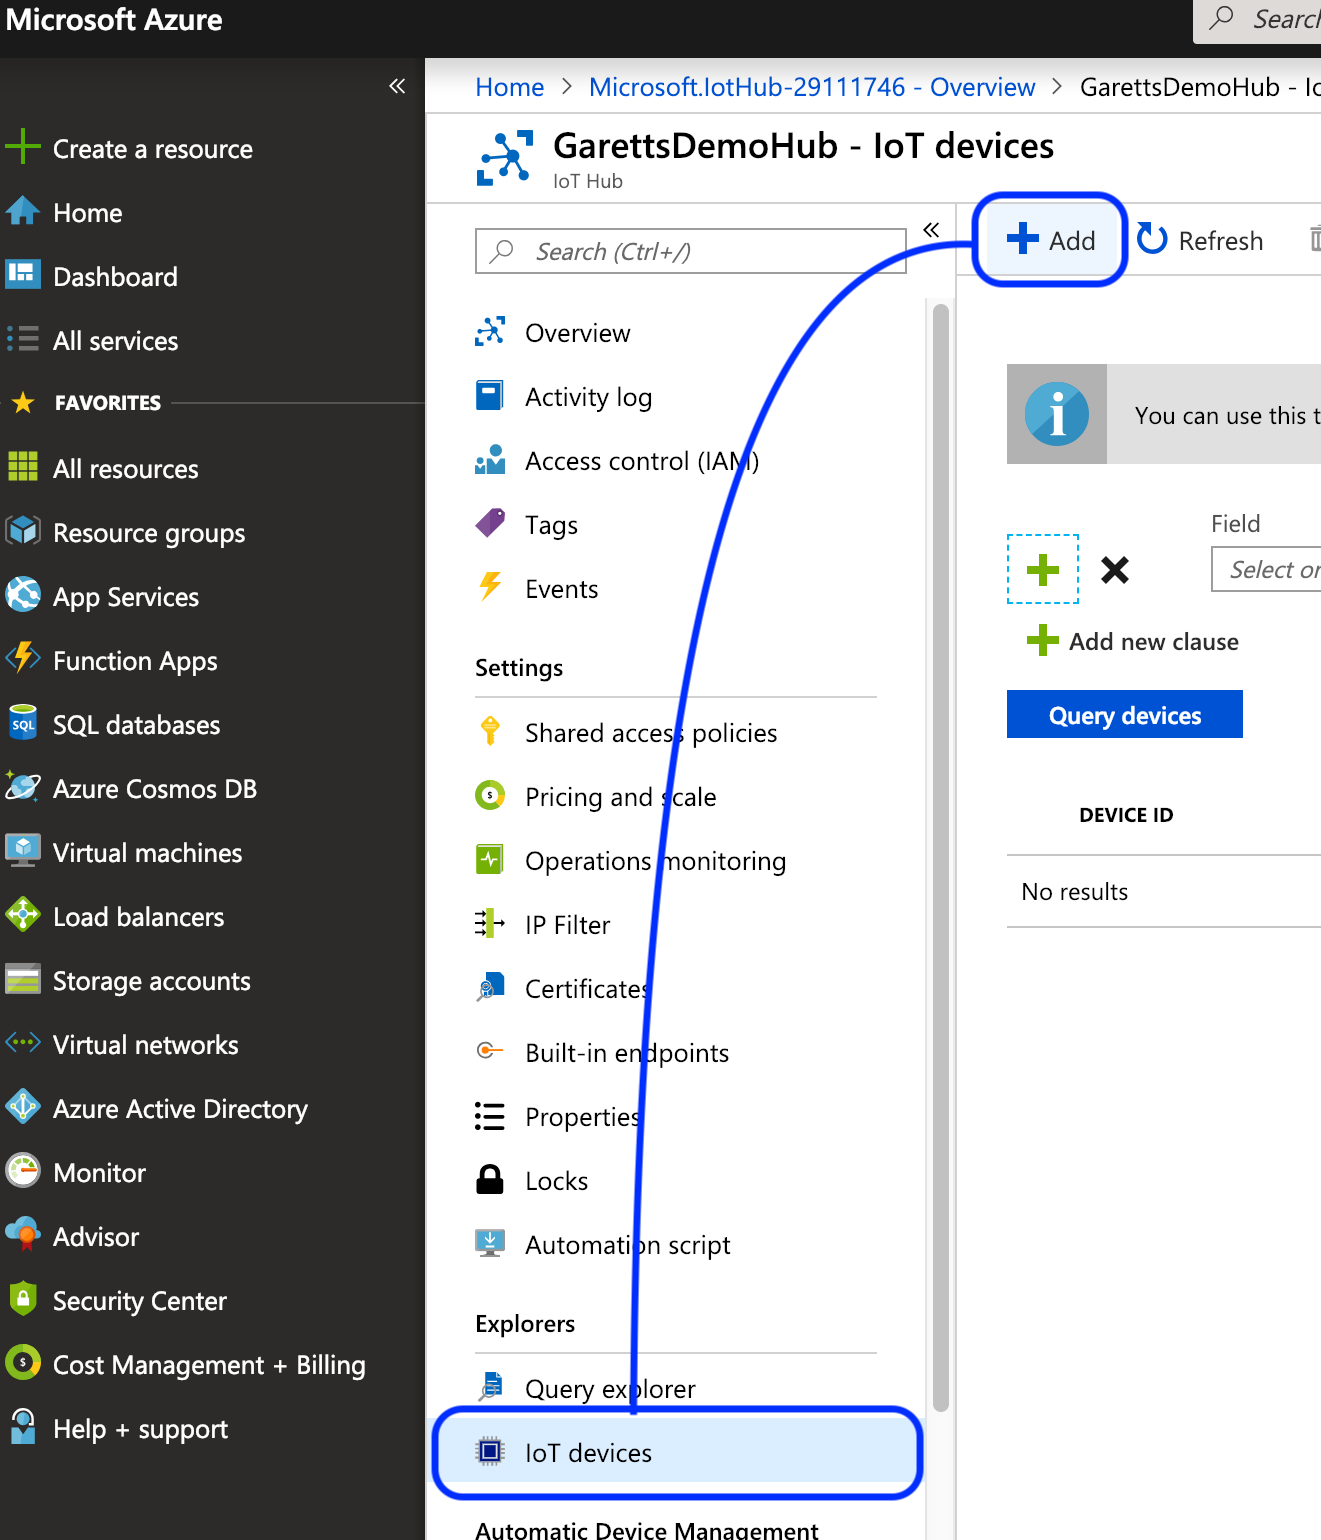
The next step is to create an IoT Device instance within your IoT Hub, this will be mapped directly to the physical IoT Device you are using. Open your IoT Hub then, from the left-pane, select “IoT Devices”, then click the “Add” button to create your new device.
Give your new device a name that is relevant to your project, this will be how you will identify the source of the data sent to your Hub. Leave the other settings as-is (“Symmetric Keys” selected and “Auto-generate keys” checked). Click “Save”.
Now that your IoT device is created, click it to bring up its “Device Details” screen. From this screen copy the “Connection String - primary key” and store it with the primary key you copied earlier from the IoT Hub creation step.
This primary key will be loaded to your IoT device to secure the communications channel between it and your IoT Hub.
At this point we have everything we need to complete the configuration of your TELUS LTE-M IoT Starter Kit, so we’ll jump back there.
Getting back to the “Download the Avnet Azure IoT Client” step from earlier on in the tutorial, hopefully it has completed importing which should have created a folder for you named “azure-iot-mbed-client”, within this folder there are 3 different files we need to configure. Open the following files in your editor of choice, the screenshots from below are from Atom:
- AvnetBG96_azure_client.cpp
- mbed_settings.py
This file handles the sensor information gathering from the IoT board sensors, crafting the sensor data into a message payload and communicating that payload to Azure. In this tutorial we’ll leave the file logic pretty much as-is, but if you feel the need to modify the function of the board, I recommend looking back to this file at a later time.
The only thing we need to configure in this file is the name of the IoT device (deviceId, line 83) and setting the connection string (connectionString, line 81). Set the device ID to the name you used for the IoT device in Azure, and set the connection string to the “Connection String - primary key” we just copied a couple steps ago when creating the IoT device. One thing to note, the device ID is actually part of the connection string. Below is a screenshot of my configured file:
In this file we need to update the GCC_ARM_PATH value to the location where you extracted the “GNU ARM Embedded Toolchain”. In my case I changed the line from /usr/local/gcc-arm-none-eabi-7-2018-q2-update/bin/ to /Users/garett/Documents/dev/telus/iot_hack/gcc-arm-none-eabi-8-2018-q4-major/bin/:
NOTE: Ensure you include the trailing slash, ‘/’ on a Mac, or compilation will not succeed!
If you’ve stuck with my rambling til now, I’m happy to say you’re now ready to compile the Azure client and get it loaded to your IoT device. The following steps will get your client compiled and loaded to your board:
- Run the terminal or command-line on your Mac or Windows PC respectively
- Change to the directory to
azure-iot-mbed-client(this is created in the same directory where we ranmbed importabove) - Install the required Python packages by running the command:
python -m pip install -r mbed-os/requirements.txt- If you encounter errors, try appending
--userto the abve command and re-run
- Plug a USB cable from the L496 MCU (white board) using the micro-usb cable into your computer
- Check to see if there is a USB drive detected called NODE_L496ZG. This means your board is connected.
- Run the command:
mbed compile -m NUCLEO_L496ZG -t GCC_ARM --profile toolchain_debug.json- You may need to prepend the command with
python -mon Windows or usesudoon Mac
- You may need to prepend the command with
- If all goes well, you will see the mbed compiler start creating your new bin file. When it is complete, the file can be found here, relative to the
azure-iot-mbed-clientdirectory you should still be in:BUILD/NUCLEO_L496ZG/GCC_ARM/azure-iot-mbed-client.bin - Drag the created binary over to the NODE_L496ZG drive, this will load the new client software and reboot your IoT board
Once your board reboots it will immediately attempt to connect to the network, read sensor data and send that data to your IoT Hub.
Here’s an example of the payload sent from my device:
{
    "event": {
        "origin": "GarettsDemoDevice",
        "payload": "{\"ObjectName\":\"Avnet NUCLEO-L496ZG+BG96 Azure IoT Client\",\"ObjectType\":\"SensorData\",\"Version\":\"1.2\",\"ReportingDevice\":\"STL496ZG-BG96\",\"Latitude\":\" 0.000\",\"Longitude\":\" 0.000\",\"GPSTime\":\"     0\",\"GPSDate\":\"\",\"Temperature\":\"23.90\",\"Humidity\":\"89\",\"Pressure\":\"1011\",\"Tilt\":\"2\",\"ButtonPress\":\"0\",\"TOD\":\"Sat 2019-02-09 16:59:52 UTC\"}"
    }
}
The actual data fed into your Azure function will be the JSON contents of the payload object.
If all goes well, your hub will start receiving the data from your board without incident. If any issues arise, or you just want to have a better idea of what is being sent to your Hub, it would be helpful to be able to see what exactly your board is doing and the raw data being sent.
With the IoT board connected to your computer you are able to analyze the board status using the COM port the board has connected to the computer using.
- From your terminal and issue the command ls /dev/tty.* This will show all the serial ports you have. Look for /dev/tty.usbmodemxxxxx (on my Mac it was 14203), which will be the board
- Issue the command screen /dev/tty.usbmodemxxxxx 115200 (where xxxxx is for your particular Mac). This connects to your device and displays the terminal output with baud rate of 115200.
- Download and install the Quectel LTE USB Driver
- Using your client of choice (I prefer Putty) open a Serial connection to the COM port the board is using (you can determine this using Windows’ Device Manager), and a Baud Rate of 115200.
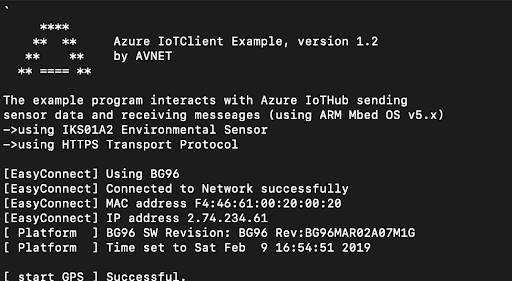
If you don’t see anything in the terminal after following the above steps, press the black “RESET B2” button on the white board, this will reboot the board and should present you with a screen similar to this one in the terminal:
Output will continue to produce as the board makes repeated network sends to Azure. You won’t, however, get to see the actual payload being send.
The Azure CLI tool will let us monitor the payloads sent from the board to Azure. The following commands will let you see the payloads sent in real-time:
- Issue the following command to log in to Azure from the command-line
az login- A browser will open, log in using your Azure credentials
- Install the Azure IoT extension:
az extension add --name azure-cli-iot-ext
- Retrieve the “Connection String - primary key” that you copied earlier when you created your IoT Hub, with it, issue the following command in the command-line terminal:
az iot hub monitor-events --login "<your_connection_string"
If all goes well you will start seeing JSON payloads as they are sent to the server:
By following the above tutorial your TELUS LTE-M IoT Starter Kit is now connected to your Azure instance and sending sensor data on a regular basis. Now you just need to do something amazing with that data!
I recommend making use of one of the fantastic tutorials for how to do something with your IoT data (e.g. store it in a database, trigger an action if the data meets some criteria). This one is great to get you started: https://github.com/Azure-Samples/functions-js-iot-hub-processing
Just bear in mind that the data being sent from your IoT board is in a different format than expected by the tutorial, so you will need to add your own parsing logic. I have updated the Function code to work with the TELUS IoT board:
module.exports = function (context, IoTHubMessages) {
    context.log(`JavaScript eventhub trigger function called for message array: ${IoTHubMessages}`);

    var count = 0;
    var totalTemperature = 0.0;
    var totalHumidity = 0.0;
    var deviceName = "";

    IoTHubMessages.forEach(message => {
        count++;
        totalTemperature += parseFloat(message.Temperature);
        totalHumidity += parseFloat(message.Humidity);
        deviceName = message.ObjectName;
    });

    var output = {
        "deviceName": deviceName,
        "measurementsCount": count,
        "averageTemperature": totalTemperature/count,
        "averageHumidity": totalHumidity/count
    };

    context.log(`Output content: ${output}`);

    context.bindings.outputDocument = output;

    context.done();
};
Can’t wait to see what you come up with!
Big thanks to James Flynn of Avnet for writing the original blog series and helper tools that this README is based off and uses. You can find the 2 related articles authored by James here and here
