Message Stream Processing
Overview
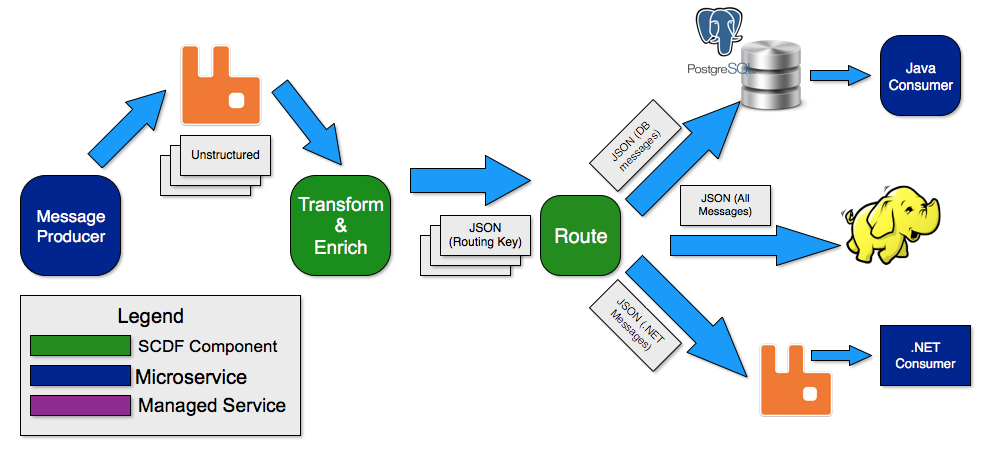
This demo shows how to process, enrich and route messages to different sinks using Spring Cloud Dataflows (SCDF):
In respect to running the server on PCF (in our case PWS), the following provide tips on how
Details on the sources and sinks used in creating streams can be found here:
https://docs.spring.io/spring-cloud-stream-app-starters/docs/Bacon.RELEASE/reference/html/
In this sample we will demonstrate:
- Streams to capture data
- Custom components in a stream to transform and enrich messages
- Routing of messages to different sinks using named destinations
- Some of the Sinks SCDF offers
High Level Message Flow
Messages are produced on the left and are sent to sinks on the right.
This demo is built to run on PWS (Pivotal Web Services). This is a Pivotal managed installation of Pivotal Cloud Foundry on AWS.
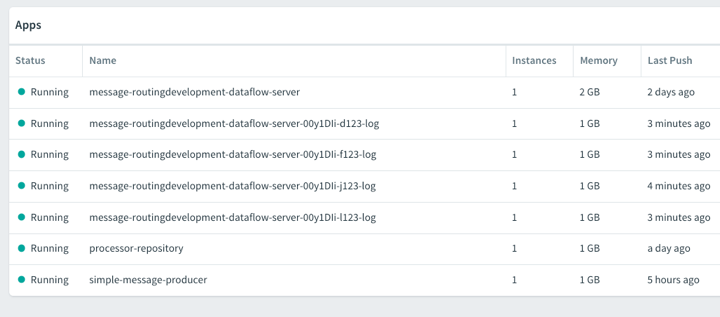
The components involved (including SCDF itself), and where they are deployed within the Cloud are as follows.
Set Up
Spring Cloud Data Flow Server
Data flows in Streams. SCDF provides a server to create and manage these streams.
To set up the SCDF Server, I modified the scripts found in this project:
https://github.com/lshannon/spring-cloud-data-flow-setup
Similar scripts can be found in the 'scripts' folder of this project.
To run this you will need a paid subscription on PWS and a CloudAMQP plan that is at least as robust as 'Tiger' as this sample heavily leverages Rabbit MQ. There is a month cost for such a plan:
https://console.run.pivotal.io/marketplace/services/3ba9445c-c709-4153-a343-e4ff5807316a
cf create-service cloudamqp tiger rabbit-scdf-queue
As this sample leverages some of the useful behaviors in the SCDF Rabbit sources, sinks and designated channels, this will only work with Rabbit MQ as the backing data bus.
Message Production
Our messages will be unstructured texts messages being published on to Rabbit MQ queue. They will come as a steady stream.
The application that produces them is in the 'simple-message-producer' folder. This is a simple Spring Boot application that will write messages to a Rabbit MQ Exchange upon start up.
Compiling The Application Locally
To compile this you will need a RabbitMQ running locally (see below). Compilation can be done using the maven wrapper at the root of the application folder.
./mvnw clean package
Setting Up RabbitMQ Locally (Only if you wish to compile the simple-message-producer)
To build the 'simple-message-producer' locally you will need a RabbitMQ running locally, otherwise the Test will not pass as the RabbitTemplate will not be able to create a ConnectionFacactory.
The following Repo explains setting up Rabbit MQ for local usage:
https://github.com/lshannon/rabbit-setup
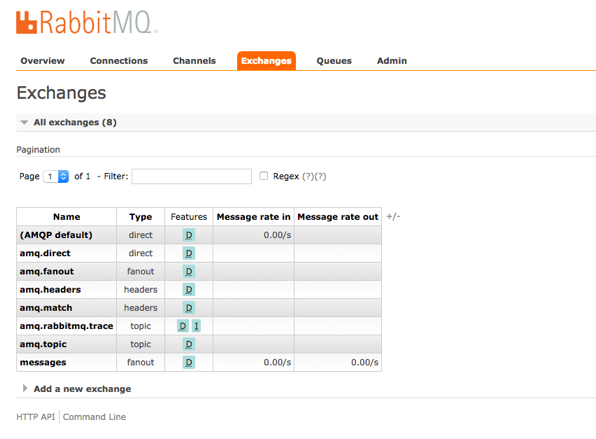
The message-producer application is configured to create the Exchanges and Queues it needs upon start up. A Fan Out exchange called 'messages' will be created, a Queue also called 'messages' (lazy with the naming) is created. The Exchange is bound to the Queue. These details can be found in the MessageQueueConfig class of the 'simple-message-producer'.
Deploying The Application To PCF
Also in the root of the application folder is a manifest.yml file for deployment to PCF.
---
applications:
- name: simple-message-producer
  random-route: true
  memory: 1G
  instances: 1
  path: target/simple-message-producer.jar
  services:
   - scdf-rabbitmq-queue
NOTE: It is bound to the same Rabbit MQ service SCDF is using. Do not change this as extra configuration is required to get SCDF and a step within a stream to use different instances of the same messaging service
Binding The Deployed Application To A Rabbit MQ Service
We will bind the 'simple-message-producer' to the same Rabbit MQ service the SCDF server is using.
Part of the Service in creating the Rabbit MQ Service is to create the manager interface.
This is a useful interface to refer too. Here you can see where messages are going and what Exchanges and Queues are created. Its also useful to clean up Queues and Exchanges not in use.
The 'simple-message-producer' and SCDF itself will create the Rabbit Exchanges and Queues it required at run-time.
No configuration of the Rabbit Service is required for this demo.
Real World Considerations
If you are using multiple brokers (ie: Rabbit MQ and Kafka or two Rabbit MQ), there is a bit of extra configuration.
To keep things simple for this demo we will be using one Rabbit MQ service for everything.
Producing the Messages
Upon starting/restarting this application it will fill the Rabbit Exchange called 'messages' with 10,000 text strings. Each are lines from various movies or TV shows. Worthless data...or is it?
Connecting To SCDF via The Shell
From within the 'script' folder of the run the following java command to launch a SCDF Shell Session.
➜  shell git:(master) ✗ pwd
/Users/lshannon/Documents/message-stream-processing/scripts/shell
➜  shell git:(master) ✗ java -jar spring-cloud-dataflow-shell-1.2.3.RELEASE.jar
  ____                              ____ _                __
 / ___| _ __  _ __(_)_ __   __ _   / ___| | ___  _   _  __| |
 \___ \| '_ \| '__| | '_ \ / _` | | |   | |/ _ \| | | |/ _` |
  ___) | |_) | |  | | | | | (_| | | |___| | (_) | |_| | (_| |
 |____/| .__/|_|  |_|_| |_|\__, |  \____|_|\___/ \__,_|\__,_|
  ____ |_|    _          __|___/                 __________
 |  _ \  __ _| |_ __ _  |  ___| | _____      __  \ \ \ \ \ \
 | | | |/ _` | __/ _` | | |_  | |/ _ \ \ /\ / /   \ \ \ \ \ \
 | |_| | (_| | || (_| | |  _| | | (_) \ V  V /    / / / / / /
 |____/ \__,_|\__\__,_| |_|   |_|\___/ \_/\_/    /_/_/_/_/_/

1.2.3.RELEASE

Welcome to the Spring Cloud Data Flow shell. For assistance hit TAB or type "help".
server-unknown:>
Next we will connect to the SCDF server in the previous step. Your server name will be based on your Org and Space.
dataflow config server https://<scdf server route>.cfapps.io
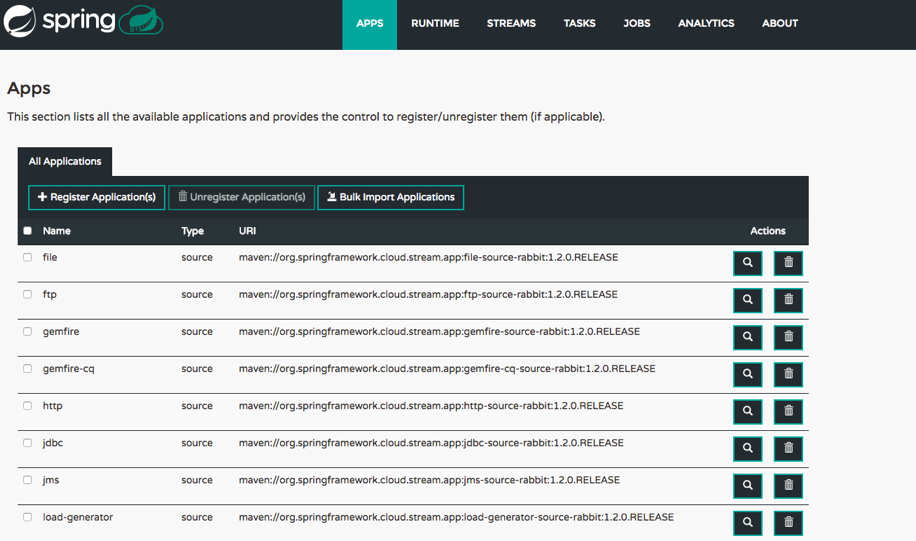
Next we can load all of the Sources, Sinks and Transformers SCDF provides out of the box.
dataflow:>app import http://bit.ly/Bacon-RELEASE-stream-applications-rabbit-maven
Successfully registered 60 applications from [source.sftp, source.file.metadata, processor.tcp-client, source.s3.metadata, source.jms, source.ftp, processor.transform.metadata, source.time, sink.s3.metadata, sink.log, processor.scriptable-transform, source.load-generator, sink.websocket.metadata, source.syslog, processor.transform, sink.task-launcher-local.metadata, source.loggregator.metadata, source.s3, source.load-generator.metadata, processor.pmml.metadata, source.loggregator, source.tcp.metadata, processor.httpclient.metadata, sink.file.metadata, source.triggertask, source.twitterstream, source.gemfire-cq.metadata, processor.aggregator.metadata, source.mongodb, source.time.metadata, sink.counter.metadata, source.gemfire-cq, source.http, sink.tcp.metadata, sink.pgcopy.metadata, source.rabbit, sink.task-launcher-yarn, source.jms.metadata, sink.gemfire.metadata, sink.cassandra.metadata, processor.tcp-client.metadata, sink.throughput, processor.header-enricher, sink.task-launcher-local, sink.aggregate-counter.metadata, sink.mongodb, sink.log.metadata, processor.splitter, sink.hdfs-dataset, source.tcp, source.trigger, source.mongodb.metadata, processor.bridge, source.http.metadata, sink.ftp, source.rabbit.metadata, sink.jdbc, source.jdbc.metadata, sink.rabbit.metadata, sink.aggregate-counter, processor.pmml, sink.router.metadata, sink.cassandra, source.tcp-client.metadata, processor.filter.metadata, processor.groovy-transform, processor.header-enricher.metadata, source.ftp.metadata, sink.router, sink.redis-pubsub, source.tcp-client, processor.httpclient, sink.file, sink.websocket, sink.s3, source.syslog.metadata, sink.rabbit, sink.counter, sink.gpfdist.metadata, source.mail.metadata, source.trigger.metadata, processor.filter, sink.pgcopy, sink.jdbc.metadata, sink.gpfdist, sink.ftp.metadata, processor.splitter.metadata, sink.sftp, sink.field-value-counter, processor.groovy-filter.metadata, source.triggertask.metadata, sink.hdfs, processor.groovy-filter, sink.redis-pubsub.metadata, source.sftp.metadata, sink.field-value-counter.metadata, processor.bridge.metadata, processor.groovy-transform.metadata, processor.aggregator, sink.sftp.metadata, sink.throughput.metadata, sink.hdfs-dataset.metadata, sink.tcp, sink.task-launcher-cloudfoundry.metadata, source.mail, source.gemfire.metadata, source.jdbc, sink.task-launcher-yarn.metadata, sink.gemfire, source.gemfire, sink.hdfs.metadata, source.twitterstream.metadata, processor.tasklaunchrequest-transform, sink.task-launcher-cloudfoundry, source.file, sink.mongodb.metadata, processor.tasklaunchrequest-transform.metadata, processor.scriptable-transform.metadata]
Running a 'app list' in the SCDF shell will show everything we just imported. We can also see it in the dashboard view of the SCDF Server:
https://.cfapps.io/dashboard/index.html#/apps/apps
Transforming The Message
Our unstructured text message will be transformed to JSON and enriched with data to route it.
To do this we will need to:
- Create a Processor class with a Stream Listener to specifiy the input and output
- Register the component with the SCDF Data Server running on PWS
To register the component we will need to host it somewhere. This is where the 'processor-repository' comes in. More on this later.
Simple Message Processor Functionality
This simple Spring Boot application is going to grab the messages from Rabbit MQ that the 'simple-message-producer' writes to Rabbit, transforms and enrich them and then passes the message to the routing components of the stream.
This component:
- Transform message to JSON
- Adds routing key to JSON
This is done in the Process.java file.
  @PostConstruct
	private void init() {
		routingKeys = new ArrayList<String>();
		routingKeys.add("java");
		routingKeys.add("net");
		routingKeys.add("log");
		routingKeys.add("db");
		routingKeys.add("file");
		mapper = new ObjectMapper();
	}

	@StreamListener(Processor.INPUT)
	@Output(Processor.OUTPUT)
	public String process(String message) {
		ProcessedMessage messageObj = new ProcessedMessage(message, getRoutingKey());
		String json = null;
		log.debug("Got a message to process: " + message);
		try {
			json = mapper.writeValueAsString(messageObj);
		} catch (JsonProcessingException e) {
			log.error("Unable to convert: " + messageObj.toString() + " to JSON");
		}
		log.debug("Processing Complete. Resulting JSON: " + json);
		return json;
	}

	private String getRoutingKey() {
		int rnd = new Random().nextInt(routingKeys.size());
		return routingKeys.get(rnd);
	}
As previously mentioned, the output of this component is the Rabbit Service SCDF is bound too.
This application is built and packaged using maven. Part of the build process is to copy this artifact to the 'processor-repository' static folder. The 'process-repository' is a simple Spring Boot application that provides a http end point to access the 'simple-message-processor' jar.
Compiling The 'simple-message-processor'
From inside the 'simple-message-processor' root folder run:
./mvnw clean package
You will see the following line where the copy is happening.
[copy] Copying 1 file to /Users/lshannon/Documents/message-stream-processing/processor-repository/src/main/resources/static
Publishing The 'simple-message-process' with the 'processor-repository' Application
The 'simple-message-process' will be made available to stream definitions by serving it from a Spring Boot application running in PWS call the 'processor-repository'.
To compile the 'processor-repository' run the maven clean package in the 'processor-repository'.
./mvnw clean package
In the root folder is a manifest.yml file that can be used when pushing to PWS.
Once the 'processor-repository' is running in PWS, hit the root page of the application to page of tips.
For a more robust solution for managing custom modules, Spring Cloud Skipper should be considered:
https://github.com/spring-cloud/spring-cloud-skipper
Registering The Custom Component With SCDF
Now custom component can be registered in the SCDF shell with the following command.
dataflow:>app register --name simple-message-processor --type processor --uri https://<application name>.cfapps.io/simple-message-processor.jar
Successfully registered application 'processor:simple-message-processor'
Should you wish to remove it, in the SCDF shell run the following:
app unregister --name simple-message-processor --type processor
For more on registering components: https://docs.spring.io/spring-cloud-dataflow/docs/1.2.1.RELEASE/reference/html/spring-cloud-dataflow-register-apps.html
Using The Custom Processor In A SCDF Stream
To test the custom processor, create a stream that routes the messages from the 'simple-message-producer' through the processor and into the logs.
stream create pt1 --definition "rabbit --queues=messages | simple-message-processor | log" --deploy
NOTE: Keep stream names short. Streams become apps in PCF (SCDF will generate the names) and PCF has a 63 character limit on route names.
If this successfully works the logs will contain the following:
2017-11-13T18:20:55.76-0500 [APP/PROC/WEB/0] OUT 2017-11-13 23:20:55.762  INFO 13 --- [ocessor.luke1-1] opment-dataflow-server-VQZn5fj-luke1-log : {"message":"Do or do not, there is not try","routingKey":".net"}
   2017-11-13T18:20:55.76-0500 [APP/PROC/WEB/0] OUT 2017-11-13 23:20:55.763  INFO 13 --- [ocessor.luke1-1] opment-dataflow-server-VQZn5fj-luke1-log : {"message":"This is Sparta!","routingKey":"java"}
   2017-11-13T18:20:55.76-0500 [APP/PROC/WEB/0] OUT 2017-11-13 23:20:55.764  INFO 13 --- [ocessor.luke1-1] opment-dataflow-server-VQZn5fj-luke1-log : {"message":"Could you pass the salt?","routingKey":"db"}
   2017-11-13T18:20:55.76-0500 [APP/PROC/WEB/0] OUT 2017-11-13 23:20:55.765  INFO 13 --- [ocessor.luke1-1] opment-dataflow-server-VQZn5fj-luke1-log : {"message":"I'm pickle Rick!","routingKey":"file"}
   2017-11-13T18:20:55.76-0500 [APP/PROC/WEB/0] OUT 2017-11-13 23:20:55.768  INFO 13 --- [ocessor.luke1-1] opment-dataflow-server-VQZn5fj-luke1-log : {"message":"By the power of Grey Skull!","routingKey":".net"}
   2017-11-13T18:20:55.77-0500 [APP/PROC/WEB/0] OUT 2017-11-13 23:20:55.769  INFO 13 --- [ocessor.luke1-1] opment-dataflow-server-VQZn5fj-luke1-log : {"message":"Do or do not, there is not try","routingKey":"log"}
   2017-11-13T18:20:55.77-0500 [APP/PROC/WEB/0] OUT 2017-11-13 23:20:55.770  INFO 13 --- [ocessor.luke1-1] opment-dataflow-server-VQZn5fj-luke1-log : {"message":"This is Sparta!","routingKey":"db"}
   2017-11-13T18:20:55.77-0500 [APP/PROC/WEB/0] OUT 2017-11-13 23:20:55.773  INFO 13 --- [ocessor.luke1-1] opment-dataflow-server-VQZn5fj-luke1-log : {"message":"By the power of Grey Skull!","routingKey":".net"}
   2017-11-13T18:20:55.77-0500 [APP/PROC/WEB/0] OUT 2017-11-13 23:20:55.774  INFO 13 --- [ocessor.luke1-1] opment-dataflow-server-VQZn5fj-luke1-log : {"message":"Shop smart, shop S-mart","routingKey":"db"}
   2017-11-13T18:20:55.77-0500 [APP/PROC/WEB/0] OUT 2017-11-13 23:20:55.775  INFO 13 --- [ocessor.luke1-1] opment-dataflow-server-VQZn5fj-luke1-log : {"message":"Do or do not, there is not try","routingKey":"file"}
   2017-11-13T18:20:55.77-0500 [APP/PROC/WEB/0] OUT 2017-11-13 23:20:55.777  INFO 13 --- [ocessor.luke1-1] opment-dataflow-server-VQZn5fj-luke1-log : {"message":"I'm pickle Rick!","routingKey":"java"}
   2017-11-13T18:20:55.77-0500 [APP/PROC/WEB/0] OUT 2017-11-13 23:
Routing Messages Part 1 - Create The Destinations
Lets start routing these messages. For now we will route to log files.
To do this we will set up the consumers first, in doing so we will set up the Rabbit MQ exchanges and queues to handle the messages we route.
This is done in SCDF using named destinations:
Here are the named destinations.
dataflow:>stream create --name j123 --definition ":java > log" --deploy
Created new stream 'j123'
Deployment request has been sent
dataflow:>stream create --name l123 --definition ":log > log" --deploy
Created new stream 'l123'
Deployment request has been sent
dataflow:>stream create --name d123 --definition ":db > log" --deploy
Created new stream 'd123'
Deployment request has been sent
dataflow:>stream create --name f123 --definition ":file > log" --deploy
dataflow:>stream list
╔═══════════╤═════════════════╤════════════════════════════════════════╗
║Stream Name│Stream Definition│                 Status                 ║
╠═══════════╪═════════════════╪════════════════════════════════════════╣
║d123       │:db > log        │All apps have been successfully deployed║
║f123       │:file > log      │All apps have been successfully deployed║
║j123       │:java > log      │All apps have been successfully deployed║
║l123       │:log > log       │All apps have been successfully deployed║
╚═══════════╧═════════════════╧════════════════════════════════════════╝
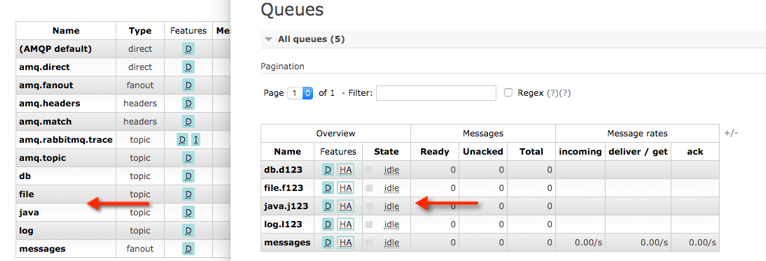
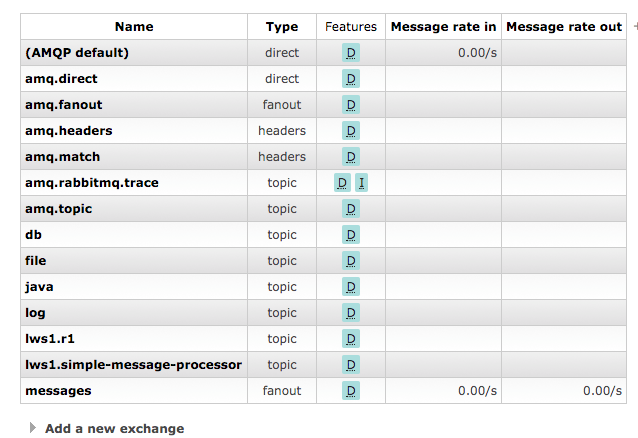
For each stream a Exchange is created and Queues created and bound to that Exchange.
SCDF also creates Apps in PCF to handle the moving of messages from these Exchanges.
Now we can set up the message routing.
Routing Messages Part 2 - Adding Routing Key
To do this we will take the messages, pass it through the processor where we add the 'routingKey' and final send it to a Rabbit Exchange named the same as that routing key (these were created in the previous step).
stream create lws1 --definition "r1: rabbit --queues=messages | simple-message-processor | r2: rabbit --routing-key-expression=#jsonPath(payload,'$.routingKey') --exchange-expression=#jsonPath(payload,'$.routingKey')" --deploy
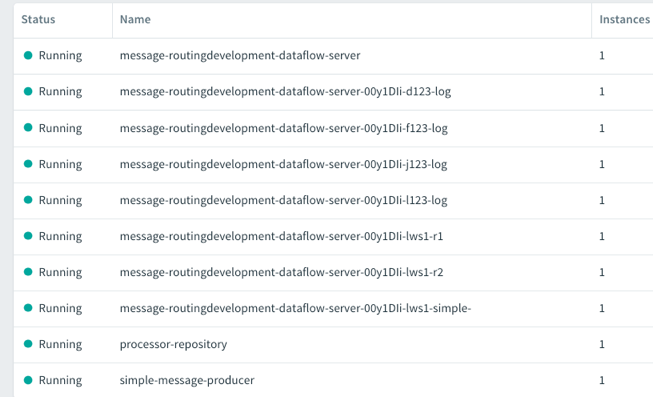
The result of this will be more Exchanges (and Queues) created in Rabbit MQ and more Applications to write messages to and from these Queues.
We also have a lot of applications created in the Apps Manager.
To run this sample we need to start the message flow. This can be done by starting/restarting the 'simple-message-producer' application.
Once its back up we will see the messages hitting the 'message' exchange.
After a short time messages will start showing up in the respective Exchanges at the end of the line.
Connecting A .NET Client To Receive Messages
The folder contains a simple .NET client that grabs messages off a Rabbit MQ Exchange.
Deploying the Application
From the root folder 'simple-dotnet-consumer' simply run a cf push. The manifest.yml contains all the details required to push the application with a random route.
Compiling the Application
Visual Studio is required to build and package this sample. This is not covered in this repository.
Deploying the Application to PCF
Verifying The Messages
Writing To A Database
Creating the Database
First we will create the database from PWS's marketplace:
cf create-service elephantsql panda message-db
We need a plan that allows for more connections than the free one. This will incur a cost.
By getting info from the message-db, a link to the management console can be obtained.
➜  message-stream-processing git:(master) cf service message-db

Service instance: message-db
Service: elephantsql
Bound apps:
Tags:
Plan: panda
Description: PostgreSQL as a Service
Documentation url: http://docs.run.pivotal.io/marketplace/services/elephantsql.html
Dashboard: https://cloudfoundry.appdirect.com/api/custom/cloudfoundry/v2/sso/start?serviceUuid=xxxxxxxxxxxxxxxxxxxx

Last Operation
Status: create succeeded
Message:
Started: 2017-11-24T16:49:44Z
Updated: 2017-11-24T16:49:44Z
The management console will give everything needed to connect to the DB from a Stream. In the screenshot below these credentials have been blocked out for security purposes.
dataflow:>stream create --name db1 --definition "time --max-messages=10 | jdbc --driver-class-name=org.postgresql.Driver --username=yldryksn --password=pleuMWy6tY5h5K3OWrf3Z169eoxxhT_4 --url=jdbc:postgresql://baasu.db.elephantsql.com:5432/yldryksn --jdbc.initialize=true" --deploy
Created new stream 'db1'
Deployment request has been sent
This will get write the payload of messages in the stream to a table in the DB called 'messages'.
Getting Messages In The Java Client
For these messages the Java client will pick up the messages from a database we populated in the previous step
Compiling The Application
Deploying to PCF
Verify the Messages
Writing To HDFS
For Audit puposes all messages will be passed into HDFS for storage.
