EM Image Segmentation
This is a simple implementation of the EM algorithm for performing image segmentation. The goal is to find the k components
that contain the most information about the pixels of an image (a coloured image).
This is done by first converting the 3d array of the image (one extra dimension for each rgb color) to a 2d representation.
Then, on top of this new array, we apply the EM algorithm in order to approximate the parameters of the GMM that is defined
for the specified number of clusters/components.
There is a very high possibility that the algorithm is wrong since I actually implemented it 2 years ago without
sufficient knowledge of the topic. The first implementation was in python (the jupyter notebook located under pure-python).
Recently, I started learning Rust and so I thought that this would be a good experiment to learn the language.
In my rust implementation, I simply implemented the same formulas without going into much detail. I believe that they can be simplified since I have used way too many for loops. Also, I am certain that there is a bug in my Rust code since the output is a bit worse than the one from the python implementation.
I have used PyO3 for binding my Rust code to a python module (named rustem) which can be invoked as from rustem import EM.
My Rust code is definitely not the best but I am still learning.
Contents
Usage
Example script:
from rustem import EM, save_new

epochs = 30
n_clusters = 32
img_path = "../images/img.jpg"

# Initialize EM
em = EM(img_path, n_clusters)
# Fit the GMM
em.fit(30)
# Save the new image
save_new(em, "path/to/new/image.jpg")
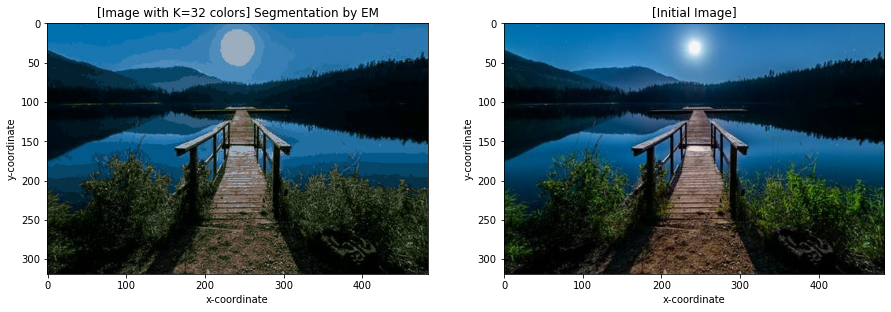
The output can bee seen in the image below:

- Left: The initial image.
- Right: The new image after using only 32 colors.
The same image with k=64 components is:
As you can see the image is now more improved, and the colors are way less than the initial number.
Performance
I used hyperfine for measuring the performance of the pure python implementation
and the python-with-rust implementation.
The hyperparameters used were the following:
k=32: Number of clustersepochs=30: Number of epochs
Pure Python Performance
em-img-seg/pure-python on master [!+?] via 🐍 v3.9.1 (env)
❯ hyperfine "python em_seg.py"
Benchmark #1: python em_seg.py
Time (mean ± σ): 50.384 s ± 2.237 s [User: 132.371 s, System: 88.762 s]
Range (min … max): 48.214 s … 54.201 s 10 runsSo, it took about 50 seconds to run the EM algorithm.
Python with Rust Performance
em-img-seg/examples on master [!+?] via 🐍 v3.9.1 (env)
❯ hyperfine "python segment.py"
Benchmark #1: python segment.py
Time (mean ± σ): 17.185 s ± 1.443 s [User: 17.242 s, System: 0.398 s]
Range (min … max): 15.160 s … 19.588 s 10 runsIt took about 17 seconds to run the EM algorithm with the same hyperparameters.
This means that the rust implementation is almost 3 times faster!
Installation/Using Locally
You can use rustem as a python library after doing the following:
git clone https://github.com/geoph9/em-img-seg.git
cd em-img-seg/
# Activate or create a new python environment
# python -m venv env
# . ./env/bin/activate
python setup.py install
To build the rust library alone, run:
cargo buildIf the above ran without any errors then you can now use the rustem module as in the example in the Usage section.
The Maths
We are going to perform image segmentation on a given image input, using the EM algorithm. Our goal will be to maximize the following likelihood:
Let's say that X is the image array (width X height X 3), N=width * height (total number of pixels), K=n_clusters and D=3 (n_colors). For the GMM, we also have the following:
(Note that I am using as sigma a diagonal covariance matrix and so I am simply representing it as a 1d array.)
Complete Data Likelihood:
Let's say that we denote the latent variable that describes our complete data as zeta. The complete data likelihood (before applying the log function ) will look like this:
E-Step
Now, we will compute the Expected Complete Log Likelihood. Since each Zeta appears linearly in complete data log likelihood then we can approximate zeta with the average of that (gamma).
We are going to calculate gamma which will be a NxK matrix that will show us if X_n is likely to belong to cluster K. Since we have a mixture of Gaussian distributions, then:
So, if we apply the
M-Step
Now, we should tune the model parameters in order to maximize the likelihood. This step is the most important since it defines how our model will react.
In order to get the new values for our parameters we will maximize the Expected Complete Log Likelihood we saw earlier.
Since we have 3 parameters, then we will maximize the function for each one. To do that we have to calculate the derivatives with respect to each of these parameters (mu, sigma, pi).
The output will be the following:
- For
muwe will simply use an average in order to find which pixels belong to clusterK. Since we haveD=3colors thenmuwill be calculated as such: - For
sigmawe only haveKpositions. That means that we will have to group the information about the color to just one cell (for each k value). The updated sigma values will be: - At last, we need to update the apriori distribution for the next step. It can be easily proved that
pialways has the same form, no matter the initial distribution (so if we have a mixture of Poisson distributions, thepiwould be updated in the same way):
Notes
The above was taken from the jupyter notebook located under the pure-python directory. The formulas have been copy-pasted and converted to latex using
Latex Codecogs.
