- Make a directory and clone this repo inside
- cd into the
Hack_O_DjangoREST_Tutrepo
Complete these steps inside the Hack_O_DjangoREST_Tut repo
- Setup a virtual environment:
- Depending on where your version of Python 3 is installed you may need to alter the path in the command below
virtualenv -p /usr/local/bin/python3 venv3
- Activate virtual environment:
source venv3/bin/activate- command above activates the virtual environment your command line prompt should start with
(venv3)if it worked
In the top level of the cloned repo there is a requirements.txt file
- Install depedencies from requirements.txt:
- pip install -r requirements.txt
- cd into the
example_projectdirectory. Should contain themanage.pyfile. - In directory with
manage.pyrun this command:python manage.py runserver- see working endpoint at: http://localhost:8000/songs/
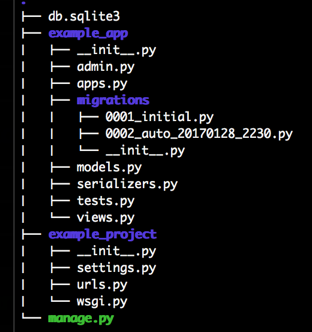
Below is what the file structure looked like after running a basic setup found here: new_project_setup

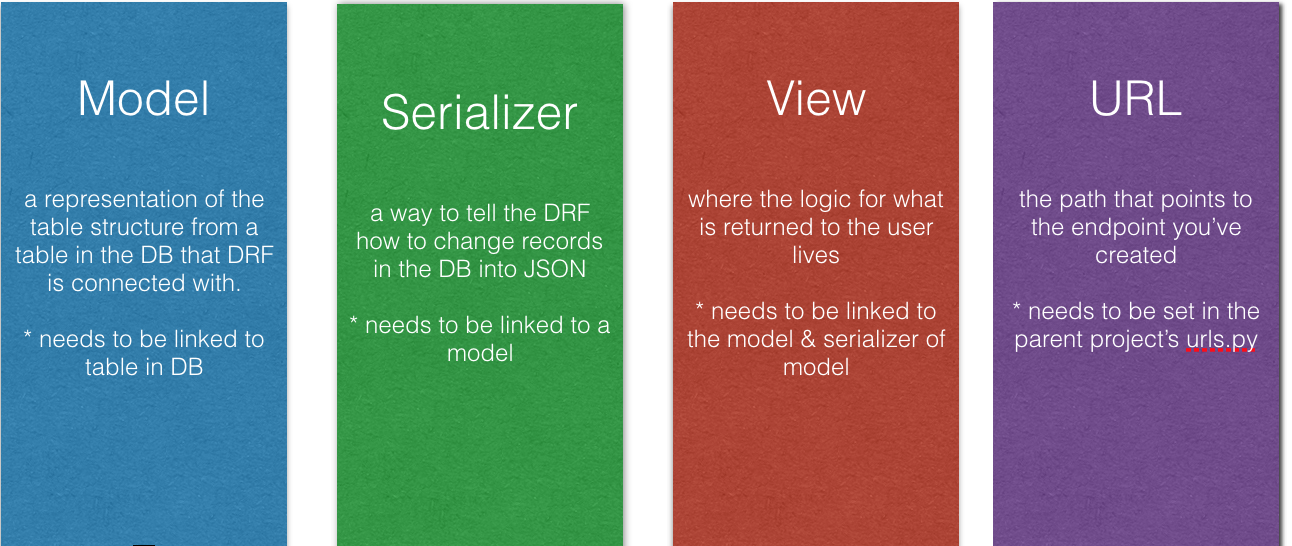
The image above outlines the pieces that need to be in place for an endpoint to work in the DRF assuming that the basic setup of the project has already been done.
A model just represents a table in your database and the attributes of the model class match the fields in that table. By creating a model and then syncing it with the database Django will tell the database to create a table that matches the model you have created in your project. Below is an example of the Songs model that is in our example_project/example_app/models.py file.
from django.db import models

class Songs(models.Model):
    # no need to declare a primary key field it is auto added with the name of 'id' by Django
    artist_name = models.CharField(max_length=255, default='')
    song_title = models.CharField(max_length=255, default='')
    song_year = models.IntegerField(blank=True, null=True)
    song_lyrics = models.TextField()

    class Meta:
        db_table = 'song_lyrics'
Notice how each attribute in the model class has a datatype to which it is assigned. These data types are defined in the django.db.models module and offer a convienient way to assign data types the values in our models. The class Meta part of a model is a container that Django uses to define meta data about a class object you're using. You will see examples of class Meta throughout Django's classes.
- Django model field docs
- Django model docs --> There is a ton of documentation here that gets into everything you can possibly do with models.
A way of serializing and deserializing data. This basically means just taking data and turning it into a different format like JSON or XML. Serializers are basically like translators that allow our Django REST API to talk to different programs using formats that both understand. There are many ways to define a serializer but we have included a simple example using Django's ModelSerializer class in the example_project/example_app/serializers.py file. See below.
class SongSerializer(serializers.ModelSerializer):
    class Meta:
        model = models.Songs
        fields = '__all__'
What we're doing is pointing this serializer at the Songs model we've already created and telling it serialize all of the fields in that model by declaring fields = '__all__' in the class Meta of the serializer. If you wanted to hide some of the fields that are returned to the end user this can be accomplished by declaring only the fields you want listed: fields = ('song_title', 'song_year') would only convert data from the song_title and song_year columns effectively hiding some of the informaton from the end user. You could also declare each attribute explicitly if you liked. Follow the instructions below to inspect this serializer in the Django shell.
-
python manage.py shell--> launches shell from command line -
Inside shell use the commands below to import our song serializer and then inspect it. Remember to hit return after entering each line.
  from example_app.serializers import SongSerializer

  serial_instance = SongSerializer()
  print(repr(serial_instance))

  # to quit shell
quit()- Example output from shell
SongSerializer():
    id = IntegerField(read_only=True)
    artist_name = CharField(max_length=255, required=False)
    song_title = CharField(max_length=255, required=False)
    song_year = IntegerField(allow_null=True, required=False)
    song_lyrics = CharField(style={'base_template': 'textarea.html'})
We can see from the output that the serializer is taking every field in our Song model and declaring its data type. This is needed to let the serializer know how to translate the data in each field of our model.
Views are where the logic of your API lives, they're primarily concerned with the request/reponse cycle. Each view is responsible for grabbing infromation out of your database by using your model and then serializing or translating that data and returning it to a user. There are many different ways to write views but we will show you two basic ones. The first is a bit longer than the second but will hopefully give you better intuition as to what a view is doing.
@api_view(['GET'])
def song_list(request):
    """
    A function based view that use the api_view decorator to add functionality
    to the view.
    """
    if request.method == 'GET':
        songs = models.Songs.objects.all()
        serializer = serializers.SongSerializer(songs, many=True)
        return Response(serializer.data)
This is an example of a function based view and can be found in the example_project/example_app/views.py file. The @api_view(['GET']) decorator is used to add some Django specific functionality to the song_list function. Inside this view function you see that we're giving instructions about what should happen if it recieves a GET request. We're telling the view to grab every object in the Songs model and then use the SongSerializer we previously made to translate all of those objects. We then use a Django's Response class to return the translated data from our serializer. While there is still a bit Django magic going on in this function the main takeaway should be that a view handles an incoming request and decides which data to grab and how to respond.
Another very useful bit of built in Django magic are class based views. The view below does basically the same thing as the functional view above but with far less code and has built in logic for different types of requests.
class ListSongs(generics.ListAPIView):
    """
    A class based view that inherits from the generics class. The generics
    class gives you a convinient way to declare views quickly when you only
    need basic functionality or simple CRUD operations.
    """

    queryset = models.Songs.objects.all()
    serializer_class = serializers.SongSerializer
This class based view can be found in the example_project/example_app/views.py file. With class based views they only require that you define a queryset and serializer_class. Remember that these attributes just represent our model and our serializer. Class based views using the generics class don't require that you explicitly return the serialized data in a response like the functional view did above. The methods that are inherited from the generics class return the correct data by plugging in your queryset and serializer_class where appropriate behind the scenes.
This view currently only accepts GET requests becasue it's inheriting from the generics.ListAPIView class. If we would like to allow this view to be able to accept POST requests it is as simple as changing the class it inherits from. By using the generics.ListCreateAPIView class instead the endpoint will now accept POST requests and allow us to load data into our database by hitting this view's endpoint.
Please see the docs for the generics classes the DRF offers: generic_views
The last thing we must remember to do is link a URL endpoint to each view we add to our project. The way we're recommending you do this for Hack Oregon projects can be seen below.
This is an example of the contents of the example_project/example_app/urls.py file:
from django.conf.urls import url
from . import views


urlpatterns = [
    #function based view
    url(r'^funcsongs/$', views.song_list),

    # class based view
    url(r'^songs/$', views.ListSongs.as_view()),
]
Notice the difference in how the functional view and class view are defined. The r'^endpoint_name/$' part of the url declaration is using regex to point to a url that a user will hit to trigger the view.
This urls.py file inside your example_app directory doesn't come standard with the project setup and must be created by you if you're making a new project. By having the urls declared for each app inside a project it gives you the ability to create a single point of entry into your API. This is valuable because as long as the user knows the entry endpoint they can find all the other endpoints easily.
There is still one last piece that needs to be linked in order for the endpoints to work properly. The endpoints that are served up by Django all must come out of the example_project/example_project/urls.py file. We haven't touched the inner example_project directory much in this tutorial yet. This inner directory is where you adjust the settings of your project and has two files that interest us settings.py and urls.py. These files control all of the top level settings in your project. Every URL that is served in your project must come out of the urls.py file. In order to do this we need to include the URLs we've already declared in our app.
from django.conf.urls import url
from django.contrib import admin
from django.conf.urls import include

urlpatterns = [
    url(r'^admin/', admin.site.urls),
    url(r'^', include('example_app.urls', namespace='example_app')),
]
Notice how we're using the include function to include all of the URLs we previously declared in our app. Doing this gives us the option to add more apps in the future without worrying about URL conflicts. We also have the option of adding a prefix to all URLs for our app here. For example:
url(r'^example_prefix/', include('example_app.urls', namespace='example_app')),Would cause every URL in our app to look someting like this: https://api_location.com/example_prefix/songs/
You now know the four main pieces that you need to worry about when adding an endpoint to any project. Those pieces are the model, serializer, view, and url. We would now like eveyone to try their hand at loading some sample data from a csv into this Django project by adding these four pieces and then sending POST requests to load the data. Please follow this link: movie_loader and follow the instructions there.
This is a list of links to directories in this repo that will let you explore other aspects of the DRF now that you know the basics
- movie_loader --> walks through creating a model and loading fake data from a csv to your db using a
POSTendpoint. - filtering --> explores passing arguments to views and then filtering responses with those arguments.
