Fast and Accurate Image Super Resolution by Deep CNN with Skip Connection and Network in Network
by Jin Yamanaka, Shigesumi Kuwashima and Takio Kurita
Overview
This is a tensorflow implementation of "Fast and Accurate Image Super Resolution by Deep CNN with Skip Connection and Network in Network", a deep learning based Single-Image Super-Resolution (SISR) model. We named it DCSCN.
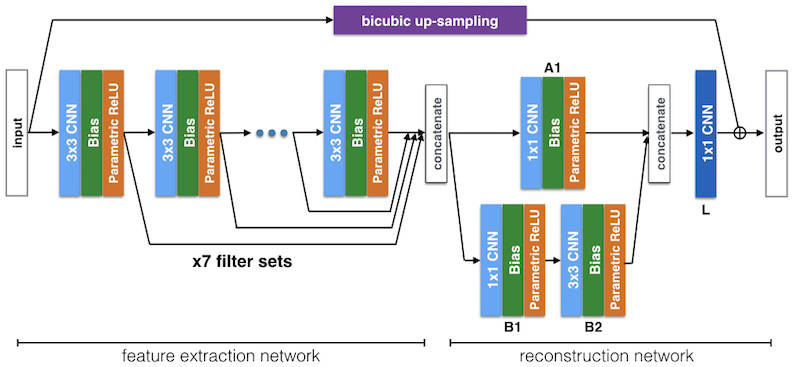
The model structure is like below. We use Deep CNN with Residual Net, Skip Connection and Network in Network. A combination of Deep CNNs and Skip connection layers is used as a feature extractor for image features on both local and global area. Parallelized 1x1 CNNs, like the one called Network in Network, is also used for image reconstruction.
Sample result
Our model, DCSCN is much lighter than other Deep Learning based SISR models. Here is a comparison chart of performance vs computation complexity from our paper.
Requirements
python > 3.5
tensorflow > 1.0, scipy, numpy and pillow
Result of PSNR
The sample result of default parameter is here. You can have even better PSNR than below with using larger filters or deeper layers with our model.
| DataSet | Bicubic | SRCN | SelfEx | DRCN | VDSR | DCSCN (normal) | DCSCN (large) |
|---|---|---|---|---|---|---|---|
| Set5 x2 | 33.66 | 36.66 | 36.49 | 37.63 | 37.53 | 37.62 | 37.80 |
| Set14 x2 | 30.24 | 32.42 | 32.22 | 33.04 | 33.03 | 33.05 | 33.19 |
| BSD100 x2 | 29.56 | 31.36 | 31.18 | 31.85 | 31.90 | 31.91 | 32.06 |
Evaluate
Learned weights for some parameters are included in this GitHub. Execute evaluate.py with these args below and you get results in output directory. When you want to evaluate with other parameters, try training first then evaluate with same parameters as training have done. Results will be logged at log.txt, please check.
Three pre-trained models (compact, normal, large) are included.
# evaluating set14 dataset with normal model
python evaluate.py --test_dataset set14 --dataset yang_bsd_4 --filters_decay_gamma 1.5 --save_results True

# evaluating set5 dataset with compact model
python evaluate.py --test_dataset set5 --dataset yang_bsd_4 --save_results True --filters 32 --min_filters 8 --nin_filters 24 --nin_filters2 8

# evaluating all(set5,set14,bsd100) dataset with large model
python evaluate.py --test_dataset all --dataset yang_bsd_8 --layers 10 --filters 196 --min_filters 48 --last_cnn_size 3
Apply to your own image
Place your image file in this project directory. And then run "sr.py --file 'your_image_file'" to apply Super Resolution. Results will be generated in output directory. Please note you should use same args which you used for training.
If you want to apply this model on your image001.png file, try those.
# apply super resoltion on image001.jpg (then see results at output directory)
python sr.py --file your_file.png --dataset yang_bsd_4 --filters_decay_gamma 1.5

# apply super resoltion with compact model
python sr.py --file your_file.png --dataset yang_bsd_4 --filters 32 --min_filters 8 --nin_filters 24 --nin_filters2 8

# apply super resoltion with large model
python sr.py --file your_file.png --dataset yang_bsd_8 --layers 10 --filters 196 --min_filters 48 --last_cnn_size 3

# apply super resoltion with large model for scale x3
python sr.py --file your_file.png --dataset yang_bsd_8 --layers 10 --filters 196 --min_filters 48 --last_cnn_size 3 --scale 3
How to train
You can train with any datasets. Put your image files as a training dataset into the directory under data directory, then specify with --dataset arg. There are some other hyper paramters to train, check args.py to use other training parameters.
Each training and evaluation result will be added to log.txt.
# training with yang91 dataset
python train.py --dataset yang91

# training with larger filters and deeper layers
python train.py --dataset yang91 --filters 128 --layers 10

# after training has done, you can apply super resolution on your own image file. (put same args which you used on training)
python sr.py --file your_file.png --dataset yang91 --filters 128 --layers 10
Data augmentation
To get a better performance, data augmentation is needed. You can use augmentation.py to build an augmented dataset. The arg, augment_level = 4, means it will add right-left, top-bottom and right-left and top-bottom fillped images to make 4 times bigger dataset. And there yang91_4 directory will be generated as an augmented dataset.
To have better model, you should use larger training data like (BSD200 + Yang91) dataset.
# build 4x augmented dataset for yang91 dataset (will add flipped images)
python augmentation.py --dataset yang91 --augment_level 4

# build 8x augmented dataset for yang91 dataset (will add flipped and rotated images)
python augmentation.py --dataset yang91 --augment_level 8

# train with augmented data
python train.py --dataset yang91_4
Visualization
During the training, tensorboard log is available. You can use "--save_weights True" to add histogram and stddev logging of each weights. Those are logged under tf_log directory.
Also we log average PSNR of traing and testing, and then generate csv and plot files under graphs directory. Please note training PSNR contains dropout factor so it will be less than test PSNR. This graph is from training our compact version of DCSCN.


