Coming Soon! An article on this tool will appear in an upcoming issue of Digital Machinist magazine.
Tool Library Manager is a Microsoft Excel application with macros written in Visual Basic for Applications (VBA). Its purpose is to translate between the export formats used by different programs and devices that need to share a common CNC tool library. For example, you can export a tool library from Autodesk Fusion 360, then use Tool Library Manager to translate the format so it can then be imported into, say, a Tormach milling machine.
The translation between formats is accomplished through a rules table, which is just a spreadsheet that defines the mapping between values. You can easily create custom rules for the programs and devices you use.
Here is a screenshot of Tool Library Manager when it is started in Excel:
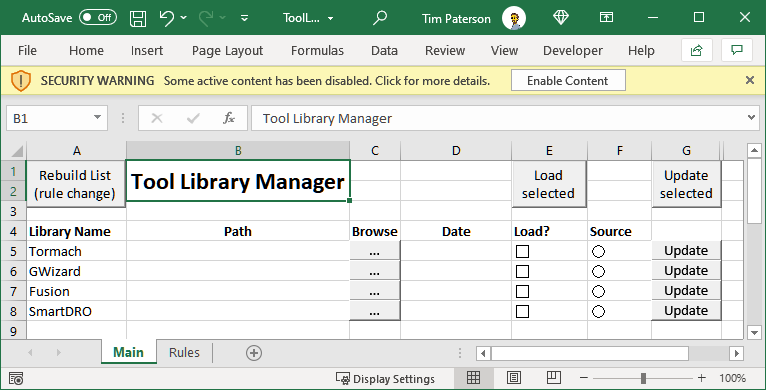
Excel applies multiple layers of security to prevent malicious macros in a downloaded file from running. As the specifics change from version to version, consult Microsoft Office documentation to fully enable macros.
Tool Library Manager comes with four sets of rules:
- Tormach Path Pilot
- G-Wizard speeds and feeds calculator
- Fusion 360 CAD/CAM
- SmartDRO mill digital readout: see TouchscreenDigitalReadout
Let's assume for a moment that these rules would work for you. Here are the steps to take to synchronize the tool libraries. Note: No other Excel workbooks should be open!
-
Export the tool libraries from each of your programs or devices. This is required even if the library is empty. You must export it in "Comma Separated Values" (CSV) format or "Tab Separated Values" (TSV) format.
-
Set the path to each of the exported library files in the spreadsheet column labeled
Path. This is easily done using theBrowsebutton. -
Use the
Load?column to select which libraries you want to deal with. -
Click the
Load selectedbutton. Each of the libraries is imported and given their own Excel worksheet with a tab at the bottom: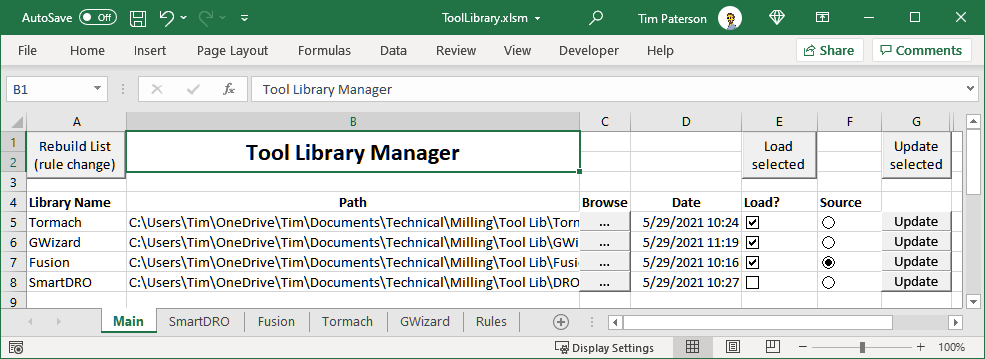 The date column shows the file system timestamp of the file. This
can be a very helpful reminder (speaking from experience) that if the
file doesn't have today's date, you aren't using a fresh export.
The date column shows the file system timestamp of the file. This
can be a very helpful reminder (speaking from experience) that if the
file doesn't have today's date, you aren't using a fresh export. -
In the
Sourcecolumn, choose one library to act as the source to be copied to the other libraries. -
Update a library individually with its
Updatebutton, or update all that are selected underLoad?with theUpdate selectedbutton. Updated files overwrite the originally exported files. -
Save the Excel workbook to keep the settings you've entered.
-
Import the updated files back into their corresponding program or device.
You can make your own rules provided the exported format follows these basic requirements:
- It is an Excel-compatible file format, either CSV or TSV.
- The file has a row of column names (not necessarily the first row).
- The rows after the column name row are the tool values.
One limitation is that Excel cannot export to TSV format. In that case, the TSV source could be used as the master tool list that is not updated from another source. (Fusion 360 has transitioned to CSV, but this limitation would apply if you were using their old TSV format.)
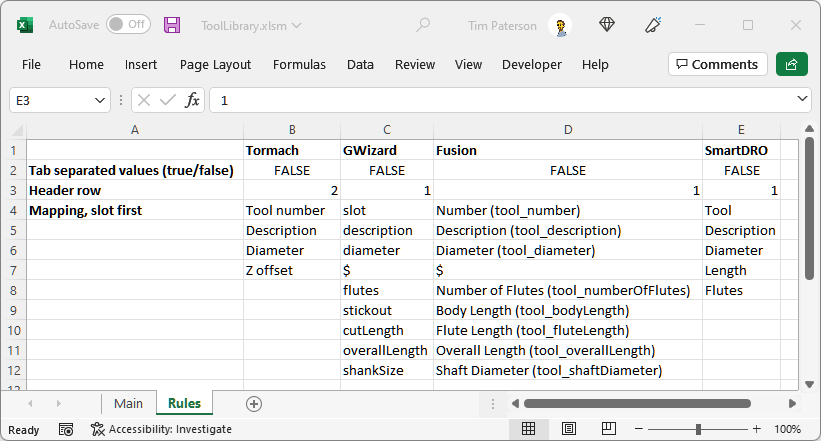
Here is a look at the rule table:
To get started on your own rules, export a tool library and load it into its own Excel workbook. You can adjust the column widths to make things more readable. (You will need to close this workbook before running the macros.)
The rules for a program or device use one column on the Rules tab, and you can have as many as you like. Working down the rows from the top:
- The name for the rule.
- TRUE if it's in TSV format.
- The row number that has the column headers.
- The tool or slot number, which links the tools across libraries.
- For all subsequent rows, enter the name of equivalent columns.
$is a placeholder that means skip this entry.
When you make any changes in the top (name) row of the rules – whether
just editing a name or adding/deleting entire columns – you must
update the table of libraries on the Main sheet. Just click the
Rebuild List button and it will build a new table with current
library names. But if you have fewer libraries than before, it will
not clear the extra rows. You can simply delete (or clear) the rows
manually.
To get it, just download ToolLibrary.xlsm from the latest Release.
The code has been exported into LibList.cls and ToolLibModule.bas so you can see how it's done.
Use the Discussions or Issues sections to make comments and ask questions.