DemonSeed is a minimal malicious USB cable. Not to be confused with the O.MG Cable (https://o.mg.lol), which is a very different piece of hardware that does a whole lot more.
This Protocol persists from my personal experiences with the Demon Seed it involves troubles I had and how I troubleshooted them. Also, will it include some personal tips and tricks I used during my assembly.
- DemonSeed EDU
- Soldering Station
- Solder
- USB Cable
- Double sided Tape
- Bigger USB Housing
- USB A Plug Socket
- Flux
- Cables Strand (Cross section: 2 x 0.14 mm² | Outer dim.: 1.3 x 2.6 mm)
- Extra Pins
- Ohmmeter (or anything one can use to test conductivity)
- Linux (Host or VM)
- Patience
I want to note that this is expanding the original setup with personal experiences and tips on Troubleshooting and Problem-solving. At the start of each section, the original Video is linked. Some Side-notes: I did my DemonSeed assembly without flux. Also, I broke my Pogo-jig PCB Traces and hardwired the pins to the pogos with cables. Also, I used the in the box USB port but removed the plastic part under the contacts. Furthermore, I used the Debian Buster OS for all Programming related tasks and for software installer code tests i used a Kali Linux guest VM through Virtual Box (Virtual Box USB drivers are needed).
The Pogo Jig is needed to connect the usbasp (The Module, which is used to set up the boot-loader) to the DemonSeed. In the following picture, one can see the 6 pins on the DemonSeed Implant, which can be used for troubleshooting. More details on what each pad does in the boot-loader section.

! Important!
put together your pogo jig before soldering it and check if your pogos can connect to the DemonSeed and check that you don't solder it backwards.
Since I broke my PCB traces, I hard-wired my pogo stencil with additional cables.
Tip: If u also need to do this I advise on tinning your cables beforehand and then use this tin to connect the cables. the following picture is an example of tinning your cable.

| Front | Back |
|---|---|
 |
 |
Finished

I advise on testing the conductivity from the pins to the end of each pogo. For more detail on which pin to connect to which pogo look at the following two schematics.
! pins for 5V, MISC and SCK are not connected to their closest pogo !
| Pins | Pogos |
|---|---|
 |
 |
Connectors
The DemonSeed uses six pads for flashing flash memory and fuse bits
-
5V:
5V Direct Current, needed to deliver your DemonSeed with power
-
GND (Ground)
needed to complete the power circle
-
SCK (Serial Clock)
needed for bit transfer (every Cycle one transfer occurs)
-
MOSI (Master Output Slave Input)
Used to send bits from the Master (your Computer) to the Slave (DemonSeed)
-
MISO (Master Input Slave Output)
Used to send bits from the Slave (DemonSeed) to the Master (your Computer)
-
RST (Reset)
Used to monitor power fluctuations and to reset the microcontroller
fuse bits
Fuse bits are used to activate certain "Abilities" of a Micro-controller. For example, they are needed to mark the DemonSeed to use a boot-loader. For the DemonSeed we use 3 fuses:
-
lfuse (low fuse)
This fuse is for time/clock related task, we use them to define the internal oscillator and the startup time of the DemonSeed
-
hfuse (high fuse)
We use this fuse to enable Serial Programming and Data Downloading as well as the Brown-out-detector-trigger level 1, which works as a safety feature, that monitors the supply voltage
-
efuse (extended fuse)
We use this fuse to enable SELFPRGEN (Self Programming) which lets us program the DemonSeed through the boot-loader
-
lock (Locked Bits)
Locked Bits are bits that shouldn't be changed under normal circumstances, they, for example, can be used to give the RST pin extra functionality, but prevent you from resetting your microcontroller.
avrdude
Avrdude is a tool that lets us flash microcontrollers and edits its fuse bits, we can select the following parameters:
-
-p
defines a microcontroller type (DemonSeed is an attiny85)
-
-c
lets us define a programming adapter (we use the usbasp)
-
-s
Disables Safe Mode prompting, means if it detects a fuse that unintentionally changed it will recover it. This Activates this feature without asking us first.
-
-U
Writes to the microcontroller, we will write to flash (the bootloader), lfuse, hfuse and efuse
sudo apt-get install avrdude
In order to install the boot-loader, you need to flash it onto the DemonSeed. The code for this is in the Repo in the file DemonSeed.hex.
Devices
| USBASP to REDIRECT | REDIRECT to POGO-JIG | POGO-JIG to DEMONSEED |
|---|---|---|
 |
 |
 |
It is OK to run this command as many times as you want, you shouldn't be able to break it through this procedure. Once again I want to remind, that you need to be in the same directory as the DemonSeed.hex file.
avrdude -c usbasp -p attiny85 -s -U flash:w:DemonSeed.hex:i -U lfuse:w:0xe1:m -U hfuse:w:0xdd:m -U efuse:w:0xfe:m
Output Successful

Output
avrdude: error: could not find USB device with vid=0x16c0 pid=0x5dc vendor='www.fischl.de' product='USBasp'

avrdude done.  Thank you.
Your usbasp wasn't found try,unplugging and plugin it in again. Also, use usb-devices | grep fischl(Note: Works with the DemonSeed EDU kit usbasp) to check if its there.
Output
avrdude: warning: cannot set sck period. please check for usbasp firmware update.
avrdude: error: program enable: target doesn't answer. 1
avrdude: initialization failed, rc=-1
         Double check connections and try again, or use -F to override
         this check.


avrdude done.  Thank you.
Means you either aren't connected to the DemonSeed at all or your pins to pogos are wrongly wired. Just try again and if it still doesn't work check if pins and pogos are connected correctly in the previous step is a schematic for that task Pogo-Jig.
Output
avrdude: verifying ...
avrdude: verification error, first mismatch at byte 0x0000
         0x00 != 0x77
avrdude: verification error; content mismatch
This means one of your connections disconnected throughout the installation, just try it again. It could also mean there is no conductivity in one of your pin-pogo connections.
USB cables
A USB Cables consist of 4 connectors which normally follow the following colour schema:
- red -> VDC (Delivers Direct Current 5V)
- white -> Data -
- green -> Data +
- black -> Ground

! Important !
Before soldering on the cables put your USB housing on the cable, also u should skip to DemonSeed Programming before soldering cables and putting on the housing, this improves troubleshooting by a lot.
Cable soldering
Like you can see in the picture I removed the bottom part of the plastic on the soldering side of the USB stick to make soldering easier, if you don't want to go through that hassle you can also buy a USB port that has soldering pins (example linked under Materials as Advisable).
Check beforehand, that you don't swap DC and GND also one should solder together both data-cables to prevent shorts.

Done
! Important !
Once again go to DemonSeed Programming and check if everything works before soldering the cable.
| USB Head | Cable |
|---|---|
 |
 |
It is advisable once again to check conductivity. Try if your DemonSeed pins and USB pins conduct electricity and check that there are no shorts.
Programming the DemonSeed is relatively simple. It is written in C and the Arduino IDE is used to detect and write to a Digispark (16.5Mhz) board. It also includes the library (Digispark) for using the DemonSeed for Keystroke Injections.
Here is some extended theory to the DemonSeed.
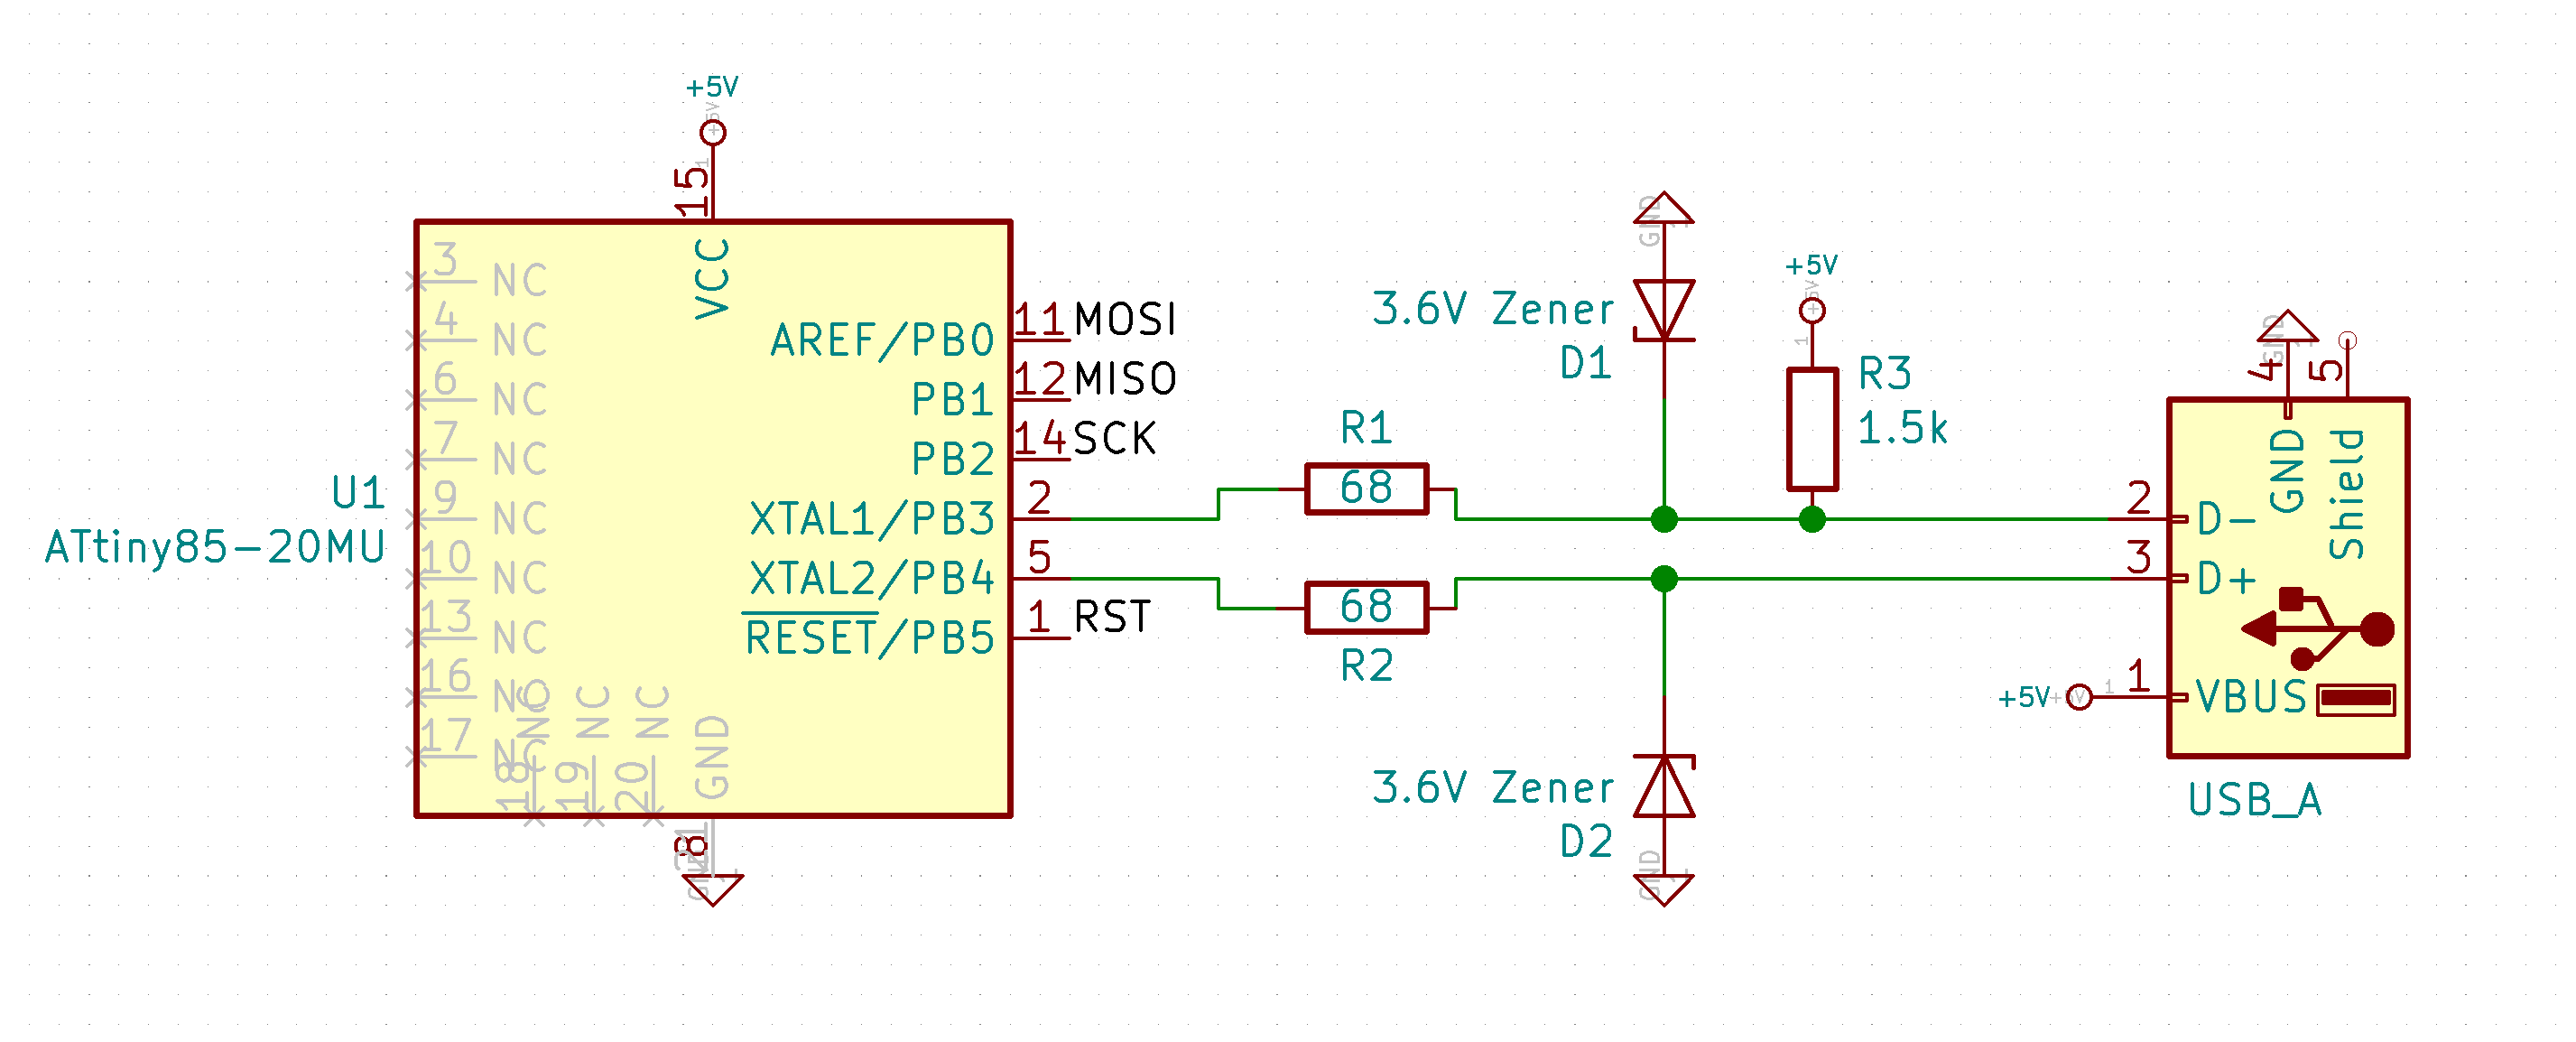
ATTINY85-20MU Schematic

DemonSeed Schematic (from V1)
Arduino: Download Page
or
wget https://downloads.arduino.cc/arduino-1.8.12-linux64.tar.xz -O /tmp/arduino.tar.xz
tar -xf /tmp/arduino.tar.xz -C /tmp/
sudo mv -f /tmp/arduino-1.8.12 /usr/lib/arduino
sudo bash /usr/lib/arduino/install.sh
Adding the right board
-
start Arduino IDE
-
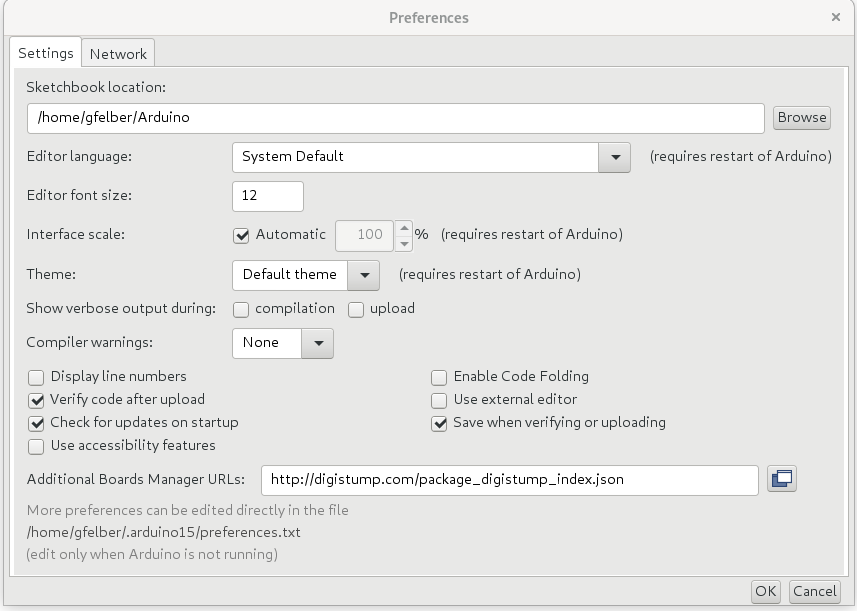
File > Preferences > Additional Boards Manager URLs:
-
add http://digistump.com/package_digistump_index.json
-
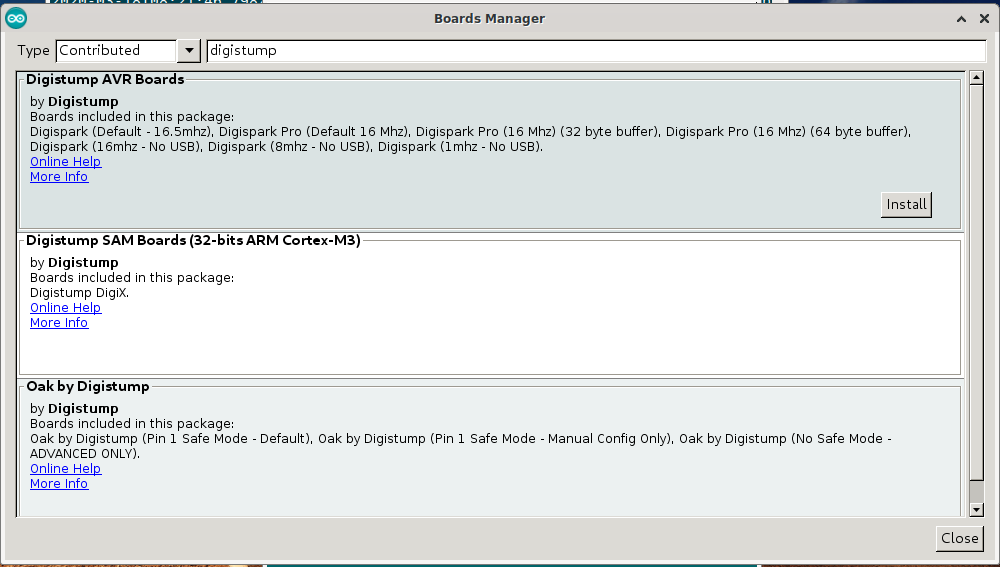
Tools > Board: > Boards Manager...
-
Type: Contributed
-
search digistump
-
install Digistump AVR Boards
-
Tools > Board: > Digispark (Default - 16.5Mhz)
-
Tools > Programmer: > Micronucleus


This following code snippet setups your DemonSeed to print so seedy... in and 5 seconds interval.
 #include "DigiKeyboard.h"

 void setup() {
  // put your setup code here, to run once:
  pinMode(2, OUTPUT);
  digitalWrite(2, HIGH);
}

void loop() {
  // put your main code here, to run repeatedly:
  DigiKeyboard.println("so seedy...");
  DigiKeyboard.delay(5000);
}
Program Start Output

Success Output

If you cant compile your code there could be a problem with your rules. To resolve this add following entry.
vim /etc/udev/rules.d/49-micronucleus.rules# UDEV Rules for Micronucleus boards including the Digispark.
# This file must be placed at:
#
# /etc/udev/rules.d/49-micronucleus.rules (preferred location)
# or
# /lib/udev/rules.d/49-micronucleus.rules (req'd on some broken systems)
#
# After this file is copied, physically unplug and reconnect the board.
#
SUBSYSTEMS=="usb", ATTRS{idVendor}=="16d0", ATTRS{idProduct}=="0753", MODE:="0666"
KERNEL=="ttyACM*", ATTRS{idVendor}=="16d0", ATTRS{idProduct}=="0753", MODE:="0666", ENV{ID_MM_DEVICE_IGNORE}="1"
#
# If you share your linux system with other users, or just don't like the
# idea of write permission for everybody, you can replace MODE:="0666" with
# OWNER:="yourusername" to create the device owned by you, or with
# GROUP:="somegroupname" and mange access using standard unix groups.
Now reload the rules and you should be good to go.
sudo udevadm control --reload-rulesIf your device isn't found there is probably a problem with conductivity. Either one of your solder connections doesn't conduct (check conductivity and solder the broken link) or you fried your DemonSeed (but that is the reason why you have two in your Kit). If you really want to know if your DemonSeed is fried or only one of the conductors got destroy you can try to flash the boot-loader again if it works one of your USB pins got fried, if not your DemonSeed got fried.