LED-RGB-Strip-Controller
A HomeKit Enabled WiFi LED Strip controller uisng ESP8266 and 5050 12v LEDs
A more detailed description of the project can be found on my webpage: HomeKit Enabled WiFi LED Strip
Library
This project uses the PubSub Arduino MQTT Library by knolleary.
Hardware
- An existing MQTT server on your network, this is required for messaging,
- If you wish to use HomeKit an existing Homebridge server on your network.
- An ESP8266 board, something like a Wemos D1 Mini, you can use other boards but you will have to amend the code.
- A length of 5050 RGB LED strip, something like this, 5 meters costs about £6.
- A suitably rated 12v power supply, the amperage will vary depending on how long your LED strip is. I used a 12v 4A supply I had already.
- Three suitable MOSFETs I used IRFZ3NN N-channel ones, this should be good for long LED lengths but will require heat sinks if you run more than a few meters (Data Sheet).
- A step down DC-DC power converter, this is to drop the 12v down to the 5v required to run the Wemos. I used a MP1584EN based one, you can get fixed 12v to 5v or variable. Please ensure you use a suitably rated one that can handle the amperage, again this will vary by LED strip length.
- Some perfboard to build the project on.
- Some patch wire to link the components on the board.
- A suitable enclosure or access to a 3D printer (STL and OpenSCAD files are provided).
- Soldering iron, snips etc.
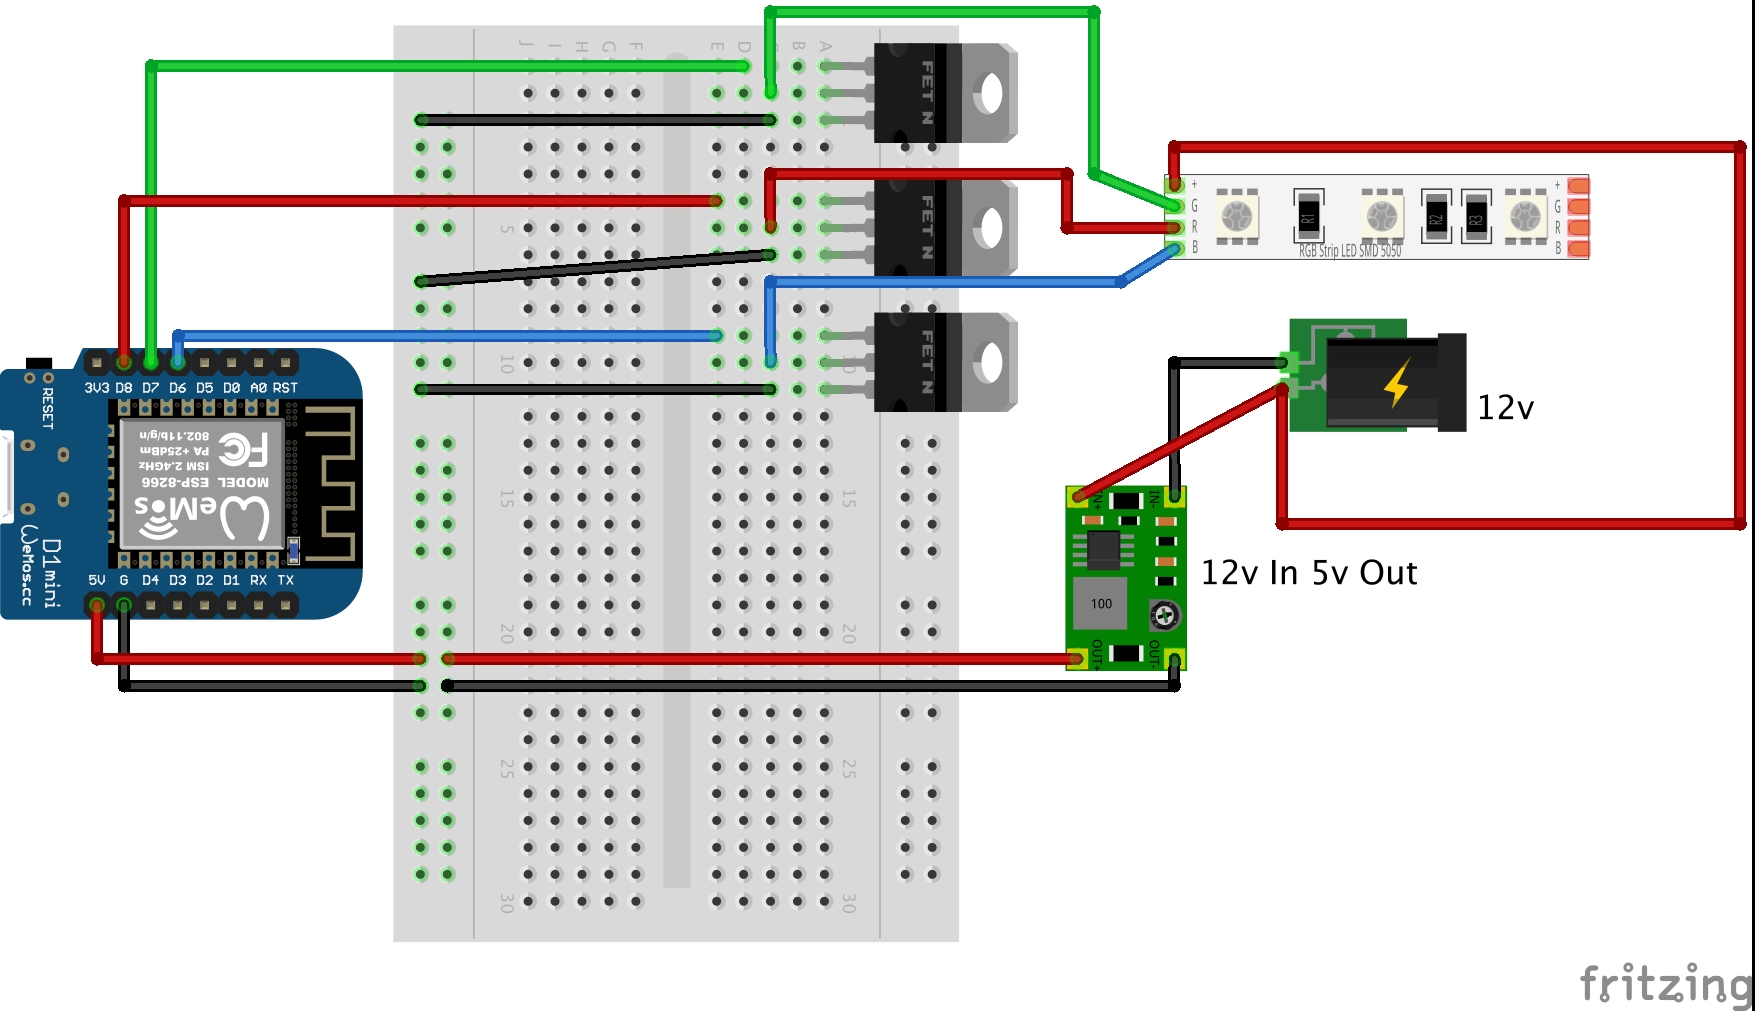
Circuit
The IRFZ3NN MOSFETs have pin 1 as the GATE, pin 2 as the DRAIN and pin 3 as the SOURCE. If you use a different component please use this information as reference on how to rework the circuit.
Configuration
Rename config.EXAMPLE.json to config.json then fill in your wifi SSID and password and your MQTT details. I suggest you check that the name, device_id and base_topic are to your liking.
The device_id and base_topic will be used to make up the MQTT topic for the device.
You need to upload the config.json file to SPIFFS
{
    "name": "Workbench LED Strip",
    "device_id": "workbench-led-strip",
    "deep_sleep_interval": 600,
    "wifi": {
      "ssid": "WIFI_SSID",
      "password": "WIFI_PASSWORD"
    },
    "mqtt": {
      "host": "xxx.xxx.xxx.xxx",
      "port": 1883,
      "base_topic": "basement/light/",
      "username": "MQTT_USERNAME",
      "password": "MQTT_PASSWORD"
    }
  }
MQTT
You can subscribe to “basement/light/workbench-led-strip/hsv” and this will post back a comma delimited string with the HSV value that the light has been set to (for example 0,0,100). It will also retain messages so after a power loss the state is known.
If you send a message to “basement/light/workbench-led-strip/hsv/set” with the payload of a comma delimited HSV value such as 0,0,100 it will set the strip to that colour and intensity, it will also then post back to “basement/light/workbench-led-strip/hsv” with the HSV change.
Please be aware the HSV ranges are as follows H: 0-360, S: 0-100, V: 0-100.
HomeKit
If you have a working Homebridge server you can easily add this device to it and be up and running in no time. You need to install the MQTTthing plugin if you do not have it already and then add the following to your config file, adjusting as required for your MQTT setup.
        {
            "accessory": "mqttthing",
            "type": "lightbulb",
            "name": "Workbench LED",
            "url": "mqtt://localhost",
            "username": "USERNAME",
            "password": "PASSWORD",
            "topics": {
                "getHSV": "basement/light/workbench-led-strip/hsv",
                "setHSV": "basement/light/workbench-led-strip/hsv/set"
            }
        },
3D-Printed-Case
I have produced a very basic 3d printed case that suits the size of my circuit board, it is very simple and just pops together. The OpenSCAD and STL files are on the project page under the folder 3d-printed-case.
