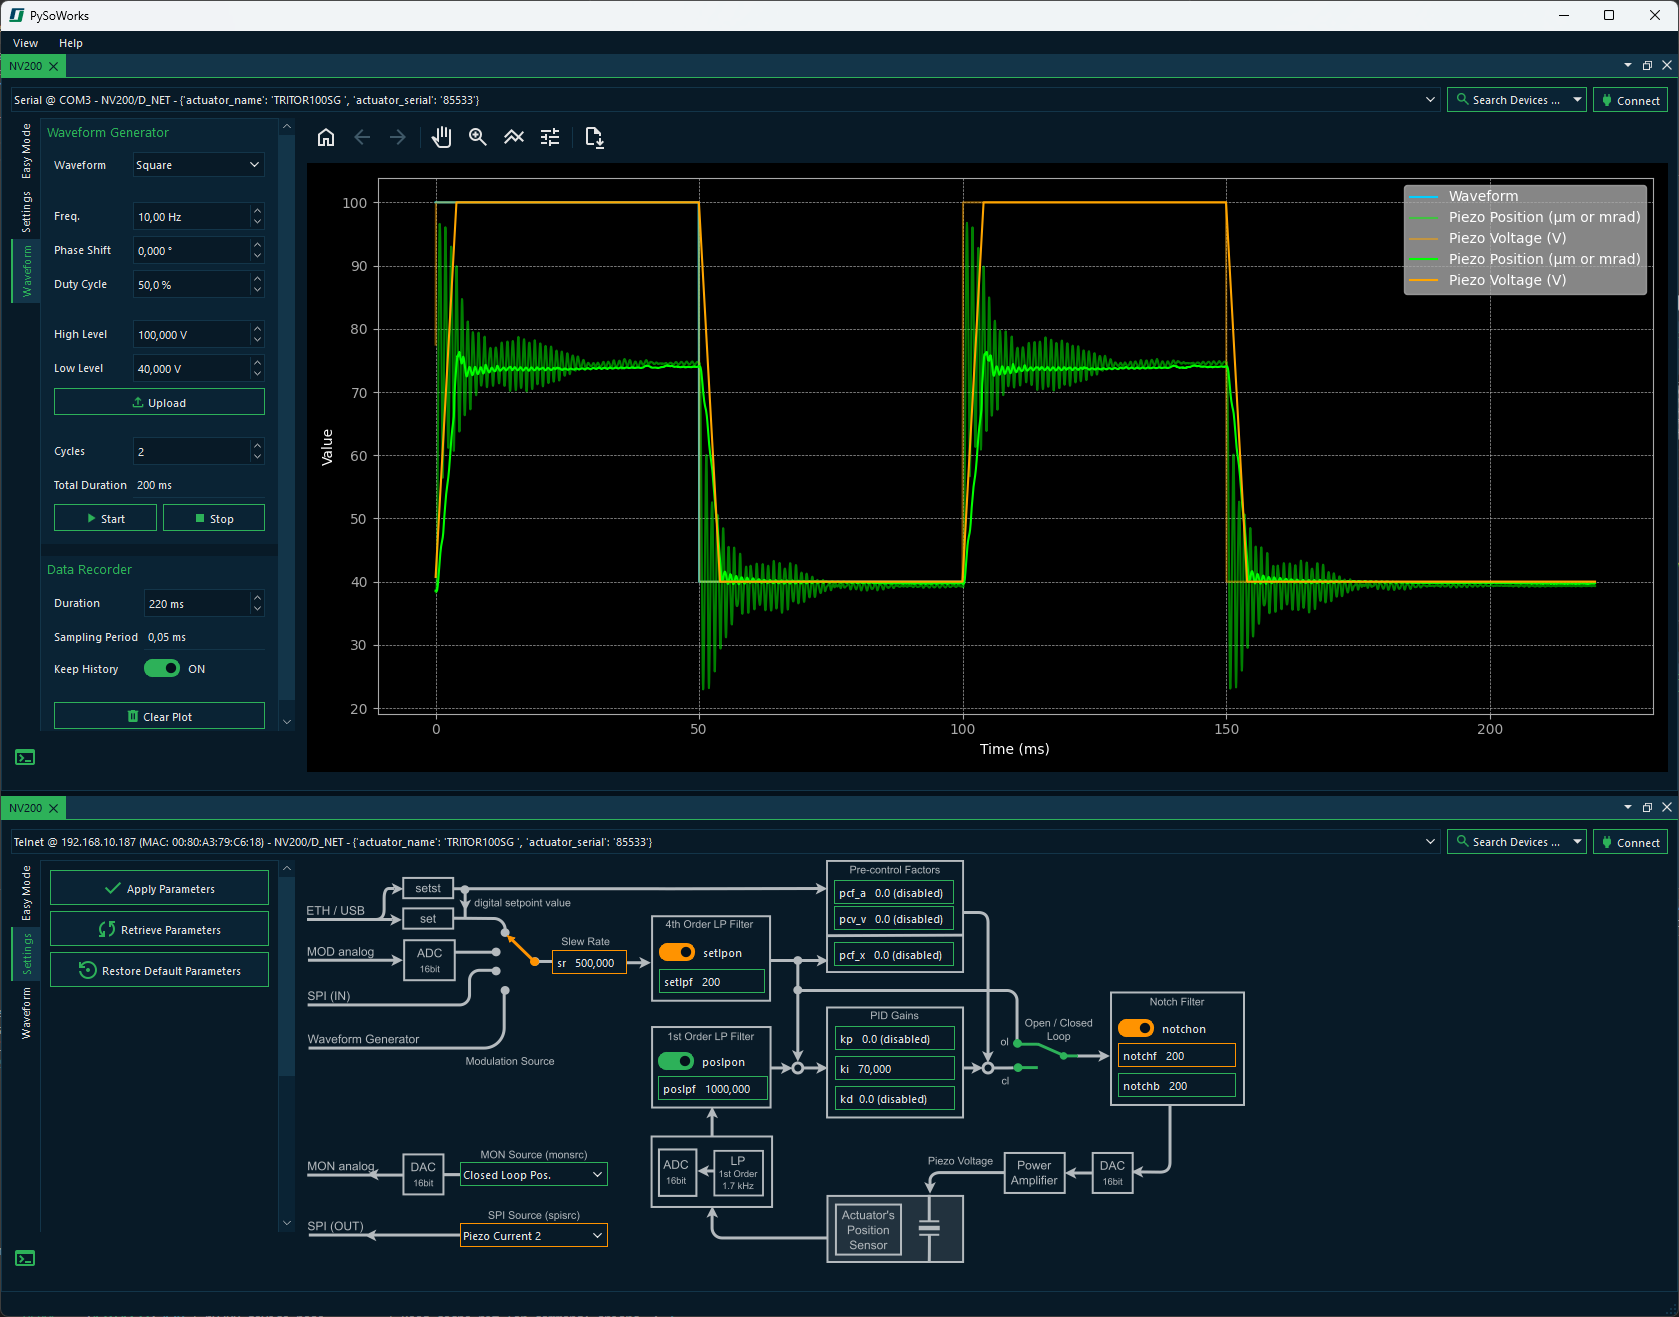
PySoWorks is an application for controlling the piezo amplifiers, such as the NV200/D, from piezosystem jena GmbH. It demonstrates the use of the NV200 Python library within a graphical interface based on PySide6.
Original Repository: https://github.com/piezosystemjena/PySoWorks
- GUI based on PySide6
- Support for NV200 hardware control
- Supports control of multiple devices
- Dark mode theming
Install from PyPI:
pip install pysoworksUsing venv (built-in Python module):
# Create a virtual environment
python -m venv .venv

# Activate the virtual environment
# On Windows:
.venv\Scripts\activate
# On macOS/Linux:
source .venv/bin/activate

# Upgrade pip
pip install --upgrade pip

# Install pysoworks from PyPI
pip install pysoworksOnce installed, you can launch the application from the terminal:
pysoworksThis project uses Poetry for Python dependency management, packaging, and publishing. Poetry provides a modern, streamlined alternative to pip and virtualenv, handling everything from installing dependencies to building and publishing the package.
If you're contributing to the project or running it locally for development, the steps below will help you set up your environment.
If necessary, install [poetry] according to the official installation instructions (it's recommended to use pipx to install poetry in its own isolated environment but still have it available as a system wide command). If you already have installed and configured poetry, you can skip this step.
pip install pipx
pipx ensurepath
Now reload your shell or create a new instance and execute the following steps:
pipx install poetry
poetry self add "poetry-dynamic-versioning[plugin]"
poetry config virtualenvs.in-project trueBy default, Poetry creates virtual environments in {cache-dir}/virtualenvs
(Windows: %USERPROFILE%/AppData/Local/pypoetry/Cache/virtualenvs).
You can instead configure Poetry to create the virtual environment inside the project directory by setting:
poetry config virtualenvs.in-project trueThis will place the virtualenv in a .venv folder at the project root the next time you run poetry install.
Now, when we run poetry install in a project directory, it will create and install all dependencies
(and the project itself) into an in-project virtualenv located in {project-root}/.venv.
Note:
If you already have an existing environment in the default location (i.e. out-of-project) and would like to convert to an in-project virtualenv, you have to first remove the existing virtualenv, ensure that thevirtualenvs.in-projectoption is set totrueand then create the new in-project virtualenv usingpoetry install(see below) again.To remove the existing virtualenv, first get its name and then remove it:
poetry env list   # note the name of the environment
poetry env remove <name>
If you're sure you only have one environment, you can also just use
poetry env remove --all.
To install all required dependencies and set up the project in editable mode use:
poetry installTo skip installing the project itself (i.e. install only dependencies):
poetry install --no-rootSome extra features are provided via optional dependencies.
- Install all optional packages:
poetry install --all-extras- Install specific extras:
poetry install --extras "extra1 extra2"
# or
poetry install -E extra1 -E extra2PySoWorks uses the nv200 library for NV200 device control. Whenever you update the release of the
NV200 library, you should also update the version used for PySoWorks:
poetry update nv200Documentation is generated using Sphinx, located in the doc/ folder.
Before you create the documentation, you should generate the dynamic version information file VERSION
by running the following command:
python generate_version.pyThis will extract the version information from Git and stores it into VERSION file for later use
by documentation, exe or installer builds. Normally the file will contains something like this for
a development version:
1.0.5.dev4
and this vor a tagged release version:
1.0.4
HTML Documentation - the results are in doc/_build/ folder.
poetry run sphinx-build -b html doc/ doc/_build/PDF Documentation - the results are in build/pdf folder.
poetry run sphinx-build -b pdf doc build/pdfTo build a distributable .whl package:
poetry buildThis creates a .whl and .tar.gz file in the dist/ directory.
Before you publish your package to PyPi you should test it with TestPyPi:
poetry build
poetry config repositories.test-pypi https://test.pypi.org/legacy/
poetry config pypi-token.test-pypi your-token-here
poetry publish -r test-pypi
If you would like to test the installation from TestPyPi, you should use the following command:
pip install -i https://test.pypi.org/simple/ --extra-index-url https://pypi.org/simple pysoworksThis avoids dependency resolution issues by:
- Getting your test package (pysoworks) from Test PyPI
- Getting all other packages (e.g., matplotlib, pyside6, etc.) from PyPI
If publishing to TestPyPi works, you can publish to PyPi:
poetry build
poetry config repositories.pypi https://upload.pypi.org/legacy/
poetry config pypi-token.pypi your-token-here
poetry publish -r test-pypiBefore you build the executable or the installer you need to update the VERSION file that
contains the version information that is extracted from Git and used by the application
and by the installer. To update the VERSION file you need to run the generate_version
python generate_version.pyYou can create a standalone executable of PySoWorks using PyInstaller.
Make sure PyInstaller is installed in your environment, normally this
is done by poetry install as a dev dependency. Build the executable using the provided
spec file using this command:
poetry run pyinstaller --clean --log-level=DEBUG pysoworks.spec-
--cleanclears any temporary PyInstaller files before building. -
--log-level=DEBUGenables detailed logging to help diagnose any build issues.
The resulting executable will be located in the dist/ directory.
The project uses Inno Setup for building the Windows installer. Ensure that you have installed Inno Setup and that is is in the path variable. To build the installer execute the following command:
iscc .\pysoworks_inno_setup.issDo the following steps, to create a release:
- Check the version of the nv200 library used in the lock file
poetry show nv200 - Update dependencies - i.e. if you modified
NV200library, then update it viapoetry update nv200 - Update the
CHANGELOG.mdfile with the new release number i.e. 1.0.4 - Commit the changes and push them to GitHub
- Check if the
PySoWorks.exeand the installerPySoWorks_Setup.exeare built properly - Test
PySoWorks.exeand the installerPySoWorks_Setup.exeif both run without problems - Check if puplishing to TestPyPi works - that means that action is successful
- Create a new git tag i.e.
v1.0.5and push the repository to GitHub with the optionInclude Tagsto push the new tag to GitHub - GitHub should now create and publish the new version to PyPi - check if it works properly
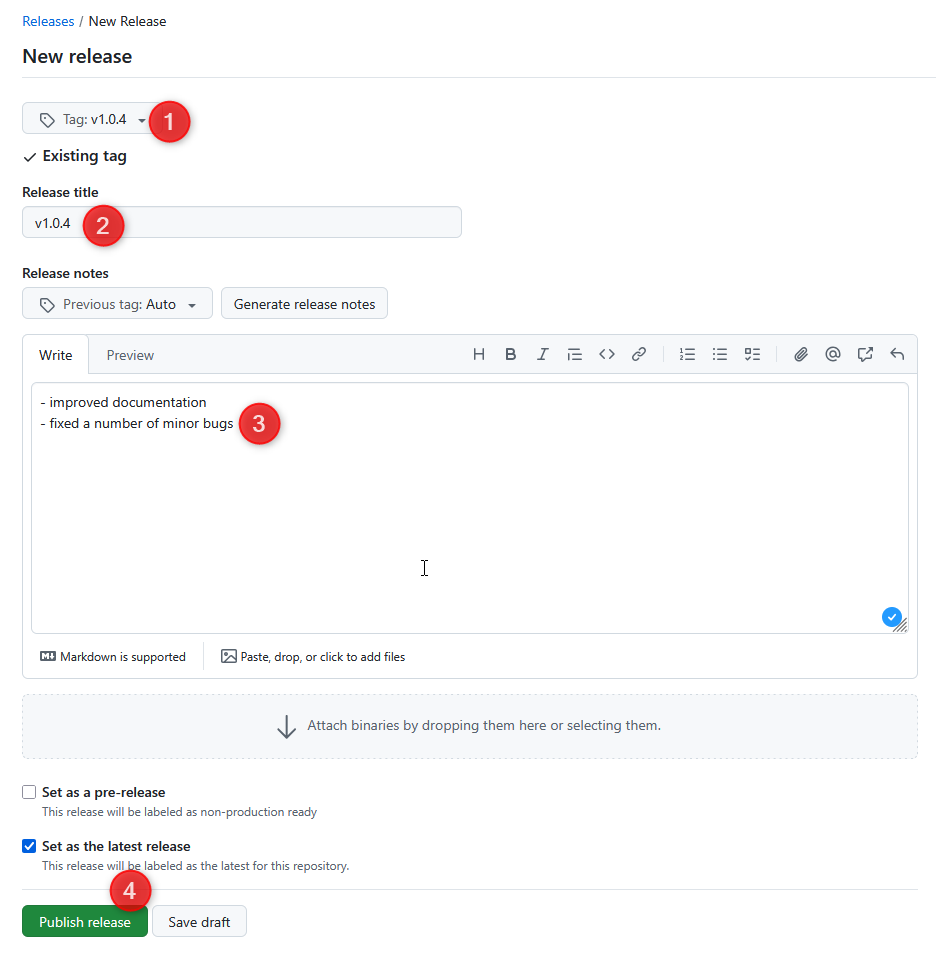
- Got to
Releasessection in GitHub and selectDraft a new release - Create a new Release in GitHub named the same as the Tag (2) and use the created tag (1)
- Copy the information in the
CHANGELOG.mdin the editor (3) and clickPublish releasebutton (4)
- Now GitHub workflow should create a new EXE and Installer suffixed with the new tag


