Step-by-step instructions on setting up Homestead in Windows 7
Homestead is a Vagrant box people use to develop Laravel apps.
Here's how you can get Homestead up and running in Windows 7.
After following the instructions below, you'll have a Homestead Vagrant box running on your computer; you'll have a brand new Laravel app running inside of that Vagrant box; and you'll be able to access the homepage of that Laravel app using a web browser on your computer.
This is an alternative to the official instructions.
- You're using Windows 7
- You have Git installed
- You have VirtualBox and Vagrant installed
- You have PuTTY Key Generator (a.k.a.
puttygen.exe) on your computer
-
Download and install the Homestead Vagrant box into Vagrant
- Run:
$ vagrant box add laravel/homestead
- During installation, when Vagrant asks you which provider you will be working with, select
virtualbox - You can run
$ vagrant box listto check which version of the Homestead Vagrant box is installed
-
Clone the Homestead Git repository
- Run:
$ git clone https://github.com/laravel/homestead.git ./Homestead
- That instructs Git to download the Homestead Git repository from GitHub, and store it in a folder named
Homesteadin the current directory
-
Check out the latest stable commit from the cloned repository
- Prior to running the following commands, replace the
vX.Y.Zwith whichever tag is associated with the latest release of the repository (e.g.v6.3.0). The latest release of the repository is shown here - Finally, run:
$ cd ./Homestead $ git checkout vX.Y.Z- The official instructions recommend doing that in case the commit checked out by default (i.e. the tip of the master branch) is in an insufficient state
- Prior to running the following commands, replace the
-
Generate the Homestead configuration file (i.e.
Homestead.yaml)- If using bash, run:
$ bash init.sh
- Alternatively, if using cmd.exe, run:
init.bat- That instructs Windows to execute the instructions in that shell/Batch script, one of which is to create a Homestead configuration file (i.e.
Homestead.yaml) in the current folder
-
Generate an SSH key pair
- Launch
puttygen.exeand generate an SSH key pair (e.g. 2048-bit RSA) - Save the OpenSSH-formatted private key (via Conversions > Export OpenSSH key) onto your computer
- Save the OpenSSH-formatted
authorized_keysstring (via copy/pasting it into a text file) onto your computer
- Launch
-
Create an app development folder
- If using bash, run:
$ mkdir /c/path/to/myapps
- Alternatively, if using cmd.exe, run:
mkdir c:\path\to\myapps- That will create a folder named
myappsinc:/path/to/ - You can name your app development folder whatever you want, and store it wherever you want
- Subsequent instructions will assume your app development folder is
c:/path/to/myapps
-
Edit the Homestead configuration file (i.e. the
Homestead.yamlfile generated earlier)- Edit the fields shown below to have the values shown below:
provider: virtualbox

authorize: c:/path/to/openssh_authorized_keys_string.txt

keys:
    - c:/path/to/openssh_private_key.txt

folders:
    - map: c:/path/to/myapps
      to: /home/vagrant/code

sites:
    - map: myapp.local
      to: /home/vagrant/code/myapp/public

databases:
    - homestead
- Save the file
-
Add an entry to the Windows
hostsfile- As an Administrator, edit the file:
C:\Windows\System32\drivers\etc\hosts - Add the following line to the file:
192.168.10.10 myapp.local
- Save the file
- That will allow you to visit your app at
http://myapp.local
- As an Administrator, edit the file:
-
Spin up the Vagrant box
- Inside your
Homesteadfolder, run:
$ vagrant up
-
That will spin up the Vagrant box and configure it (i.e. provision it) according to the settings defined in the Homestead configuration file
-
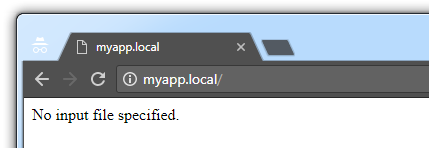
Once the Vagrant box has been provisioned, you will be able to visit http://myapp.local in your web browser. You may see a page there that says, "No input file specified." (screenshot below).
- Inside your
-
Connect to the Vagrant box via SSH
- Run:
$ vagrant ssh
-
Create a Laravel app on the Vagrant box
- On the Vagrant box, run:
$ cd /home/vagrant/code $ composer create-project --prefer-dist laravel/laravel myapp- That will create a Laravel app, whose files are stored in
/home/vagrant/code/myapp
-
Visit the app's homepage
-
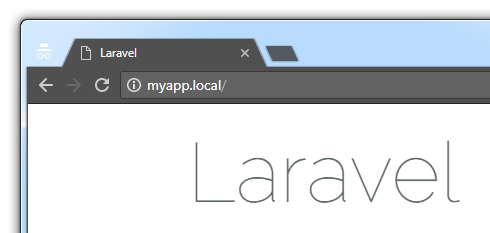
Using a web browser on your computer (i.e. not on the Vagrant box), visit http://myapp.local
-
You will see the app's homepage (i.e. the "Laravel" page)
-
-
Done!


I used the following software versions when writing this document:
- Windows 7: 64-bit with Service Pack 1
- Vagrant: 1.9.6
- VirtualBox: 5.1.14
- Homestead Vagrant box: 3.1.0
- Homestead Git repository: 6.3.0
- PuTTY Key Generator (a.k.a.
puttygen.exe): 0.68 (64-bit) - Git: 2.12.2.windows.2