Frogbot
![]()
![]()
🤖 What is Frogbot?
Frogbot is a Git bot that scans your pull requests for security vulnerabilities using JFrog Xray . Frogbot adds the scan results as a comment on the pull request. If no new vulnerabilities are found, Frogbot will also add a comment, confirming this. Please note that GitHub and GitLab are currently supported and Bitbucket will be supported soon. Projects that use one of the following tools to download their dependencies are currently supported.
- Npm
- Maven
- Gradle
- Go
- Pip
- Pipenv
- Nuget
- Dotnet
🕵️♀️ How does it work?
General
For security reasons, Frogbot is not triggered automatically. After you create a new pull request, the maintainer of the git repository can trigger Frogbot to scan the pull request from the pull request UI. The scan output will include only new vulnerabilities added by the pull request. Vulnerabilities that aren't new, and existed in the code prior to the pull request creation, will not be included in the report.
Running Frogbot on GitHub
- A developer opens a pull request.
- If missing, Frogbot creates the
🐸 frogbot scanlabel in the repository. - A maintainer of the repository assigns the
🐸 frogbot scanlabel on the pull request. - Frogbot is triggered by the label, scans the pull request, adds a comment with the scan results, and removes the label from the pull request.
- Frogbot can be triggered again following new commits, by adding the label to the pull request again.
Running Frogbot on GitLab
- A developer opens a merge request.
- A maintainer of the repository triggers the manual frogbot-scan job.
- Frogbot is triggered by the job, scans the merge request, and adds a comment with the scan results.
- Frogbot can be triggered again following new commits, by triggering the frogbot-scan job again
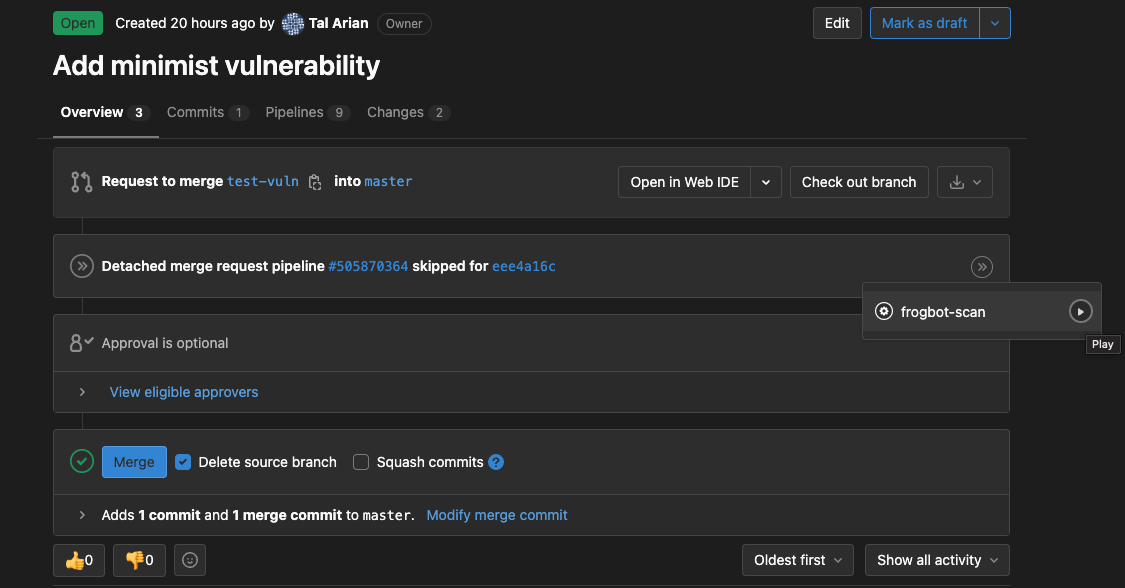 .
.
Pull Request Comments
👍 No issues
If no new vulnerabilities are found, Frogbot automatically adds the following comment to the pull request:

👎 Issues were found
If new vulnerabilities are found, Frogbot adds them as a comment on the pull request. For example:

| SEVERITY | IMPACTED PACKAGE | VERSION | FIXED VERSIONS | COMPONENT | COMPONENT VERSION | CVE |
|---|---|---|---|---|---|---|
 High High |
github.com/nats-io/nats-streaming-server | v0.21.0 | [0.24.1] | github.com/nats-io/nats-streaming-server | v0.21.0 | CVE-2022-24450 |
| High |
github.com/mholt/archiver/v3 | v3.5.1 | github.com/mholt/archiver/v3 | v3.5.1 | ||
 Medium Medium |
github.com/nats-io/nats-streaming-server | v0.21.0 | [0.24.3] | github.com/nats-io/nats-streaming-server | v0.21.0 | CVE-2022-26652 |
🖥️ Installing and Using Frogbot
General
- Frogbot requires a JFrog environment to scan pull requests. Don't have a JFrog environment? No problem - Set Up a FREE JFrog Environment in the Cloud. You'll later save the connection details (URL, username, and password) as secrets in Git.
- Setting up Frogbot on a GitHub repository? Install Frogbot using GitHub Actions
- Setting up Frogbot on a GitLab repository? Install Frogbot using GitLab CI
Set up a FREE JFrog Environment in the Cloud
Need a FREE JFrog environment in the cloud, so Frogbot can scan your pull requests?
Just run one of the following commands in your terminal, to set up an environment in less than a minute. The commands will do the following:
- Install JFrog CLI on your machine.
- Create a FREE JFrog environment in the cloud for you.
After the set up is complete, you'll receive an email with your JFrog environment connection details, which you can then store as secrets in Git.
On MacOS and Linux using cUrl
curl -fL https://getcli.jfrog.io?setup | sh
On Windows using PowerShell
powershell "Start-Process -Wait -Verb RunAs powershell '-NoProfile iwr https://releases.jfrog.io/artifactory/jfrog-cli/v2-jf/[RELEASE]/jfrog-cli-windows-amd64/jf.exe -OutFile $env:SYSTEMROOT\system32\jf.exe'" ; jf setup
Install Frogbot Using GitHub Actions
- Make sure you have the connection details of your JFrog environment.
- Save the JFrog connection details as secrets in GitHub with the following names - JF_URL, JF_USER, and JF_PASSWORD (You can also use JF_ACCESS_TOKEN instead of JF_USER and JF_PASSWORD).
- Use one of these GitHub Actions templates to create a file named
frogbot.yml. - Push the
frogbot.ymlfile to the.github/workflowsdirectory in the root of your GitHub repository.
Install Frogbot Using GitLab CI
- Make sure you have the connection details of your JFrog environment.
- Save the JFrog connection details as secrets in GitLab with the following names: JF_URL, JF_USER and JF_PASSWORD (You can also use JF_ACCESS_TOKEN instead of JF_USER and JF_PASSWORD).
- Add a job named
frogbot-scanto your.gitlab-ci.ymlfile in your GitLab repository using the below structure.
Important Guidelines
- For npm, pip, pipenv, nuget or dotnet: Make sure to set the command in a way that it downloads your project dependencies as the value of the JF_INSTALL_DEPS_CMD variable. For example,
npm iornuget restore - Make sure that either _JF_USER and JF_PASSWORD or JF_ACCESS_TOKEN are set, but not both.
frogbot-scan:
  rules:
    - if: $CI_PIPELINE_SOURCE == 'merge_request_event'
  when: manual
  variables:
    # [Mandatory only for project which npm, pip, pipenv, nuget and dotnet]
    # The command that installs the project dependencies (e.g "npm i", "nuget restore" or "dotnet restore")
    JF_INSTALL_DEPS_CMD: ""

    # [Mandatory]
    # JFrog platform URL
    JF_URL: $JF_URL

    # [Mandatory if JF_ACCESS_TOKEN is not provided]
    # JFrog user and password with 'read' permissions for Xray
    JF_USER: $JF_USER
    JF_PASSWORD: $JF_PASSWORD

    # [Mandatory]
    # GitLab accesses token with the following permissions scopes: api, read_api, read_user, read_repository
    JF_GIT_TOKEN: $USER_TOKEN

    # Predefined gitlab variables. There's no need to set them
    JF_GIT_PROVIDER: gitlab
    JF_GIT_OWNER: $CI_PROJECT_NAMESPACE
    JF_GIT_REPO: $CI_PROJECT_NAME
    JF_GIT_BASE_BRANCH: $CI_MERGE_REQUEST_TARGET_BRANCH_NAME
    JF_GIT_PULL_REQUEST_ID: $CI_MERGE_REQUEST_IID

    # Uncomment the below options if you'd like to use them.

    # [Mandatory if JF_USER and JF_PASSWORD are not provided]
    # JFrog access token with 'read' permissions for Xray
    # JF_ACCESS_TOKEN: $JF_ACCESS_TOKEN

    # [Optional, default: "."]
    # Relative path to the project in the git repository
    # JF_WORKING_DIR: path/to/project/dir

    # [Optional]
    # Xray Watches. Learn more about them here: https://www.jfrog.com/confluence/display/JFROG/Configuring+Xray+Watches
    # JF_WATCHES: <watch-1>,<watch-2>...<watch-n>

    # [Optional]
    # JFrog project. Learn more about it here: https://www.jfrog.com/confluence/display/JFROG/Projects
    # JF_PROJECT: <project-key>
  script:
    # For Linux / MacOS runner:
    - curl -fLg "https://releases.jfrog.io/artifactory/frogbot/v1/[RELEASE]/getFrogbot.sh" | sh
    - ./frogbot scan-pull-request

    # For Windows runner:
    # iwr https://releases.jfrog.io/artifactory/frogbot/v1/[RELEASE]/frogbot-windows-amd64/frogbot.exe -OutFile .\frogbot.exe
    # .\frogbot.exe scan-pull-request
💻 Contributions
We welcome pull requests from the community. To help us improve this project, please read our Contribution guide.