A Home Assistant custom component for use with ECHONETLite compatible devices. This custom component makes use of the 'pychonet' Python library also written by yours truly: (https://github.com/scottyphillips/pychonet)
This component will set up the climate, sensor and select platforms.
Based upon feedback this custom component works with the following compatible ECHONETLite Devices:
- Mitsubishi MAC-568IF-E WiFi Adaptor connected to the following systems:
- GE Series
- MSZ-GE42VAD
- MSZ-GE24VAD
- MSZ-GL50VGD
- MSZ-GL35VGD
- AP Series
- MSZ-AP22VGD
- MSZ-AP25VGD
- MSZ-AP50VGD
- Ducted
- PEA-RP140GAA
- GE Series
- 'MoekadenRoom' ECHONETLite Simulator: https://github.com/SonyCSL/MoekadenRoom
- Generic HVAC Climate
- Light Sensor
- Lock Sensor
- Temperature Sensor
- Sharp AC
- AY-J22H
- AY-L40P
- Daikin (ECHONETLite enabled models)
- Koizumi
- Lighting system AE50264E bridge (https://www.koizumi-lt.co.jp/product/jyutaku/tree/ )
This Custom Component makes use of the official Mitsubishi MAC-568IF-E WiFi Adaptor. Other adaptors (indeed other vendors!) may work, but they must support the 'ECHONET lite' protocol.
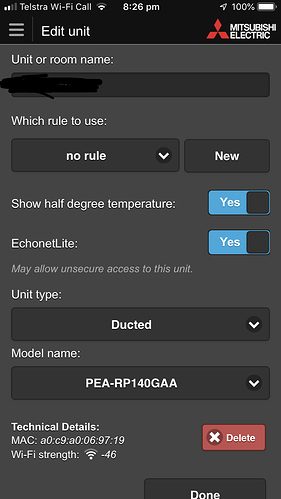
From the official Mitsubishi AU/NZ Wifi App, you will need to enable the 'ECHONET lite' protocol under the 'edit unit' settings.
- Delete 'mitsubishi' from your 'custom_components' directory
- Remove references to 'mitsubishi' from 'configuration.yaml'
- Using the tool of choice open the directory (folder) for your HA configuration (where you find
configuration.yaml). - If you do not have a
custom_componentsdirectory (folder) there, you need to create it. - In the
custom_componentsdirectory (folder) create a new folder calledechonetlite. - Download all the files from the
custom_components/echonetlite/directory (folder) in this repository. - Place the files you downloaded in the new directory (folder) you created.
- Restart Home Assistant and clear your browser cache
- Go to configuration -> integrations -> ADD INTEGRATION.
- Select the 'echonetlite' integration. Enter your IP address in the host field, and give the platform a name.
- Platform should automatically configure 'climate', and depending on your system will automatically configure 'sensor' and 'select'.
- If you have additional HVACs to configure then repeat step 4.
Once you have added the integration, you can go back to configuration -> integrations Under your ECHONETLite device click 'configure' Fine tune your required fan and swing mode settings. The integration will be able to determine what settings are supported for your system in question. NOTE: Selecting which specific options are suitable is a 'trial and errror' process as ECHONETLite does not provide a means of returning permittted values for these settings As soon as you configure your options and save, the settings will take effect.
Thanks to Jason Nader for all the quality of life updates to the codebase and doco.
Thanks to khcnz (Karl Chaffey) and gvs for helping refector the old code and contributing to testing.
Thanks to Dick Swart, Masaki Tagawa, Paul, khcnz, Kolodnerd, and Alfie Gerner for each contributing code updates to to the original 'mitsubishi_hass' and therefore this custom component.
Thanks to Jeffro Carr who inspired me to write my own native Python ECHONET library for Home Assistant. I could not get his Node JS Docker container to work properly on Hass.io :-) Some ideas in his own repo got implemented in my own code. (https://github.com/jethrocarr/echonetlite-hvac-mqtt-service.git)
Also big thanks to Futomi Hatano for open sourcing a high quality and extremely well documented ECHONET Lite library in Node JS that formed the basis of my reverse engineering efforts. (https://github.com/futomi/node-echonet-lite)
This application is licensed under an MIT license, refer to LICENSE for details.


